Eleglide M1, M1 Plus Manual
- User manual (68 pages) ,
- User manual (88 pages) ,
- User manual (22 pages)
Advertisement
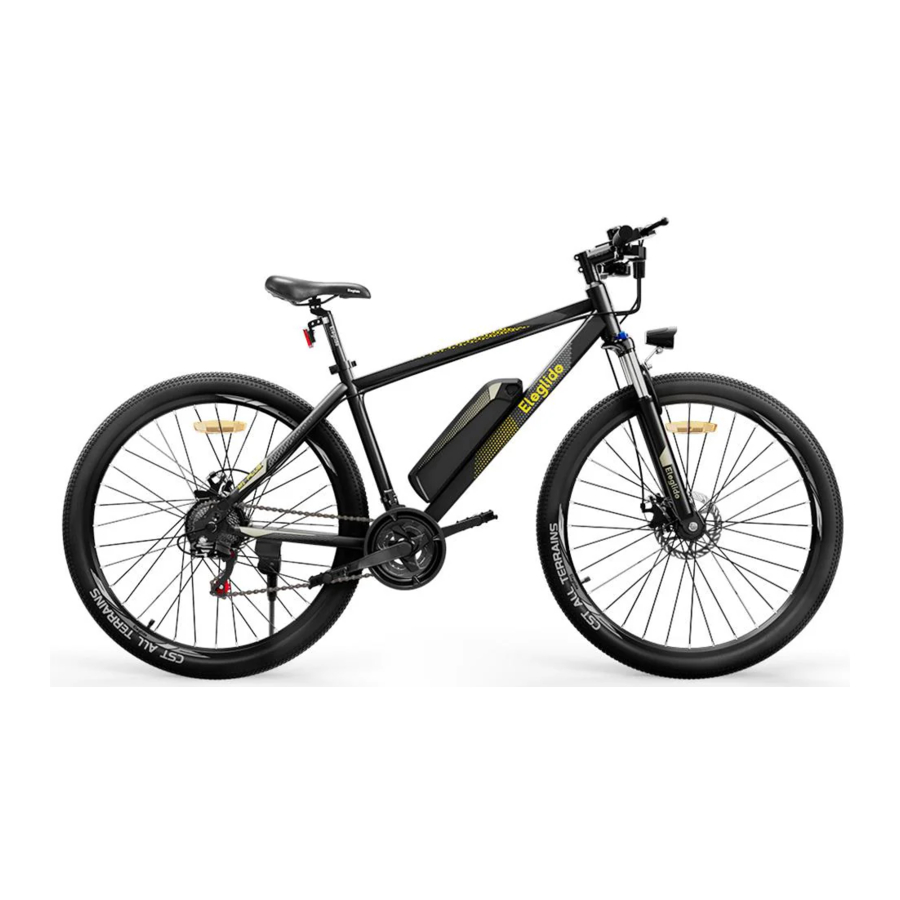
Diagram

- Handlebar with Display
- Front Wheel
- Brake
- Pedals
- Electric Motor
- Rear Derailleur
- Rear Wheel
- Saddle
- Battery
- Spoke Reflector
- Chain
- Front Derailleur

- Brake Lever
- Handle
- Front Derailleur Lever
- Rear Derailleur Lever
- Bell
- Display

| A. 70.5" | C. 43" | E. 40.5" | G. 23" |
| B. 41" | D. 33" | F. 30" | H. 27.5" |

| M1 Plus (27.5") | M1 Plus (29") | ||||
| A. 70.5" | D. 33.5" | G. 21.2" | A. 71.3" | D. 34.3" | G. 21.2" |
| B. 41" | E. 41.3" | H. 27.5" | B. 42.5" | E. 41.3" | H. 29" |
| C. 43" | F. 30.6" | I. 26.8" | C. 42.6" | F. 32.9" | I. 27.6" |
Specification
| Model | M1 | M1 Plus (27.5") | M1 Plus (29") | ||
| Basic Spec. | Unfolded Size | 1790x680x1041mm | 1810x700x1080mm | ||
| Width of Handlebar | 680mm | 700mm | |||
| N.W. | 21.3kg | 21.7kg | 22.8kg | ||
| Waterproof Level | IPX4 | ||||
| Material | Aluminium Alloy | ||||
| Max. Range | Assist Mode | 67km | 104km | ||
| Manual Mode | No Limit | ||||
| Cut-off Speed | 25km/h | ||||
| Derailleur | Shifter Quantity | 3 (Front), 7 (Rear) | |||
| Brand | Shimano | ||||
| Control | Shift Gears by Pushing the Left/Right Thumb Shifter | ||||
| Motor | Rated Power/Voltage | 250W / 36V | |||
| Instant Max. Power | 400W | ||||
| Max. RPM | 210 | ||||
| Max. Output Torque | 45N.M | ||||
| Battery | Capacity/Voltage | 7.8Ah / 36V | 13Ah / 36V | ||
| Power Capacity | 280.8Wh | 468Wh | |||
| Charging Time | 4.5h | 7h | |||
| Protection System | Yes | ||||
| Brake | Type | Disc Brake & Auto Power-off Design | |||
| Brake Disc | Outside Diameter | 160mm | |||
| Thread Root Diameter | M6 x 16mm | ||||
| Control | Brake front wheel by the left hand and rear wheel by the right hand in the EU; Brake front wheel by the right hand and rear wheel by the left hand in the UK; | ||||
| Tire | Size | 27.5"x2.1" | 29"x2.1" | ||
| Brand, Type, Material | CST Pneumatic Rubber Tires | ||||
| Tire Pressure | 45~65PSI | ||||
| Best Tire Pressure | 50PSI (Front Tire), 55PSI (Rear Tire) | ||||
| Shock Absorption | Type | Hydraulic Suspension with a lockout | |||
| Control | Lock/Unlock the Suspension by Rotating the Blue Knob on the Front Fork | ||||
| Recommended Rider Heights | 155-185cm | 160-195cm | 165-200cm | ||
Note: the max speed and range data are provided by the Eleglide lab. The max range is achieved under the following conditions: a full charge, a 75kg load, 26°C temperature, 15km/h constant speed, on flat roads with no strong wind.
The actual data may vary based on different road conditions, temperature, humidity, wind speed, and the rider's habits (the frequency of braking, speed shifting, etc.) and rider's weight.
Package List
| Eleglide Pedelec x 1 | User Manual x 1 | Charger x 1 |
| Pedal x 2 | Tool Kit x 1 | Key x 2 |
| Spoke Reflector x 4 | Rear Reflector x 1 |
Assembly Guide
Adjust The Stem

- Undo the stem bolts slightly till you can turn the stem.
- Align the stem with the front wheel.
- Tighten up the stem bolts.
Install The Steering Bar

- Undo the handlebar clamp bolts to open the clamp.
- Place the handlebar and make sure the clamp is in the middle of the handlebar. (The brake levers should be in front of the grips.)
- Tighten up the clamp bolts to lock the clamp.
Install The Front Wheel

- Put the bike upside down.
- Loose the nut to remove the temporary protected bar.
- Insert the wheel between the fork blades so that the axle can seat firmly at the fork dropouts (the slots at the tip of the fork blades).
- Put the gaskets on it and tighten the nuts.
Note: if the lever cannot be pushed all the way to a position parallel to the fork blade, return the lever to the OPEN position. Then turn the tension adjusting nut counterclockwise and make a one-quarter turn, and try tightening the lever again.
Install The Front Light

- Place the front light with the fork brace.
- Secure the light by tightening up the bolt.
- Connect the light cable with the bike cable.
Install The Pedals

Install The Seat

- Put the seat post into the support frame.
- Adjust the seat to a suitable height and fix it by locking the quick-release clip.
Install The Battery

- Put the battery in the right position and unlock the battery before you use it.
Install The Reflectors

Turn The Power on

- Press the on/off button on the control panel to turn the power on. Then it's ready to go!
Battery Indicator Light Instruction

Correspondence between battery indicator lights and battery level under 1C current discharge:
| Number of Lights On | Battery Level |
4  | 81%-100% |
3  | 51%-80% |
2  | 11%-50% |
1  | 0-10% (Only red light on) |
Display Guide (M1)
")
Power on/off
![]()
Press the ON/OFF button to turn the LED display on/off.
Headlight on/off
![]()
When the display is turned on, press the LIGHT button to turn the headlight on. Press it again to turn it off.
Battery Power Indicator

When battery level is 100%, all the LED lights will be on. When there is only one LED light on and blinking, it means it's running out of battery power and it needs to charge immediately.
5 Speed Mode Indicator

The five LED lights below the word "ASSIST" represent the five speed modes, including 12 km/h, 16 km/h, 20 km/h, 23 km/h and 25 km/h. Press the MODE button to change the speed mode.
6km/h Push Mode

First, turn the LED display on and keep the bike standstill. Then, press the MODE button till the first light blinks to turn on the 6km/h push mode. The push mode can be turned off by hitting the brake.
Display Guide (M1 Plus)
")
Battery Level Indicator

Functions
Power on/off
Long press the on/off button for 3 seconds to turn the display on/off.
Light on/off
Short press the light switch to turn the light on/off.
Shifting Speed Level
Short press  or
or  to shift among 5 speed levels, including 12/16/20/23/25 km/h.
6km/h Push Mode
When the bike is at zero speed, long press the light switch to activate the push mode.
Switching Trip Distance/Odometer
Short press the light switch twice to switch trip distance with odometer.
Changing Speed Unit
Short press the light switch 3 times to switch between "km" and "mile".
Removing ODO Data
When the display is on, long press the on/off button for 8 seconds till the display flashes. The ODO data will be removed when the display reboots.
Restoring Factory Settings
When the display is on, long press the on/off button and ![]() for 5 seconds till the display flashes.
for 5 seconds till the display flashes.
Or restore the factory settings via the Eleglide app.
Hidden Menu
First, long press both and to enter the hidden menu. Second, short press or to shift among different menu pages. Different pages are for setting different functions. Third, after selecting the page you want, short press the light switch to stay on this page and short press or to set the item on the page. Fourth, short press the light switch again to remain your setting. Last, short press the on/off button to exit the hidden menu.
P1: adjusting the brightness of the display backlight from level 1 to 3;

P2: setting the screen timeout within 0-30 minutes; 0 means it never sleeps.

P3: setting the speed limit within 0-25km/h; The default speed limit is 25km/h.

P4: setting the default speed level; 0 means starting at speed level 0, and 1 means starting at speed level 1.

P7: turning on/off the bike locking function; 0 means the locking function is turned off, and 1 means the locking function is activated. The default setting is 0.

Tips:
- When the locking function is activated, you'll need to enter the password to access to use of the display. It is a 3-digit cord. The default password is 111.
- To enter the password, press
![]() and
and ![]() to select the number for the current digit place and double press the on/off button to move to the next digit place.
to select the number for the current digit place and double press the on/off button to move to the next digit place. - The password can only be altered via the Eleglide app.
- If you forget the password, you can restore the factory settings via the Eleglide app. And the password will be changed back to 111.
Error Tracking

| Error Codes | Causes | Solutions |
| E01 | The motor is out of phase. |
|
| E04 | Communication error; |
|
| E05 | Both E01 and E04 are occurring. | Check the above solutions of E01 and E04. |
| E08 | Under-voltage fault; |
|
| E10 | Controller fault; |
|
| E11 | Both E01 and E10 are occurring. | Check the above solutions of E01 and E10. |
| E40 | Motor hall signal abnormality; |
|
App Guide
Your Eleglide bike can be controlled with an app that is available on Apple iOS (11.0+) and Android devices (5.0+).
More functions can be checked and activated via the app, such as setting the bike lock code and changing the speed unit.
To download the app, please scan the QR code with your Apple/Android device or search for "Eleglide" in the app store.


Maintenance
Cleaning
Use a soft and wet cloth to wipe the mainframe clean. Dirt that is hard to remove can be scrubbed with a toothbrush and toothpaste, then cleaned with a soft and damp cloth. Do not wash your pedelec with alcohol, gasoline, acetone, or other corrosive/volatile solvents. These substances may damage the appearance and internal structure of the pedelec. Do not soak the bike or wash it with a pressure washer or hose.
Storage
- Bicycle
Do not expose the pedelec to direct sunlight or rain for an extended period of time, and avoid storing it at a high temperature. It's better to store the bike in a dry and safe place at a temperature of 0°C-25°C.
Avoid corrosive gas, so as to avoid chemical corrosion and damage to the electrical parts and painted surfaces, which may lead to operational failure and accident.
Don't store it in an explosive or flammable environment or near flammable liquids. - Lithium-ion Battery
- Charge the battery after each ride and avoid draining the battery completely. Because completely draining the battery may cause permanent damage to it. Never keep the lithium-ion battery discharged for a long time. If the voltage of the cell drops under allowed limit due to self-discharge, it will cause damage. For maximum durability, store the battery charged up to 50% of the maximum capacity.
- Never charge the battery in an explosive or flammable environment or near flammable liquids. Do not charge the battery on a flammable substrate, such as paper, textiles, etc., when the battery is detached from the vehicle. Charge it at a safe place away from flammable items.
- Never charge a battery which is already damaged or is leaking.
- Don't charge the battery too long. Stop charging when it gets full.
- Charge or discharge the battery at a temperature within 0~45°C.
- It is better to store the battery indoors within 20°C~25°C temperature while it is not being used for a long time. (When used at 25°C, the battery range and performance is at its best. But using it at a temperature below 0°C can decrease its mileage and performance.)
- Do not store the battery at a too high or too low temperature.
- The humidity of the storage place should be 60±25%RH. As for the working place, the humidity should be 5~85%RH.
- Do not puncture, hit or crash the battery.
- Don't try to disassemble the old or damaged battery or throw it away. Please take it to the local professional battery recycling facility.
- Other Parts
| Head Sets | Remove, clean and lubricate the rims annually. Replace them if necessary. |
| Joints | Continuously check all nuts, bolts and quick-release devices for tightness. |
| Brakes | Lubricate the brake cables slightly with oil monthly. Check the adjustment and replace the brake parts (blocks, shoes, pads) in time if they are worn. The cables must be replaced if they are damaged/down. |
| Front Suspension Fork | Entrust it to experts. |
| Tires | Regularly check for damage, wear, cut and air leakage. |
| Wheel Hubs | Lubricate the hub bearings monthly. Check and adjust the cones, if necessary, to prevent the hubs from rubbing against the forks. |
| Pedals | Lubricate the bearings and check for tightness. |
| Cranks | Lubricate the bearings monthly (unless a maintenance-free center bracket is installed on the bike). Check whether all center bracket parts are correctly tightened. |
| Chain | Take it off and clean it every 6 months. The chain must be clean but not dry. |
| Rims | Frequently check whether the wheels are tight and secure. The rims should be protected from oil, wax, grease, adhesive, etc. Check whether the spokes are loosing or missing. |
| Sprockets | Clean regularly as necessary and grease lightly. Keep the front and rear derailleur running smoothly by adjusting. |
| Saddle and Seat Post | Check whether the screws, nuts and quick-release devices are tight. |
| Kickstand | Clean and lightly grease it annually. |
 Attention: when lubricating, make sure the lubricant doesn't get on the brake discs and pads. Otherwise, the brake system may fail to function. Driving with a bad wheel bearing can cause the axle/hub/spindle to weld itself from friction and heat, causing the wheel to lock up and spin you out. More likely, the metal will wear away from the friction and the wheel/hub will become loose. Replace worn/damaged parts in time, such as inner and outer tires, brake kits, etc.
Troubleshooting
Please check the following issues and solutions before sending the product to designated repair offices.
| Problem | Possible Causes | Solutions |
| The display fails to work or the vehicle can't be turned on. |
|
|
The front light fails to work |
|
|
The battery fails to charge |
|
|
Insufficient Riding Distance |
|
|
The motor fails to work |
|
|
Attention: if any other failures occur and you can not find any solution from the chart above, please contact the re-seller to solve it. Any other maintenance and repair that need to be done by using professional tools and techniques, should be performed by a qualified bicycle mechanic designated by manufacturer or the maintenance center.
Note
Before your first ride, it is important for you to know your new pedelec well, so that you can get the best performance, comfort, enjoyment and safety from it during your ride. To understand the new bicycle and the correct operation, you should first read the manual carefully.
Second, it is significant to take your first ride under a safe and controlled circumstance, like staying away from cars, obstacles and other cyclists.
Third, bicycles are vehicles with certain risks. Please follow the traffic rules during cycling. It's better to learn the local traffic rules about riding an pedelec on public roads before your first ride in case you violate the regulations. For your own safety, never forget to put on a qualified helmet before you get on the pedelec.
Fourth, the pedelec is supplied without basic mandatory equipment, which may vary from place to place. Therefore, if you intend to use the pedelec on public roads, it's necessary to equip the bike with the basic mandatory equipment, in accordance with the relevant laws and regulations.
In addition, this product is designed for your personal use. Do not use it for commercial or other purposes.
Last, keep this manual safe for reference.
Warning
Before each charge, check the charger, cable and plug. If there is any damage, do not use the charger.
Before riding, check the tire pressure and check whether the wheels and handlebar are installed correctly and tightly.
Before riding, check whether the headlights are securely fastened in the correct position, clean and not covered by anything. Damaged reflectors must be replaced.
Besides, if the seat post in the seat tube is not inserted deep enough to reach the minimum insertion mark, the seat post may break. Check whether it is inserted deeper than the minimum insertion depth.
When braking on a wet road, the braking distance is usually longer than on a dry road. Therefore, brake earlier for a safer stop.
When you have to brake urgently, please hit the right hand brake first to stop the rear wheel, and then hit the left hand brake, especially when you brake at a high speed. If the front wheel stops suddenly while the rear wheel is still cycling at a high speed, you may fall over and get hurt. So please ride it carefully.
Furthermore, avoid puddles, wet mud, swamps, water, snow or ice. Try not to use the pedelec on a rainy, stormy or snowy day. If the bicycle's electric parts (control unit, engine and battery) get damp, wet or soaked, it will cause irreversible damage, or even a battery explosion.
The handlebar may be affected as the user steers or brakes the bike.
This product can only be used by one adult at a time. Do not carry any extra passengers.
This vehicle is not a toy. Same as other vehicles, it is possible to fall, crash or encounter other dangerous situations. Please don't offer your pedelec to anyone that doesn't know how to use it correctly. If you let anyone else ride your bike, it will be your responsibility to ensure that all riders understand all warnings, cautions, instructions and safety precautions, and to ensure that they are able to use this product safely and responsibly and protect themselves and others from injury.
Do not modify your bike. You'll be responsible for any issues caused by your personal modification.
Documents / Resources
References
Download manual
Here you can download full pdf version of manual, it may contain additional safety instructions, warranty information, FCC rules, etc.
Advertisement


Need help?
Do you have a question about the M1 and is the answer not in the manual?
Questions and answers