Hisense C1 Series, MT9900 Manual
- User manual (28 pages) ,
- Service manual (15 pages) ,
- Quick setup manual (14 pages)
Advertisement
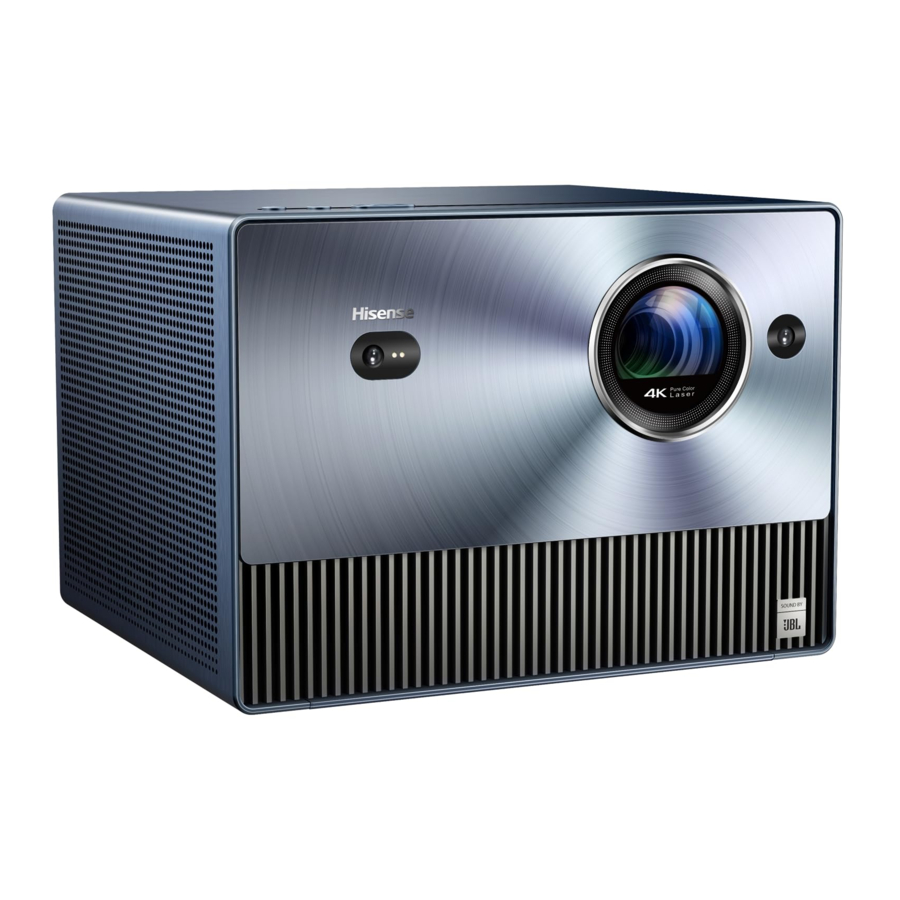
Unit and External Ports
Smart Mini Projector Diagram

List of circuit boards


| NO. | Part | NO. | Part |
| 1 | Display board (including software) | 5 | TOF sensor Board |
| 2 | Main Board (including software) | 6 | WiFi& Bluetooth |
| 3 | Small transfer Board | 7 | DMD board |
| 4 | Indicator led Panel board& Key Board | 8 | Power board |
Wiring diagram

Factory/Service OSD Menu and Adjustment
How to enter the Factory Menu
With user's RC
- Power TV on
- Press button on the RC then call up "Menu" option.
- Move and "ok "button on RC to selectSetting-> Sound->Advanced setting -> Balance
- On theBalance, input figure 1->9->6->9 in sequence on RC.
![information]() Note: It is important to remember that the hand fingers can't shield the RC emitter diode.
Note: It is important to remember that the hand fingers can't shield the RC emitter diode. - Call up a "M" on the left-top of TV, then press button again, the Factory menu appear then
- DC power off and DC power on the TV, which can exit Factory OSD.
Factory OSD Menu
Factory OSD menu list: if you want to learn more about TV, you'd better read it but would not adjust the value please. The Factory menu may be have difference for diverse market and customer.
Factory Option

Laser Options

Soft Version

Write keys

 Note:
Note:
The Factory menu may be have difference for diverse market and customer, above Factory menu only for reference.
The factory menu data varies according to different sources. Incase changing the factory data by error, you can choose to "Clear all", by which you can resume the default value.
Clean the EEPROM
- Select the item "Option"--"Clear all" in Factory mode
- Press button to clear the EEPROM data
- Laser TV restarts automatically
Software Upgrade Method
Main software upgrade directly with USB
TV in user mode
The main software can be upgraded with USB disk.
TV in factory mode
TV is in factory mode, only AC power off TV and insert the USB disk, next AC power on, TV can identify automatically to update, till call up "Loading data" interface, update process bar is 1%.
Once choose another TV mode, must AC power off and power on the TV to reboot.
Firgure-1: Loading data

Firgure-2: Upgrading software

Firgure-3: Software upgrade complete, TV automatically reboot.

Troubleshooting
Warning indicator light
| Light | Failure principle | Fault determination |
| Flash 1 | The NTC temperature exceeds the protection temperature |
|
| Flash 2 | The fan speed is slow or stops spinning |
|
| Flash 3 | DLP system failure |
|
| Flash 4 | Communication failure from the display board to the TV board |
|
| | |
|
| Flash 6 | Diffusion wheel failure |
|
| | | |
Warning display board light
This display board don't have Led indicator.
Special operating procedure
EYE PROTECTION- Close by default, user can open
- Function: When someone or object approaches the machine and triggers the eye protection, the screen immediately adjusts the backlight to the minimum; At the same time, the popup window prompts, " In order to protect your eyes, do not look into the lens. This projector is shutting down in 5 seconds (or Other)", the sensor continues to detect occlusion, then turn off the screen; if the person or object leaves, and the screen is turned on.
- The path for turning off the eye protection function: Settings->projector ->Eye Protection
![]()

Auto correction and Auto focus

Setting->Projector->Auto Correction
Setting->Projector->Auto Focus


If you want to use auto correction or auto obstacle avoidance function: Setting->Projector->correction settings

Power Indicator
Function: When turn on the Laser TV, the Power Indicator can be lighted. When the Laser TV is error, the Power Indicator flash to report the error.
Automatic dust removal-users cannot close
- Function: The machine will automatically trigger the automatic dust removal function every 500 hours of operation, and the fan of the whole machine will run at high speed for 3 minutes. There is a prompt at the bottom of the screen during dust removal.
- Is it normal to watch the dust removal process→yes
- Does the subtitle disappear during the dust removal process → not disappear, keeps prompting
- What happens when the dust removal ends → the subtitle prompt disappears directly after the dust removal ends
Temperature reminder
- Function: When the ambient temperature reaches protect temperature, the screen will remind overheat protection, if continuous warming, the machine will automatically shut down.
- Screen prompt: When power on again, it will prompt "The previous shutdown was due to the high temperature of the laser TV, and it was automatically turned off for protection"
- Fault determination: If there is a warning of overheating, first check if there are any obstructions around the machine, which may cause poor heat dissipation. If so, remove obstructions.
Cleaning and Maintenance
- Keep dry, avoid long periods of inactivity.
- When using the HDMI interface to connect or disconnect multimedia devices, be sure to do it after "turn off the TV".
- Regular cleaning
Host: Use air blower to clean the dust, not touch or wipe with your hands. For oil stains and fingerprints, wipe carefully with a microfiber cleaning cloth to avoid damage to the optical coating.
Screen: Clean the screen with a brush or microfiber cleaning cloth. If there are dirt, fingerprints, etc. on the screen, you can try to wipe it with clean water with a dust-free cloth first, and if it can't be wiped off, you can try to wipe it gently with a dust-free cloth dipped in alcohol.
Important Safety Information
Precautions
BEFORE SERVICING THE mini projector, READ THE SAFETY PRECAUTIONS IN THIS MANUAL.USE ONLY MANUFACTURER SPECIFIED REPLACEMENT PARTS WHEN SERVICING.USE OF NON - AUTHORIZED PARTS WILL VOID THE MANUFACTURE'S WARRANTY
The service procedures recommended by Hisense and described in this Service Guide are effective methods of performing service operations. Some of these service operations require the use of tools specially designed for the purpose. The special tools should be used when and as recommended. It is important to note that this manual contains various CAUTIONS and NOTICES which should be carefully read in order to minimize the risk of personal injury to service personnel. The possibility exists that improper service methods may damage the equipment and pose risk of personal injury. It is also important to understand that these CAUTIONS and NOTICES ARE NOT EXHAUSTIVE. Service should only be performed by an experienced electronics techician trained in the proper mini projector safety and service methods and procedures.

Use of non-manufacturer's recommended parts may create shock, fire, or other hazards. Under no circumstances should the original design be modified or altered without written permission from RCA. Hisense eassumes no liability, express or implied, arising out of any unauthorized modification of design. Service tech assumes all liability.
All ICs and many other semiconductors are susceptible to electrostatic discharges (ESD). Careless handling during repair can reduce life drastically. When repairing, be sure to use anti-static table mats and properly use a grounding wrist stra. Keep components and tools also at this same potential.

Always disconnect the power cord from AC outlet before replacing parts or modules.
To prevent electrical shock, use only a properly grounded 3 prong outlet or extension cord.
Safety regulations require that after a repair the set must be returned in its original condition. In addition, prior to closing set, check that:
Note:
- All wire harnesses and flex cables are properly routed and secured with factory tape and/or mounted cable clamps.
- All cables and connectors are properly insulated and do not have any bare wires/lead exposed
- Do not supply a voltage higher than that specified to this product. This may damage the product and may cause a fire.
- Do not use this product:
- High humidity areas
- In an area where any water could enter or splash into the unit. High humidity and water could damage the product and cause fire.
- If a foreign substance (such as water, metal, or liquid) gets inside the panel module, immediately turn off the power. Continuing to use the product may cause fire or electric shock.
- If the product emits smoke, and abnormal smell, or makes an abnormal sound, immediately turn off the power. Continuing to use the product, it may cause fire or electric shock.
- Do not pull out or insert the power cable from/to an outlet with wet hands. It may cause electric shock.
- Do not damage or modify the power cable. It may cause fire or electric shock.
- If the power cable is damaged, or if the connector is loose, do not use the product: otherwise, this can lead to fire or electric shock.
- If the power connector or the connector of the power cable becomes dirty or dusty, wipe it with a dry cloth. Otherwise, this can lead to fire.
- Use only with the cart, stand, tripod, bracket, or table specified by the manufacturer, or sold with the apparatus. When a cart is used, use caution when moving the cart/apparatus combination to avoid injury from tip-over
Notes
The work procedures shown with the Note indication are important for ensuring the safety of the product and the servicing work. Be sure to follow these instructions.
- Before starting the work, secure a sufficient working space.
- At all times other than when adjusting and checking the product, be sure to turn OFF the POWER Button and disconnect the power cable from the power source during servicing.
- To prevent electric shock and breakage of PC board, start the servicing work at least 30 seconds after the main power has been turned off. Especially when installing and removing the power board, start servicing at least 2 minutes after the main power has been turned off.
- While the main power is on, do not touch any parts or circuits other than the ones specified. If any connection other than the one specified is made between the measuring equipment and the high voltage power supply block, it can result in electric shock or may trip the main circuit breaker
- Be sure to handle the circuit board by holding the large parts as the heat sink or transformer. Failure to observe this precaution may result in the occurrence of an abnormality in the soldered areas.
- Do not stack the circuit boards. Failure to observe this precaution may result in problems resulting from scratches on the parts, the deformation of parts, and short-circuits due to residual electric charge.
- Perform a safety check when servicing is completed. Verify that the peripherals of the serviced points have not undergone any deterioration during servicing. Also verify that the screws, parts and cables removed for servicing purposes have all been returned to their proper locations in accordance with the original setup.
 The lightning flash with arrowhead symbol, within an equilateral triangle is intended to alert the user to the presence of uninsulated dangerous voltage within the products enclosure that may be of sufficient magnitude to constitute a risk of electric shock.
 The exclamation point within an equilateral triangle is intended to alert.
Documents / ResourcesDownload manual
Here you can download full pdf version of manual, it may contain additional safety instructions, warranty information, FCC rules, etc.
Advertisement


Need help?
Do you have a question about the C1 Series and is the answer not in the manual?
Questions and answers