Advertisement
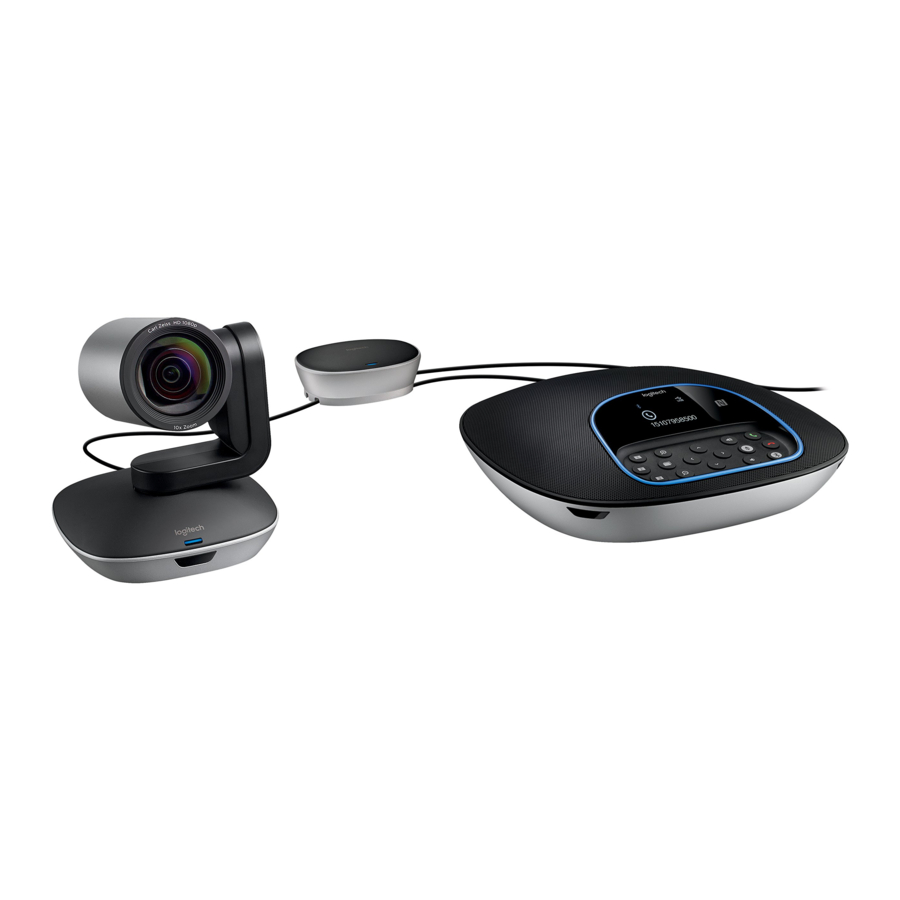
OVERVIEW

CAMERA
- 10X lossless zoom
- Camera LED
- Kensington security slot
HUB
- Hub LED
- Power
- USB
- Camera
- Speakerphone
SPEAKERPHONE
- Kensington security slot
ACCESSORIES
- Camera mount
- Hub velcro mount
- Cables clip
- Cables
- Power adapter
- Expansion Microphones
CONNECTION AND SETUP
Setup and connection to a computer
- Set the camera on the table, or using the included camera mount on the table or a wall.

- The hub can be on placed on a table or mounted underneath using the included hook and loop pads.

- Connect the cable between the speakerphone and h ub. Simply match the colored ends of the cables to the corresponding color marks on the speakerphone and hub.
![]()
Connect the cable between the camera and hub. Simply match the colored ends of the cables to the corresponding color marks on the camera and hub.
![]()
If you're using the optional Expansion Microphones, connect them to the appropriate jacks on the bottom of the speakerphone. Please use only these microphones with GROUP; use of other microphone can damage GROUP and the microphones and may void the warranty.
![]()
Press the cables into the slots on the bottom of the speakerphone.
![]()
Connect the power cable to the hub and plug in the power adapter. The display on the speakerphone will turn on and show the Logitech logo when powered.
![]()
- Connect the hub to a USB port on your computer. The speakerphone display will also prompt you to make this connection. The camera and the Activity light will flash to show that connection is taking place, and when completed, the camera head will rotate and the speakerphone will play a sound. If these activities do not take place, try again and then consult Troubleshooting or contact technical support.

- Attaching cable lock.
- Attach Cable Lock to cable end that connects to the camera
![]()
- Plug Cable Lock into the slot of the housing of the camera
![]()
- Rotate the Cable Lock clockwise to lock the cable
![]()
- Attach Cable Lock to cable end that connects to the camera
- Optional: connect computer to external display such as a television, monitor or projector.
Note regarding longer cables: GROUP includes 5m/16' cables to connect the speakerphone and camera to the hub. Extending this length while maintaining picture quality requires amplified cables. Please see the Complimentary Solutions page at www.logitech.com/LCP-compsolutions for options.


CONNECTING TO BLUETOOTH® DEVICE
To connect GROUP to your mobile device:

- If your device is NFC enabled, touch the mobile device to the NFC icon on the speakerphone, which should enable Bluetooth acceptance on the mobile device.
OR - Hold down the Bluetooth button until the Activity light on the speaker-phone starts blinking blue rapidly Follow the instructions on your mobile device to pair with Bluetooth.
Note: When GROUP is paired and connected, the Bluetooth icon on the speakerphone will appear bright. When paired but not connected, it will be greyed out.
GROUP cannot pair to Bluetooth while streaming to USB. If an attempt is made to pair to a mobile device while in a USB call, an error beep will sound. Please wait until the USB call is complete before pairing your mobile device.
USING LOGITECH GROUP
Video and audio
- Ensure GROUP is selected as the microphone, speaker and camera in your video application.
- Simply start a call in your video application to use GROUP for HD video and high quality audio. The Activity light will be blue when video is streaming.
Audio only with Bluetooth
- Ensure GROUP Is paired and connected to your mobile device as outlined in Connection and Setup. Place a call on your mobile device and enjoy the improved audio experience via the GROUP speakerphone.
REMOTE and EXPANSION MICROPHONES

- Call answer
- Microphone mute
- Volume down
- Camera pan/tilt
- Camera zoom out
- Camera presets
- Call end
- Volume up
- Camera zoom in
- Near/Far camera control
- Remote battery door.
The GROUP remote control runs on a Li-ion CR2032 battery. Battery life will vary based on usage.
SPEAKERPHONE

- Answers incoming calls in supported applications.
- Note: Call Answer and End buttons may not work in some applications so simply use your video application to answer and end calls. To enable answer and end buttons for Skype or Cisco Jabber, please download the respective plug-ins available from www.logitech.com/support/group.
- Mutes the microphones.
- Decreases the speaker volume.
- Pans and tilts the camera. Press once for incremental or press and hold for continuous pan or tilt.
![]()
Do not manually rotate the camera as doing so may cause damage. - Zooms the camera out.
- Camera Presets: GROUP has 5 camera presets (1 through 3 are on both the remote and the speakerphone and 4 & 5 are on the remote) that allow you to position the camera at a preset location with a push of a button. To set the camera preset, move the camera to the desired location and then press and hold the Camera Preset button until the associated icon shows on the display and a beep plays to confirm the setting.
- Ends the current call in supported applications.
- Increases the speaker volume.
- Zooms the camera in up to 10x.
- Near/Far camera control: In supported applications this button allows you to control the pan, tilt and zoom of a remote GROUP, ConferenceCam CC3000e or a ConferenceCam BCC950. Some applications support this feature natively, others can be enabled by using an application that can be downloaded from www.logitech.com/support/group. Please visit the download page listed for more information.
- Bluetooth pairing button. Please see Connection and Setup section for more information.
- NFC antenna location. Place your NFC enabled mobile device here to initiate Bluetooth pairing.
- Speakerphone Activity light indications:
- Blue - GROUP is in active call.
- Blinking blue - incoming call.
- Blinking blue light in call - Call has been put on hold
(via hold function in application) - Rapid blinking blue - in Bluetooth pairing mode.
- Speakerphone blue activity light may not function in some applications.
- Red - Audio is muted.
- Display will show call activity as well as volume and connectivity status.
- Kensington Security Slot for securing the speakerphone and camera.

VISIT PRODUCT CENTRAL
Discover your product's full potential.
Get valuable information and usage tips by browsing easy-to-use FAQs. Find answers to product questions and get help setting up your product. See if there's software available for download that can enhance your product experience. To enjoy all the benefits of your Logitech product, visit www.logitech.com/support/group and take advantage of Logitech's wide range of useful support services:
- Product information
- Tutorials
- Troubleshooting
- Diagnostics
- Firmware upgrades
- Support community
- Software downloads
- In-box documentation
- Warranty information
- Spare parts
Troubleshooting tips
Please visit www.logitech.com/support/group for troubleshooting tips, information on software tools and for a diagnostic tool to help troubleshoot issues you may have with GROUP.
Documents / ResourcesDownload manual
Here you can download full pdf version of manual, it may contain additional safety instructions, warranty information, FCC rules, etc.
Advertisement


Need help?
Do you have a question about the GROUP and is the answer not in the manual?
Questions and answers