Bosch MUZ5FW1 Manual
- Operating instructions manual (57 pages) ,
- Instruction manual (44 pages) ,
- User manual (40 pages)
Advertisement
Overview
Please fold out the illustrated pages.
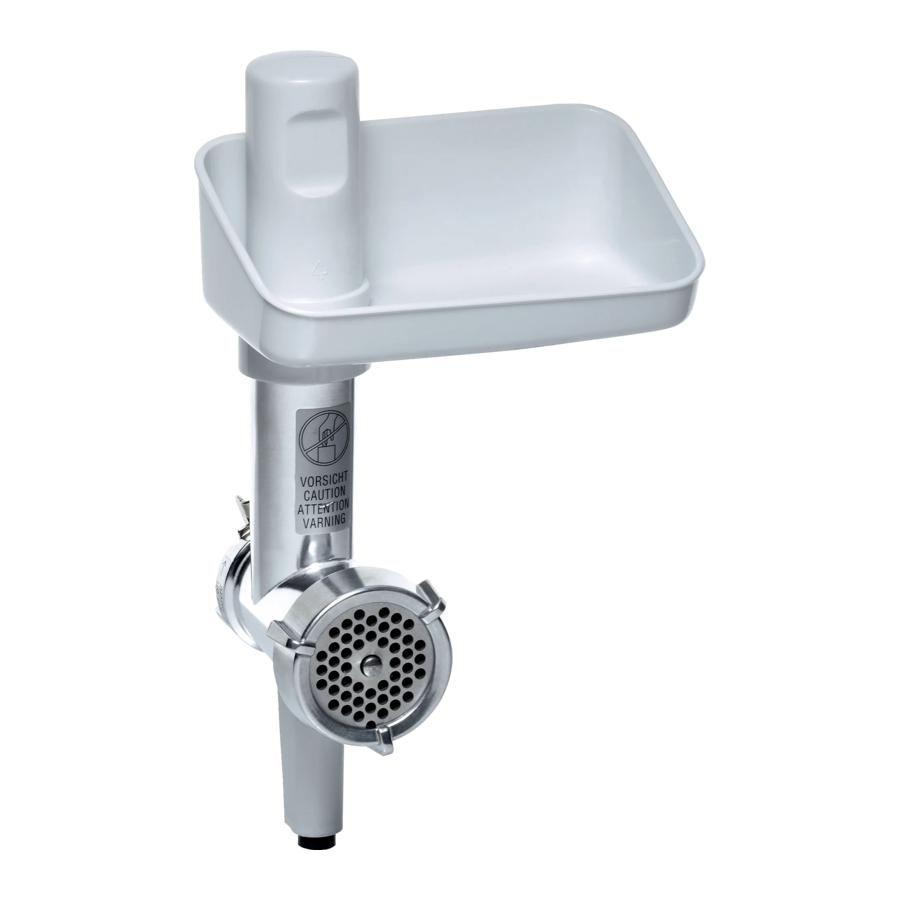
Fig. A

- Mincer attachment
- Threaded ring
- Perforated disc (hole diameter 4.5 mm)
- Blade
- Worm gear with driver
- Locking lever f Seal
- Filler tray
- Pusher
Optional accessories
- Fruit press attachment
- Viennese whirl attachment
- Grater attachment
- Perforated disc
(hole diameter 3 mm and 6 mm)
Fig. B
Operating position

Protection from overload
To prevent serious damage to your appliance if the mincer is overloaded, the driver has a notch (predetermined breaking point).
If an overload occurs, the driver breaks instead. However, the driver can easily be replaced.
A new driver is available from customer service.
- Unscrew fastening screw on the worm gear.
- Replace driver.
- Tighten fastening screw.
Operating the appliance
- Thoroughly clean the mincer before using for the first time, see "Cleaning and care".

In these instructions for use the recommended reference values for the operating speed refer to appliances with a 7-setting rotary switch. For appliances with a 4-setting rotary switch you can find the values in brackets after the values for a 7-setting rotary switch.
- Assemble mincer attachment in the indicated sequence (Fig. A). Do not fully tighten threaded ring.
- Insert seal. Note position (Fig. C)!


Fig. D

- Press the Release button and move the swivel arm to position 4.
- Connect mincer to the drive. Note position of the driver (1d) with respect to the drive. If required, turn the driver slightly.
To do this, the threaded ring must not be screwed tightly!
![]()
- Turn mincer anti-clockwise.
- Press down locking lever.
- Now tighten the threaded ring.
- Attach filler tray.
- Place a bowl or plate under the outlet opening.
- Insert the mains plug.
- Set rotary knob to setting 7 (4).
- l Place the food to be processed in the filling tray.
Use the pusher to push in ingredients.

Do not process bones.
Tip: Process steak tartare through the mincer twice.
After using the appliance
- Switch off the appliance with the rotary switch.
- Lift up locking lever.
- Rotate the mincer in a clockwise direction and remove.
- Clean mincer.
Cleaning and servicing
 Attention!
Do not use abrasive cleaning agents. Surfaces may be damaged. Mincer and individual parts are not dishwasher-proof.
- Loosen threaded ring and disassemble attachment.
- Rinse individual parts by hand and dry immediately.
Optional accessories
(available from dealers)
Always assemble the accessories without blades and perforated discs. Follow all instructions mentioned above concerning "For your safety ", "After work" or "Cleaning and servicing".
Fruit press attachment
for pressing e.g. berries, tomatoes, apples, pears, rosehips (cook rosehips for 1 hour before pressing). Extracted fruit pulp is especially suitable for making jam.
Fig. E

- Preparation as described for mincer attachment. Note required individual parts and sequence when assembling the fruit press attachment.
- First undo the fastening screw as far as is required to allow the pulp to flow out while still moist.
- Then adjust the fastening screw until the pulp flows out with the required moisture.
- Place the food to be processed in the filling tray.
Use the pusher to push in ingredients. - Set rotary knob to setting 7 (4).
Viennese whirl attachment
for shaping biscuit dough or short pastry.
Fig. F

- Preparation as described for mincer attachment. Note required individual parts and sequence when assembling the biscuit attachment.
- Place the dough to be processed in the filling tray. Use the pusher to push in ingredients.
- Turn rotary switch to setting 4 (2) or 5 (3) depending on dough consistency.
- Separate the shaped dough coming out of the appliance with a pastry cutter. Briefly switch off the food processor if the dough comes out too quickly.
Grater attachment
for grating almonds, nuts and dried bread or bread rolls.
Process only dry nuts and almonds in small quantities!
Fig. G

- Preparation as described for mincer attachment. Note required individual parts and sequence when assembling the grating attachment.
- Place the food to be processed in the filling tray.
Use the pusher to push in ingredients. - Turn rotary switch to setting 3 (2) or 4 (3) depending on hardness of the food.
For your safety
The accessories are suitable for the food processor MUM5... .
Follow the operating instructions for the food processor MUM5... . This appliance is suitable for mincing and mixing raw or cooked meat, bacon, poultry and fish. It must not be used for processing other objects or substances.
Other applications are possible if the accessories approved by the manufacturer are used.
Safety instructions for this appliance
Risk of injury!
Do not reach into the feed tube, always use the pusher to add more ingredients.
Do not attach/remove the mincer until the drive is at a standstill.
Use the mincer in the specified operating position only.
The mincer must be completely assembled before use. Never assemble the mincer attachment on the base unit.
Register your new Bosch now: www.bosch-home.com/welcome
Documents / Resources
References
Download manual
Here you can download full pdf version of manual, it may contain additional safety instructions, warranty information, FCC rules, etc.
Advertisement


Need help?
Do you have a question about the MUZ5FW1 and is the answer not in the manual?
Questions and answers