hohem iSteady Mobile+ - Stabilizer Manual
- User manual (63 pages) ,
- User manual (73 pages)
Advertisement
Product List
Before using this product, please carefully check that all the following items are included in the product package. In case that any item is found missing, please contact Hohem customer service or the local distributor.

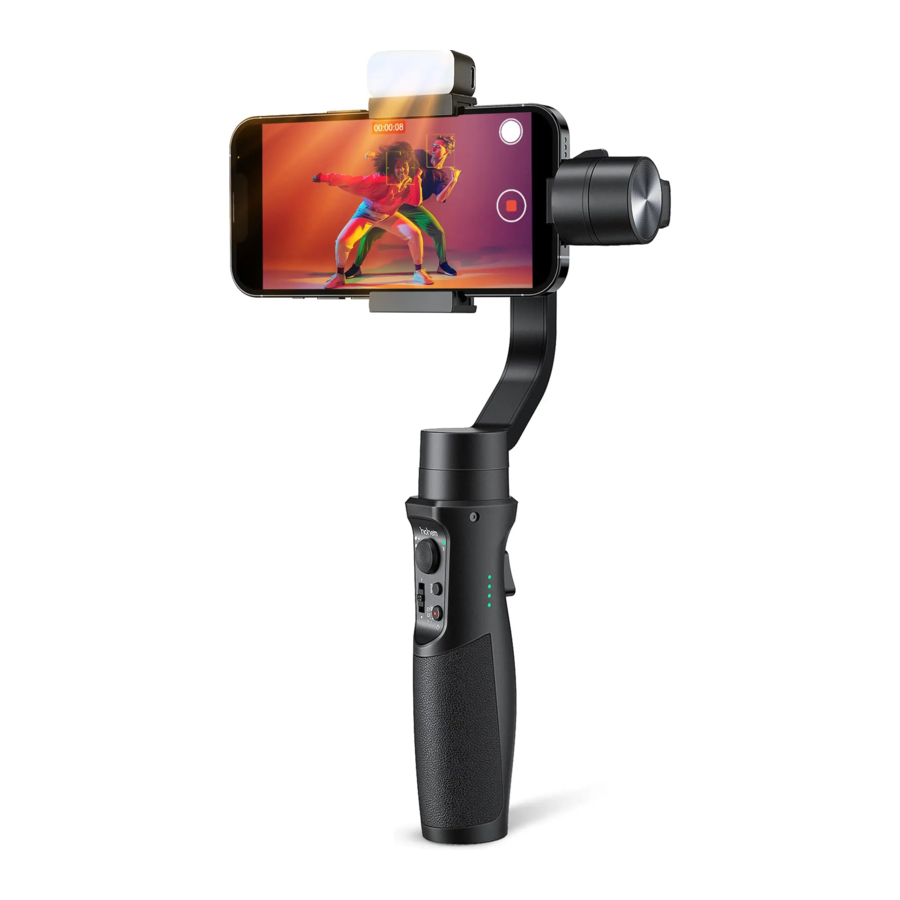
Introduction

- Magnetic Fill Light *Item included only in the kit
- Magnetic Contact
- Roll Motor
- Pan Motor
- 1/4 Inch Extension Screw Hole
- Handle (Battery inside)
- 1/4 Inch Extension Screw Hole
- Mode Indicator
- Zoom/Focus Slider
- Bluetooth Indicator
- Joystick
- Mode Button
- ON/OFF (Shutter button)
- Tilt Motor
- Balancing Knob
- Rotatable Phone Holder
- Trigger
- USB Output
- Type-C Input
Battery and Charging
Before use, please ensure that iSteady Mobile+ has sufficient battery power.
Charging Method: To charge the iSteady Mobile+, connect a USB adapter (not included choose a 5V-2A adapter for better results) into the charging port with the provided USB-C charging cable.

Battery Display: Tap the power button to check the battery status.

Flickering: Charging
4 LED lights on: 100%, fully charged
3 LED lights on: 75%
2 LED lights on: 50%
1 LED light on: 25%
Reverse Charging (DC out charging for smartphones)
Android: Charging with the provided USB-C to USB-C cable.
iOS: Charging with USB-C to Lightning cable (Not Included).

Tips:When the gimbal is powered off, press the power button once to start reverse charging your smartphone.
Download the Hohem Joy App


Scan the QR code or search "Hohem Joy" in App Store or Google Play to download.
* The app Hohem Joy requires iOS 11.0 or later, Android 6.0 or later.

- Items marked "*" are optional accessories which are sold separately.
- Mount your mobile phone before powering on the iSteady Mobile+.
- If no mobile phone is detected or the motor is overloaded because the phone is not balanced well, the gimbal will shut down after a warning beeping.
First Use
*Smartphone screens with 6.7 inches and above, such as iPhone 15 Pro Max, should be mounted almost at level with the ground.*If your phone case is bulky, it's recommended to remove it before installation.
Horizontal Mode
- Pull the phone clamp and mount the phone.
![]()
- Push the phone to the right most to close to the motor.

- Loosen the knob, and slide the arm to balance the gimbal.

- Tighten the knob.

- Long press the power button to power on.
![]()


Vertical Mode
*Do not rotate the phone clamp while the gimbal is powered on.
- Loosen the knob, slide the arm to the leftmost and tighten the knob.

- Rotate the phone clamp 90 degrees

- Pull the phone clamp and mount the phone. Adjust the phone up or down to roughly balance the gimbal.

- Make the phone roughly balance, and long press the power button to power on.


Quick Switch to Portrait Mode

*After you switch to the portrait mode, the joystick only control the phone to rotate left and right.
The following do not support quick switch:
- In POV mode
- When the handle is perpendicular
- When the app setting of left/right joystick is roll

Scan the QR code to watch the tutorials.
Ultra-Wide-Angle Shot
- Ultra-Wide-Angle Shot, switch to this mode by pressing the trigger four times and the roll motor will be in front of the phone screen for capturing unobstructed views.
![]()
- Default Mode, no obstruction in front of the phone screen.
![]()


*Ultra-Wide-Angle Shot is only supported to switch while shooting horizontally.
Magnetic Fill Light
*Item included only in the kit
Magnetic Attachment
Position the fill light near the magnetic contact ("hohem" logo upward). The magnet on the fill light will automatically attract and attach to the gimbal.

Operation
Cold Light / Warm Light / Natural White Light (10-Level Adjustable Brightness)

- M Button (Turn on/off fill light)
Press and hold for 3s: Turn on/off the fill light
Press once: Cold/warm/natural the white light switch - Plus "+" Button
Single press to increase brightness in ten levels - Minus "-" Button
Single press to decrease brightness in ten levels - Fill Light Indicator
("C" is short for cold; "W" is short for warm.)
C indicator lighting alone: Cold light in use
W indicator lighting alone: Warm light in use
C&W indicators both lighting: Natural white light in use - Power Indicator
Flashing red: Charging Solid red: Fully Charged
Buttons and Gimbal Modes
Buttons and Indicators

- Joystick
Push Up/Down: Tilt Control
Push Left/Right: Pan Control - Mode Indicator
PF: Pan Follow
PTF: Pan & Tilt Follow
L: AII Locked
POV: All Follow & Inception - Zoom Slider
(Available in the Hohem Joy / Android 10.0 or later, please ensure the Bluetooth pairing.)
Push up: Zoom in
Push down: Zoom out - Bluetooth Indicator
Soild green: Gimbal is connected with phone Bluetooth
Soild red: Gimbal abnormality
Flashing red:- Low battery (auto shutdown)
- Overload (beep warning)
Blinks yellow and green alternately: Remote*
Pairing Blinks yellow: Remote control under operation
*Remote control is non standard purchase. For remote control pairing and instructions please see the user manual of remote control or FAQs.
- Mode Button
Single press: Switch between gimbal modes
Triple press: 600° Auto inception (press mode button to stop the rotation)
Press five times: Auto calibration - Power Button/ Shutter Button
Press and hold: Power on/off
Single press: Take a photo and start/end video (Please ensure Bluetooth is connected.)
Double press: Switch photo/video modes (Only available in the Hohem Joy / Android 10.0 or later, please ensure the Bluetooth pairing.)
Triple press: Switch front/rear cameras (Only available in the Hohem Joy / Android 10.0 or later, please ensure the Bluetooth pairing.) - Trigger Button
Press on: Sport mode
Press once, and then press and hold: L(All locked)
Double press: Recenter the gimbal
Press 4 times: Switch to Ultra-Wide-Angle Shot
Gimbal Modes


Scan the QR code to watch the tutorials.
 | PF (Pan Follow) Default mode, tilt & roll axis both locked, camera is able to move to left or right smoothly. |
 | PTF (Pan & Tilt Follow) Roll axis locked, camera is able to move to left/right, and tilt up/down. |
 | L (All Locked) The camera stays in its current orientation. |
 | POV (AlI Follow & Inception) All Follow - Tilt axis, roll axis and pan axis all follow the movement of the gimbal. Inception - Hold the gimbal horizontally and push joystick to left or right. |
Hohem Joy App
Bluetooth Connection
- Power on iSteady Mobile+
- Turn on Bluetooth on the Mobile Phone
- Launch the app Hohem Joy and follow the prompts to connect to iSteady Mobile+.
App Features

- Exposure Settings
- Resolution/Frame Rate
- Smart Tracking
- Parameter Setting
- Home
- Focus/Zoom
- Flash
- Beauty & Filters
- Gesture Control
- Front/Rear
- Moment Templates
* For more details on the "Hohem Joy" app features, please visit the official website of Hohem (www.hohem.com) and watch iSteady Mobile+ video tutorials.

Scan the QR code to watch the tutorials.
Auto Calibration and Firmware Update
Calibration Reasons and How to Calibrate
Auto calibration could reduce drift or slight deviation caused by nearby magnetic interference or human error.
- Place gimbal on a flat surface using a tripod.
![]()
- Double press the trigger button to recenter the gimbal.
![]()
- Press mode button five times to start the auto calibration. Please do not touch the gimbal during calibration.

- Two beeps indicate that the calibration is completed, the gimbal will recenter and automatically return to normal operation.
![]()


*If the gimbal is not placed on a flat surface for calibration (e.g. hand-held calibration in the car), it may cause calibration failure.
*When the calibration fails, the gimbal will make a beep sound, all 4 mode lights flash and enter the sleep mode. Single press any button (except the joystick) to wake up the gimbal and follow the above steps to try again.
Firmware Update
You will be prompted in the app Hohem Joy if a new firmware update is available. Follow the on-screen instructions in the app to update the firmware.
FAQs
Why does the gimbal automatically power off?
The gimbal will automatically power off if no phone is installed or the phone is not properly balanced (causing motor overload). You will hear a "beep" sound as a warning before it shuts down. Make sure to install and balance the phone correctly before turning on the gimbal (see the First Use section for details).
How can I connect my phone's Bluetooth to the gimbal while the app can't find the device?
Clear the Bluetooth connection and try reconnecting: Push the zoom lever upwards and simultaneously long-press the M button for 5s. When the Bluetooth indicator flashes green five times, it means the Bluetooth connection has been cleared. You can then follow the Bluetooth connection steps to connect again.

How do I connect the remote controller?
*The remote controller is an optional accessory and needs to be purchased separately.
Switch the remote to "OFF". Press the M button seven times to enter the remote controller pairing mode (at this point, the Bluetooth indicator will alternate between yellow and green). Switch the remote to "ON," and it will automatically connect to the gimbal. When you press buttons on the remote controller, and the gimbal's Bluetooth indicator flashes yellow, it indicates a successful pairing.

Exit the remote controller pairing: Press the mode button once.
Clear the remote controller pairing: Double-press the M button while in the remote controller pairing.
Product Specification
Gimbal
| Weight | 474g include battery |
| Folded Size | 294*120*47mm |
| Main Material | High performance composite |
| Payload | 280g |
| Mobile Width Supported | 58mm~89mm |
| Power Rating | 1.0W |
| Battery Capacity | 18650li-ion 7.4V/1800mAh/13.32Wh |
| Battery Life | Up to 13 hours (Under ideal conditions with the gimbal fully balanced) |
| Charging Time | 2 hours (5V 2A) |
| Mechanical Range | Panning: 600° Rolling: 320° Tilting: 320° |
| Working Temperature | -10~45°C |
| Motors Protection | Gimbal will be powered off automatically due to improper operation of motors |
Fill Light *Item included only in the kit
| Weight | 16g |
| Battery Capacity | 3.7V / 300mAh |
| Power Rating | 1W |
| Battery Life | 1 Hour |
| Lights | Cold Light (6500k) Warm Light (3000k) Natural White Light (5500k) |
Email: service@hohem.com
Website: www.hohem.comHohem

Connect us at Facebook

Scan the QR code to access the tutorial
Documents / Resources
References
Download manual
Here you can download full pdf version of manual, it may contain additional safety instructions, warranty information, FCC rules, etc.
Advertisement


Need help?
Do you have a question about the iSteady Mobile+ and is the answer not in the manual?
Questions and answers