Advertisement
- 1 Getting to know your Hoover RE AC T Cordless Vacuum
- 2 What's in the Box?
- 3 Assembly
- 4 Mounting the Wall Bracket
- 5 Charging your ONE PWR Lithium Battery
- 6 Hoover FloorSense Technology
- 7 Hoover Dashboard and FloorSense Technology
- 8 Using the Hoover App
- 9 Quick Start
- 10 Using your Vacuum
- 11 Using your Vacuum as a Handheld
- 12 Using your Vacuum to Clean Up High
- 13 Maintenance: System Error Troubleshooting
- 14 Maintenance: Removing the ONE PWR Lithium Battery
- 15 Maintenance: Emptying the Dirt Cup
- 16 Maintenance: Cleaning the Filter, Dirt Cup and Separator
- 17 Maintenance: Removing and Replacing the Brush Roll
- 18 How to Order Accessories
- 19 Need Help?
- 20 IMPORTANT SAFETY INSTRUCTIONS
- 21 Documents / Resources
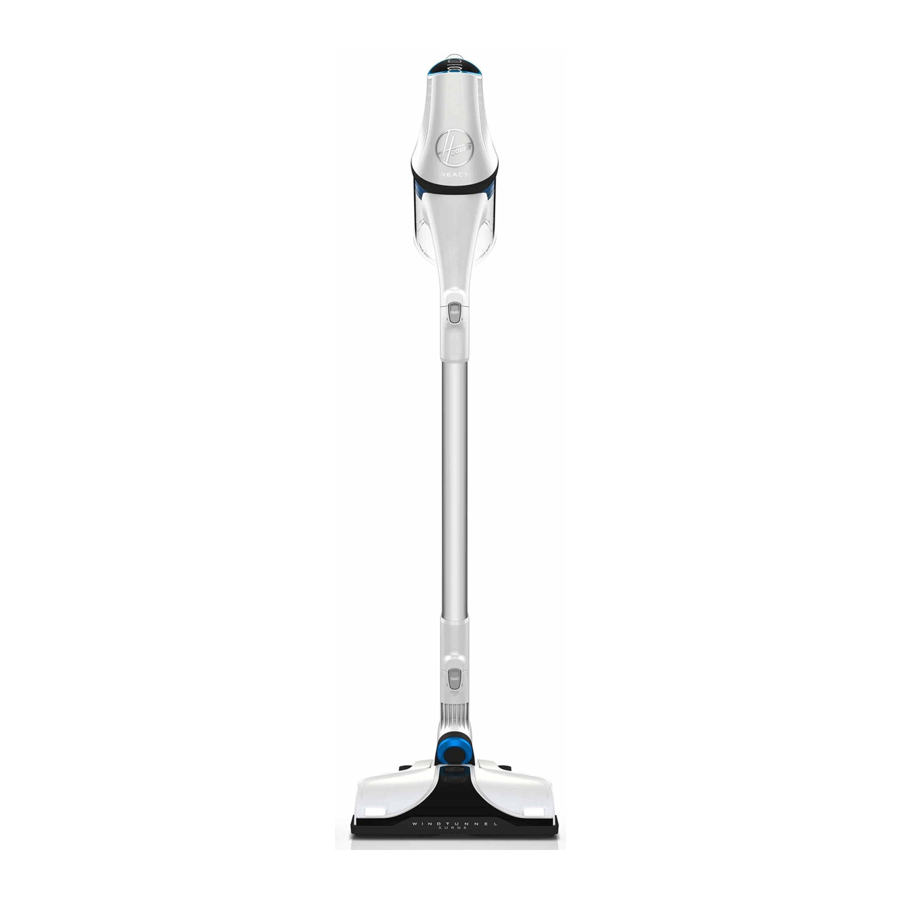
Getting to know your Hoover ® RE AC T ™ Cordless Vacuum

- Hoover ® Dashboard
- XL Easy Empty Dirt Cup
- Release Button
- Reach Wand
- Advanced Swivel Steering
- Easy Clean Brush Roll
- Powered Nozzle with WindTunnel Surge ™
- High Intensity LED Headlights
- Battery Level Indicator
- Mode Indicator
- Mode Button
- Power Trigger
- ONE PWR ™ Lithium Battery
- ONE PWR ™ Lithium Battery Release Button
- ONE PWR ™ Charger
- ONE PWR ™ Charger Indicator
What's in the Box?

All models come with a Handheld, Powered Nozzle, Reach Wand, ONE PWR™ Lithium Battery, Charger and Wall Mount.
Assembly
- Push the Reach Wand down onto the Powered Nozzle until it clicks into place.
![]()
- Push the Handheld down onto the Reach Wand until it clicks into place.
![]()
- Before first use be sure to fully charge the battery.
TIP: Charging your ONE PWR™ Lithium Battery may take up to 3 hours.
![]()


To reduce the risk of personal injury, remove battery before cleaning or servicing.

This vacuum cleaner is not free standing. In between uses or when carrying out any maintenance always lie flat on the floor in a suitable location so it does not become a trip hazard or can be stepped on.
Mounting the Wall Bracket
First, fully assemble the vacuum but do not attach the battery.
- Snap the Wall Bracket arm into the Wall Bracket and screw into place. Hold the vacuum against the wall. Position the Wall Bracket behind the Handheld so that the hook holds the vacuum.
TIP: The Floor Nozzle must be flat on the ground for proper wall mounting.
![]()
- Set the vacuum aside. Mark the Wall Anchor locations. Install the anchors and screw the Wall Bracket to the wall.
![]()
Use BOTH screws to mount the Wall Bracket to wall.
![]()
- Slide Tool Storage Part into the slot on the Wall Mount Bracket until it locks into place.
![]()
- Store the Vacuum on the Wall Bracket arm.
![]()


Charging your ONE PWR™ Lithium Battery
- Charge the battery fully before first use, this will take up to 3 hours.
NOTE: Due to federal regulations the battery does not come fully charged.
![]()
- When charging, the charger will illuminate to indicate charging progress.
![]()
- Once charge is complete, remove the ONE PWR Battery from the charger and place it into the handheld for cleaning.
![]()


See label on the bottom of the charger for charge indicator explanation.
Hoover® FloorSense™ Technology
Hoover ® REACT ™ with FloorSense ™ Technology automatically optimizes cleaning performance on carpets and hard floors. On carpet, FloorSense ™ automatically increases the brush roll speed to lift deep-down embedded dirt. On hard floors, FloorSense ™ automatically slows the brush roll to prevent scattering of dirt across the floor. The Hoover ® Dashboard in the Handheld displays useful functions of your vacuum. When FloorSense ™ is active, the dashboard will illuminate indicating "FloorSense".

Hoover® Dashboard and FloorSense™ Technology
TIP: To allow FloorSense™ to determine floor type and optimize brush roll speed automatically, ensure FloorSense™ is illuminated on the Hoover® Dashboard.

- The Hoover ® Dashboard will indicate "FloorSense". In FloorSense ™ mode, brush roll speed automatically adjusts for the best results on any floor type.
![]()
- The Hoover ® Dashboard will indicate "Brush Off". In "Brush Off" mode, brush roll turns OFF to prevent scattering of dirt and debris across hard floors and area rugs.
![]()
- When the mode button has been pressed and no words illuminate on the Hoover ® Dashboard, the brush roll is ON and perfect for lifting and removing deep-down dirt on carpet.
![]()
- The Hoover ® Dashboard will light up, if there is a system error. Refer to the Maintenance section for further information.
![]()


Using the Hoover® App
TIP: Pull power trigger to illuminate the Hoover® Dashboard and connect to the Hoover® App.
Hoover® REACT™ vacuums are compatible with the Hoover® App. Download the Hoover® App to:
- Customize FloorSense ™ Settings
![]()
- Set Filter Maintenance Reminders
![]()
- Access Tips and Tricks
![]()
![www.apple.com]()
![play.google.com]()


Read all instructions before using this appliance.
Quick Start
- Multi-Floor Cleaning
![]()
- Handheld Cleaning
![]()
- Up High Cleaning
![]()


Using your Vacuum
- Squeeze the trigger to turn the vacuum ON. Release the trigger to shut the vacuum OFF.
NOTE: When power is ON, the Hoover ® Dashboard will light up.
![]()
- For continuous power, double-click the trigger. Power should remain ON. Pull trigger again to power OFF.
![]()
- Push the "Mode" button on the Hoover ® Dashboard if you'd like to change from FloorSense ™. The vacuum will default to "FloorSense" mode.
![]()
- When in use, the Hoover ® Dashboard will display the battery level and selected mode. When the battery level is getting low, recharge the battery.
![]()


This vacuum cleaner has a constantly rotating brush roll when FloorSense ™ is ON. Never leave the vacuum in one spot for an extended period of time as this may damage the floor surface.
Risk of personal injury – the brush roll may suddenly restart. Turn power switch OFF and remove the battery before cleaning or servicing the brush roll.
Using your Vacuum as a Handheld
- Press the Handheld Release Button. Pull to separate the Handheld from the Reach Wand.
![]()
- Choose an accessory. (All accessories not available on all models).
![]()
- Push the chosen accessory into the Handheld until it clicks into place.
TIP: All available accessories can be attached directly onto the Handheld.
![]()


Not to be used for grooming a pet.
This vacuum cleaner is not free standing. In between uses or when carrying out any maintenance always lie flat on the floor in a suitable location so it does not become a trip hazard or can be stepped on.
Using your Vacuum to Clean Up High
- Press the Powered Nozzle Release Button and pull to remove the Powered Nozzle from the Reach Wand.
![]()
- Choose an accessory (all accessories not available on all models).
![]()
- Push the chosen accessory into the Reach Wand until it clicks into place.
TIP: The Reach Wand can be used for hard-toreach places.
![]()


This vacuum cleaner is not free standing. In between uses or when carrying out any maintenance always lie flat on the floor in a suitable location so it does not become a trip hazard or can be stepped on.
Maintenance: System Error Troubleshooting

If your Error Light is flashing, you may have a clog. Turn the product off, remove the handheld and keep off for at least 5 seconds.
- Turn it back on, if after 10 seconds the indicator comes back on, clean your filter (refer to Maintenance: Cleaning the Filter, Dirt Cup and Separator page).
- If it doesn't come back on after 10 seconds, the clog is either in the Reach Wand, Powered Nozzle or whichever accessory tool you were using.
If your Error Light is solid, your brush roll has stalled.
- Release trigger for at least 5 seconds.
- Remove obstruction or clean brush roll (refer to Maintenance: Removing and Replacing the Brush Roll page).
- Wait 5 seconds and then power the vacuum on to ensure the light goes off.
Crevice tool opening is small and may cause a faulty system error. If System Error occurs with crevice tool in use, turn the product off, remove the crevice tool and then power the product back on and check of the error light.
Maintenance: Removing the ONE PWR™ Lithium Battery
- Lie the Handheld on its side on a flat stable surface. Pull the "Battery Release Button" back to release the ONE PWR Lithium Battery.
![]()
- Slide the ONE PWR ™ Lithium Battery out from the bottom of the Handheld.
![]()
- Place ONE PWR ™ Lithium Battery on charger.
![]()


To reduce the risk of personal injury, remove battery before maintaining or servicing your vacuum.
Maintenance: Emptying the Dirt Cup
- Press the Handheld Release Button. Pull to separate the Handheld from the Reach Wand.
![]()
- Ensure the ONE PWR ™ Lithium Battery has been removed and hold the Handheld over a trash bin. TIP: Wrap bag around dirt cup to capture dirt and dust.
![]()
- Press the dirt empty button.
![]()


To reduce the risk of personal injury, remove battery before maintaining or servicing your vacuum.
This vacuum cleaner is not free standing. In between uses or when carrying out any maintenance always lie flat on the floor in a suitable location so it does not become a trip hazard or can be stepped on.
Maintenance: Cleaning the Filter, Dirt Cup and Separator
- Remove the Reach Wand. Press the dirt cup release button and pull the dirt cup away.
![]()
- Pull the filter away and tap over a trash bin to remove dirt. Rinse filter under warm water until water is clear. Allow filter to dry for 24 hours or until completely dry before reinstalling.
![]()
- To clean the separator, lift to remove. Clean dirt & debris, then place back into dirt cup.
![]()
- To reassemble, align the hook to the front. Push the dirt cup backwards, until it locks in place.
![]()


To reduce the risk of personal injury, remove battery before maintaining or servicing your vacuum.
DO NOT USE SOAP OR OTHER CHEMICALS TO CLEAN. DRY FILTER COMPLETELY, FOR UP TO 24 HOURS, BEFORE REINSTALLING INTO THE PRODUCT.
Maintenance: Removing and Replacing the Brush Roll
- Remove Powered Nozzle from Reach Wand. Turn the Powered Nozzle upside down. Slide the Brush Roll Release Button.
![]()
- Lift the end of brush roll to remove from the Powered Nozzle.
![]()
- Clear any threads or hair from both ends of the brush roll and any dirt or debris inside the housing of the Powered Nozzle.
![]()
- Re-fit the brush roll into the housing.
![]()


Risk of personal injury – the brush roll may suddenly restart. Turn power OFF and remove the battery before cleaning or servicing the brush roll.
How to Order Accessories


WHAT TO BUY:
Buy Genuine Hoover® Parts & Accessories:
If you are in need of a new part, attachment or accessory, visit Hoover.com or Hoover.ca for more information.
Having trouble locating an item or model on our site, contact Customer Care at 877 839-2046.
Need Help?
My Hoover® REACT™ Cordless Vacuum won't turn on
Your battery may not be charged. Check the Charge Level Indicator and charge the battery if it's low. Charge time may take between 1 and 3 hours. Due to federal regulations the battery does not come fully charged.
The FloorSense™ on my Hoover ® REACT ™ isn't working
You may have a clogged filter. Your filter should be rinsed every 4-6 times you fill the dirt cup or at least once a month. Remove the filter. Rinse with clear warm water for two minutes. Let it dry for 24 hours or until completely dry before reinstalling it.
If your suction power seems low
You may also have a clog in the system. Check the Reach Wand for any clogged debris. If found, remove the clog.
Any other servicing should be done by an authorized service representative. If appliance is not working as it should, has been dropped, damaged, left outdoors, or dropped into water, take it to a service center prior to continuing use.
To reduce the risk of personal injury, remove battery before cleaning or servicing.
IMPORTANT SAFETY INSTRUCTIONS
READ CAREFULLY BEFORE ASSEMBLY AND USE. This product is intended for household use only. If used commercially the warranty is void.
SAVE THESE INSTRUCTIONS
When using an electrical appliance, basic precautions should always be followed, including the following:
READ ALL INSTRUCTIONS BEFORE USING THIS APPLIANC THIS PRODUCT IS INTENDED FOR HOUSEHOLD USE ONLY. IF USED COMMERCIALLY WARRANTY IS VOID.

TO REDUCE THE RISK OF FIRE, ELECTRIC SHOCK, DAMAGE OR INJURY:
- Fully assemble before operating.
- Do not use appliance on wet surfaces. Do not expose appliances to rain. Store appliances indoors.
- The charger is for indoor use only. Be sure to always keep the battery and charger indoors in a dry place.
- Do not allow to be used as a toy. Not intended for use by children age 12 and under. Close supervision is necessary when used near children. To avoid injury or damage, keep children away from product, and do not allow children to place fingers or other objects into any openings.
- Use only as described in this manual. Use only Hoover® recommended attachments and products.
- Do not use charger with damaged cord or plug. If appliance or charger is not working as it should, has been dropped, damaged, left outdoors, or dropped into water, take it to a service center prior to continuing use.
- Do not pull or carry charger by cord, use cord as a handle, close a door on cord, or pull cord around sharp edges or corners. Do not place product on cord. Do not run appliance over cord. Keep cord away from heated surfaces.
- Do not unplug charger by pulling on cord. To unplug charger, grasp the plug, not the cord.
- Do not handle charger including charger plug and charger terminals, or appliance with wet hands.
- Do not put any object into openings. Do not use with any opening blocked; keep free of dust, lint, hair, and anything that may reduce air flow.
- Keep hair, loose clothing, fingers, and all parts of body away from openings and moving parts.
- Use extra care when cleaning on stairs. To avoid personal injury or damage, and to prevent the cleaner from falling.
- Do not use to pick up flammable or combustible liquids, such as gasoline, or fine wood shavings, or use in areas where they may be present.
- Do not pick up anything that is burning or smoking, such as cigarettes, matches, or hot ashes.
- Do not use without Dirt Cup and/or Filters in place.
- Turn power switch off and remove battery before removing or installing brush roll.
- Always turn off this appliance before connecting or disconnecting Motorized Turbo Tool or tools.
- Do not incinerate the charger, battery, or appliance even if it is severely damaged. The batteries can explode in a fire.
- This product includes rechargeable Lithium-Ion Batteries. Do not expose batteries to high temperatures, as they may catch fire and/or explode.
- Do not expose battery to crushing, incineration or similar actions.
- Do not dispose of battery in a fire or trash compactor. See battery disposal section for directions.
- Do not attempt to disassemble battery.
- Unplug the charger from the outlet before any routine cleaning or maintenance.
- Leaks from battery cells can occur under extreme conditions. If any liquid gets on the skin wash quickly with soap and water. If any liquid gets into the eyes, do not rub eyes, immediately flush them with clean water continuously for a minimum of 15 minutes. Seek medical attention immediately.
- Use only the charger (Hoover Model #BH04200, BH04230) supplied by Hoover® to recharge.
- Use only the battery (Hoover Model #BH04000, BH04010, BH04020) supplied by Hoover®. Other batteries may burst causing serious personal injury or damage.
- Do not touch or insert objects into battery pack or charger terminals.
- Do not attempt to short circuit the battery or charger terminals.
- Prevent unintentional starting. Ensure the appliance is off before connecting to battery pack, picking up or carrying the appliance. Carrying the appliance with your finger on the trigger or energizing appliances that are powered on invites accidents.
- When battery pack is not in use, keep it away from other metal objects, like paper clips, coins, keys, nails, screws or other small metal objects that can make a connection from one terminal to another. Shorting the battery terminals together may cause burns or a fire.
- Do not use a battery pack or appliance that is damaged or modified. Damaged or modified batteries may exhibit unpredictable behavior resulting in fire, explosion or risk of injury.
- Follow all charging instructions and do not charge the battery pack or appliance outside of the temperature range specified in the instructions. Charging improperly or at temperatures outside of the specified range may damage the battery and increase the risk of fire.
CHARGING AMBIENT TEMPERATURE RANGE: 5°C-50°C (41°F - 122°F) - Have servicing performed by a qualified repair person using only identical replacement parts. This will ensure that the safety of the product is maintained.
- Do not modify or attempt to repair the appliance or the battery pack except as indicated in the instructions for use and care.
- Disconnect the battery pack from the appliance before making any adjustments, changing accessories, or storing appliance. Such preventive safety measures reduce the risk of starting the appliance accidentally.

The battery used in this device may present a risk of fire or chemical burn if mistreated.
Do not disassemble, heat above manufacturer's maximum temperature limit (60°C/140°F), or incinerate. Replace battery with Hoover Battery Part #BH04000, BH04010, BH04020 only. Use of another battery may present a risk of fire or explosion. Dispose of used battery promptly. Keep away from children. Do not disassemble and do not dispose of in fire. Do not attempt to disassemble the battery or remove any component projecting from the battery terminals. The battery and charger have no user serviceable parts. Fire or injury may result. Prior to disposal, protect exposed terminals with heavy insulating tape to prevent shorting.
QUESTIONS OR CONCERNS?
Hoover.com/support or Hoover.ca/support
Connect with us:
Twitter: @HooverUSA
Facebook: facebook.com/hoover
Do not return to store. See back of product for model number.
Register your vacuum by:
Visiting Hoover.com or Hoover.ca
Calling 877 839-2046
Documents / Resources
References
![www.apple.com]() App Store - Apple
App Store - Apple![play.google.com]() Google Play
Google Play![hoover.com]() Vacuum Cleaners | Carpet Cleaners | Hard Floor Cleaners | Hoover
Vacuum Cleaners | Carpet Cleaners | Hard Floor Cleaners | Hoover![hoover.ca]() Hoover Canada
Hoover Canada![hoover.com]() Parts Finder & Support Library – Hoover
Parts Finder & Support Library – Hooverhttp://facebook.com/hoover
Download manual
Here you can download full pdf version of manual, it may contain additional safety instructions, warranty information, FCC rules, etc.
Advertisement


Need help?
Do you have a question about the REACT and is the answer not in the manual?
Questions and answers