Numark iDJ3 - Digital DJ System Manual
- Service manual (46 pages) ,
- Quick start manual (21 pages)
Advertisement
BOX CONTENTS
- iDJ3
- USB cable
- Power adapter
- Software CD
- Quickstart Guide
- Safety & Warranty Information Booklet
REGISTRATION
Please go to http://www.numark.com to register your iDJ3. Registering your product ensures that we can keep you up-to-date with any new product developments and provide you with world-class technical support, should you run into any problems.
SETUP
PC
Before you can begin using the iDJ3 with your computer, you must install the included Virtual DJ LE software:
- Please insert the included installation disc into your computer's CD-ROM drive.
- Open the CD to view its contents.
- Open the folder titled "PC."
- Double-click "Setup.exe."
- Select your preferred language and when done press "OK."
- Read the information screen then press "Next."
- Read the User Agreement, select "I accept the agreement," then click "Next."
- You will be asked to choose a location to install. (We recommend using the default location for most users.) Once you have selected the location, click "Next."
- The installation procedure will begin. Follow the on-screen instructions.
- Once the installation is complete, click "Finish."
To start using iDJ3:
- Connect iDJ3 to an available USB port on your computer. (If possible, use a USB port on the rear panel of your computer.)
- Open Virtual DJ LE by double-clicking the icon on your computer's Desktop (if you created a Desktop shortcut) or by going to Start → All Programs → Virtual DJ.
For more information on how to use Virtual DJ, see the manual on the CD, located in the "Manual" folder.
MAC
Before you can begin using the iDJ3 with your computer, you must install the included Virtual DJ LE software:
- Please insert the included installation disc into your computer's CD-ROM drive.
- Open the CD to view its contents.
- Open the folder titled "Mac."
- Double-click "Setup. MPKG."
- Once you see the installer welcome screen, click "Continue."
- Read the User Agreement, select "I accept the agreement," then click "Continue," then "Agree."
- You will be asked to choose a location to install. By default, your hard disk will be selected. (We recommend using this for most users.) Once you have selected the location, click "Install" to begin the installation.
- Enter your password and click "OK."
- Once the installation is complete, click "Close."
To start using iDJ3:
- Connect iDJ3 to an available USB port on your computer. (If possible, use a USB port on the rear panel of your computer.)
- Open Virtual DJ LE by going toApplications → Virtual DJ LE.
For more information on how to use Virtual DJ, see the manual on the CD, located in the "Manual" folder.
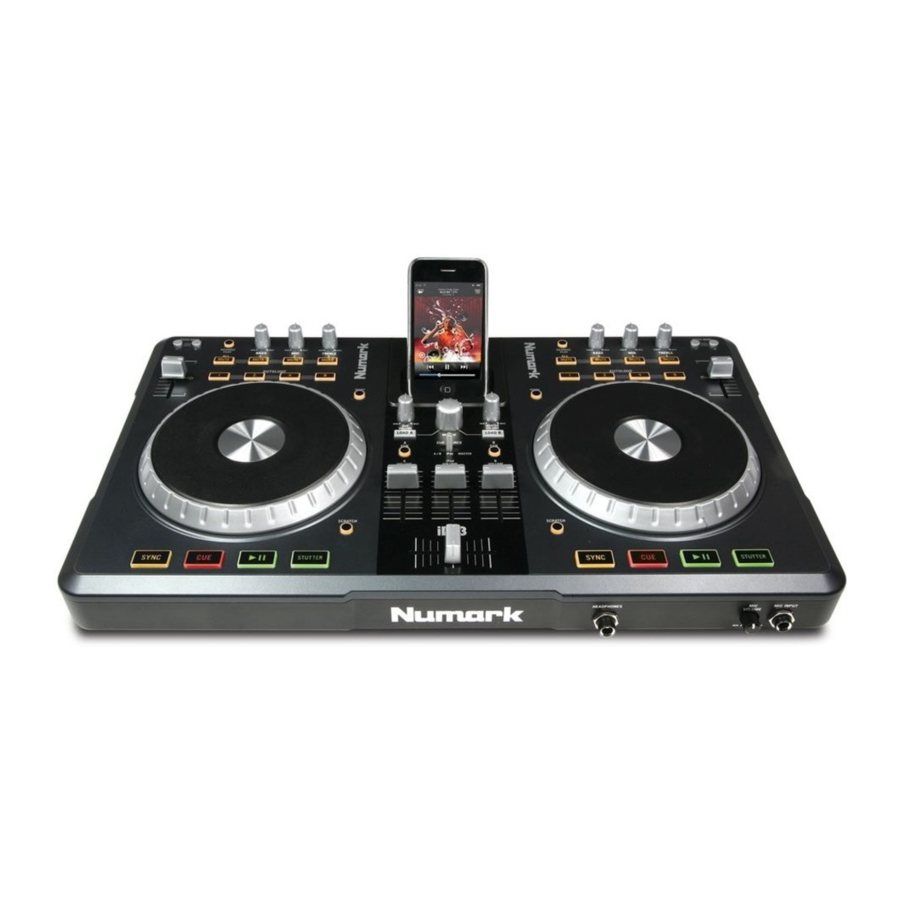
TOP PANEL FEATURES

- HEADPHONES – Connect your 1/4" headphones to this output for cueing and mix monitoring.
- MIC INPUT – Connect a 1/4" microphone to this input.
- MIC GAIN – Adjusts the audio level of the microphone signal.
- MASTER VOLUME – Adjusts the output volume of the Program mix.
- CUE VOLUME – Adjusts the audio level of the Cue channel.
- CUE SOURCE – Selects the audio that is sent to the headphones. Switch it to "MASTER" to hear the Program mix. Switch it to "A/B" to hear Decks A and B in the Cue channel. Switch it to "iPod" to hear iPod/iPhone.
- A/B CUE – Sends pre-fader audio to the Cue Channel for headphone monitoring.
- BROWSE KNOB – Turn this knob to scroll through lists of tracks and directories in the software. When a directory is selected, press the knob to enter it.
- LOAD A / LOAD B – Press one of these buttons while a track is selected to assign it to Deck A or Deck B, respectively.
- CHANNEL FADER – Adjusts the audio level on the corresponding channel.
- CROSSFADER – Blends audio playing between Decks A and B. Sliding this to the left plays Deck A and sliding to the right plays Deck B.
- DOCK – Connect your iPod/iPhone here. Gently rock the iPod/iPhone back and forth over the connector when attaching or removing it.
- DOCK ADJUSTER – Turn this knob accordingly so your docked iPod/iPhone rests against the support.
- JOG WHEEL – When the deck is playing, the JOG WHEEL will bend the track's pitch. When the SCRATCH button is on, the JOG WHEEL will scratch the selected track. When the deck is not playing, rotating the JOG WHEEL will scan through the track.
- SCRATCH – Turns Scratch Mode on or off. If Scratch Mode is on, the button will light up and the JOG WHEEL will scratch like a turntable when you spin it. The LED will light up to indicate Scratch Mode is on.
- KEYLOCK – This feature allows you to change the speed of the song without changing the key. The key of the song will lock to the position of the pitch fader when Keylock is engaged.
- PLAY / PAUSE – Starts or resumes playback if the Deck is paused. Pauses playback if the Deck is playing.
- STUTTER – Press this button while the music is playing to jump back to the last set cue point, creating a "stutter" effect.
- CUE – The CUE button will return and pause the track at the last set cue point. For temporary play of the cue point, you can hold down the CUE button. The track will play for as long as the button is held down and will return to the cue point once it has been released. You can hold down CUE and PLAY / PAUSE simultaneously to start playback from the cue point. Release both buttons to allow playback to continue.
- SYNC – Automatically matches the corresponding Deck's tempo with the other Deck's tempo.
- PITCH FADER – Controls the track's playback speed. An LED next to the fader will light up when set at 0%.
- PITCH BEND ( + / – ) – Press or hold down either of these buttons to temporarily adjust the track's playback speed. When released, the track playback will return to the speed designated by the PITCH FADER.
- CHANNEL BASS – Adjusts the low (bass) frequencies of the corresponding channel.
- CHANNEL MID – Adjusts the mid-range frequencies of the corresponding channel.
- CHANNEL TREBLE – Adjusts the high (treble) frequencies of the corresponding channel.
- EQ KILL SWITCH – Pressing down on these buttons removing that frequency band (BASS, MID, or TREBLE) from the music on that deck. The button will illuminate when the EQ kill feature is engaged. To disengage it, press the button again.
- REVERSE PLAY – Reverses playback of the Deck. Press the button again to resume normal forward playback.
- AUTOLOOP – Automatically creates a 1-, 2-, 4-, or 8-beat loop from the current location in the track.
REAR PANEL FEATURES

- CHARGE – Connect the 6V-1A power adapter if you want to charge an iPod/iPhone while using iDJ3.
- USB – This USB connection sends and receives control information to/from a connected computer. When plugged into your computer, the unit will draw power from the USB connection.
- MASTER OUTPUT (RCA) – Use standard RCA cables to connect this output to a speaker or amplifier system. The level of this output is controlled by the MASTER VOLUME knob on the top panel.
Documents / Resources
References
Download manual
Here you can download full pdf version of manual, it may contain additional safety instructions, warranty information, FCC rules, etc.
Advertisement


Need help?
Do you have a question about the iDJ3 and is the answer not in the manual?
Questions and answers