ZEISS DTI 4/50 - Thermal Imaging Camera Manual
- Quick manual (21 pages) ,
- Instructions for use manual (15 pages) ,
- Quick manual (116 pages)
Advertisement
- 1 Scope of Supply
- 2 Installing/removing the battery
- 3 Attaching the thermal imaging attachment
- 4 TECHNICAL DATA
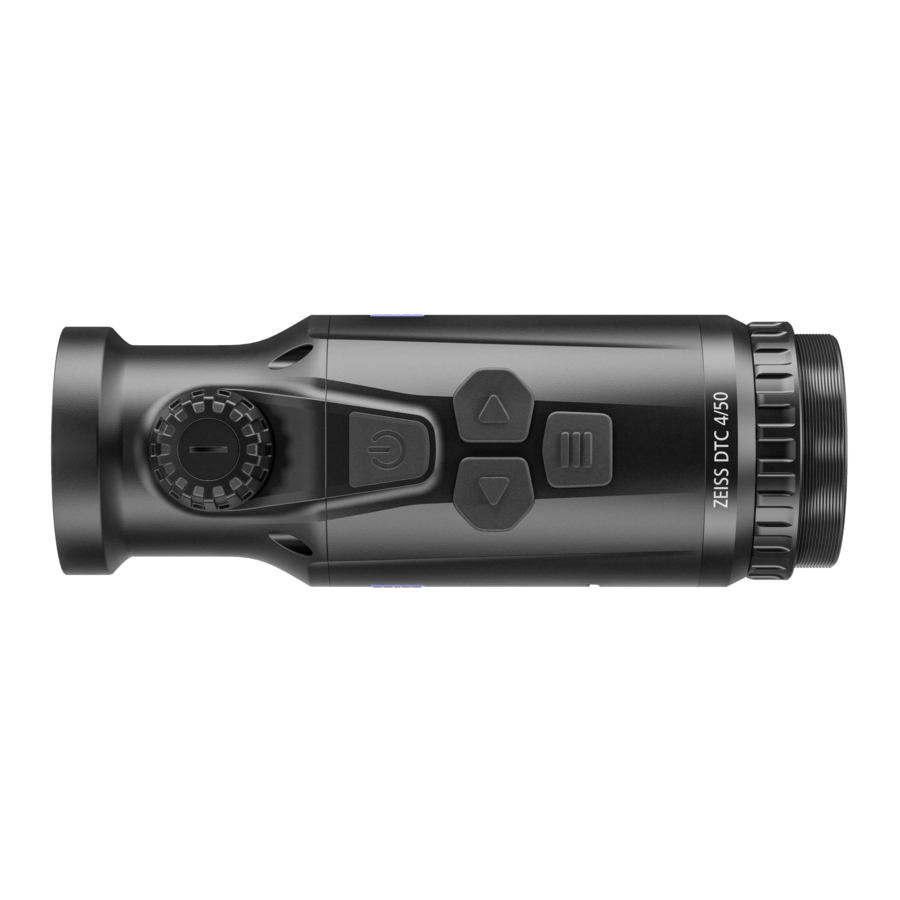
- 5 Overview
- 6 Power on/off
- 7 Standby mode
- 8 Calibration
- 9 Observation mode
- 10 Color modes
- 11 Shooting mode
- 12 Menu
- 13 Scene Mode
- 14 Zeroing Profiles
- 15 System
- 16 Image Zeroing
- 17 Simplified Zeroing Mode
- 18 Pixel Correction
- 19 Date / Time
- 20 Icon Optimization
- 21 Factory Reset
- 22 Icon Mode
- 23 Personal data when you dispose of or pass on your ZEISS device
- 24 Cooperation on device safety
- 25 Firmware update
- 26 LED status
- 27 ZEISS Hunting app
- 28 Charging the device
- 29 Replacing the lens cap
- 30 Replacing the USB cover
- 31 Adapter
- 32 Care and maintenance of the device
- 33 Software updates
- 34 Troubleshooting
- 35 Care and maintenance of the battery
- 36 Customer Service
- 37 Documents / Resources
Scope of Supply
| Product | Order no. | Scope of Supply | |
| ZEISS DTC | 4/50 | 527032 | DTC 4/50 thermal imaging attachment Protective lens cap Eyepiece protection Bag Optics cleaning cloth USB cable Quick Guide Safety instructions Warranty card EULA document |
Installing/removing the battery
The ZEISS thermal imaging attachment is equipped with a battery. It cannot be removed.
Attaching the thermal imaging attachment
An adapter is required to attach it to an optical device, e.g. a riflescope. To expose the thread for attaching the adapter, turn the retaining ring (6) as far clockwise as possible in the direction of the thermal imaging attachment. Handtighten your external adapter clockwise onto the device. Turn the retaining ring (6) counterclockwise as far as it will go. Hold the retaining ring (6) in place with one hand. Use your free hand to grasp the adapter and turn it as tightly as possible clockwise towards the retaining ring (6).
Note: Check the legal and regional regulations in your country before using the ZEISS DTC 4 in combination with an optical sight.
TECHNICAL DATA
| DTC 4/50 | ||
| Optics | ||
| Focal length | 50 mm / F1.1 | |
| Lens type | Germanium | |
| Range | m (object 1.8 m × 0.6 m) yd (object 2 yd × 0.7 yd) | 2,635 (2,883) |
| Field of view in m at 100 m (Field of view in ft at 100 yd) | m (ft) | 15.35 (46.05) |
| Field of view in degrees (horizontal × vertical) | ° | 8.8 × 7 |
| Optical magnification | 1 | |
| Maximum image adjustment X to 100 m (Maximum image adjustment X to 100 yd) | cm (ft) | ± 88 (2.9) |
| Maximum image adjustment Y to 100 m (Maximum image adjustment Y to 100 yd) | cm (ft) | ± 53 (1.7) |
| Adjustment per click at 100 m (Adjustment per click at 100 yd) | cm (in) | 1.6 (0.576) |
| Sensor | ||
| Sensor resolution | px | 640 × 512 |
| Sensor pixel pitch | μm | 12 |
| Frame rate | Hz | 50 |
| NETD | mK | 25 |
| Display | ||
| Display resolution | px | 1,024 × 768 |
| Display type | AMOLED | |
| Electronics | ||
| Interfaces | USB: charging WLAN: data transfer | |
| Battery | Lithium-ion | |
| Battery life | h | 5 |
| External power supply (not included in the scope of supply) | 5V / 2A (USB) | |
| Connection with other devices | ZEISS Hunting app, WLAN | |
| Internal memory | GB | 32 |
| General | ||
| Protection type | IP65 / IP67 (protected from heavy rain) | |
| Operating temperature range | °C (°F) | -10 / +50 (+14 / +122) |
| Length × width × height | mm (in) | 182.1 × 60.5 × 65 (7.2 × 2.4 × 2.6) |
| Weight | g (oz) | 680 (24) |
| Subject to changes in design and scope of supply due to technical improvements. | ||
Overview

Power on/off
Press and hold the on/off button (3) (approx. 1.5 seconds) to switch on the device. Press and hold the on/off button (3) to switch off the device again.
Note: The on/off button (3) must be pressed until the OFF symbol appears on the display. Only then can the on/off button (3) be released and the device switches off. If the on/off button (3) is released before the OFF symbol is displayed, the device does not switch off but switches to standby mode.

Standby mode
Briefly press the on/off button (3) to switch the device to standby mode. Briefly press the on/ off button (3) again to switch the device back to observation mode.
To further conserve battery power and extend running time, the ZEISS DTC 4 offers Smart Standby with a built-in motion sensor. This automatically detects the position of the thermal imaging attachment and activates standby mode at 45° lateral inclination or 70° downward or upward inclination. As soon as the thermal imaging attachment returns to its normal position, the device automatically switches back to observation mode. You can deactivate this function in the menu under "Smart Standby".
Calibration
The device can be calibrated automatically (Auto Calibration = On) or manually (Auto Calibration = Off). This can be set in the main menu or via the right arrow button (4) in observation mode.
In automatic mode, the device automatically performs a calibration by closing and opening an internal shutter when necessary. A gentle click should be heard. In this mode, you also have the option of performing the calibration manually. Briefly press the right arrow button (4). The device activates the shutter and calibrates itself. The device is now calibrated again.
If automatic calibration is switched on, the device displays a circle two seconds before the shutter is calibrated. This indicates that a calibration will take place shortly.
To perform a manual, silent calibration, first switch to observation mode by pressing and holding the right arrow button (4) in manual mode. To calibrate, cover the lens and then briefly press the right arrow button(4).

Note: Always cover the lens when performing a manual calibration. Otherwise the sensor cannot calibrate correctly and the image will deteriorate, e.g. ghost images. If you forget to cover the lens during a manual calibration, repeat the calibration procedure with the lens covered.
Observation mode
Turn the focusing turret (2) to bring the scene into focus.
Color modes
The scene can be displayed in different color modes. Briefly press the menu button (5) to change the observation mode. When changed, the selected mode is shown on the display as text for about 2 seconds. You can activate or deactivate the desired modes under the system menu item "Color Modes". When changing with the menu button (5), only the active modes are changed. The following color modes are available:

- White Hot: Cold areas are displayed here in black and warm areas in white.
- Black Hot: Cold areas are displayed here in white and warm areas in black.
- Red Hot: Cold areas are displayed here in black and warm areas in white. In addition, the warmest areas are shown in yellow to red.
- Rainbow: A varied color palette displays cold areas in black to blue and warm areas in yellow to white.
- Green Hue: The image is displayed in green levels here. Cold areas are displayed in dark green and warm areas in light green.
- Red Hue: The image is displayed in red levels here. Cold areas are displayed in dark red and warm areas in light red.
- Dark Hue: Cold areas are displayed here in a sepia tone and warm areas in violet.
- Night Eye: This is a combination of White Hot and Black Hot. Cold areas are displayed here in black to dark brown and warm areas in sepia to light brown.
Shooting mode
You have the possibility to take photos and make videos.
To take a photo, press the left arrow button (4) once briefly; a photo symbol appears on the display. Press and hold the left arrow button (4) to record a video; a video symbol appears on the display. During a video recording, photos can also be taken by briefly pressing the left arrow button (4); to confirm, the video symbol briefly switches to the photo symbol. To end a video recording, press and hold the left arrow button (4).
Menu
Press and hold the menu button (5) to show the main menu on the display. The main menu gives you the following options:

- Brightness: Set the brightness of the display here. There are ten brightness levels to choose from. The brightness is lowest at level 1. The brightness is highest at level 10.
- Contrast: Adjust the contrast of the scene here. There are ten contrast levels to choose from. The contrast is lowest at level 1. The contrast is highest at level 10.
- Auto Calibration: Set manual (Auto Calibration = Off) or automatic calibration (Auto Calibration = On) here.
- Scene Mode: Choose from three different modes. Universal, Detect and Fog are available.
- WLAN: Activate (WLAN = On) or deactivate (WLAN = Off) WLAN. With WLAN turned on, the device can be connected to your smartphone and the app.
- Zeroing Profiles: Select the zeroing profile you created for the riflescope you are currently using.
- Smart Standby: Activate (Smart Standby = On) or deactivate (Smart Standby = Off) the automatic standby mode.
- Zoom Level: Here you can choose between the zoom levels 1× and 0.65×.
- System: Make all system-relevant settings here, including zeroing, language, time and factory reset.
The arrow buttons (4) and the menu button (5) are used to navigate in the main menu. Press the right arrow button (4) to scroll down. Press the left arrow button (4) to scroll up.
Briefly press the menu button (5) to select a menu item. This opens the submenu. Make your settings using the arrow buttons (4).
Briefly press the menu button (5) to confirm your selection and return to the main menu.
Press and hold the menu button (5) to exit the main menu and return to observation mode.
Scene Mode
To activate one of the three modes on your device, select "Scene Mode" in the main menu. Then select Universal, Detect or Fog. Briefly press the menu button (5) to confirm the selection.

- Universal: This is the standard mode for normal conditions.
- Detect: With this mode, warm objects are displayed much better than their surroundings.
- Fog: This mode enables better recognition of details in foggy environments or in high humidity.
Note: It is recommended to use fog mode only in the above-mentioned conditions and to disable this mode in normal conditions.
Zeroing Profiles
Up to four different zeroing profiles can be stored on your device. To change the profile, select "Zeroing Profiles" in the main menu. Select the desired profile and confirm the selection by briefly pressing the menu button (5).
Note: The BDC of the riflescope cannot be used at 0.65x magnification.
System
The "System" submenu has the following options:

- Factory Reset: Select "Factory Reset" to reset the device to the factory settings. This also deletes all settings saved on the device.
Note: If you perform a factory reset, all zeroing profiles and photos/videos will be deleted and the date and time reset. Only perform a factory reset if you want to delete all settings on the ZEISS DTC 4. - Reset Settings: Select "Reset Settings" to reset all settings to the default values for the device.
- Regulatory Information: Here you can find information about the licenses used and regulatory information.
- Licenses from Third-Party Providers: Reference to licenses from third-party providers
- Language Settings: Select a menu language here.
- Image Zeroing: Adjust the thermal imaging attachment to perfectly fit your riflescope here.
- Date / Time: Set the date and time of the device here.
- Pixel Correction: Remove defective pixels for a perfect field of view.
- Icon Mode: Select the number of icons to be shown on your display.
- Auto Off: Set the automatic switch-off function here. Possible setting levels are OFF, 0.5 h, 1 h, 2 h, 3 h, 4 h or 5 h.
- Color Modes: Activate or deactivate the desired color modes here.
- Icon Optimization: Determine the magnification at which the icons are displayed.
You can also view the following information:
- WLAN SSID: The name of the WLAN hotspot is displayed here.
- Password: The currently used WLAN password is displayed here.
- Firmware: The current firmware version is displayed here.
Image Zeroing
Select "System" in the main menu to set the selected zeroing profile. Navigate to "Image Zeroing" and start the zeroing procedure by briefly pressing the menu button (5). Setting the X axis: Press the left arrow button (4) for minus and the right arrow button (4) for plus. Each time you press the button, the image shifts by 1.6 cm at 100 m in the corresponding direction. Confirm the setting by briefly pressing the menu button (5). Now make the settings for the Y axis in the same way. Switch between the setting for the X and Y axis by briefly pressing the menu button (5).

To correct the impact point, move the image opposite to the direction to which you detected the deviation, i.e.:
- Shot placement too far to the left: Correction to the right
- Shot placement too far to the right: Correction to the left
- Shot placement too far to the bottom: Correction to the top
- Shot placement too far to the top: Correction to the bottom
To save the settings, press and hold the menu button (5). Press and hold the menu button (5) to go to the "Confirm reticle" menu. White crosshairs are displayed there. Now navigate the crosshairs so that they match the position of the reticle.
Confirm the prompt whether you would like to save or discard the calibration by briefly pressing the menu button (5).
To change an already saved zeroing profile, select "System" in the main menu. Then navigate to "Image Zeroing". Briefly press the menu button (5) to restart the zeroing procedure. Proceed as described above.
Note: The changes are always made to the currently selected profile.
Simplified Zeroing Mode
The ZEISS Hunting app offers you a zeroing assistant for zeroing in. Connect your DTC 4 to your smartphone via the ZEISS Hunting app and navigate to the "Zeroing Profiles" menu item. Enter the deviations in relation to the distance of the respective axis. The device then performs the calibration automatically. For more information, please contact ZEISS Hunting App.
Pixel Correction
If individual pixels fail, you can locate them here and fix the error.
Select "System" in the main menu to start the correction. Navigate to "Pixel Correction" and start the correction by briefly pressing the menu button (5). A crosshairs appear, which you use to capture the affected pixel. For more precise detection, the area around the crosshairs is displayed enlarged in an additional window. Setting the X axis: Press the left arrow button (4) for minus and the right arrow button (4) for plus. Every time you press the button, you move one pixel further. To jump several pixels further, press and hold the arrow button (4). Confirm the setting by briefly pressing the menu button (5). Now make the settings for the Y axis in the same way. Switch between the setting for the X and Y axis by briefly pressing the menu button (5).

To save the settings, press and hold the menu button (5). Confirm the prompt whether you would like to save or discard the calibration by briefly pressing the menu button (5).
Date / Time
Select "System" in the main menu to set the date and time.
Then navigate to "Date / Time". You can now set the day, month, year, hour and minute individually. The time format setting allows you to choose between 24-hour and 12-hour display.
Be sure to set the current date and time, as your photos and videos will be timestamped.

Icon Optimization
With icon optimization, you can determine the magnification at which the icons are displayed. To set the value, select "System" in the main menu and navigate to "Icon Optimization". Then choose between the following modes and confirm your selection by briefly pressing the menu button (5):
- Low
- Moderate
- High
Factory Reset
To perform a factory reset, select "System" in the main menu. Then navigate to "Factory Reset". Select "Yes" and confirm your selection. A second security prompt follows, which must also be confirmed with "Yes".
Note: If you perform a factory reset, all zeroing profiles will be deleted. Only perform a factory reset if you want to delete all settings on the ZEISS DTC 4.
Note: All photo and video files will be deleted.
Note: The device must be restarted for the reset of the settings to be completed successfully.
Icon Mode
With the ZEISS DTC 4, you have the option of having various icons shown on the display: battery icon, calibration mode, WLAN, scene mode symbols. To set the icon mode, select "System" in the main menu. Navigate to "Icon Mode". Then choose between the following modes and confirm your selection by briefly pressing the menu button (5):
- Non: No icons are displayed.
- Bat: Only the battery symbol with the current charge status is displayed.
- All: All icons are displayed.
Personal data when you dispose of or pass on your ZEISS device
Before passing on the device to a third party, please perform the factory reset to delete data and verify it has been deleted. By doing so, you help maintain your privacy and data security.
Cooperation on device safety
Please take an active role in protecting the IT security of your device by using the ZEISS Hunting app and installing new firmware updates as soon as they become available.
Firmware update
A firmware update can be carried out using the ZEISS Hunting App. Follow the instructions for this in the ZEISS Hunting App.
Note: If you initiate an update via the ZEISS Hunting app, you must confirm this again on the device for security reasons.
Note: Make sure that the device is fully charged before updating the firmware. Do not switch off the device during the update, otherwise it may be damaged.
LED status
Note: The LED is located under the cover for the USB charging socket.
Note: If the device is switched on and has more than 10% charge, the LED lights up green constantly.
| Charge state | LED color | LED status |
| Not charging (low charge level) | Red | Flashing |
| Charging | Red | Constant |
| Charging (fully charged) | Green | Constant |
ZEISS Hunting app
Install the ZEISS Hunting app on your smartphone and open the app. To connect to the thermal imaging attachment, activate WLAN on your thermal imaging attachment and follow the steps displayed in the app. The app enables you to make settings, use the ZEISS DTC 4 via remote control mode and use the simplified zeroing mode. A more detailed description can be found in the help function of the app.
Charging the device
Charge the device via the USB port (7) when the battery is empty. To do this, first open the rubber cover on the side of the device (9).
The battery charge level is shown in the upper left corner of the display. When the charge level is low, the display changes to red. When the device is being charged, the LED (8) lights up red when the device is switched on and off. When the battery is fully charged, the LED (8) lights up green.
Replacing the lens cap
To replace the protective lens cover (1), loosen the front part of the lens cover by turning it counterclockwise. Unscrew the lens cover completely. Then screw the new lens cover back on.
Replacing the USB cover
To replace the USB cover (9), unscrew the screws (13) using a screwdriver. Remove the retaining plate (14) and the defective USB cover (9). Insert the new USB cover (9) and the retaining plate (14). Tighten the screws (13) using a screwdriver.

Adapter
There are two ¼-inch standard threads (12) on the underside of the device. These offer you the option of attaching an adapter here, e.g. for a Picatinny rail.
Care and maintenance of the device
Please do not wipe coarse particles from the lenses (e.g. sand), rather blow them away or use a fine brush to remove them! Over time, fingerprints can corrode the lens surface. Breathing on the lens and polishing it with a clean optical cleansing cloth is the easiest method of cleaning the lens surface. Dry storage and keeping the outer lens surfaces well ventilated, especially in the tropics, helps to prevent a possible mold film forming on the optics. Your thermal imaging attachment requires no further special care.
Software updates
Within the scope of the statutory warranty (2 years from the transfer of risk of the goods – according to German law), we will provide appropriate updates to remedy defects. Generally, updates are used for security-related aspects or to eliminate functional impairments and do not include new functions of the software. Insofar as the provision of new functions is necessary to remedy security aspects, this shall not in principle constitute a claim to new functions as such.
After the legal warranty period has expired, we will of course endeavor to provide you with appropriate further updates. However, there is no entitlement to this.
Troubleshooting
| Fault | Possible reasons | Solution |
| Will not boot. | Battery is empty. | Charge the device. |
| The device is not charging. | External power supply is not sufficient. | Check if the external power supply is fine. |
| The USB cable is not properly connected to the device. | Unplug the USB cable and check that the connector and port are undamaged and free from dirt. | |
| The image is unclear. The image has streaks. The background is not uniform. | The device must be recalibrated. | Follow the instructions when performing the calibration procedure. |
| The image is blurred. | The contrast boost is activated despite normal conditions. | Deactivate the contrast boost. |
| The image is too dark. | The screen brightness is set too low. | Adjust the screen brightness. |
| The image on the display is flat. | The contrast is set too low. | Adjust the contrast. |
| Image quality is poor. The detection range is too short. | Poor weather conditions may have adverse effects (e.g. heavy snowfall, rain, fog, etc.). | |
Care and maintenance of the battery
Follow these steps to extend the battery life:
- Only store the device at temperatures ranging between 0 and 35°C.
- Avoid storing the device with a fully charged battery.
- Avoid complete discharging of the device.
Customer Service
For service questions or obtaining the warranty terms, please see our website: www.zeiss.com/cop/warranty

For service inquiry or a free copy of the warranty terms for your region, please contact:
ZEISS Customer Service
Zeiss Sports Optics GmbH
Gloelstr. 3-5, 35576 Wetzlar, Germany
Phone: +49 800 934 77 33
E-mail: consumerproducts@zeiss.com
www.zeiss.de/consumer-products/service.html
ZEISS Customer Service USA
Carl Zeiss SBE, LLC
Consumer Products
1050 Worldwide Blvd.
Hebron, KY 41048-8632, USA
Phone: 1-800-441-3005
E-mail: info.sportsoptics.us@zeiss.com
Manufacturer's address
Carl Zeiss AG
Carl-Zeiss-Straße 22
D-73447 Oberkochen
www.zeiss.com/nature and www.zeiss.com/hunting
Subject to changes in design and scope of supply due to technical improvements. No liability for mistakes and printing errors.
Data protection notice
Personal data is processed when using the thermal imaging attachment.
Our information on data protection and the processing of personal data can be found in our download center: www.zeiss.com/hunting/manuals
Documents / Resources
References
![www.zeiss.com]() COP Community
COP Community![www.zeiss.de]() ZEISS Service & Support | Maßgeschneiderter Support
ZEISS Service & Support | Maßgeschneiderter Support![www.zeiss.com]() ZEISS Nature Observation | Always on the lookout for something special
ZEISS Nature Observation | Always on the lookout for something special![www.zeiss.com]() ZEISS Hunting | Confidence in the toughest conditions
ZEISS Hunting | Confidence in the toughest conditions![www.zeiss.com]() ZEISS Hunting | Manuals
ZEISS Hunting | Manuals
Download manual
Here you can download full pdf version of manual, it may contain additional safety instructions, warranty information, FCC rules, etc.
Advertisement


Need help?
Do you have a question about the DTI 4/50 and is the answer not in the manual?
Questions and answers