Advertisement
Welcome to Cricut Cake™!
The Cricut Cake™ is the latest addition to the revolutionary Cricut® cutting system. This cartridge-based system does not require a personal computer and allows you to cut thousands of intricate and detailed characters as small as 1.5" (3.81 cm) and as large as 23.5" (59.69 cm) with just the touch of a button. Cricut Cake works with material up to 12" x 12" (30.48 cm x 30.48 cm) and 12" x 24" (30.48 cm x 60.96 cm), significantly expanding your creative capabilities. This impressive machine is also compatible with all of the existing Cricut cartridges. Creative Features built into every Cricut® cartridge allow you to add special effects to characters. There are literally thousands of custom combinations you can use to make each project uniquely your own.
Before activating your 30 days of free customer service, we recommend that you spend at least an hour getting acquainted with your Cricut Cake™ cutting system. The Cricut Cake™ User Manual has been prepared to help you become familiar with the Cricut Cake™ machine and answer most questions you may have. For the most up-todate information, FAQs, and tips, visit www.cricutcake.com.
Unpack Your Box
Your box should contain the following:

- Cricut Cake™ machine
- User Manual
- Blade assembly
- Cake Basics cartridge, cartridge binder, keypad overlay, and handbook
- 12" x 12" (30.48 cm x 30.48 cm) foodsafe cutting mat
- Quick Start Guide
- Power adapter
- Cleaning guide
- Cartridge plug
- Cartridge Skirt
- Blade cleaning basket
- Cleaning brush
- Keypad protector
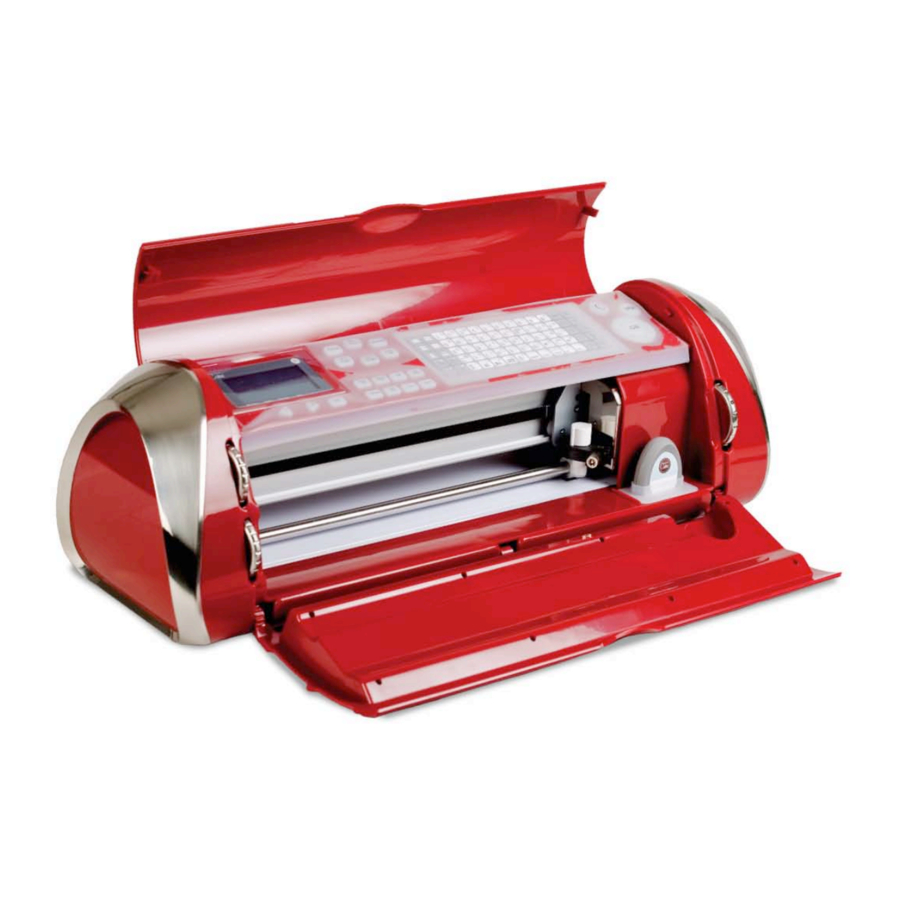
The Cricut Cake™ 24" Personal Electronic Cutter™
The illustration below will help you become familiar with your Cricut Cake™ machine. All the buttons, keys, and components shown will be described in more detail later on.


Disconnect electrical power before servicing or cleaning. DO NOT place your fingers or other objects in the Cricut Cake™ machine while connected to electrical power, powered on, or during cutting operations. Rapid movements of the cutting carriage during operation may cause bodily injury and/or damage to the Cricut Cake™ machine.
Installing the Cutting Blade Assembly
Please note that the Cricut Cake™ machine's cutting blade assembly is located in the bottom of your box, separate from the machine. Before you turn the machine on, you will need to insert the blade assembly. To do this, follow these simple instructions:
- Open the doors on the Cricut Cake machine and remove the cardboard inserts from either side of the carriage.

- Remove the cutting blade assembly from its bag. Place silicone gasket on blade assembly. Make sure that the cutting blade is inserted into the assembly with the sharp end pointing down.

- The blade assembly fits into the black cradle to the left of the carriage. Locate the silver screw and turn it counter-clockwise until it loosens enough that you can swing the screw to the right. Be careful not to loosen the screw too much, or it will fall out.

- Open the left arm of the black cradle and position the cutting blade assembly inside as shown. Align ribs with slots to properly fit in blade housing. Close the cradle, swing the screw back to the left, and tighten it by turning it clockwise. Plug the machine in and press theOn button to place the blade assembly in cutting position.


Positioning Your Cricut Cake™ Machine
Place your Cricut Cake™ machine at least 12" (30.48 cm) from the edge of your table to prevent it from tipping and causing possible injury.
Depending on the cutting mat used, allow 12" (30.48 cm) or 24" (60.96 cm) in the back of the Cricut Cake machine for mat movement.

When positioning your Cricut Cake machine, choose a location that is
- inaccessible to children. The Cricut Cake machine is not a toy and contains components, including a sharp blade, that could be hazardous to children.
- stable, flat, and hard-surfaced, within 6 feet (1.83 meters) of a grounded electrical outlet, and that has a minimum clearance of 2 feet (60.96 cm) behind the Cricut Cake machine for paper movement.
- indoors or in a dry location where the Cricut® cartridges are not directly exposed to the effects of the weather.
- away from direct exposure to sunlight or extreme temperatures such as in parked cars, storage sheds, sunrooms, etc.

Your Cricut Cake™ machine should never be left or stored outside, in unheated or un-air conditioned locations, or in environments where the machine or cartridges can come in contact with water.
What Your Cricut Cake™ Machine Can Cut
The Cricut Cake™ cutting system can cut a wide range of thin food materials, from gum paste to frosting sheets.
Basic Operations
Setup
Plug your Cricut Cake ™ machine into a grounded electrical outlet.

Place the keypad overlay on top of the machine's keypad.

Place keypad protector on top.

Insert a Cricut® cartridge with cartridge skirt into the cartridge slot located in the front of your Cricut Cake machine.

Turn it on by pressing the On button near the CUT button.

TIP: Make sure the title on the keypad is the same as the title on the cartridge.
Loading Material
TIP: The Cricut Cake machine can cut materials as large as 12" x 24" (30.48 cm x 60.96 cm). The machine cannot cut materials smaller than 3" x 3" (7.62 cm x 7.62 cm). Cricut Cake™ products are recommended for best results.

Place Material on Cutting Mat:
- Apply a generous amount of shortening to the mat.
- Align material with lower left corner of the cutting mat.
![]()
- Press and smooth from the center of the material to the edges of the cutting mat to remove all bubbles. Your material is ready to be cut. To use other sizes, see "Basic Keys and Buttons You Should Know".

Load Cutting Mat into Machine:
- Once the material has been placed on the mat, insert the mat into the machine with the arrow pointing toward the machine.

- Hold the cutting mat firmly between the roller bar and the deck and gently push the leading edge of the mat into the rollers. Then press the Load Mat key on the keypad overlay. The Cricut Cake machine will then load the mat and material. If the mat does not load, press the Unload Mat key and try again.


TIP: Depending on the cutting mat used, allow 12" (30.48 cm) or 24" (60.96 cm) in the back of the Cricut Cake machine for mat movement.
TIP: For best results, begin cutting about ½" (1.27 cm) from edges.
Choosing Your Characters
Select the character(s) you want to cut from the keypad overlay. Your selection will be displayed in the display screen.
TIP: Letters will be cut as single characters.
Basic Keys and Buttons You Should Know
 | If you want to stop the Cricut Cake™ machine from cutting before it is finished, simply press the STOP button located adjacent to the CUT button. This will suspend any operation in progress. |
 | Press the CUT button to begin cutting the character selections on the display screen. The Blade Navigation Buttons offer eight-way directional blade movement, moving the cutting blade to any location on the paper. |
 | The Shift key allows you to select the character in the upper right corner of a key. The Shift key will be backlit in green when active. TIP: To select a character from the upper right corner of a key, press the Shift key once (you do not need to hold it down) and make your selection. |
 | The Shift Lock key allows repeated selections of characters in the upper right corners of keys. The Shift Lock key will be backlit in green when active. |
 | The Space key functions just like the space bar on a computer or typewriter. It inserts one space after the last character entered every time the Space key is pressed. |
TIP: You probably won't need the Space key if you are cutting one word at a time. Use it when you specifically want negative space in your cuts.
 | The Back Space key functions just like the backspace key on a computer or typewriter. It deletes character(s), starting from the last one entered, every time it is pressed. |
 | The Clear Display key clears the contents of the Cricut Cake machine's display when pressed. |
 | The Reset All key clears the contents of the Cricut Cake machine's display and returns all settings to their defaults. No key should be backlit in green after you press Reset All. |
 | The Repeat Last key inserts the last selections that were cut onto the display. Once the character(s) appears on the screen, you can press CUT again or you can change any settings (features, dial size, speed, pressure, etc.) and then press CUT. |
 | The Sound On/Off key turns the chirp on or off. This key will not turn off any system warning beeps. |
TIP: If you turn the sound key off, that will become your default setting. The next time you turn the Cricut Cake machine on, the sound will still be off.
 | The Load Mat key pulls the cutting mat and material into the machine. |
 | The Unload Mat key ejects the cutting mat and material from the machine. |
 | The Set Cut Area key is used when you are using a material smaller than 12" x 12" (30.48 cm x 30.48 cm) or 12" x 24" (30.48 cm x 60.96 cm), depending on the mat size selected. Place the material on the cutting mat, aligning it in the lower left corner of the mat as indicated (even if cutting in the Portrait mode). Once the material has been placed on the mat, insert the mat arrow first into the machine, holding it firmly between the roller bar and the deck. Then press Load Mat. Move the cutting blade to the upper right corner of the material using the Blade Navigation Buttons, and then push the Set Cut Area key. The size of your material will appear on the display. You can now begin entering your project information. |
 | Use the Load Last key instead of the Load Mat key when you've temporarily unloaded the mat and you want the blade to start cutting at the point on the material where the previous cut ended. |
 | The Material Saver key automatically rearranges your selections to take up the least amount of space possible on your material. If you turn the Material Saver function on, that will become your default setting. The Material Saver key will be backlit when active. |
Cutting Characters
Size Dial:

Using the Size Dial, choose one of the size settings ranging from 1.5" (3.81 cm) to 23.5" (59.69 cm). This will determine the height of your finished cut. The selected size will be displayed on the display screen next to the keypad overlay. Although the full size range is available no matter the size of the cutting mat, be sure to select a size that will fit on the material you are using (a warning message will display on the display if your size is too large). The Cricut Cake machine includes four units of measurement: Inches—1/4ths, Inches—1/10ths, cm, and mm. Select the desired unit of measurement from the Settings menu.
TIP: All letters in a font set are cut in proportion to the Key Height Character. This is usually the tallest character in a set. Refer to the handbook of each font cartridge to determine the Key Height Character. For other character sizing, see "Advanced Operations".
Cutting Your Selections:

Press the CUT button.
The STOP button, located adjacent to the CUT button, will stop any operation in progress.
When the Cricut Cake machine is finished cutting, press the Unload Mat key on the keypad to eject the cutting mat and material from the machine.
TIP: For best results, begin cutting about ½" (1.27 cm) from edges.
Removing Your Characters from the Cutting Mat:

Gently remove images from the cutting mat. If it is difficult to remove the characters, use a spatula or the Cricut Cake™ Tools (sold separately) to carefully lift the images. Once all characters are removed, clean off any small scraps of material remaining on the cutting mat. This will improve cutting mat performance in the future.
Wash mat with warm soapy water.
Advanced Operations
Your Cricut Cake machine has a variety of advanced operations designed to enhance your creativity. We recommend you become familiar with basic operations before moving onto the advanced operations described in this section.
Creative Feature Keys

Creative Features are found within the six gray keys in the upper left corner of the keypad. Creative Features vary from cartridge to cartridge and provide a multitude of creative options. Refer to a Cricut cartridge's handbook for a full review of the Creative Features that are available on that particular cartridge.
When a feature key is selected, it will be backlit in green. A feature can be selected before or after a character(s) has been selected, but before the CUT button is pressed (unless using the Mix 'n Match mode). Once pressed, a feature key will remain lit until it is turned off in one of the following ways: the feature key is pressed a second time or theReset All key is pressed. The Mix 'n Match mode offers multiple Creative Features to be applied to different characters in the same cut.
TIP: Due to the sizes and shapes of characters, a feature may not work with all characters. Please refer to the handbook included with each cartridge for Creative Feature details.
Shadow Feature:
The Shadow feature is the most common Creative Feature offered on Cricut® font and shape cartridges. When selected, this feature creates a proportionately larger shadow image of every character that is selected. When the Shadow feature is active, the Shadow key will be backlit in green.
TIP: Using just the Shadow feature by itself creates a chunky version of the original font. TIP: When sizing a shadow to fit a character, use the same dial size that was selected on the base image or original character. Example: If you've cut a 2" (5.08 cm) letter A and you now want a shadow of it, keep the Size Dial set at 2".
Advanced Keys and Buttons
 | The Blade Navigation Buttons are the eight directional buttons marked with arrows and arranged around the CUT button. They allow you to move the cutting blade so you can easily position it exactly where you want to start a cut. When repositioning, the display tells you the cutting blade's location on the cutting mat. |
 | The Left and Right Arrow Buttons (the plus and minus arrows) below the display allow you to move between different selections on the display. |
 | The OK button next to the Left and Right Arrow Buttons confirms selections made on the display. It also will display any calculations pertaining to the Auto Fill, Quantity, Fit to Page, or Fit to Length modes. |
Modes on the Cricut Cake™ machine

 | The Portrait mode changes the cutting direction from Landscape mode, the default setting, to Portrait mode. Landscape cuts characters from top to bottom on the cutting mat (the right side of the cut comes out of the machine first). Portrait cuts characters from left to right on the cutting mat (the bottom side of the cut comes out of the machine first). |
 | The Portrait mode will start with the cutting blade in the top left corner instead of the top right corner in the Landscape mode. To cut in Portrait mode, you will need to press the Portrait button so that the display reads "Portrait mode" and the button is backlit in green. Press Load Mat to load the material and cutting mat, wait for the blade to move to the top left corner, and make your cutting selection. Press the Portrait button again to return to Landscape mode. You will need to load the paper and cutting mat again. |
 | The Mix 'n Match mode allows multiple Creative Features or the Flip function to be applied to only certain characters selected on the display. To use the Mix 'n Match mode, press the Mix 'n Match button so that the display reads "Mix 'n Match on" and the button is backlit in green. Make your cutting selection, selecting different Creative Features from the keypad overlay for each character if desired. Be sure to select the character first and then select the desired Creative Feature. Use the Left and Right Arrow Buttons below the display to select the different characters and alter features as needed. |
TIP: If you are using both the Mix 'n Match mode and the Quantity mode, the Left and Right Arrow Buttons will control the quantity of cuts. You will not be able to use the arrow buttons to select the different characters and alter the features.
 | The Quantity mode allows you to choose the number of cuts you want of those selected on the display. To use the Quantity mode, press the Quantity button until the button is backlit in green and the display reads "Quantity on" and offers instructions. Then use the plus and minus arrows (the Left and Right Arrow Buttons) to indicate the quantity of cuts desired. Then make your cutting selection and press CUT. The display will show a running total of how many cuts from the selected quantity have been cut. If the quantity selected exceeds the amount of available material, you can unload the mat and load more. The machine will keep track of the number of cuts made. |
Pressing the OK button once the quantity count has started will reset the cut tally back to zero, whether or not you've adjusted the quantity using the Left and Right Arrow Buttons.
 | The Fit to Page mode maximizes the size of the character on the page, overriding the size set with the Size Dial. To use the Fit to Page mode, press the Fit to Page button any time before pressing the CUT button. The mode will be on when the button is backlit in green. After pressing CUT, the display will preview the cut height and length before the machine begins to cut. |
TIP: To cut two proportionate characters (such as a base character and its shadow) using the Fit to Page mode, select the Fit to Page mode with the larger character (shadow) selected first. Press the OK button to see the calculated size of the character and press CUT. Note this size. Unload and remove that cut and load in your next cutting mat and material. Then turn off the Fit to Page mode and select the noted calculated size for the smaller (base) character. These two cuts (the shadow and the base) will now be in perfect proportion to each other.
TIP: After making your cutting selection, press the OK button to see the calculated size of the cut.
 | The Fit to Length mode allows you to set the size of the length of a designated cut. This mode is only available in the Landscape mode. This mode takes out the guesswork of setting the height of each cut with the Size Dial and hoping to make a cut a certain length. To use the Fit to Length mode, press the Fit to Length button so that the button is backlit in green. Then make your cut selection and determine the length using the Size Dial on the right side of the front of the machine. Press CUT and the display will preview the height before the machine begins to cut. The Fit to Length mode will apply to all cuts on the display screen. |
TIP: After making your cutting selection, press the OK button to see the calculated number of cuts that will fit on the page.
 | The Auto Fill mode fills the page with as many of the characters selected on the display as will fit on the page at the size selected. To use the Auto Fill mode, press the Auto Fill button so that the button is backlit in green. Then make your character(s) selection, set the Size Dial, and press CUT. |
TIP: After making your cutting selection, press the OK button to see the calculated height of the cut.
TIP: The Auto Fill mode will only allow up to 300 duplicates of the selected character(s). If you would like to cut more than 300, you can select two (or more) of the same character(s) and then press the Auto Fill button. This would increase the duplicates to 600 (or more).
TIP: Certain modes can be combined, such asPortrait, Mix 'n Match, and Quantity.
However, the size modes (Fit to Page, Fit to Length, and Auto Fill) cannot be combined. For example, if you select Fit to Page and then select Auto Fill, the Cricut Cake will automatically deselect Fit to Page and select Auto Fill.
Functions on the Cricut Cake™ machine

 | The Multi Cut function allows you to cut the cut lines of a selected character(s) two, three, or four times on top of the original cut lines. This allows the machine to cut thicker materials. To use the Multi Cut function, you must first determine the number of multi cuts in the Settings screen. Press the Settings button and advance through the settings options until you reach the Multi Cut menu. Use the plus and minus arrows to select 2, 3, or 4 and then press OK to select. Exit the Settings screen and then press the Multi Cut button until it is backlit in green. Then make your character selection(s), press CUT, and the machine will use your Multi Cut setting to cut the character(s). |
 | The Center Point function cuts a character(s) centered on a designated point. It is only available in the Landscape mode. To use the Center Point function, move the cutting blade using the Blade Navigation Buttons until the blade is over the center of the cut. Press the Center Point button until it is backlit in green. Then make your character selection(s), press CUT, and the machine will cut the character with the blade position you set as the center of the cut. |
TIP: Even with the Center Point function activated, a character will still cut proportionate to the Key Height Character unless Real Dial Size is selected. For example, a lowercase letter may not cut exactly centered over the center point because it is being cut proportionate to the Key Height Character. Press Real Dial Size for a centered cut.
 | The Line Return function allows you to create line breaks between cuts as if you were using the return or enter key on a computer keyboard. Select the first line of characters, press CUT, select more characters, press the Line Return button, and then press CUT again. |
 | The Flip function creates a flipped (or mirrored) image cut of characters. To use the Flip function, press the Flip button until it is backlit in green. Then make your character selection, press CUT, and the machine will cut a flipped version of the selection on the display. The Flip function can also be used with the Mix 'n Match mode. |
TIP: To turn off modes and functions, simply press the specific mode or function button again until the button is no longer backlit in green.
Settings

The Settings screen allows you to change the language, units of measurement, Multi Cut settings, mat size, and character image display. The Settings screen determines the machine's settings that will be the default each time the machine is used. To access the Settings screen, press the Settings button until it is backlit in green and the display shows the first Settings menu. There are five Settings menus:
- The language menu allows you to choose one of four languages (English, French, Spanish, or German) to be used for the instructions and information on the display screen.
- The units menu allows you to choose one of four units of measurement (Inches— 1/4ths, Inches—1/10ths, cm, or mm).
- The Multi Cut menu allows you to choose the numbers of cuts (2, 3, or 4) to be used for the Multi Cut mode.
- The default mat size menu allows you to choose the mat size (12" x 12" or 12" x 24") you will be cutting with.
- The character images menu allows you to choose to show previewed cuts on the display (Display) or to not show previewed cuts on the display (Don't Display). The Left and Right Arrow Buttons can be used to move through the different selections, and theOK button is used to make selections. Press the OK button to advance to the next menu and press the SETTINGS button to exit.
Mat Size
The Mat Size button is a quick way to set the mat size that you will be using with the Cricut Cake machine. Load the mat and then press the button to change to 12" by 12" or 12" by 24". The default mat size can also be changed on the Settings screen.
Xtra Buttons
The Xtra1 and Xtra2 buttons are placeholders for future functions for the Cricut Cake™ machine. See all the Cricut Cake updates at www.cricutcake.com.
Sizing
Characters in the Cricut cutting system are measured from the lowest possible point to the highest possible point. In font sets, and some shape sets, the character shown in red is the Key Height Character. This is usually the tallest character in any one set. All other characters will be sized in proportion to the Key Height Character, unless Real Dial Size is selected. In shape sets, some images are also cut in proportion to other shapes. See the cartridge handbook to get the details on specific cuts.
Real Dial Size
If Real Dial Size is selected, all characters will be sized according to the selected dial size, rather than cutting proportionate to the Key Height Character or the base shape.
TIP: Only one dial size can be selected for each cut, and that dial size will be applied to all characters on the display (even in the Mix 'n Match mode). For example, you cannot select an A at 1.5" (3.81 cm) and then immediately select a B at 2" (5.08 cm) in the same cut. We recommend you check the size appearing in the display prior to pressing the CUT button.
Cutting on Lightweight or Heavyweight Materials
Your Cricut Cake machine can cut a variety of materials. For an optimal cut, you may need to adjust the speed of the cut, and/or the cut pressure as discussed in the following sections.
Always unplug your Cricut Cake machine before removing the cutting blade assembly!
To remove the cutting blade assembly (Figure 1), locate the screw and turn it counterclockwise until it loosens enough that you can swing the screw to the right (Figure 2). Be careful not to loosen the screw too much, or it will fall out. Remove the cutting blade assembly from the machine.

TIP: If the Cricut Cake produces poor cutting results, always clean it first before trying other options.
Speed Dial:
The Speed Dial allows you to control the cutting speed for an optimal cut on a variety of materials. If you regularly cut on heavyweight materials, you may want to turn the dial up to increase the cutting speed. For lightweight materials or for smaller, more detailed cuts, you may want to turn the dial down to decrease the cutting speed. After each adjustment, we recommend that you test the setting with a scrap piece of material, readjusting as necessary until you achieve the desired results.
The display will indicate the speed level, ranging from one bar ("Min") to five bars ("Max"). As a general rule, decrease the cutting speed if your cuts are being torn. If this doesn't work, change the blade or adjust the pressure.
Pressure Dial:
The Pressure Dial allows you to control how hard the cutting mechanism presses against the material. For heavyweight materials, you may want to move the dial up to increase the cut pressure. For lightweight materials, you may want to turn the dial down to decrease the pressure. After each adjustment, we recommend that you test the setting with a scrap piece of material, readjusting as necessary until you achieve the desired results.
The display will indicate the pressure level, ranging from one bar ("Min") to five bars ("Max"). As a general rule, increase the pressure if your selections are not being cut completely through the material.
Basic Care
Blade Life
You can expect anywhere from 500 to 1500 single cuts from your cutting blade before it requires replacement. Your actual cutting blade life will vary, depending on the settings you use and the materials you cut. When the quality of your cuts decreases, it is probably time to replace your cutting blade. For best results, use only genuine Cricut Cake™ Replacement Cutting Blades, available at participating Cricut retailers.
Replacing the Cutting Blade
Always unplug your Cricut Cake™ machine before replacing the cutting blade.
To change the cutting blade, you must first remove the cutting blade assembly.
After removing the cutting blade assembly, gently pull the blade away from the magnet holding it in place (Figure 1).
To install the new blade, carefully insert the shaft of the blade into the hole in the bottom of the cutting blade assembly. The blade should be "sucked" up inside the shaft if properly installed (Figure 2). The replacement cutting blade is now installed. Reinstall the cutting blade assembly into the Cricut Cake machine by reversing the procedure to remove the cutting blade assembly.

Cutting blades are extremely sharp and should be handled with the utmost care. They are also potential choking hazards; they should be kept away from children.
Caring for the Cutting Mat
You can expect anywhere from 25–40 full mat cuts (expect even more when a cut is smaller than the full mat) from your Cricut Cake™ cutting mat before it requires replacement. Your actual cutting mat life will vary, depending on the settings you use and the materials you cut. Use only genuine Cricut Cake™ replacement cutting mats, available at retailers everywhere.
TIP: To extend the overall life of each mat, use several mats, rotating them often, and keep them clean.
Cleaning Your Cricut Cake™ Machine
Always unplug your Cricut Cake™ machine before cleaning!
Before First Use
Wipe down all food contact surfaces before using for the first time. Clean blade and mat with mild soap and warm water. Be sure to dry all surfaces before using your machine.
Cleaning Machine
Use the provided cleaning brush to lightly brush off any dried food from the machine. To clean off rollers, hold brush against one roller and push theLoad Mat key. Hold the brush against the other roller and press the Unload Mat key. Brush out any excess crumbs.
Unplug machine before further cleaning.
Wipe down your machine with a soft, lightly damp cloth. Do not use a dripping cloth. Water can damage electrical parts.
Remove cartridge and cartridge skirt. Cartridge skirt can be washed with mild soap and warm water. DO NOT GET YOUR CARTRIDGE WET. The exterior of the cartridge can be wiped down with a lightly damp cloth, but do not wipe inside. This can damage the cartridge. Place cartridge plug in cartridge slot for storage. Be careful to keep food particles and water away from the cartridge slot.
Keypad protector can also be removed and washed with warm water and mild soap. Make sure to dry completely before placing on Cricut Cake machine.
Wash the mat in warm, soapy water. Dry completely before storing.
To clean blade and housing: Remove blade housing from machine. Grasp blade with two fingers and pull. Be careful of sharp edge. Squeeze the handle of the blade cleaning basket to open. Place blade inside the basket and release the handle to close it. The blade and basket can be placed in the dishwasher on the top rack or washed by hand. Remove the silicone gasket from the blade housing and wash with mild soap and warm water. Dry completely. Wipe off housing with a lightly damp cloth. DO NOT SUBMERGE blade housing in water. This will cause damage. Once clean, replace silicone gasket and carefully reinsert blade.
Additional Basic Care Tips:
- Keep away from liquids
- Keep in dry, dust-free location
- Avoid excessive heat or cold
- Do not leave in car, where excessive heat may melt or damage plastic components
- Do not expose to direct sunlight for any extended period of time
Frequently Asked Questions
TIP: For our complete list of frequently asked questions, plus the latest updates to the User Manual, visit www.cricutcake.com.
Q: Do I have to hold down the Shift key to use it?
A: No. Just press it once and it will be backlit in green, indicating it is in use.
Q: Are the Creative Feature keys the same for each cartridge?
A: Only the Shadow feature is found on most sets. The other five Creative Features are handpicked by the artist and will vary.
How long will the blade last?
A: Anywhere from 500 to 1500 single cuts, depending on what kind of materials you are cutting. Replacement blades are inexpensive and easy to change. Refer to the "Replacing the Cutting Blade" section in this manual.
How long will a cutting mat last?
![]() A: Each mat will last anywhere from 25–40 full mat cuts, depending on the size of cuts and what kind of materials you are cutting. We recommend that you use several mats, rotating them often. This will extend the overall life of each mat.
A: Each mat will last anywhere from 25–40 full mat cuts, depending on the size of cuts and what kind of materials you are cutting. We recommend that you use several mats, rotating them often. This will extend the overall life of each mat.
Q: Can I use a smaller material size than the size of the cutting mat?
A: Absolutely! Just align a corner of the material with the bottom left corner of the mat, even in the Portrait mode. Once the mat is loaded, use the Blade Navigation Buttons to move the cutting blade down to the upper right corner of the new material. Then press the Set Cut Area key on the keypad overlay to let the machine know where to start cutting on the new size of material.
Q: Do I have to finish cutting a full page before unloading the cutting mat?
A: No. You can unload the material and remove just the pieces you need. You can then reload the material at a later time and navigate the cutting blade to any open area to resume cutting. If you immediately use the same material for a new cut, press the Load Last key instead of the Load Mat key. The Load Last key will automatically return the cutting blade to the place where it stopped cutting.
How does the Material Saver mode work?
A: The Material Saver mode will "pack in" any selected cuts to optimize the space needed.
What does Real Dial Size do?
A: By default, your Cricut Cake™ machine will cut characters in proportion to each other. However, if you want to "break" this proportion and get any character to cut at the literal dial size, press the Real Dial Size key. For instance, with the Size Dial set at 2", a lowercase a will actually cut out approximately 1" (2.54 cm) to fit proportionately with any other cut letter. With Real Dial Size selected, that same a would cut at a full 2"(5.08 cm).
How is the cut of a character measured?
A: Each character cut is measured from the lowest possible point to the highest possible point.
Troubleshooting
TIP: For our complete list of frequently asked questions, plus the latest updates to the User Manual, visit www.cricutcake.com.
Problem: The cutting mat won't load when I push the Load Mat key.
Solution: Try pushing the cutting mat slightly into the roller bar as you press the Load Mat key.
Problem: The cutting mat didn't load when I pushed the Load Mat key. And now, when I try to push it again, it doesn't do anything.
Solution: You need to press Unload Mat first. Your Cricut Cake™ machine "thought" that it loaded the mat, even if it didn't pull it in. The machine needs to be given the command to unload before another load attempt is made. Pressing the Unload Mat key will reset the roller bar, allowing for another load attempt.
Problem: The blade is not cutting all the way through the material.
Possible Solution 1: Increase the cut pressure. Do this with the Pressure Dial found on the left side of the front of the Cricut Cake machine.
Possible Solution 2: The cutting blade may dulled by use and need replacement. Refer to the "Replacing the Cutting Blade" section.
Problem: The material lifts off the mat as the Cricut Cake machine is cutting.
Possible Solution 1: Make sure you press the material firmly onto the cutting mat when setting up the cut.
Possible Solution 2: Try using more shortening on the mat.
Problem: I can't get characters to cut out with the Creative Feature selected.
Solution: Some characters don't work with all of the Creative Features available on a font or shape cartridge. Refer to the Icon Gallery in the cartridge handbook to see which features work with which characters.
Problem: I've placed a smaller size of material on the mat and navigated to the upper right corner of the cutting mat, but when I cut characters, the blade returns and starts cutting back at the top of the cutting mat.
Solution: After you've navigated to the upper right corner using the Blade Navigation Buttons, and prior to pressing CUT, you need to press the Set Cut Area key. This will tell the Cricut Cake™ machine that you have selected a smaller paper size. Otherwise, the machine "thinks" that a full sheet of material (either 12" x 12" [30.48 cm x 30.48 cm] or 12" x 24" [30.48 cm x 60.96 cm], depending on the cutting mat) is loaded.
Documents / Resources
References

Download manual
Here you can download full pdf version of manual, it may contain additional safety instructions, warranty information, FCC rules, etc.
Advertisement


Need help?
Do you have a question about the Cake and is the answer not in the manual?
Questions and answers