Advertisement
- 1 Welcome and Introduction
- 2 Setup for Installation
- 3 Installation
- 4 Connecting Cricut Machine and Computer
- 5 Launching the Cricut DesignStudio
- 6 Software Activation
- 7 Updating
- 8 Uninstalling
- 9 Getting Started
- 10 User Interface
- 11 Tips and Tricks
- 12 Customer Support, Troubleshooting, and FAQ
- 13 Conclusion
- 14 Documents / Resources
Welcome and Introduction
We here at Provo Craft offer a great, heart-felt thank you for purchasing the Cricut DesignStudio™ software! Congratulations! The program you now own will help you enhance your Cricut creativity. Enjoy!
What is the Cricut DesignStudio?
The Cricut DesignStudio is many things. It's a streamlined virtual workbench, a digital content walk-in closet, a mad-scientist laboratory of image creation, a shimmering portal to the worldwide Cricut brain-share, and even a glowing crystal ball from which the future of your Cricut adventures can be divined.
With the Cricut DesignStudio software, you can create digital layouts of any and all desired images from the Cricut DesignStudio Library before you cut them. What You See Is What You Cut! You can weld images together to make new combinations or letters together to make words and phrases. You can change image properties, rotate, flip, shear, duplicate, or multi cut to your heart's content. You can preview cartridge sets you don't have yet. You can more easily explore the cartridge sets you do have in various modes of organization. You can use keyword descriptors to quickly locate just the right image. You can save your progress on the layouts you're creating, and reload them to pick up where you left off. The Cricut DesignStudio is a powerful tool to help you explore, design, and cut your way to the perfect project, the way you want it.
Setup for Installation
You can use the Cricut DesignStudio software with the Cricut™ Personal Electronic Cutter™ or the Cricut Expression™ 24" Personal Electronic Cutter™.

Install the Cricut DesignStudio BEFORE connecting your Cricut to your computer. This ensures the proper drivers are installed.
Installation
Be sure to close all applications before beginning the installation or setup.
- Insert the Cricut DesignStudio CD into the disk drive.
- When the Setup Wizard appears, follow the instructions. The Setup Wizard will present the End User License Agreement, then have you choose an installation location. The default location it will show should work just fine. After choosing the installation location, the program will perform the install and let you know when it's done. Just click on "Finish" to complete the installation.


Note: If the Setup Wizard does not start automatically, you can start it manually by exploring the contents on the disk and double-clicking on the "CDSInstaller.exe" file.

End User License Agreement
Please read the End User License Agreement as it applies to you in regards to your use of the Cricut DesignStudio software. We promise it isn't a very exciting read, but a small part of you deep down inside will glow warmly at having participated in the act of being a responsible consumer. Also, you can't continue the installation process until you agree to the stipulations the license puts forth.

.NET 2.0 Installation (if needed)
If at any time during the install or launch process you get a message referring to the need for. NET 2.0 to be installed before proceeding it means that your current Windows setup does not have this framework onboard. We included the install file for this on the Cricut DesignStudio CD. You can access the contents of the CD from a Windows Explorer window and double click the dotnetfx.exe file. Once completed, continue launching and running the software.
Connecting Cricut Machine and Computer
Make sure you have installed the Cricut DesignStudio BEFORE connecting your Cricut machine to your computer. This ensures the proper drivers are installed.
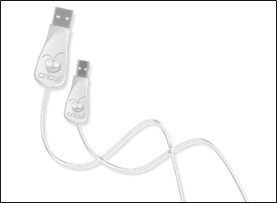
Locate the USB cable that came with your Cricut DesignStudio Bonus Pack. Then locate the USB port on the back of your Cricut machine, next to the A/C adapter port. Notice its unique shape and plug in the corresponding end of the Cricut USB cable. Finish the connection by plugging in the standard end of the Cricut USB cable to an open USB port on your computer. Make sure that you plug the USB cable into both the computer and the Cricut before turning the Cricut machine on. Your computer should automatically sense and install the drivers required to run the Cricut system once it is turned on the first time. This may take a minute or two. You will see Windows popup balloons indicating the status until complete.
Launching the Cricut DesignStudio
Start the Cricut DesignStudio software by double-clicking the icon that was placed on your desktop during installation OR via the Start / All Programs / Cricut DesignStudio link.
Software Activation
When you launch the Cricut DesignStudio software for the first time, you will be asked to authenticate your software product to gain access to the full range of features. Until activated the software can only run in a "trial" mode where your cutting options are limited to the following: While operating on the Cricut V1, you can only cut from the George and Basic Shapes cartridge. While operating on the Cricut Expression, you can only cut from the Plantin SchoolBook and Accent Essentials cartridges. Verifying legitimate software ownership helps us protect your investment and promotes a brighter Cricut future for all of us.

The easiest way to activate your software is by choosing the "Activate using the Internet" option during this stage of the installation process. If you find yourself without Internet access at the time of installation, you can also activate your software by phone by clicking the tab to the immediate right of the "Activate using the Internet" tab. As the phone method is a bit more complicated than the online method, please pay close attention to the instructions provided during the process. You can take comfort in the fact that software activation only happens once per install.

Updating
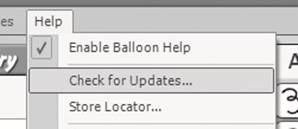
Periodically, Provo Craft will release updates to the Cricut DesignStudio. Also, as Provo Craft releases new content, updating will automatically add this new content to your Cricut DesignStudio cartridge library so you can preview it, design with it, and love it. If you want to see the newest stuff, update often! To update, use the Check for Updates options in the Help menu, or check the Cricut Support webpage on Cricut.com. An active Internet connection is required for this option.
Updating the Cricut Firmware
Before you cut for the first time from the Cricut DesignStudio, you will be required to update the Cricut firmware on the machine itself. Do this by selecting "Update Cricut Firmware" under the Help menu. Be sure your Cricut machine is connected to your computer before performing the update. After selecting the Update Cricut Firmware option, follow the instructions that come up. This updating process can take around 5 to 10 minutes to complete.
Uninstalling
If you ever have the need to uninstall the Cricut DesignStudio software, follow these steps:
- Go to "Start," select "Control Panels" and then "Add or Remove Programs."
- Select Cricut DesignStudio from the list, then click "Remove."
- Choose "Uninstall" and follow the instructions. All done.
or
- Go to "Start", then "All Programs", then "Cricut DesignStudio".
- Choose "Uninstall" from the menu. This will start the Uninstall Wizard.
Getting Started
Enough chatter about the Cricut DesignStudio software, let's take a good look at it! Feel free to open up the program and follow along. Your success and enjoyment using this program will be greatly enhanced if you are familiar with the all the nooks and crannies. If this is your first time operating the Cricut DesignStudio software, we recommend actively following along with the descriptions and experimenting with the functions as you go.
User Interface

Let's take a look at the features and functions of the Cricut DesignStudio software. The following is a list of the functional elements you'll find in the program along with a brief description of what each function does.
Cricut Cartridge Library
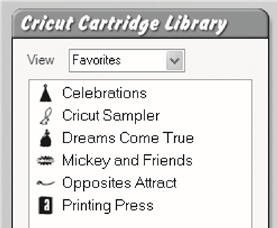
In this window, you'll be able to browse through all available Cricut content, and access any cartridge sets you own. This feature allows you to preview whatever you like, but remember that you can cut only the content you have purchased.
View
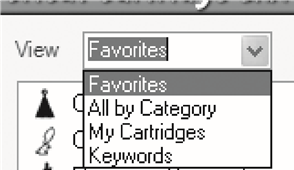
Use the View drop-down menu to choose how you organize your content for browsing. Your content can be organized in the following ways:
Favorites
Any cartridge you flag as a favorite appears in this category.
All by Category
Cricut content can be organized by general category type. These are Font sets, Image (Shape) sets, Educational sets, and Seasonal sets.
My Cartridges
Any cartridge you flag as your own appears in this category.
Keywords
Cricut content can be organized by character type, and browsed one by one.
Key 1 and Key 2
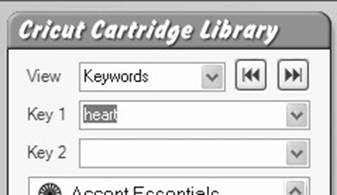
Enter search criteria in these fields to look for specific image types. For example, dog, star, tag, etc.
Show Key Shape Buttons
Use these arrow buttons to view the "previous" or "next" character in the keyword search results.
Cartridge List Window
Content will be listed in this window according to the chosen view method. Double-click on the content name to select it.
Virtual Keypad Overlay

As you select content from the Cricut Cartridge Library, the keypad overlay will update itself to represent the content you have chosen. Use these buttons just as you would on the Cricut machine to input the images you want to work with or cut. Click on an image button with the pointer to select that image and add it to the on-screen cutting mat.
Creative Feature Keys
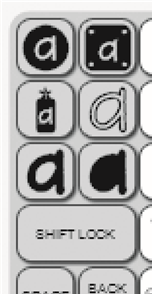
On the left side of the overlay are six gray keys for creative feature selection. Each of these keys has a symbol that summarizes the theme of a particular creative feature. Click on these keys to switch to the creative feature of your choice. Click on the button again to de-activate the creative feature and return the keypad overlay to the base images. You can also select creative features from the Features Menu.
SHIFT LOCK
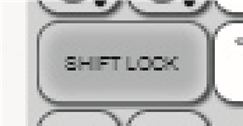
After clicking on the SHIFT LOCK key, any image selected will be a shifted image. Click on the SHIFT LOCK key again to switch back to non-shift images. All shifting must be done with this key. The Shift key on your computer's keyboard will not work in its place.
SPACE
Just like with the Cricut machine, clicking the SPACE key will add a space after the image currently selected.
BACK SPACE
Clicking the BACK SPACE key will remove the image or space currently selected.
Paper Saver

Select the Paper Saver mode by clicking the box. Paper Saver mode realigns images to conserve as much paper space as possible.
Real Size
Select Real Size mode by clicking the box. Real Size mode, like Real Dial Size on your Cricut machine, disregards a character's proportionate size and causes images to be shown and cut at the actual size you have chosen.

Default Size
Use the Default Size slider to choose the size of the next selected character. This size only refers to character height or how tall a character is. Use the mouse pointer and then click and hold on the slider bar to grab the slider arrow. Move it right to increase size and left to decrease it. You can also click on the "plus" or "minus" symbols to do the same. Tip: For quick size changing, click near the ends of the size slider to jump up or down in larger increments.

Shape Properties

This window contains options for modifying image properties, such as position on the mat, character dimension, and others. Simply enter in the desired data and press your keyboard Enter key.
The controls in this window are just one way of manipulating shape properties. You can also change shape properties directly with selection handles.
X-Axis
This option determines where a character or selection sits on the horizontal X-axis of the mat, or how far left or right the image is.

Y-Axis
This option determines where an image or selection sits on the vertical Y-axis of the mat, or how far up or down the image is.
Width
This option alters the width of an image or selection.

Height
This option alters the height of an image or selection.

Rotate
Measured in circular degrees, this option alters the image angle and can be used to rotate an image or selection to a specific degree.
Slant
This option alters the slant of the image or selection by slanting (skewing) it right or left.

Welding
This powerful option allows for the seamless combination of unassociated images into welded groups. Welding causes multiple images, which have been moved close enough together to overlap, to become one image. It does this by joining images together wherever an overlap occurs. With this tool, individual letters can easily be welded into words and phrases. Check the Welding box when choosing images you want to weld.
There are two ways to position images for welding. You can use kerning and nudging to bring images together within a selection (typing a word, then nudging each letter closer together in that word) or you can use the selection handles to drag and drop separate image groups together (putting two or three separate words next to each other).
Tip: When welding multiple images, apply a negative kerning number (see Kerning below) to bring your selected images close enough to overlap.

Flip Shapes
Check the Flip Shapes box to face each image or selection in the opposite direction, effectively reversing image orientation.

Kerning
This option alters the space between characters as they are placed on the mat. A negative number shrinks the margin while a positive number enlarges it.
Tip: Kerning can also help you fit a few extra characters on the mat when working at a small character size.

Apply
To activate the Kerning amount you've entered click the Apply button. Note: The Apply button is specifically for the Kerning window, not for all of the other areas within the Shape Properties box. To set those areas just press the Enter key on your keyboard.
Nudge Arrows
Using the Nudge Arrows makes for easy adjustment of character placement. Clicking on the Nudge Arrows causes a slight kerning shift and moves any character or selection right or left a small distance.
Tip: If you only need to move your image over a small distance, using the Nudge Arrows takes the guesswork out of trying to find the right Kerning setting.
Turn 90 Degrees
Clicking the 90 button will rotate an image or selection counter-clockwise 90 degrees.
Click twice to rotate 180 degrees.
Tip: Use this feature in conjunction with the Rotate option to more quickly find the perfect rotation angle.
Revert
Click the Revert button to reset all the options in the Shape Properties menu. This sets the X, Y, Width, Height, Rotate, Slant, and Turn 90 fields back to the original settings.
Buttons
Down the left side of the Cricut DesignStudio user interface you'll see a series of buttons. These buttons perform some of the most useful functions and are placed close to the on-screen cutting mat for your convenience.
New Page
Clicking the New Page button will create a new on-screen cutting mat on which you can continue your current project, or begin a new one.
Note: Multiple mat pages stack on top of each other and are tabbed for easy navigation.
Copy Shapes
Want to repeat the last image selection you adjusted without having to redo all the changes by hand? Click the Copy Shapes button to copy any image selection. This is especially useful when you want to repeat an image arrangement you have spent time creating. The Copy Shapes function is identical to the Copy command in the Edit menu. Note: When copying images, only the most recent copy selection can be pasted.
Paste Shapes
Clicking the Paste Shapes button will paste any image selection you just copied into the mat area you have chosen. Use the cursor to determine mat placement when pasting.
The Paste Shapes function is identical to the Paste command in the Edit menu.
Tip: You can continue to paste the most recent copy selection. This is one way to make mass production easier.
Delete Shapes
Clicking the Delete Shapes button will remove any selected characters from the mat. The Delete Shapes function is identical to the Delete Shapes command in the Edit menu.
Tip: You can undo an accidental deletion. (Whew!)
Preview

Clicking the Preview button will bring up a temporary preview outline that shows you what your selected characters will look like once they're cut. Preview displays all shape property changes you have applied such as welds, flips, and rotations. Using the Preview function is a great way to survey your arranged characters and determine if any final changes need to be made before cutting. The Preview function is identical to the Preview command in the View menu. Tip: When using the Preview, the joined cutting lines of welded shapes will be bolded and any non-welded shapes will be shaded.
Cut With Cricut

Clicking the Cut With Cricut button sends all the images on your current mat page to the Cricut machine and begins the cutting process. Be sure to have the right paper loaded into the Cricut before clicking this button. The Cut With Cricut function is identical to the Cut With Cricut command in the File menu.
Fit to Page

Clicking the Fit to Page button will reset the mat zoom level so that the entire mat can be seen. This is a great way to survey everything you've selected and how it's all arranged.
100% View

Clicking the 100% button will reset the mat zoom level so that you will see your selected characters at 100% of their natural size. This is great way to compare characters to each other.
200% View

Clicking on the 200% button will reset the mat zoom level so that you will see your selected characters at 200% of their natural size. This is a great way to take a closer look at character details.
Tip: To view an individual character without the handles, select the character and then hold down Alt. This will temporarily remove the handles to give you a clearer view.
Pages
Pages in the Cricut DesignStudio are essentially virtual cutting mats. Multiple pages can be saved as one project.
Tip: Naming each individual page in a multi-page project makes it easier to navigate to any desired page. To change the name of the currently selected page, right-click anywhere on the mat to bring up page options. See Page Options below.

On-Screen Virtual Cutting Mat
In the Cricut DesignStudio software, the mat page is your workspace. The on-screen cutting mat, in its three sizes (6" x 12", 12" x 12", 12" x 24"), is identical to the real Cricut cutting mat. One of the powerful benefits of using the Cricut DesignStudio software is being able to see all your character selections laid out on the mat all at once, and having the ability to adjust and alter character properties before actually cutting anything. With the onscreen cutting mat, What You See Is What You Cut!
Page Options
You can use Page Options to customize the way you access and organize your layouts and projects. To bring up page options, right-click anywhere on the mat.

Change Page Name
Use this field to enter in a name for your currently selected page, then hit the Enter key or click on Change Page Name to make it stick.
Show Cartridge
This feature is tailored for those of us without photographic memories. Which set did that cute little letter come from? Can't remember? No worries. Just select the image in question, choose Show Cartridge, and the Cartridge Library and Virtual Overlay will show you exactly where that beauty lives, cartridge name and feature. Look for the highlighted key.
Page Order
They're your pages, put them in any order you want. You can bring the currently selected page to the front, send it to the back, jump it one page forward, or send it back one jump. The page tabs show which page is where.

Include Page in Preview
Use this feature to decide which of your pages you want to be affected by the Preview function. It might not be necessary to apply a preview to all your pages when all you want to see is the change you just made on one page. Any page that has this feature checked will be included in previews.
Set Preview Color
Selecting Set Preview Color will bring up a color palette window. In this window you can choose the color your previewed images will take on when applying the Preview feature.
If you don't like the colors offered, you can create your own custom color to be applied. Choose something nice on the eyes.

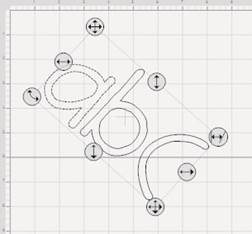
Handles

As you select images on the on-screen virtual cutting mat, you will see your selections in a box with eight handles, one on every side and one at every corner. Each of these handles performs a unique function. Getting well acquainted with these handles will transform you into an image-tweaking expert! To use these selection handles, just click and drag.
 | Free Move The handle on the top-left corner of the selection box is used to move your selection anywhere on the on-screen mat. |
 | Vertical Move The handle in the top-middle of the selection box is used to move your selection up or down on the on-screen mat. While using this handle, there is no horizontal movement. |
 | Slant The handle in the top-right corner of the selection box is used to slant (skew) your selection to the right or left. |
 | Horizontal Move The handle in the middle-left of the selection box is used to move your selection right or left on the virtual mat. While using this handle, there is no vertical movement. |
 | Horizontal Stretch The handle in the middle-right of the selection box is used to stretch your selection horizontally. |
 | Rotate The handle on the bottom-left corner of the selection box is used to rotate your selection to any desired angle. |
 | Vertical Stretch The handle in the bottom-middle of the selection box is used to stretch your selection vertically. |
 | Scale The handle on the bottom-right corner of the selection box is used to scale your selection to any desired size. While scaling, image proportions remain the same. |
The handle on the bottom-right corner of the selection box is used to scale your selection to any desired size. While scaling, image proportions remain the same.
Shortcut Keys
There are a few keystrokes available to you that can enhance your designing experience.
Arrow Keys: Moves the cursor or selected shape group around the on-screen cutting mat. Use this while pressing the CTRL key down and each move goes from 1/8" to 1/32".
Shift Key and the Up/Down Arrow Keys: Adjusts the default size.
Enter Key: As you are typing in characters, you can hit the Enter key to close the current shape group and start another.
File Menu

The File menu options are as follows:
New
Use New to open a new project.
Open
Use Open to open any saved project.
Close
Use Close to close any open project.
Note; Simply closing a project does not save it.
Save
Use Save to save any progress, updates, or adjustments you have made to your project. The first time you save your project, you will be asked to name your project file and choose where you're going to save it on your computer. Remember to save your work often. The shortcut key for Save is Ctrl+S.
Note: Using Save overwrites your original project with the current, modified project. If you don't want to lose the project in its original state, use Save As instead of Save and give the modified project a different file name.
Save As
Use Save As whenever you want to choose the file name for your project and the location you want to save it in.
Cut With Cricut
This option is identical to the Cut With Cricut button. All the images on the selected mat page will be sent to the Cricut machine and the cutting process will begin.
Exit
Use Exit to close the Cricut DesignStudio program.
Note: Exiting the program does not save your work. Remember to save before exiting.
Edit Menu

The Edit menu options are as follows:
Undo
Use Undo to undo the most recent series of actions taken. You can step back up to 20 times. This little saving grace steps you back to the moment before you ruined all your hard work with that accidental deletion. A good time to use Undo is any time you don't like the change you just made. The shortcut key for Undo is Ctrl+Z.
Redo
Use Redo to re-implement the last action that was undone. Basically, it's an undo for Undo. The shortcut key for Redo is Ctrl+Y.
Tip: Toggling back and forth between Undo and Redo is a great way to compare the effects of your changes.
Copy
Use Copy to copy any image selection. This option is identical to the Copy Shapes button. The shortcut key for Copy is Ctrl+C.
Paste
Use Paste to paste in any copied image selection. This option is identical to the Paste Shapes button. The shortcut key for Paste is Ctrl+V.
Delete Shapes
Use Delete Shapes to delete any selected images. This option is identical to the Delete Shapes button. The shortcut key for Delete Shapes is Delete.
Delete All
Use Delete All to delete every image on the selected page. There is no shortcut key for Delete All.
Revert All
Use Revert All to return all your images back to their original state. There is no shortcut key for Revert All.
View Menu

The View menu options are as follows:
New Page
Use New Page to add a new page to your current project. There is no shortcut key for New Page.
Delete Page
Use Delete Page to remove the currently selected page from your project. The shortcut key for Delete Page is Ctrl+D.
Preview
Use Preview to see what all the images on the mat will look like when cut. This option is handy when seeing how well your welding is coming along. It's also identical to the Preview button. The shortcut key for Preview is Ctrl+A.
Clear Preview
Use Clear Preview to return to working mode. The shortcut key for Clear Preview is Ctrl+L

Keep Preview as Mat Background
Use Keep Preview as Mat Background to create a watermark, or template, from your current images to use as a background for the next page of images you arrange. Basically, the images youarranged on the first page can become the guide for arranging images on the next page. This can be helpful when you're working with image layers and shadows, and especially helpful when you're cutting for negative space rather than positive space (wanting the page that the letters were cut out of rather than the letters themselves).
Show Ruler
Use Show Ruler to bring up the ruler guide on the virtual cutting mat. The ruler guide displays one-inch increments and quarter-inch marks.
Tip: You can see the quarter-inch markings best in 200% view mode.
Mat Size
Use Mat Size to change the size of the virtual mat into the same size as the real mat you're cutting on. The three cutting mat sizes are 6" x 12", 12" x 12", and 12" x 24".
Mat View
Use Mat View to change the mat zoom level. This option is identical to the Fit to Page, 100%, and 200% button.
Features Menu
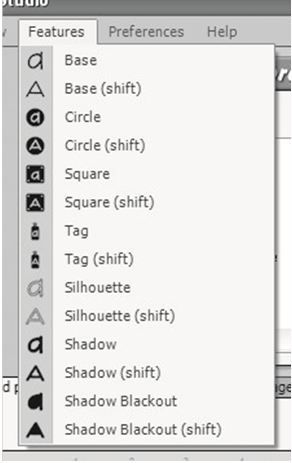
The Features menu lists all the creative features available in the current cartridge set and changes according to which cartridge set you have selected. It also allows you to select the creative feature of your choice. This option is identical to using the creative feature keys on the virtual keypad overlay.
Preferences Menu

The Preferences menu options are as follows:
My Cartridge
Use My Cartridge to flag (or mark) the sets you currently own. To do so, select (doubleclick) a cartridge set you own from the Cricut Cartridge Library list. Once selected, choose the My Cartridge option in the Preferences menu. Doing this adds the flagged content to your My Cartridges list in the Cricut Cartridge Library.
Favorite Cartridge
Use Favorite Cartridge to flag (or mark) the sets you currently love. These aren't your kids, so go ahead and pick your favorites. To do so, select (double-click) a cartridge set you adore (or maybe just merely admire) from the Cartridge Library list. Once selected, choose the Favorite Cartridge option in the Preferences menu. Doing this adds the flagged content to your Favorites list in the Cricut Cartridge Library.
Multi Cut
Use Multi Cut to set the amount of times you want the Cricut machine to re-cut the same cut over again in the same spot. This is useful for cutting through materials thicker than paper. You can direct the Cricut machine to re-cut the same image in the same place up to 4 times.
Tip: If you're cutting a material thicker than paper, remember to also increase blade depth and blade pressure for better results.
Help Menu

The Help menu options are as follows:
Enable Balloon Help
Use Enable Balloon Help to toggle context-sensitive balloon hints off or on. While this option is turned on, you can learn the name of any functioning button by resting the pointer over the button for a second without clicking on it.
Check For Updates
Use Check For Updates to connect directly to the Cricut webpage to upload new fonts and software updates. An active Internet connection is required for this option.
Store Locator
Use Store Locator to connect directly to the Cricut Store Locator webpage. An active Internet connection is required for this option.
Update Cricut Firmware
Use Update Cricut Firmware to have the Cricut DesignStudio automatically update your Cricut machine's firmware to the most recent version. Be sure to have your Cricut machine connected to your computer before performing the update. After selecting the Update Cricut Firmware option, follow the instructions that come up. This updating process can take around 5 to 10 minutes to complete.
Help
Use Help to find links to resources and information that can answer that burning Cricut DesignStudio question you might have.
About
Use About to see information about your current version of the Cricut DesignStudio program.
Tips and Tricks
In an attempt to be helpful, let's run through some basic Cricut DesignStudio functions and see if we aren't all the better for it once we emerge, older and wiser, on the other side.
Working with Cartridge Sets
Remember, you can view all content, and even design layouts with all content, but you can only cut characters from the cartridges you own. Hopefully, this feature will be useful when you want to identify your favorite chracters, or when you're shopping for particular content.
Working with Images
The on-screen cutting mat is your palette. The only limitation to the imagery you can concoct is the size of the mat. Letters can be mixed with numbers, fonts sets with shape sets, sizes with positions, welds with flips, and chaos with order. Layouts can be devised with robotic laser-like precision, each page more orderly and balanced than the last, or they can be stumbled-upon through playful practice, with unre lated images splashing together to create unexpected treasure-troves of style and beauty. Mix it up. You'll discover more.
Sizing and Positioning
Using the selection handles simplifies the sizing and positioning process, but the shape properties options allow you greater control when making precise adjustments.
Intricate Designs
As you design keep in mind that some overly intricate or complex designs will be difficult for your Cricut machine to cut.
Saving and Loading
When you save your project, the default file location will be "MyDocuments/Cricut/Projects", and the file type is ".cut." Also, it might have been Confucius who said, "Save your work often."
Welding
This long-awaited feature is the belle of the ball! Welding isn't limited to simply combining letters to make words or phrases. You can use welding to combine any image with any other, in any position or combination, and the resulting image combination can be welded yet again. Combine your favorite flower images to make the ultimate bouquet. Turn familiar shapes into fresh new ones. The uses and possibilities are endless.
Note: Complicated projects may require more time for the computer to figure all the weld connections out. Please be patient with projects that include a lot of characters.
Maximizing Paper Usage
You can use kerning, sizing, rotation, and precise image placement to pack all your images close together, to fill gaps and holes, and to get the most out of that valuable paper space. Some layouts can end up looking like dizzying puzzles, but a lot can be squeezed out of a little when you use the right tools, and the Cricut DesignStudio software enables you to use every square inch to its upmost.
Community/Feedback
The great Cricut adventure has generated legions of active, talented paper crafting aficionados, many of whom generously share their Cricut-wielding insights and experiences with whoever takes the time to look. The Cricut Community is a rich and wonderful resource for anyone just starting on this creative journey, for experts looking for new tips or fresh ideas, or for anyone in between. We highly recommend that you tap into this impressive knowledge base by actively participating in Cricut feedback forums, by peer-rating posted projects, and even by posting some of your own creations for others to see. Visit the Cricut Community webpage at Cricut.com for more information.
Technical Support
If you're having problems getting everything up and running, or if you hit any technical snags while using this program, please contact our Technical Support experts and see if they can't get everything smoothed out and running proper. We are at your beck and call. To get technical support, please go to www.cricut.com, email support@cricut.com or call our Customer Support line at 877-7CRICUT (or 877-727-4288).
Customer Support, Troubleshooting, and FAQ
For assistance in troubleshooting any problems or issues that involve program installation, program functionality, or use of the Cricut DesignStudio program, or to see a list of the most frequently asked questions, please check out our Cricut Support webpage at Cricut. com. You can also email us at support@cricut.com or call our great Customer Support line at 877-7CRICUT (or 877-727-4288) Monday–Friday 7:00 a.m.–6:00 p.m. (MST).
Conclusion
The only thing concluding here is this manual. There is so much more in store for you to discover and create! We can't wait to see what you come up with! Your odyssey is just beginning. So go now, with our gratitude and appreciation, and claim what is yours.
Documents / Resources
References
Download manual
Here you can download full pdf version of manual, it may contain additional safety instructions, warranty information, FCC rules, etc.
Advertisement


Need help?
Do you have a question about the DesignStudio and is the answer not in the manual?
Questions and answers