Advertisement
ZA des Petits Champs
10 allée Jean-Baptiste Venturi
26120 Montélier France
Tel : +33 (0)4 75 59 91 91 - www.coval.com
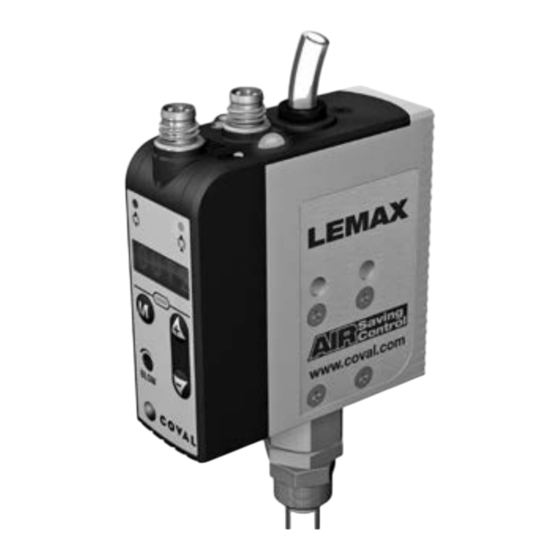
LEMAX
modules
1
%V
Vmax=85%
L2=75%
L1=65%
A
1
2
0
c
Air Saving Control
0
B
%V
Vmax=85%
L2=75%
L1=65%
Air Saving Control (ASC)
c
0
CYCLE 1
4.5/7 bar
P=4.5/7 bar
h2=10%
3.5 bar
3
t
"ASC"
t
no ASC
"ASC alarm"
CYCLE 2
CYCLE 3
LEMAX
modules
integrated compact
Operating instruction
vacuum pumps
This document is intended for users of LEMAX vacuum pumps in
the following versions:
- LEMAX90X -- S
- LEMAX90X -- SC14
Important: Revision to LEMAX -- V (NO) operating mode as of
software version V4.0.2 (See chapter XIV).
By default, the initial setting corresponds to a standard NO
function.
I - WORKING PROCEDURE
The LEMAX vacuum pumps operate with "ASC": Air Saving Control.
Once vacuum is established, no more air consumption to hold the
product. The resulting energy saving is a key progress. Here is how
it is obtained.
A- The "Air Saving Control" automatic cycle
Example with a LEMAX -- X -- S module; On this module, the sole-
noid valve
➋
is normally closed (NC).
The A diagram presents the 3 steps of the cycle:
1- Product gripping
➊
Pressure regulator*
supplies 3.5 bar to the "vacuum" solenoid
v
valve
➋
. Vacuum signal
starts the cycle by piloting valve
➌
that feeds venturi
. The generated vacuum grips the product. At
➏
65% vac., vacuum sensor
generates the "product gripped"
signal that authorizes next step.
➊
* : The pressure regulator
is included on standalone modules
only.
2- Operations on vacuum gripped product
The operations on the product (transfer, machining...) will start.
When vacuum reaches threshold L2 (75%), the pressure supply
to the venturi is automatically stopped by solenoid valve
no more consumption. The product remains gripped by vacuum V
that is preserved, due to the closing of poppet
lead to the decrease in vacuum level. Each time it goes below L2-
h2 (65%), the vacuum level is regenerated to L2 (75%) thanks to a
brief pressure supply to the venturi.
3- Product release
At the end of operations, release is ordered. "Blow-off" solenoid
b
➑
valve
, piloted by blow-off signal
es isolation valve
➓
and, through flow regulator
product for a quick release.
B- "Air Saving Control" cycle self-adaptation
The B diagram shows how the module adapts the cycle to fit to
the production realities: leaks due to products, to vacuum pads...
- Here, cycle 1 deals with an air tight product under the influence
of "ASC", resulting in optimum energy savings.
ASC
- At cycle 2 however, the porous product generates leaks that pro-
voke repeated intermittent vacuum regeneration. The anomaly is
automatically detected, and the cycle goes on but without "ASC.
A "ASC missing" signal is then emitted and displayed, and pro-
duction goes on.
t
- Cycle 3 illustrates the automatic return to the "ASC" cycle as
soon as leaks are eliminated: air tight products, vacuum circuit
maintenance...
The LEMAX module thus provides the maximum energy saving,
without any limitations to the performance and functioning of the
overall production system.
- 1 -
EN
LEMAX
Kompakte integrierte
Vakuumpumpen
V4.0.4 software
Diese Dokument richtet sich an Nutzer der LEMAX Vakuumpumpen,
folgender Versionen:
- LEMAX90X -- V
- LEMAX90X -- S
- LEMAX90X -- SC14
Wichtig: Weiterentwicklung der Betriebsart von LEMAX -- V (NO)
seit der Softwareversion V4.0.2. (siehe Kapitel XIV).
Standardmäßig
entspricht
Standard-NO-Betrieb.
I - BETRIEB
Die LEMAX-Vakuumpumpen funktionieren in „ASC": Air Saving
Control. Sobald das Vakuum hergestellt ist, verbraucht das Modul nicht
weiter, um das Vakuum aufrecht zu erhalten. Die derart erzielte Ener-
gieeinsparung ist ein wesentlicher Fortschritt. Und so wird sie erzielt.
A- Der automatische Air Saving Control-Zyklus
Beispiel mit einem Modul LEMAX -- X -- S ; bei diesem Modul ist das
Elektromagnetventil
➋
normal geschlossen (NC).
Das Nomogramm A zeigt die 3 Schritte des Zyklus.
1- Werkstückaufnahme
➊
Der Druckregler*
versorgt das „Vakuum"-Magnetventil
v
Das Signal
zum Steuern des Vakuums startet den Zyklus unter
➋
Steuern von
➋
, das das Venturi
te Vakuum erfasst das Werkstück. Bei 65 % Vakuum erzeugt der
r
➏
Vakuumschalter
das Signal
nächsten Schritt erlaubt.
➊
*: Der Druckregler
ist nur für die autonomen Module verfügbar.
2- Vorgänge an den vom Vakuum gehaltenen Werkstücken
Die Vorgänge an dem Werkstück (Transfer, Bearbeitung,...) finden
jetzt statt. Wenn das Vakuum den Schaltwert L2 (75%) erreicht, wird
die Versorgung der Venturidüse vom Magnetventil
➋
Der Druckluftverbrauch sinkt auf null. Das Werkstück wird weiter-
hin, durch das Schließen der Klappe
➎
. Micro-leaks may
Das Vakuumniveau wird hierdurch aufrechterhalten. Mikroleckagen
können das Niveau des Vakuums langsam absinken lassen.
Immer, wenn das Vakuum auf L2-h2 (65%) sinkt, wird eine kurze
Vakuumerzeugung ausgelöst, um auf L2 (75 %) zurückzukehren.
3- Werkstückablegen
Am Ende des Vorgangs wird das Ablegen angesteuert. Das
, generates an air jet that clos-
Magnetventil „Abblasen"
➒
, blows off the
gesteuert wird, erzeugt einen Luftstrahl, der das Absperrventil
schließt und bläst das Werkstück für ein schnelles Ablegen über die
➒
Durchflusseinstellung
B- Automatische Anpassung des Air Saving Control-Zyklus
Das Nomogramm B zeigt, wie das Modul den Zyklus in Abhängigkeit
von den Produktionsgegebenheiten anpasst: Lecks auf Grund der
Werkstücke, der Saugnäpfe,...
- Hier verarbeitet der Zyklus 1 ein dichtes Werkstück und läuft in
„ASC" mit optimaler Energieeinsparung ab.
- Im Zyklus 2 hingegen, kommt ein poröses Werkstück an, des-
sen Lecks aufeinander folgende „schlagende" Verbesserungen
des Vakuums auslösen. Diese Anomalie wird automatisch er-
kannt und der Betrieb wird fortgesetzt, allerdings ohne „ASC".
Ein Signal „Ohne ASC" wird ausgegeben und angezeigt, die
Produktion wird fortgesetzt.
- Der 3. Zyklus veranschaulicht die automatische Rückkehr zum
„ASC"-Betrieb, sobald die Lecks eliminiert sind: das Werkstück
ist dicht, der Vakuumkreislauf wird aufrecht erhalten, ...
Das LEMAX-Modul stellt daher die maximale Energieeinsparung
sicher, ohne irgendwelche Zwänge aufzuerlegen und ohne den
Betrieb jemals zu unterbrechen.
D
modules
Bedienungsanleitung
V4.0.4 software
- LEMAX90X -- V
die
Grundeinstellung
einem
➋
.
➌
versorgt. Das dabei erzeug-
r
„Werkstückaufnahme", das den
➋
unterbrochen.
➎
, vom Vakuum V gehalten.
b
➑
, das vom Signal
der Abblassteuerung
➓
.
Advertisement
Table of Contents

Related Manuals for coval LEMAX90X S Series


Summary of Contents for coval LEMAX90X S Series
- Page 1 Diese Dokument richtet sich an Nutzer der LEMAX Vakuumpumpen, 10 allée Jean-Baptiste Venturi the following versions: folgender Versionen: 26120 Montélier France Tel : +33 (0)4 75 59 91 91 - www.coval.com - LEMAX90X -- S - LEMAX90X -- SC14 - LEMAX90X -- V - LEMAX90X -- S...
- Page 2 II - IDENTIFYING YOUR MODULE II - AUSWAHL DES RICHTIGEN MODULS In order to answer to all needs, the LEMAX range includes stand- Um jede Art von Bedarf zu decken, weist die Produktreihe von LEMAX90X -- S LEMAX90X -- V alone and island modules, each of them with a vacuum solenoid LEMAX autonome und Inselmodule auf, die jeweils eine Steuerung valve either NC or NO.
- Page 3 (illustration) is recommended to assure an Kappe (Abbildung) empfohlen. air-tight connection. Siehe COVAL-Katalog, Auswahl der Schlauchanschlüsse dxD = see COVAL catalog, choice of fittings for tubes dxD= 4x6 mm, 4x6 mm, 6x8 mm und 8x10 mm. 6x8 mm, 8x10 mm. Wichtig Important Für kurze Reaktionszeiten und einen minimalen Verbrauch, ord-...
-
Page 4: Electrical Connections
V - ELECTRICAL CONNECTIONS V - ELEKTROANSCHLÜSSE CDM8 The LEMAX vacuum pump must be used with power supply units Die LEMAX-Vakuumpumpe erfordert die Verwendung von that provide a Protective Extra Low Voltage (PELV) and with an Schutzkleinspannung (= PELV - Protective Extra Low Voltage) (LEMAX90X -- S / LEMAX90X -- V) isolation of the supply voltage according to EN60204. -
Page 5: Menü-Übersicht
VII - FUNCTIONS SYNOPTIC VII - MENÜ-ÜBERSICHT Keypad locking/unlocking: Tastaturverriegelung/-entriegelung: (see IX-B) (siehe IX-B) & Electronic Electronic Electronic manual controls (see chap. VIII) Manuelle elektronische Steuerung (siehe VIII) manual override manual override Vacuum Electronic manual override Blow-off Rücksetzung auf werkseitige Einstellung: Factory Setting Back to “factory”... - Page 6 IX - CONFIGURATIONS IX - PARAMETRIERUNG ➐ ➒ ➐ ➒ Configurations are made with display and keyboard Die Parametrierung verwendet die Anzeige und das Bedienfeld 3 functions may be configured: 3 Funktionen können parametriert werden: ƒ Unit (IX-1). ƒ Einheit (IX-1). ƒ...
- Page 7 IX-3 IX-3- Blow-off IX-3- Abblasen “Automatic timed blow-off” not available on LEMAX90X -- V. Das automatisch verzögerte Abblasen ist bei der Variante LEMAX90X -- V nicht verfügbar. LEMAX90X -- S: the initial factory setting of blow-off is set on the A1 LEMAX90X -- S: die werkseitige Einstellung des Abblasens ist die Op- option (chap.
- Page 8 X - CYCLES / VERSION DISPLAY X - ANZEIGE ZYKLEN/VERSION A- Cycle counter A- Zykluszäler 1- Press the + key for 3 s to get into this mode. 1- Druck für 3 Sek. auf die Taste + halten schaltet diesen Modus um. 2- The display shows for 2 s: 2- Die Anzeige zeigt...
-
Page 9: Specific Settings
XII - SPECIFIC SETTINGS XII - SPEZIFISCHE EINSTELLUNGEN A- "Factory" setting reminder A- Errinnerung auf die Werkseinstellungen This initial "factory" setting is convenient for most applications. Die ursprüngliche Werkseinstellungen des Moduls ist für die meis- L1= 65%, vacuum threshold generating "gripped product" signal. ten Anwendungen geeignet. - Page 10 XII-2 XII-2 XII-2- L2 and h2 settings XII-2- Einstellung von L2 und h2 1- Pressing M twice bring us to L2 setting mode. 1- Zweimal auf M drücken, um auf den Betrieb zum Einstellen des appears for 2 s. Grenzwerts „ASC“ L2 zu schalten. 3- Display then specifies existing setting ( , for example).
-
Page 11: Error Messages
XII-4 XII-4- Return to "factory" setting XII-4- Rückkehr zu der Werkseinstellung A possible return to "factory" setting is obtained as follows. Eine eventuelle Rückkehr zu der Werksteinstellung wird wie folgt 1- Starting from the display position of the vacuum level , press ermöglicht: simultaneously the M and + for 3 seconds (3 s). - Page 12 XIV - PROCEDURE FOR CHANGING XIV - ÄNDERUNGSVERFAHREN DER THE NO OPERATING MODE NO-BETRIEBSART (for LEMAX V) (für LEMAX V) As of software version V4.0.2, the LEMAX V is equipped with a Ab der Softwareversion V4.0.2 verfügt die LEMAX V stan- standard NO operating mode (24V DC signal on NO Pilot = vacuum dardmäßig über eine NO-Betriebsart (24V DC Signal auf...
- Page 13 1.70 s 3.18 SCFM 2.47 SCFM The range and the products characteristics may be modified by COVAL without notice. Die Firma COVAL behält sich das Recht vor, ihre Produktreihe sowie die Merkmale ihrer - 13 - Produkte jederzeit unangekündigt zu ändern.
Need help?
Do you have a question about the LEMAX90X S Series and is the answer not in the manual?
Questions and answers