
Subscribe to Our Youtube Channel
Related Manuals for Bolin Technology 3HDU-M-07092017


Summary of Contents for Bolin Technology 3HDU-M-07092017
- Page 1 USB3.0 HD PTZ Camera USER MANUAL VERSION: 3HDU-M-07092017 UCC-3HD10S-U3 UCC-3HD10B-U3 UCC-3HD05B-U3 © 2017 Bolin Technology...
-
Page 2: Table Of Contents
Contents IMPORTANT INFORMATION ..............................3 WHAT’S IN THE BOX ................................. 5 OVERVIEW ....................................6 ....................................6 AMERA ERSION ..................................... 6 ODEL UMBERS FEATURES ....................................6 CAMERA DIAGRAMS ................................. 7 ......................................7 AMERA ..................................8 EMOTE ONTROLLER SYSTEM CONFIGURATION ................................. 9 .................................... -
Page 3: Trademark Acknowledgement
Before operating the unit, please read this manual thoroughly and retain it for future reference. Copyright Copyright 2015-2016 Bolin Technology all rights reserved. No part of this manual may be copied, reproduced, translated, or distributed in any form or by any means without prior consent in writing from our company. - Page 4 Maintenance Precautions: If there is dust on the front glass surface, remove the dust gently using an oil-free brush or a rubber dust blowing ball. If there is grease or a dust stain on the front glass surface, clean the glass surface gently from the center outward using anti-static gloves or an oil-free cloth.
-
Page 5: What's In The Box
WHAT’S IN THE BOX Accessories (Optional) Wall Mount Ceiling Mount... -
Page 6: Overview
Overview Camera Version Software: UCC-3HD10S-U3: 1.0.47U UCC-3HD05B-U3: N/A Model Numbers This user guide is suitable for the following models: UCC-3HD10S-U3 UCC-3HD10B-U3 UCC-3HD05B-U3 Features HD resolution allows for high- definition resolution with superior picture quality. 5X,10X optical zoom with wide-range. ... -
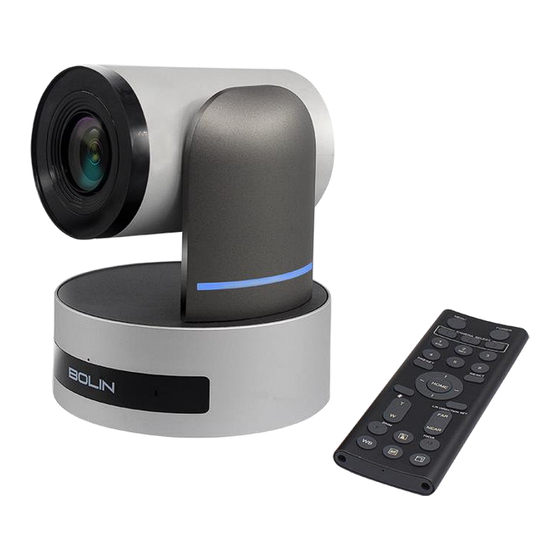
Page 7: Camera Diagrams
Camera Diagrams Camera 1. HDMI Port (1.4b) 2. USB 3.0 Port USB3.0 video output. Do not apply the voltage higher than the rated value to the USB terminal. This unit does not have the Battery Charging function. This unit does not support USB2.0. This unit does not support the USB suspend. -
Page 8: Remote Controller
Remote Controller 1. Power 2. Camera ID (Total 3) Selector 3. Preset Position (Total 6) Calling and Setting 4. PAN-TILT Pan and Tilt direction control HOME: Home position, Resolution reset 5. L/R Direction Set Left and right orientation setting 6. -
Page 9: System Configuration
System Configuration Connection In this connection configuration, HDMI cable, USB3.0 cable is required. To obtain these third-party components or accessories, Notes Use only the DC power adaptor (JEITA type4) supplied with the unit. Do not use any other DC power adaptor. ... -
Page 10: Camera Control Methods And System Configurations
Camera Control Methods and System Configurations This unit has multiple ways of controlling the USB3.0 camera and various system configuration capabilities using optional products. This section describes ways of controlling and typical system examples with the required components and usage of each system. 1. - Page 11 Use camera built-in virtual COM port To operate the camera third party control software / interface, control distance may be short. System Configuration B Before you use the virtual COM port, you need to install the driver onto your PC/Mac. You can download the driver (PL2303 Prolific Driver Installer v1.12.0) from internet for your PC operation system from official driver provider.
-
Page 12: Bottom Dip Switch Settings
BOTTOM DIP SWITCH SETTINGS The bottom dip switch is for setting the camera configuration for following items: 1. Camera ID Address for VISCA protocol 2. Video output / Video color space 3. Baud Rate 4. Video resolutions selection 5. IR remote controller ID Setting of the BOTTOM DIP Switches Turn off power to the camera before changing the DIP switch settings. - Page 13 4. Baud Rate Setting The baud rate of the camera has been set up as 9600bps, it is not changeable. Baud Rate Setting 9600 bps 9600 bps 9600 bps 9600 bps Setting of the BOTTOM DIP Switch (SW2) Turn off power to the camera before changing the DIP switch settings. Power on the camera to have the new Dip Switch setting activated.
-
Page 14: Adjusting And Setting With Menus
Adjusting and Setting with Menus About On-Screen Menus You can change various settings, such as shooting conditions and system setup of the camera, while observing menus displayed on a connected computer screen. This section explains how to read the on-screen menus before starting menu operations. The menu parameters may vary according to the different product model numbers. -
Page 15: Exposure Menu
EXPOSURE Menu The EXPOSURE menu is used to set the items related to exposure. MODE (Exposure Mode) FULL AUTO: The exposure is adjusted automatically using the sensitivity, electronic shutter speed, and iris. BRIGHT: Adjust the brightness level (LEVEL) manually. SHUTTER PRI: Shutter Priority mode. The exposure is adjusted automatically using the sensitivity and iris. -
Page 16: Picture Menu
PICTURE Menu The PICTURE menu is used to set the items related to the picture. SHARPNESS: Picture sharpness value ranges from 0 to 20. You can enjoy emphasized edge and high-resolution images. EFFECT: (Picture Effect) It consists of the following functions: Image effect from Off, B&W, NEG.ART NOISE REDUCTION: Noise reduction - you can enjoy clearer images by removing unnecessary noise. -
Page 17: System Menu
SYSTEM Menu PELCO ID PELCO ID setting. The PELCO protocol is available in specific model, invalid on UCC-3HD series cameras. IR-RECEIVE (Infrared Signal Reception) When this is set to OFF, the camera does not receive the signal from the infrared remote controller. -
Page 18: Operation Using The Infrared Remote Controller
Operation Using the Infrared Remote Controller Pan/Tilt and Zoom Operation Panning and Tilting 1. Press the POWER switch. The camera will turn on and perform the pan/tilt reset operation automatically. 2. Press the arrow button to pan or tilt the camera. While checking the picture on the screen, press the desired arrow button. -
Page 19: Operating Multiple Cameras With The Infrared Remote Controller
Zooming Button [T] - Zoom-IN and [W] - Zoom-OUT. Button [F] – FAST mode. Press once and the LED turns red to activate the Fast Zoom Speed Mode, press again to go back to normal Zoom Speed mode. Note When you perform pan/tilt operation while the camera is in the telephoto mode, the moving speed of the image on the screen may be a little jerky. -
Page 20: Storing The Camera Settings In Memory - The Presetting Feature
Storing the Camera Settings in Memory — the Presetting Feature Memory (Preset) Using the preset function, 6 sets of camera shooting conditions can be stored and recalled. 6 sets of camera shooting conditions can be stored and recalled by using remote controller. Up to 128 presets via protocol programming. This function allows you to achieve the desired status instantly, even without adjusting the following items each time. -
Page 21: Menu Configuration
Menu Configuration The menus of the camera are configured as described below. For more details, refer to the pages in parentheses. The initial settings of each item are in bold. -
Page 22: Dimensions
Dimensions Unit: mm... -
Page 23: Specifications
Specifications... - Page 24 2082 TECHNOLOGY LLC BOLIN TECHNOLOGY...
Need help?
Do you have a question about the 3HDU-M-07092017 and is the answer not in the manual?
Questions and answers