
Related Manuals for Woodson W.CG6


Summary of Contents for Woodson W.CG6
- Page 1 SPECIFICATION, INSTALLATION AND OPERATION MANUAL READ ALL INSTRUCTIONS BEFORE USE Woodson Contact Grill Models: W.CG6 / W.CG8 A guide on the use, care and maintenance of your quality Woodson product Revision: A - 27/08/2024 - 01...
- Page 2 Page Intentionally Left Blank Due to continuous product research and development, the information contained herein is subject to change without notice. www.stoddart.com.au www.stoddart.co.nz Page 1...
- Page 3 1.1 Your New Woodson Product ........
-
Page 4: Your New Woodson Product
Thank you for choosing this quality Woodson product. All Woodson products are designed and manufactured to meet the needs of food service professionals. By caring for and maintaining this new Woodson product in accordance with these instructions, will provide many years of reliable service. -
Page 5: Warranty And Registration
1.0 Introduction Warranty & Registration 1.2 Australia and New Zealand Warranty All Stoddart manufactured and distributed products are covered by Stoddart’s standard Australia and New Zealand Product Warranty. For product registration and to view the warranty period, full terms, conditions and exclusions your new product, follow the below Link/QR code. www.stoddart.com.au/warranty-information 1.2.2 General Precautions When using any electrical unit, safety precautions must always be observed. -
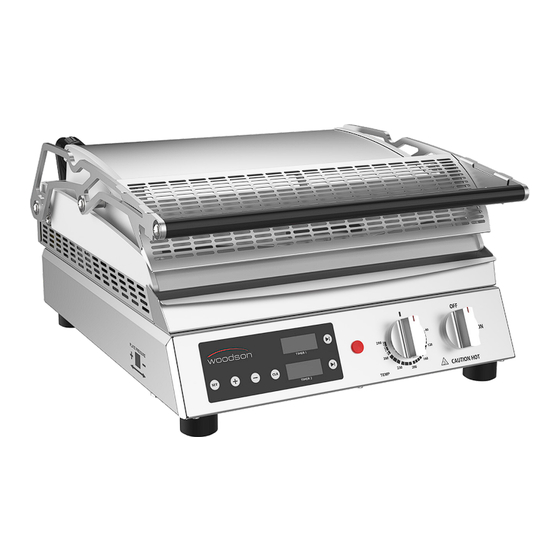
Page 6: Product Overview
2.0 Installation 2.1 Product Overview CAUTION Surface is Hot Removable Heat Shield Removable Drip Tray Power ON/OFF Tempurature Height Adjustment Wheel Theromostat Control Panel Indicator Light Due to continuous product research and development, the information contained herein is subject to change without notice. www.stoddart.com.au www.stoddart.co.nz Page 5... - Page 7 2.0 Installation 2.2 Setting Up WARNING Improper installation, adjustments, alterations, service or maintenance can cause property damage, injury or death. 2.2.1 Handling • Use suitable means to move the unit; - For smaller items use two people - For large items a fork lift, pallet trolley or similar (the forks should reach completely beneath the pallet) 2.2.2 Unpacking •...
-
Page 8: Electrical Connection
3.0 Specification 3.1 Electrical Connection WARNING This unit must be installed in accordance with local electrical regulations/requirements. Some procedures in this manual require the power to the equipment to be turned off and isolated. Turn the power OFF at the power point and unplug the power supply lead by the plug body. -
Page 9: Technical Specifications
3.0 Specification 3.2 Technical Specifications 3.2.1 W.CG6 Model W.CG6 W x D x H 447 x 517 x 251 (mm) Top Plate 389 x 312 (W x D mm) Bottom Plate 401 x 324 (W x D mm) Weight 23kg... -
Page 10: Initial Start-Up
4.0 Operation 4.1 Initial Start-up IMPORTANT Do not keep the plates closed for extended periods at high temperatures without any food product being cooked, as this may cause the plates to buckle. IMPORTANT When using a Teflon sheet, the unit MUST NOT operate above 260°C. - Page 11 4.0 Operation 4.1.2 Operation Upon using the equipment, the following steps must be followed: Turn the unit on by turning the ON/OFF Dial to the ON position Set the Thermostat dial to the required temperature 80°C - 290°C (when using a teflon sheet the unit must not operate above 260°C) The timer can be set if required (unit will continue to operate after timer turns off) Place food item into the unit and lower plate Adjust as required: increase/decrease the temp.
- Page 12 4.0 Operation 4.2 Operation 4.2.1 Setting The Timer Press button ‘4’ to enter the timer programming mode By default ‘Timer 2’ is selected, to select ‘Timer 1’ press button ‘10’. Use button ‘5’&’6’ to increase or decrease the seconds (15sec increments). At anytime during the programming mode button ‘7’ can be pressed to clear the settings To adjust the minutes press button ‘11’...
- Page 13 4.0 Operation Once the timers have be adjusted press and hold button ‘4’, this will save and exit the programming mode 4.2.2 Timer Operation To use the timer during operation press button ‘11’ (Timer2) or button ‘10’ (Timer1), this will activate the selected timer When the timer reaches the end of its countdown and audible alarm will sound and ‘End’...
- Page 14 4.0 Operation 4.3 Teflon Sheet Installation (optional) CAUTION Ensure surfaces have cooled Fold the teflon sheet over the teflon bracket, aligning the edge the sheet with the front edge of the bracket. Optional Ribbed Plate: Position the ribbed plate onto the folded teflon sheet and clip while holding the bracket and teflon sheet, position centrally onto the bottom plate of the unit, aligning the front edge of the bracket Hook the back of the clip over the back of the top plate aligning the clip centrally Due to continuous product research and development,...
- Page 15 4.0 Operation While holding the back of the clip push the front leg of the clip over the front edge of the top plate (ensure teflon sheet isn’t bunched up) Push the teflon sheet into the back edge of the bottom plate allowing the teflon to follow the profile of bottom plate) With the teflon sheet pressed into position, rotate and insert the drip tray between the unit and bottom plate this will clamp the teflon sheet in position Due to continuous product research and development,...
- Page 16 4.0 Operation 4.4 Heatshield (optional) CAUTION Ensure surfaces have cooled Align the heatshield with the contact toaster arms Insert the front tabs of the heat shield into the front cutouts on the arms Rotate the heatshield down, locating the back tabs of the heatshield into the rear cutouts Ensure the heatshield is firmly seated Due to continuous product research and development, the information contained herein is subject to change without notice.
- Page 17 5.0 Cleaning and Maintenance 5.1 Cleaning 5.1.1 Cleaning Schedule • Daily cleaning is required for the unit. This will help to maintain and prolong the efficiency of the unit • The unit should be cleaned at the end of each service period 5.1.2 Materials Required •...
- Page 18 5.0 Cleaning and Maintenance 5.1.6 Cleaning Procedure Isolate from power supply Using a good quality nylon brush and/or plastic scraper remove soiling and small food items, then clean using a cloth dampened with clean soapy water (warm) until all soil has been removed For heavy soiling, use a scouring pad dampened with clean soapy water (warm), scrub any baked on soil in a forward/backward motion Rinse using a clean cloth dampened with fresh clean water Using a dry sanitised cloth, thoroughly dry the plates.
-
Page 19: Troubleshooting
5.0 Cleaning and Maintenance 5.2 Troubleshooting • If any faults/issues occur with the unit, follow the below troubleshooting procedures • If the troubleshooting procedures do not correct the problem, contact the Stoddart Service Department WARNING Technician tasks are only to be completed by qualified service people. - Page 20 Australia Australian Business Number: 16009690251 Service / Spare Parts https://customerservice.stoddart.com.au Sales Tel: 1300 79 1954 Email: sales@stoddart.com.au Customer Service Portal Web: www.stoddart.com.au New Zealand New Zealand Business Number: 6837694 Service / Spare Parts https://customerservice.stoddart.com.au Sales Tel: 0800 79 1954 Email: sales@stoddart.co.nz Customer Service Portal Web: www.stoddart.co.nz...
Need help?
Do you have a question about the W.CG6 and is the answer not in the manual?
Questions and answers