
Subscribe to Our Youtube Channel
Related Manuals for LLG LLG-uniTEXER 4


Summary of Contents for LLG LLG-uniTEXER 4
- Page 1 OPERATION MANUAL ® L A B W A R E OPERATION MANUAL LLG-uniTEXER 4 Thank you very much for purchasing this LLG-uniTEXER 4. Please read the following instructions carefully and always keep this manual within easy reach.
-
Page 2: Table Of Contents
® L A B W A R E Contents Product Description 1.1 Introduction 1.2 Intended Use 1.3 Features 1.4 Technical Specifications 1.5 Scope of delivery Safety Precautions Installation 3.1 Location 3.2 Connecting Power Adaptor Standard Parts Listing User Interface and Display Optional Attachments and its Installment Operation 7.1 Connecting Power Adaptor... -
Page 3: Product Description
This LLG-uniTEXER 4 is designed for laboratory mixing. It assures the highest performance in terms of speed, reliability, precision and safety. LLG-uniTEXER 4 has a variable speed with digital control that allows low RPM start-up for gentle shaking and high speed mixing for vigorous vortexing of samples. -
Page 4: Scope Of Delivery
(Refer table on page: 7). 3. Installation Open the box, open the inner packaging and gently take the LLG-uniTEXER 4 out of the box. Before the first use ensure that all the packaging is removed and the cup head is firmly tightened before using the product. -
Page 5: Location
OPERATION MANUAL 3.1 Location Take the unit out and place it on the leveled & stable surface near the grounded electrical outlet. The surface should be clean and free from dust to ensure that the feet grip the surface firmly. Keep a clearance of 10 cm on all sides of the unit for proper ventilation. Keep the unit away from heat &... -
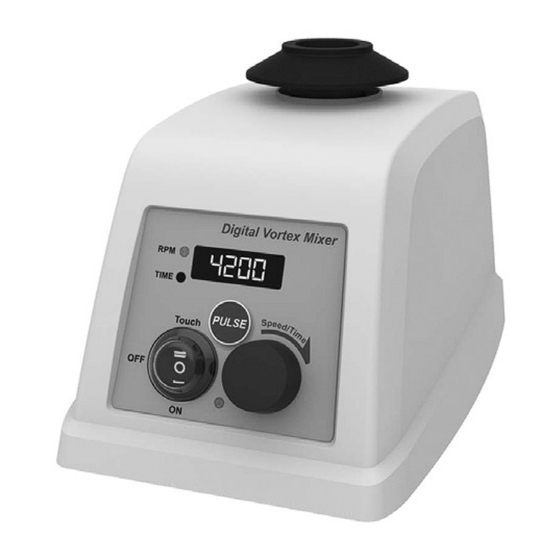
Page 6: User Interface And Display
& time value. The rocker switch is used to select different mode 3 way Switch in the LLG-uniTEXER 4 The modes are “OFF” (Mode Selection) (stand by), Continuous and Touch operation. The digital Display shows speed value, time value Display and pulse parameters. -
Page 7: Optional Attachments And Its Installment
6. Optional Attachments and its Installment The standard attachment is normally used for vortexing samples in tubes. The LLG-uniTEXER 4 can accommodates optional attachments when combined with the optional universal attachment. Optional attachments include the universal attachment, which can combine with other foam attachments and can be used for mixing samples in microplates, microtubes &... - Page 8 ® L A B W A R E The below additional rubber attachments when in Combination with the universal attachment can be used for mixing samples in 250 ml flask. First always attach the universal attachment, then place the flask on the universal attachment &...
- Page 9 OPERATION MANUAL Center Press to attach Standard Attachment Shaft body Removing Standard Attachment Attaching Standard Attachment Note: Do not rotate the universal attachment or any attachments attached to the shaft body. To remove the universal attachment, pull the universal attachment up with both hands as shown in below figure.
- Page 10 Place the microplate or microtubes first in the foam attachment and then place the foam attachment on the universal attachment attached to the LLG-uniTEXER 4. Inserting filled microplate or microtubes in the foam attachment attached to LLG-uniTEXER 4, can lead to spillage of samples.
-
Page 11: Operation
Adaptor Standby mode Connecting Power Adaptor at rear side Connect the power adaptor at the rear side of the LLG-uniTEXER 4 as shown in the above image. 7.2 Setting Speed and Time Always set the required speed and time first before doing any mixing operation. Rotate the knob to select and set the speed value. -
Page 12: Standby, Touch & Continuous Mode
7.3 Standby, Touch & Continuous Mode Placing the 3 way switch in the STANDBY position It will keep the LLG-uniTEXER 4 in an OFF state i.e. it will not operate as TOUCH or CONTINUOUS mode. Below is the position of the 3 way switch showing the LLG-uniTEXER 4 is in STANDBY mode. -
Page 13: Touch Mode Operation
OPERATION MANUAL 7.4 Touch Mode Operation Before operating, check that the upper cup head is firmly tightened to the shaft body. Set the required speed using the knob in STANDBY mode and select the “TOUCH” mode using the 3 way switch. For touch mode operation, gently press and hold the cup head using the tube as long as you want it to run. -
Page 14: Continuous Mode Operation
® L A B W A R E 7.5 Continuous Mode Operation Before operation, keep the LLG-uniTEXER 4 in standby mode and set the operation parameters. Check the attachment you are using is firmly tightened with the shaft. Select the “ON” mode to start continuous mode operation. -
Page 15: Pulse Mode
The pulse mode is used for intermittent shaking. In this mode the shaking action works on run-stop-run mode. This LLG-uniTEXER 4 comes with default pulse mode and user programmable pulse mode. In default pulse mode, the ON & OFF time are pre-set for 5 seconds each and in the programmable pulse mode, the user can set the ON time &... -
Page 16: Maintenance And Cleaning
L A B W A R E 8. Maintenance and Cleaning 1. Always keep the LLG-uniTEXER 4 & its accessories in a safe storage location and clean periodically with moist cloth. After cleaning, ensure that all parts are dry before re-use 2. -
Page 17: Warranty
OPERATION MANUAL 10. Warranty This product is warranted to be free from defects in material and workmanship for a period of three (3) years from date of purchase. This warranty is valid only if the product is used for its intended purpose and within the guidelines specified in this instruction manual. - Page 18 ® L A B W A R E Notes...
- Page 19 OPERATION MANUAL Notes...
- Page 20 L A B W A R E L A B W A R E ® L A B W A R E Lab Logistics Group GmbH Am Hambuch 1 D-53340 Meckenheim/Germany Fon: +49 (0)2225 9211- 0 Fax: +49 (0)2225 9211-11 www.llg-labware.com info@llg-labware.com...
Need help?
Do you have a question about the LLG-uniTEXER 4 and is the answer not in the manual?
Questions and answers