Table of Contents
Advertisement
Quick Links
Advertisement
Table of Contents

Subscribe to Our Youtube Channel
Related Manuals for Triplett SLM850


Summary of Contents for Triplett SLM850
- Page 1 SLM850 Noise Dosimeter...
-
Page 3: Table Of Contents
Contents: SAFETY PRECAUTIONS ......................3 1.1. Preliminary Description ..................... 3 1.2. Note ........................... 3 PREPARATION FOR USE ....................... 4 2.1. Initial ..........................4 2.2. Supply Voltage ........................4 2.3. Calibration ......................... 4 2.4. Storage ..........................4 INSTRUMENT INSTRUCTIONS ....................5 3.1. - Page 4 7.2.2. EMC ............................22 7.3. Accessories ........................22 SERVICE ..............ERROR! BOOKMARK NOT DEFINED. 8.1. Warranty Conditions ............Error! Bookmark not defined. 8.2. Service ................Error! Bookmark not defined. EN - 2...
-
Page 5: Safety Precautions
1. SAFETY PRECAUTIONS When taking measurements: ˙ Avoid doing measurements in humid or wet places - make sure that humidity is within the limits indicated in section “environmental conditions”. ˙ Avoid doing measurements in presence of explosive gas, combustible gas, steam or excessive dust. -
Page 6: Preparation For Use
2. PREPARATION FOR USE 2.1. Initial The instrument has been checked mechanically and electrically prior to shipment. Take care to ensure the instrument reaches you undamaged. However, it is wise to carry out a rapid check in order to detect any possible damage that may cause during transport. -
Page 7: Instrument Instructions
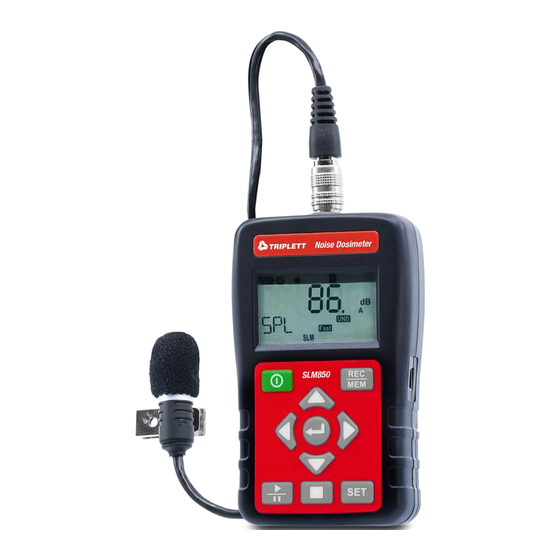
INSTRUMENT INSTRUCTIONS 3.1. Instrument Description 3.1.1. Controls Description Microphone Microphone Cable Microphone Connector (Male) Microphone Connector (Female) LCD Display Record dada / Reading Record dada button Power ON/OFF Button UP Button Right Button Enter Button Down Button Left Button SET Button Stop Button Start /Pause Button Belt clip... -
Page 8: Display Description
3.1.2. Display Description Low Battery Auto Power Off Enable Pause 115dB indicator(SPL) Stop 140 dB indicator(Peak) Start USB Interface SPL Hi dB Range dB Display (140~70) SPL Mid dB Testing mode Range (110~50) SPL Lo dB Range Sound Level Meter (90~30) mode Noise Dose %... -
Page 9: St-130S Microphone
3.1.3. ST-130S Microphone ˙ Diameter : 1/2 inch ˙ Polarization voltage : 0V ˙ Dynamic range : 25dBA ~140dB ˙ Sensitivity : -32±3dB (250Hz 0dB=1V/Pa) ˙ Free field frequency response : ±2dB(25Hz~12.5kHz) Frequency (KHz) Deviation of pressure 0.25 -0.1 -0.5 -0.6 -0.9 -1.2... -
Page 10: Sound Level Measurement Procedures
⚫ Press to observe testing date information. Press change date dispaly information. ◎ Time(hh:mm:ss)→date(YY-DD-MM) ⚫ Press stop testing 3.3. Sound Level Measurement Procedures ⚫ Press turn on meter ⚫ LCD show symbol ⚫ Press button to select test function. ◎ SPL→Leq→SEL→PeakMAX ⚫... -
Page 11: Auto Data Record
CAUTION Wind blowing across the microphone would bring additional extraneous noise. Once using the instrument in the presence of wind with speed higher than 10m/s, it must mount the windscreen to prevent the undesirable signals. Keep the microphone dry and avoid severe vibration. -
Page 12: Set Mode
˙ Press more than 1 sec again to exit viewing logged reading mode. 3.7. Set Mode ˙ Press into set mode , can set 7 functions in set mode ˙ Press exit set mode ◎ Test Mode→Auto Power Off→Sampling Time & Auto Record→Real Time Clock→94dB Offset Adjust→Noise standard→SLM Fuunction ˙... -
Page 13: Sampling Time & Auto Record Set
3.7.3. Sampling Time & Auto Record Set ˙ Press , select auto records set or sampling time. ˙ Press enable or disable Auto Record, adjust sampling time. ˙ Minimum sampling time: 1 second; Maximum sampling time: 23 hours 59 minutes 59 seconds 3.7.4. -
Page 14: Noise Standard Set
3.7.6. Noise Standard Set ˙ Press ,select NDM testing law ◎ OSHA→MSHS→DOD→ACGIH→ISO85→ISO90→USER 3.7.7. SLM Function Set ˙ Press , change test function → → ◎ → → ◎ → → ◎ ◎ Peak C →Peak Z ˙ Press ,selsect test function ◎... -
Page 15: Software
4. SOFTWARE 4.1. System Requirements • Operating: Windows XP/Windows Vista/Windows 7/Windows 8/Windows10. • Storage:200 MB of available hard disk space. • Processor: Intel Pentium® 4 • Memory:1 GB RAM (XP), 1.5 GB (Windows Vista/Windows 7/Windows 8) • Other: PL2303 Windows Drive ;Microsoft .NET Framework 3.5 Service Pack 1 4.2. -
Page 16: Tools Description
4.3. Tools Description Open file Options Print noise dose report Sound level chart (*.ndr) Noise dose chart (LN%) Start to log sound level (*.csv) Stop to log sound level Download sound level logs; Doenload noise does report Erase mesdured data that Automatic detect port which stored in meter connect with meter... -
Page 17: Pc Setting
4.5. Option PC Setting Meter Setting 4.5.1. PC Setting PC data logger sample time. Click the left mouse button to change the color box Graph (Y-axis) sound level range 4.5.2. Meter Setting Serial number(0~9;A~Z)16 word Alarm setting Offset setting MAX:+1.5dB MIN:-1.5dB Setting meter real time clock Enable/disable auto record. -
Page 18: Print Noise Dose Report
format(*.ncg) 4.6. Print Noise Dose Report • Select noise dose logger report (*.ndr) • Click and key in user information , click ok ,the output report 4.7. Sound level chart & Noise dose chart (LN %) • Sound level char. X-axis is the time coordinate. Y-axis is the sound coordinate. •... -
Page 19: Enable Pc Data Logger
4.8. Enable PC data logger • Click enable data logger. • Create a new log file (*. csv) in the hard disk. • Click stop data logger 4.9. Download Record data • Click download sound level logs or noise dose report on the meter mrmory •... -
Page 20: Explanation
5. EXPLANATION 5.1. 1. MEASUREMENT PARAMETERS: Test Function Screen parameter Explanation LAFp Sound pressure level (SPL) LASp Sound pressure level (SPL) LCFp Sound pressure level (SPL) LCSp Sound pressure level (SPL) LZFp Sound pressure level (SPL) LZSp Sound pressure level (SPL) Equivalent continuous level for the LAFq duration of the measurement for A... -
Page 21: A, C, Z Weighting Instruction
5.2. A, C, Z WEIGHTING INSTRUCTION: A: The A weighting curve is based on 40 Phon Fletcher-Munson Equal Loudness Contour, Noise assessment in human, suggest to use the A weighting. C: The C weighting in essentially is approximate smooth. With labor safety concern, suggest using the C weighting. -
Page 22: Maintenance
6. MAINTENANCE 6.1. GENERAL INFORMATION This is a precision instrument. To guarantee its performances be sure to use it or keep it stored on suitable environmental conditions. Do not expose it to high temperatures or humidity or direct sunlight. Be sure to turn it off after use. If you expect not to use the instrument for a long period remove batteries to avoid leakages of battery liquid which could damage the its inner components. -
Page 23: Technical Specifications
7. TECHNICAL SPECIFICATIONS 7.1. FEATURE Environmental conditions: temperature 23℃ ± 5℃, relative humidity < 80%. Display 999999 count LCD Display Refresh Rate 1 Time/sec Standards IEC 61252-1993 IEC 61672-1-2002 ANSI S1,25-1992 ANSI S1,4-1983 ANSI S1,43-1997 1/2” pre-polarized condenser microphone build in Microphone(ST-130S) preamplifier: 1V/Pa@250HZ, frequency range: 20 Hz~12.5 kHz, Thermal noise: <25 dB(A) -
Page 24: Environment
7.2. ENVIRONMENT 7.2.1. Environmental Conditions ˙ For inside use, max height: 2000m ˙ Reference temperature: 23° ± 5℃ ˙ Operation temperature: 5 ~ 40 ℃ ˙ Operation humidity: <80% RH ˙ Storage temperature -10 ~ 60 ℃ ˙ Storage humidity <70% 7.2.2.
Need help?
Do you have a question about the SLM850 and is the answer not in the manual?
Questions and answers