Table of Contents
Advertisement
Quick Links
Advertisement
Table of Contents

Related Manuals for Dash DBCMW100


Summary of Contents for Dash DBCMW100
- Page 1 # DBCMW100 wreath MINI BUNDT MAKER ® Instruction Manual Recipe Guide...
-
Page 2: Table Of Contents
wreath MINI BUNDT MAKER ® Important Safeguards ..............4-9 Welcome Parts & Features ................10 Using Your Mini Bundt® Maker ..........11-17 to the Foodie Family Tips & Tricks ..................18 Cleaning & Maintenance ..............19 love We hope you Recipes .................. -
Page 3: Important Safeguards
IMPORTANT SAFEGUARDS IMPORTANT SAFEGUARDS IMPORTANT SAFEGUARDS: PLEASE DO NOT lift the Cover so that your to clean your appliance as this may • READ AND SAVE THIS INSTRUCTION arm is over the Cooking Surface as damage the Mini Bundt Maker and it is hot and may cause injury. -
Page 4: Garanties Importantes
IMPORTANT SAFEGUARDS garanties importantes GARANTIES IMPORTANTES: contact a qualified electrician. Do cord should be at least as great not attempt to modify the plug in as the electrical rating of the VEUILLEZ LIRE ET CONSERVER CE any way. appliance. If the appliance is of the grounded type, the extension A short power supply cord is to MODE D’EMPLOI ET D’ENTRETIEN... - Page 5 garanties importantes garanties importantes adhérente. le fabricant de l’appareil, car ils StoreBound n’est nullement • pourraient entraîner un feu, une responsable des dommages causés Avertissement : Surfaces chaudes! Un cordon d’alimentation court doit • • électrocution ou un dommage par une mauvaise utilisation de Ne touchez jamais la surface de être fourni afin d’éviter le risque corporel.
-
Page 6: Parts & Features
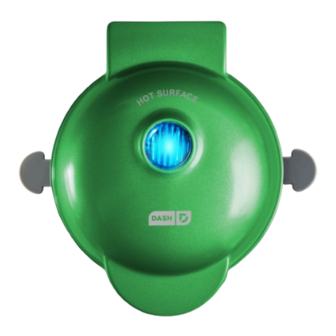
parts & Features Before First use Carefully unpack the Mini Bundt Maker and remove all ® packaging materials. Indicator Light (Blue) Prior to use, clean both Cooking Surfaces of the Mini Bundt Maker with a ® damp cloth or sponge. Main Body Cover NEVER IMMERSE THE MINI BUNDT... - Page 7 using the Mini Bundt Maker ® When using the Mini Bundt Maker, the Cooking Surface and Cover will ® become hot. To properly open the Mini Bundt Maker, lift using the Cover ® Handle from the side. Never touch the DO NOT lift the Cover Always lift and lower Cooking Surface or...
-
Page 8: Using Your Mini Bundt® Maker
using the Mini Bundt Maker using the Mini Bundt Maker ® ® using your Mini Bundt® maker Add the Removal Tool to the base of the Mini Bundt® Maker (photo Place the appliance on a stable and dry surface and lift the Cover to open the Mini Bundt®... - Page 9 using the Mini Bundt Maker using the Mini Bundt Maker ® ® using your Mini Bundt® maker Once cool, carefully remove the cake by lifting the Removal Tool (photo F), taking note that the sides of the Removal Tool may still be hot as well.
-
Page 10: Tips & Tricks
tips & tricks cleaning & maintenance Before cleaning, unplug from outlet and allow to cool completely. • Always pre-heat the Mini Bundt Maker before adding batter or ® the cake will not cook evenly. Be careful when adding batter as Once cool, clean the interior and exterior surfaces of the Mini Bundt®... - Page 11 RECIPE GUIDE Follow us! @bydash | recipes, videos, & inspiration @unprocessyourfood | veg & vegan-friendly meals...
- Page 12 Bake for 4-5 minutes. To check for doneness, insert a toothpick. If cake is done, toothpick should come out clean. classic vanilla Lift cake out using the Removal Tool. Allow to cool completely before glazing or frosting. holiday wreath cake Prep Time: 8-10 minutes •...
- Page 13 Ensure that the hot water has been heated to a simmer then, with the mixer still on low, add the hot water in a slow stream. Turn the mixer to medium and beat until smooth, about two minutes. The batter will be very thin. peppermint Grease Mini Bundt®...
- Page 14 Grease Mini Bundt® Maker and Removal Tool with a light coating of cooking oil. Add batter until Maker is full, about 3 tablespoons. Bake for 4-5 minutes. To check for doneness, insert a toothpick. If cake is done, toothpick should come Gingerbread out clean.
- Page 15 Pour the flour mixture and eggs into the bowl of chocolate. Slowly stir everything together, noting that the batter will be slightly thick. Chocolate Grease Mini Bundt® Maker and Removal Tool with a light coating of cooking oil. Add batter until Maker is full, about 3 tablespoons. Bake for 3-4 minutes, Molten Lava Cake taking note that the middle should be still gooey.
- Page 16 Bake for 10-12 minutes. To check for doneness, insert a toothpick. If cake is done, toothpick should come out clean. Orange Olive Oil Lift cake out using the Removal Tool. Allow to cool completely before glazing or frosting. Mini Bundt Cake ®...
- Page 17 Fill the Mini Bundt Maker ¾ full ( cup batter). If desired, sprinkle 1 tabelspoon ® of walnuts over top of batter prior to baking. Bake for 12-13 minutes. To check for doneness, insert a toothpick. If cake is done, toothpick should come out clean. Ket0 Zucchini Spice Lift cake out using the Removal Tool.
- Page 18 Gluten-Free Dark Chocolate Mini Bundt Cake ® Prep Time: 8-10 minutes Cook Time: 16-20 minutes Serves: 5-6 cakes Ingredients: 1 cup gluten-free flour ¼ teaspoon salt 6 tablespoons unsalted butter, at room ½ teaspoon xanthan gum 1 large egg temperature cup unsweetened Dutch ½...
- Page 19 Grease Mini Bundt® Maker and Removal Tool with a light coating of cooking oil. Fill the Mini Bundt® Maker 3/4 full ( cup batter). Red Velvet Bake for 12 minutes. To check for doneness, insert a toothpick. If cake is done, toothpick should come out clean.
- Page 20 ingredients into the wet until just combined. Grease Mini Bundt® Maker and Removal Tool with a light coating of cooking Strawberry oil. Fill the Mini Bundt Maker 3/4 full ( cup batter). Bake for 10-12 minutes. To check for doneness, insert a toothpick. If cake is Mini Bundt ...
- Page 21 Banana Bread Blueberry Lemon Keto Mini Bundt Cake Mini Bundt Cake ® ® Prep Time: 8-10 minutes Cook Time: 16-20 minutes Serves: 5-6 cakes Prep Time: 8-10 minutes Cook Time: 16-20 minutes Serves: 5-6 cakes Ingredients: Ingredients: 3/4 cup unbleached all-purpose flour ½...
- Page 22 Cream Peanut Cheese Glaze Butter Glaze ½ cup cream cheese, ½ cup confectioners’ sugar room temperature 2 tablespoons peanut powder 1cup confectioners sugar 4 teaspoons whole milk 3 tablespoons whole milk, room temperature Glazy! In a mixing bowl, combine the Place cream cheese in mixing sugar, peanut powder and milk, stirring vigorously until the glaze...
-
Page 23: Recommended Combinations
RECOMMENDED COMBINATIONS BUNDT GLAZE TOPPING ® Vanilla Vanilla Sprinkles Half Vanilla, Half Chocolate Fresh Berries Lemon Raspberry Jam Lemon Zest Chocolate Nutella Sprinkles Peanut Butter Shredded Coconut Fresh Berries Chopped Peanuts Red Velvet Cream Cheese Sprinkles Vanilla Mini Chocolate Chips Confectioner's Sugar Banana Bread Peanut Butter... -
Page 24: Customer Support
Refurbished items or items not purchased through an authorized retailer are not eligible for warranty claims. REPAIRS DANGER! Risk of electric shock! The Dash Wreath Mini Bundt ® Maker is an electrical appliance. Do not attempt to repair the appliance yourself under any circumstances. - Page 25 1-800-898-6970 | @bydash | bydash.com...
Need help?
Do you have a question about the DBCMW100 and is the answer not in the manual?
Questions and answers