Table of Contents
Advertisement
Quick Links
Advertisement
Table of Contents

Subscribe to Our Youtube Channel
Related Manuals for Estun SCARA Clean Edition ER10-SR-C Series


Summary of Contents for Estun SCARA Clean Edition ER10-SR-C Series
- Page 1 Robot SCARA Clean Edition Series Body Operation Instructions...
- Page 2 ESTUN Robot SCARA Clean Edition Series Body Operation Instructions EBM01108-EN-01...
- Page 3 In this manual, all specifications and information are checked on a regular basis. Nevertheless, discrepancies cannot be precluded, for which reason we are not able to guarantee total conformity. ESTUN assumes no responsibility for any direct or indirect losses arising from use of this manual and products described herein.
-
Page 4: Safety
SAFETY SAFETY Installation and transportation of robots and robotic equipment shall be performed by qualified personnel and should conform to all national and local codes. Please read this manual and other related manuals before installing the robot system or before connecting cables. Keep this manual handy for easy access at all times. Conventions Important safety considerations are indicated throughout the manual by the following symbols. -
Page 5: Operation Safety
SAFETY Operation Safety (1) Please carefully read the safety-related requirements in the Safety chapter before operating the robot system. Operating the robot system without understanding the safety requirements is extremely hazardous and may result in serious bodily injury and/or severe equipment damage to the robot system. (2) Do not enter the operating area of the Robot while the power to the robot system is turned ON. -
Page 6: Emergency Stop
SAFETY (14) When tear down the adhesive tape or seal on the oil paint surface of the robot and the cabinet, be careful that damage to the paint may occur. (15) The surface of the robot may be heated when operating with high payload or high speed. Pay attention to second injury due to unintentionally touch of heated parts. - Page 7 SAFETY...
-
Page 8: Electric Shock Warning
SAFETY Robot Labels (1)Electric Shock Warning Fig 0.1 Electric shock warning This label indicates hazardous voltage or electric shock. Do not touch any electronic parts inside. (2)Personal Injury Warning Fig 0.2 Personal injury warning Never enter the operation area while the Robot is moving. This is extremely hazardous and may result in serious safety problems. - Page 9 SAFETY (4)Manual Reading Warning Fig 0.4 Manual reading warning Be sure to read and understand the content of the manual and the labels before installation and operation. Read the content again when operate the robot the next time. Information not included in this manual is not allowed.
-
Page 10: Preface
This manual describes the following robots. Series Robot Type Load Capacity Z-axis motion travel ER10-500-SR-C ER10-600-SR-C ER10-SR-C 10kg 200mm ER10-700-SR-C ER10-800-SR-C Related manuals ESTUN SCARA Robot Mechanical Unit Operator’s Manual ESTUN ERC series compact control cabinet product manual ESTUN ER Series Industrial Robot Operation Manual... -
Page 11: Table Of Contents
CONTENTS CONTENTS SAFETY ................................s-1 PREFACE ................................p-1 CONTENTS ................................ c-1 SPECIFICATIONS ............................1 1.1. Model Number ............................1 1.2. Part Names and Outer Dimensions ......................2 1.3. Specifications ............................5 ENVIRONMENTS AND INSTALLTION ..................... 7 2.1. Environmental Conditions........................7 2.1.1. -
Page 12: Contents
CONTENTS 5.3. Tightening Hexagon Socket Head Cap Bolts ..................26 5.4. Maintenance of the Belt ........................28 5.4.1. Belt specifications ........................28 5.4.2. Failure mode of timing belt ....................... 28 CALIBRATION ............................30 6.1. Introduction ............................30 6.2. Calibrating With Special Tools ......................30 6.3. -
Page 13: Specifications
SPECIFICATIONS 1. SPECIFICATIONS 1.1. Model Number Arm length Load capacity... -
Page 14: Part Names And Outer Dimensions
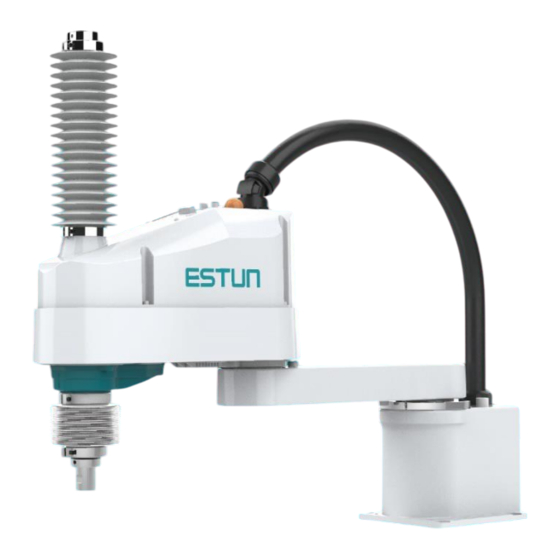
SPECIFICATIONS ER10 - 600 - SR - C : Clean Edition Series SR : SCARA Series Arm length 400 : 400mm 500 : 500mm 600 : 600mm 700 : 700mm 800 : 800mm 1000 : 1000mm Load capacity : 3kg : 6kg : 10kg : 20kg... - Page 15 SPECIFICATIONS Joint #3 brake release switch LED lamp Arm #1 Arm #2 Base Shaft Fig 1.1 Part name (ER10)
- Page 16 SPECIFICATIONS Details A 1mm flat cut Conical hole Max diameter through hole Shaft diameter Mechanical stop diameter Mechanical stop diameter More than 90 Space for cables Through hole Fig 1.2 Dimension of ER10 robot...
-
Page 17: Specifications
SPECIFICATIONS 1.3. Specifications Tab 1.1 Specifications for SCARA robots Item ER10 series 500 series 600 series Arm#1, #2 (mm) 700 series 800 series Arm length 500 series 600 series Arm#1 (mm) 700 series 800 series Arm#2 (mm) 500 series 7033 600 series 7750 Arm#1, #2 (mm/s) - Page 18 SPECIFICATIONS 800 series Joint #3 down force (N) Installed wire for customer use 15 pins: D-sub 3 pneumatic tubes (ø 6 mm): 0.59 Mpa (6 kgf/cm : 86 Installed pneumatic tube psi) for customer use 1 pneumatic tubes (ø8 mm): 0.59 Mpa (6 kgf/cm2: 86 psi) 0 to 45 degrees C (with minimum temperature Ambient Temp.
-
Page 19: Environments And Installtion
ENVIRONMENTS AND INSTALLATION 2. ENVIRONMENTS AND INSTALLTION 2.1. Environmental Conditions A suitable environment is necessary for the robot system to function properly and safely. Be sure to install the robot system in an environment that meets the following conditions: Item Conditions Ambient temperature* 0 to 45°C (with minimum temperature variation) -
Page 20: Base Table
ENVIRONMENTS AND INSTALLATION 2.2. Base Table A base table for anchoring the Robot is not supplied. Please make or obtain the base table for your Robot. The shape and size of the base table differs depending on the use of the robot system. For your reference, we list some Robot table requirements here. -
Page 21: Mounting Dimension
Cable break may occur when the robot is operating on the rail or lifting platform, due to factory-set configuration with a fixed installation standard for cables between devices. If cable break occurs, contact ESTUN for custom solutions for flexible cable with drag chain. - Page 22 ENVIRONMENTS AND INSTALLATION Center of Joint #3 Maximum space Motion range Area limited by mechanical stops Base mounting face Fig 2.2 Motion range ER10-SR-C Item ER10-600-SR- ER10-700-SR- ER10-800-SR- ER10-500-SR-C a Length of Arm #1& Arm #2 (mm) b Length of Arm #1 (mm) c Length of Arm #2 (mm) d Motion range of Joint #1 (°...
-
Page 23: Unpacking And Transportation
ENVIRONMENTS AND INSTALLATION j Mechanical stop position range 121.8 142.5 (mm) k Mechanical stop position range 427.0 494.6 562.1 629.7 of backside (mm) m Motion range (mm) Maximum space (mm) 2.4. Unpacking and Transportation Only authorized personnel should perform sling work and operate a crane and a forklift. -
Page 24: Installation Procedure
ENVIRONMENTS AND INSTALLATION When transporting the Robot for a long distance, secure it to the delivery equipment directly so that the Robot never falls. If necessary, pack the Robot in the same style as it was delivered. The Robot weights are as follows. Parts Weight (kg) ER10-500-SR... -
Page 25: Grounding Methods
ENVIRONMENTS AND INSTALLATION Fig 2.4 Secure the base table Use bolts with specifications conforming to ISO898-1 Property Class: 10.9 or 12.9. The tightening torque is 32.0 N· m (326kgf· cm). (2) Using nippers, cut off the wire tie binding the shaft and arm retaining bracket on the base. (3) Remove the bolts securing the wire ties removed in step (2). - Page 26 ENVIRONMENTS AND INSTALLATION Main body grounding cable Flat washer 4 (nickel-plated) Spring washer 4 (nickel-plated) M4X10 (nickel-plated) Fig 2.6 Connection of grounding cable...
-
Page 27: Connecting The Cables
ENVIRONMENTS AND INSTALLATION 2.7. Connecting the Cables To shut off power to the robot system, pull out the power plug from the power source. Be sure to connect the AC power cable to a power receptacle. DO NOT connect it directly to a factory power source. -
Page 28: User Wires And Pneumatic Tubes
ENVIRONMENTS AND INSTALLATION The serial number of the robot should be accordance with the serial number of the cabinet. Precision deviation may occur due to unmatched serial numbers. 2.8. User Wires and Pneumatic Tubes Only authorized or certified personnel should be allowed to perform wiring. Wiring by unauthorized or uncertified personnel may result in bodily injury and/or malfunction of the robot system. -
Page 29: Relocation And Storage
ENVIRONMENTS AND INSTALLATION Fittings for φ6mm Fittings for φ6mm Fittings for φ8mm (blue) Fittings for φ6mm (other color) User connector (male plug) (15-pin D-sub connector) User connector (female plug) Fittings for φ6mm Third axis brake release (15-pin D-sub connector) (other color) switch Power cable connector Fittings for φ6mm... -
Page 30: Relocation
ENVIRONMENTS AND INSTALLATION 2.9.2. Relocation (1) Turn OFF the power on all devices and unplug the cables. (2) Cover the arm with a sheet so that the arm will not be damaged. Tie the lower end of the shaft and arm, and the base and arm together with the wire tie. -
Page 31: Setting Of End Effectors
SETTING OF END EFFECTOR 3. SETTING OF END EFFECTORS 3.1. Attaching an End Effector Users are responsible for making their own end effector(s). Before attaching an end effector, observe these guidelines. If you use an end effector equipped with a gripper or chuck, connect wires and/or pneumatic tubes properly so that the gripper does not release the work piece when the power to the robot system is turned OFF. -
Page 32: Attaching Cameras And Valves
SETTING OF END EFFECTOR 3.2. Attaching Cameras and Valves The bottom of the Arm #2 has threaded holes as shown in the figure below. Use these holes for attaching cameras, valves, and other equipment. Fig 3.1 Dimensions for attaching cameras and valves... -
Page 33: Equivalent Weight
SETTING OF END EFFECTOR 3.2.1. Equivalent weight When you attach a camera or valve to the arm, calculate the weight as the equivalent of the shaft. Then add this to the load. Equivalent weight formula is shown below. When you attach the equipment near Arm #2: �� = ��... -
Page 34: Motion Range
MOTION RANGE 4. MOTION RANGE 4.1. Motion Range Setting by Mechanical Stops Mechanical stops physically limit the absolute area that the Robot can move. Mechanical stop of Joint #3 (lower limit mechanical stop) Mechanical stop of Joint Mechanical #2 (fixed) stop of Joint #1 (fixed) Mechanical stop... - Page 35 MOTION RANGE Fig 4.2 Mechanical stops Type Angle for the J1 axis mechanical stop Angle for the J2 axis mechanical stop ER10-SR-C ±115° ±125°...
-
Page 36: Maintenance
MAINTENANCE 5. MAINTENANCE This chapter describes maintenance inspections and procedures. Performing maintenance inspections and procedures properly is essential for preventing trouble and ensuring safety. Be sure to perform the maintenance inspections in accordance with the schedule. Never perform any maintenance unless shut down the system. 5.1. -
Page 37: Inspection While Power Is Off (Robot Is Not Operating)
MAINTENANCE 5.1.1. Inspection While Power is OFF (Robot is not operating) Inspection Point Inspection Place Daily Monthly Quarterly Biannual Annual √ √ √ √ √ End effector mounting bolts √ √ √ √ √ Robot mounting bolts Check looseness or backlash of √... -
Page 38: Greasing Procedures
MAINTENANCE following table. Keep enough grease in the Robot. Operating the Robot with insufficient grease will damage sliding parts and/or result in insufficient function of the Robot. Once the parts are damaged, a lot of time and money will be required for the repairs. ... - Page 39 MAINTENANCE These bolts are fastened with the tightening torques shown in the following table. When it is necessary to refasten these bolts in some procedures in this manual (except special cases as noted), use a torque wrench so that the bolts are fastened with the appropriate tightening torques as shown below.
-
Page 40: Maintenance Of The Belt
MAINTENANCE 5.4. Maintenance of the Belt Item Model Notes Tool Acoustic tension gates U507 For details about measurement, refer to specification of the meter acoustic tension meter. 5.4.1. Belt specifications Tab 5.2 Belt specifications L =450mm Model Belt Mass (g/mm*m) Width (mm) Span (mm) Internal stress (N) -
Page 41: Oil Leakage Inspection
MAINTENANCE Abnormal wear on the Wear of the tooth cloth. Exposure of the rubber. (width of gear tooth tooth profile reduces) Crack on the gear Crack dedendum Dedendum fall off Exposure of core wire Abnormal wear Edge tends to round, abnormal wear (exposure of core wire) Note: it is normal when the side face section shows an knife- cutting shape. -
Page 42: Calibration
6. CALIBRATION 6.1. Introduction Calibration associates the angle of each robot axis with the pulse count value supplied from the absolute Pulsecoder connected to the corresponding axis motor. To be specific, calibration is an operation for obtaining the pulse count value, corresponding to the home position. -
Page 43: Calibration In Each Axis
Fig 6.1 Single-ring value of quick calibration (ERC controller) 6.3. Calibration in Each Axis Calibrate the home position of J1-axis of ER3/ER6 Robot follow the procedures below. Move Arm #1 to the position as shown in the figure. Align the mark on Arm #1 to the mark on the base. Calibrate home position again. -
Page 44: Necessary Tools
Zero position of J2-joint Fig 6.3 Home position of Joint #2 Zero position of J4-joint Zero position of J3-joint Fig 6.4 Home position of Joint #3 and #4 Before performing all maintenance activities, read the safety precautions in Chapter 1 carefully. Never perform any maintenance unless the power of the robot system is turned off. - Page 45 Symptom Description Cause Measure Unfirm connection between base The connection between the base and Reinforce the connection the ground is loose due to the frequent and floor. between robot base and floor. vibration of the robot. It is likely caused by a loose bolt, or lack of bolt fastening measures (such as Re-mount and re-fasten the Joint connection is loose...
- Page 46 Joint does not The servo motor brake went out. Replace the servo motor. rotate under the action of gravity lock after a period of time after stopping. REPLACING SERVO MOTOR PARTS 7.3. Contact ESTUN representative if servo motor replacement is needed...
- Page 47 CALIBRATION When removing some parts of the robot, other parts may lose support, thus leads to unexpected movement, and cause personnel injury and equipment damage. Disassembling of the robot must been performed by authorized person. When replacing servo motors, the disassembled parts should be kept properly and cleaned thoroughly before remounting.
-
Page 48: Appendix
REVISION RECORD APPENDIX Appendix A ER10 Maintenance Parts List Part name Code Note quantity Maintenance ● Joint #1 12700000462 ● AC Servo Motor Joint #2 12700000462 ● Joint #3/#4 12700000452 ● Joint #3 G5400000428 Timing belt ● Joint #4 G5400000427 Battery 51200000104... -
Page 49: Appendix B Er6 Maintenance Parts List
REVISION RECORD REVISION RECORD Revision Date Content 2024.07 New edition.
Need help?
Do you have a question about the SCARA Clean Edition ER10-SR-C Series and is the answer not in the manual?
Questions and answers