Table of Contents
Advertisement
Advertisement
Table of Contents

Subscribe to Our Youtube Channel
Related Manuals for Estun Mini Series


Summary of Contents for Estun Mini Series
- Page 1 ESTUN Robotics Mini Series Robot Body Operation Instructions...
- Page 2 ESTUN Mini Series Robot Body Operation Instructions M-0501CN-12...
- Page 3 Thank you for purchasing ESTUN robots. Before using the robot, be sure to read the SAFETY PRECAUTION and understand the content. ESTUN endeavor to improve the products. All specifications and designs are subject to change without notice. All statements, information, and advice provided in this manual have been carefully processed, but no guarantee is given for their complete accuracy.
- Page 4 This Chapter describes the content to be observed for the safe use of the robot. Before using, be sure to read and understand the content in this Chapter. Companies and individuals using ESTUN Robotics should be familiar with the local and national standards and laws. Appropriate safety facilities shall be provided to protect users. Before use...
- Page 5 A supplementary explanation helps users operating the robot more efficiently. Safety precautions for users (1) The robot should be transported and installed as procedures recommended by ESTUN. Wrong procedures may cause severe injuries or damage due to the robot fall.
- Page 6 Instructions for Safe Use Check the motor brake to avoid personnel injuries caused by unexpected situation. Always have an escape plan in mind in case the robot comes towards you unexpectedly. Ensure that there is a place to retreat to in case of emergency. ...
- Page 7 Instructions for Safe Use ON/OFF enabling is done by operating a Mot button on the teach pendant. When pressing this button, the servomotor is enabled, and disabled when releasing it. To ensure the safe use of the teach pendant, the following rules must be observed: Ensure that the enable button works at all times.
- Page 8 Instructions for Safe Use (5) Brake detection In general, the brake can be worn in the normal operation. Therefore, the brake detection is necessary by following the steps below. Move each joint to a position, where the joint can bear the maximum load. Shut down the robot and brake.
- Page 9 Instructions for Safe Use The following processing is performed at Power-Off stop: An alarm is generated and servo power is turned off, and the robot operation is stopped immediately. Execution of the program is paused. For the robot in motion, frequent power-off operations through E-stop buttons will cause robot failure.
- Page 10 Instructions for Safe Use Warning and Caution Signs (1) Electric shock Figure 0.1 Electric shock warning sign Attention should be paid to the danger of high voltage and electric shock at the place where this sign is affixed. (2) High temperature Figure 0.1 High temperature warning sign Be cautious about a section where this label is affixed, as the section generates heat.
- Page 11 Instructions for Safe Use Do not step on or climb the robot as it may adversely affect the equipment, and cause the bodily injury to operators. (4) Wounding by robot Figure 0.4 Wounding by robot warning sign There is a danger of wounding by robot when working within the motion range of robot. Handling Figure 0.3 Handling sign (ER10-900-MI/HI) This symbol indicates the precautions for handling robots.
- Page 12 Instructions for Safe Use Figure 0.4 No disassembly warning sign Users are prohibited from disassembling the part affixed with this sign. Disassembly shall be carried out by professionals using professional tools.
-
Page 13: Preface
This manual is applicable to the following robot type. Robot type Load capacity ER10-900-MI/HI 10kg List of relevant instructions Mini Series Robot Body Operation Instructions of ESTUN Robotics ERC Series Compact Control Cabinets Product Manual Operation Instructions of ESTUN RCS2 System... -
Page 14: Table Of Contents
CONTENTS CONTENTS Instructions for Safe Use ............................ 1 Preface .................................. 1 CONTENTS ................................1 Transportation & Installation ........................1 1.1. Transportation ..........................1 1.1.1. Way of transport ........................2 1.2. Installation ............................. 3 1.2.1. Stand............................6 1.3. Installation conditions ........................7 Connection with the Controller........................ -
Page 15: Contents
CONTENTS Appendix ................................34 Appendix A Screw tightening torque list ....................34 Appendix B Specifications and technical parameters of chemical bolts ........... 34 Appendix C List of recommended spare parts for ER10-900-MI/HI ............34 Revision Record ..............................35... -
Page 16: Instructions For Safe Use
J3-axis and J4-axis) Wrist assembly (Including wrist, J5-axis and J6-axis) Some parts with less weight are not listed. Contact ESTUN if you need the IN FO details. During transportation, it is necessary to install the mounting bracket and protective pad for the robot. -
Page 17: Way Of Transport
Transportation & Installation Mounting holes 2 x M5*10 screws and flat gasket Mounting holes 2 x M10*20 screws and flat gasket Handling bracket Protective Fig. 1.1 Robot fixed bracket (ER10-900-MI/HI) 1.1.1. Way of transport The robot described in this manual can be transported by a forklift. Set the robot to the handling position and install special handling brackets (2 in total) on both sides of the base. -
Page 18: Installation
The following precautions must be fully understood and observed before installing the robot: Be sure to read and understand SAFETY chapter thoroughly; ESTUN robots must be transported, mounted and operated by authorized person, and in accordance with the applicable national laws, regulations and standards;... - Page 19 Transportation & Installation When mounting the robot base, consider its structure and the force upon it. Concrete on the base may not have any crack and conform to the specified codes. The bearing capacity and compaction of the concrete foundation should be in accordance with the design guideline.
- Page 20 Transportation & Installation 3-∅13.5 Through hole Fig. 1.4 Robot base mounting dimension (ER10-900-MI/HI) Tab 1.2 Robot fixing components (ER10-900-MI/HI) Name & model Qty. Fixed screw: M12X55 (GB/T 70.1 12.9 grade) Spring washer: Spring washer 12 (GB/T 93) Positioning pin: Cylindrical pin 8X20 Installing positioning pins can greatly minimize the impact on the existing robot's program trajectory caused by reinstalling or replacing the robot.
-
Page 21: Stand
Transportation & Installation 4-∅11 Through hole 3-M12 Through hole J1-axis rotation center Chemical bolts Base mounting M10X130(4) screws Tightening torque: M12X55(4(3) 33NM Level: 12.9 Tightening torque: 137NM Note: When installing the iron plate on the ground, secure the robot mounting plate to the concrete floor using four M10X130 chemical bolts. -
Page 22: Installation Conditions
The robot body exhibits excellent resistance to chemicals and solvents, as described below: (1) The following liquids may cause aging or corrosion of rubber components (seals, gaskets, O-rings, etc.) on the robot. Please refrain from using them, except for products approved by ESTUN. (a) Organic solvents... -
Page 23: Connection With The Controller
Connection with the Controller 2. Connection with the Controller The figure below shows the cables connect the robot with the controller. Connect these cables on the back of the base. Detail A Flat washers 4 Screw M4×10 Control cabinet Robot connection cable (nickel-plated) (nickel-plated) (Power cable, signal cable, I/O... - Page 24 Connection with the Controller Fig. 2.2 Dimensions of aviation plug...
-
Page 25: Specification
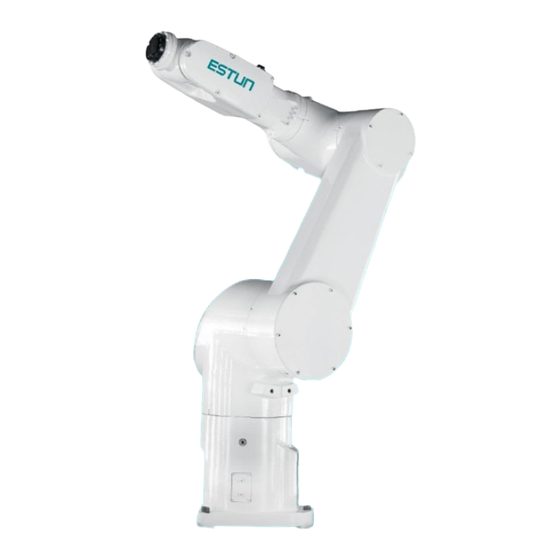
Specification 3. Specification 3.1. Robot configuration Motor base J3-axis J5-axis motor Small arm J4-axis Wrist joint J5-axis J3-axisand J4-axis J6-axis motor J6-axis motor J2-axis motor J2-axis Swivel base J1-axis motor J1-axis Base Fig 3.1 Robot configuration (ER10-900-MI/HI) Tab 3.1 Robot specifications ER10-900-MI/HI Model Type... -
Page 26: External Dimensions And Operating Space
(Note 3) For usage in high-temperature, low-temperature, vibrating, dusty, or environments with high concentrations of cutting oil, please consult ESTUN for guidance. 3.2. External dimensions and operating space The following figures illustrate the range of motion of the robot and serves as a reference for selecting and setting up the robots installation position. - Page 27 Specification Range of motion at point P Fig 3.2 Motion range (ER10-900-MI/HI)
-
Page 28: Zero Point Position And Motion Limit
Specification 3.3. Zero point position and motion limit Zero point and motion range are provided for each controlled axis. Exceeding the software motion limit of a controlled axis is called overtravel (OT). Overtravel is detected at both ends of the motion limit for each axis. - Page 29 Specification J1-axis limit J1-axis limit Fig. 3.4 J1 Axis brake position (ER10-900-MI/HI) J2-axis limit J2-axis limit Fig. 3.5 J2 Axis brake position (ER10-900-MI/HI)
- Page 30 Specification J4-axis limit Fig. 3.6 J4 Axis brake position (ER10-900-MI/HI) J5-axis limit Fig. 3.7 J5 Axis brake position (ER10-900-MI/HI) Refer to system operation manual for more information about setting motion range.
-
Page 31: Wrist Load Condition
Robot load capacity (including weight of gripper or welding gun) coincides with robot model. Observe restrict of load torque and load inertia strictly. For the calculation of payload torque and payload inertia, please refer to the "ESTUN Robot Payload Capacity Calculation Table". For specific details, please consult our sales personnel. -
Page 32: Equipment Installation
Equipment Installation 4. Equipment Installation 4.1. End flange mounting interface This section describes the mounting face dimension of the end flange. Consider the depth of the screw holes and pin holes sufficiently before choose the length of the bolts and pins. Antirust measures of screws, grippers, etc., should be considered as well. - Page 33 Equipment Installation Available with pre-assembled bolts removed Fig. 4.2 Equipment mounting surface (ER10-900-MI/HI) When installing external equipment, it is important to ensure that there is no interference with the robot body to prevent any accidents. The external interface of the J3 axis should not bear a load exceeding 0.3kg. When installing the robot body, it is important to strictly adhere to the following precautions to avoid deformation of the rotating base.
-
Page 34: External Pipelines
0.2mm 以 内 0 .2 m m 4.3. External pipelines This mini series of robots provides pathways for supplying pneumatic or hydraulic pressure to the end effector mechanism. I/O connector Air hose connector 2- ∅6 Fig 4.3 External pipelines (ER10-900-MI/HI) 4.3.1. - Page 35 Equipment Installation Wire Color Contact pin gauge Blue This core is connected to Green housing IO connector at small arm Welding surface IO correspondence Figure 4.4 IO connector pin distribution at top of small arm...
-
Page 36: Check And Maintenance
Check and Maintenance 5. Check and Maintenance Before performing any maintenance, be sure to read SAFETY PRECAUTIONS in Chapter 1 and understand the content. Never implement any maintenance unless the power of the robot is cut off. 5.1. Daily checks Check the items below before daily operation as occasion demands. - Page 37 Check and Maintenance not operate, replace the damaged parts. Check whether the cable protection sheaths of the mechanical Check damages of unit cable have holes or tears. If damage is found, replace the the cable protection cable protection sheath. If the cable protection sheath is sheaths damaged due to the interference with peripheral equipment, eliminate the cause.
-
Page 38: Adjustment Of Drive Belts
Replace mechanical unit cable. Contact ESTUN mechanical unit cable representative for information regarding replacing the cable. 5.3. Adjustment of drive belts After a period of use, the tension of the timing belt may decrease, and it will require re-tensioning. - Page 39 Check and Maintenance Socket head cap screw M4X16 J5 axis moto Aim headpin of the straining device to the belt in line at 5-7mm distance. Use an internal hexagon wrench to wave the belt when measuring tense. Fig 5.1 Strain the timing belt (ER10-900-MI/HI) Tab 5.1 Timing belt tense/frequency value reference (ER10-900-MI/HI) Model Range of belt tense...
-
Page 40: Replacement Of Batteries
Check and Maintenance 5.4. Replacement of batteries The position data of each axis is preserved by the backup batteries. The batteries need to be replaced every 1 year. Also use the following procedure to replace when the backup battery voltage drop alarm occurs. - Page 41 For the J3 to J6 axes, under normal operating conditions, lubricant replenishment is not required (except when replacing the reducer). However, under harsh conditions such as high duty cycle, high-speed movements, or heavy load, regular lubricant replenishment is necessary. For any inquiries regarding lubricant replenishment, please contact ESTUN. J1-axis oil inlet J1-axis oil outlet Fig 5.3 J1-axis oil inlet/outlet (ER10-900-MI/HI)
-
Page 42: Steps To Replace Grease
Check and Maintenance 5.5.1. Steps to replace grease The following procedure is specific to the J1 and J2 reducers of ER10-900-MI/HI robots. Please follow the steps below: a) Teach each joint of the robot at 100% speed for 10-20 minutes to convert the internal grease into a lower viscosity oil;... -
Page 43: Zero Calibration
ESTUN employs robot encoder information to assist in zero-point calibration, following these steps: Manually operate the robot and align the axis with two zero reference marks. -
Page 44: Mechanical Zero Calibration
Zero Calibration Fig 6.1 Quick zero calibration single-turn value 6.3. Mechanical zero calibration Mechanical disassembly or maintenance may cause zero position data lost. Mechanical zero position calibration is performed with all axes jogged to zero-position using their respective witness marks. Take J1-axis for example of zero position calibration. - Page 45 Zero Calibration Fig 6.2 Calibration for J1-axis and J2-axis J3 zero calibration Fig 6.3 Calibration for J3-axis J4 zero calibration Fig 6.4 Calibration for J4-axis J5 zero calibration 图 6.5 Calibration for J5-axis...
- Page 46 Zero Calibration J6 zero calibration Fig 6.6 Calibration for J6-axis...
-
Page 47: Troubleshooting
Troubleshooting 7. Troubleshooting Be sure to read SAFETY PRECAUTIONS in Chapter 1 and understand its contents before any maintenance. Never perform any maintenance unless the power of the robot system is turned off. 7.1. Tools Troubleshooting tools includes travelling crane, forklift, internal hexagonal wrench, monkey wrench and special tools for removing the bearings. -
Page 48: Replacement Of Servo Motor Components
7.3. Replacement of servo motor components Contact ESTUN technical representative if servo motor replacement is needed. When removing some parts of the robot, other parts may lose support, thus leads to unexpected movement, and cause personnel injury and equipment damage. - Page 49 Appendix Appendix Appendix A Screw tightening torque list Bolt Models (GB/T 70.1) Tightening 9.01 15.6 37.2 73.5 Torque /N.m (Level ±0.49 ±0.78 ±1.86 ±3.43 ±6.37 ±10.2 ±15.9 ±22 12.9) Appendix B Specifications and technical parameters of chemical bolts Designed Designed Nominal Screw Drill...
- Page 50 Revision Record Revision Record Revision Date Contents 2017.09 New edition. Add description of solenoid valve assembly; change description of reducer; 2018.10 add dimensions of base aviation plug connector; change error description; change the instructions for lubrication maintenance; update the layout. Modify robot J3 axis range of motion and description;...
Need help?
Do you have a question about the Mini Series and is the answer not in the manual?
Questions and answers