
Subscribe to Our Youtube Channel
Related Manuals for Mastervac 054-0297-6


Summary of Contents for Mastervac 054-0297-6
- Page 1 10 L (2.5 U.S. GALLONS) WET/DRY VACUUM model no. 054-0297-6 IMPORTANT: INSTRUCTION Read and understand this instruction manual thoroughly before MANUAL using the product.
- Page 3 TABLE OF CONTENTS SPECIFICATIONS EXTENSION CORDS SAFETY WARNINGS LOCATION OF PARTS GENERAL ASSEMBLY INSTRUCTIONS DRY VACUUM OPERATION WET VACUUM OPERATION BLOWER OPERATION MAINTENANCE INSTALLING AND CLEANING REUSABLE CLOTH FILTER INSTALLING AND CLEANING FOAM WET FILTER TROUBLESHOOTING ACCESSORIES EXPLODED VIEW PARTS LIST WARRANTY * “Tank Size”...
-
Page 4: Extension Cords
054-0297-6 | contact us 1-800-689-9928 Tank size 10 L (2.5 U.S. gallons/ 2.19 Imperial gallons) Peak horsepower 2.0 HP Power 120 V, 60 Hz, 6.0 A Tank Polypropylene Power cord 10' (3.0 m) Hose 1 1/4" x 6' (3.2 cm x 1.8 m) Water lift 51"... -
Page 5: Important Safety Instructions
IMPORTANT SAFETY INSTRUCTIONS READ AND UNDERSTAND ALL INSTRUCTIONS BEFORE USING THIS VACUUM. Read and understand this operator’s manual and all labels on the wet/dry vacuum cleaner before operating. Safety is a combination of common sense, staying alert and knowing how your vacuum works. - Page 6 054-0297-6 | contact us 1-800-689-9928 • Do not pull or carry by cord, use cord as a handle, close a door on cord, or pull cord around sharp edges or corners. • Keep cord away from heated surfaces.
-
Page 7: Double Insulation Instructions
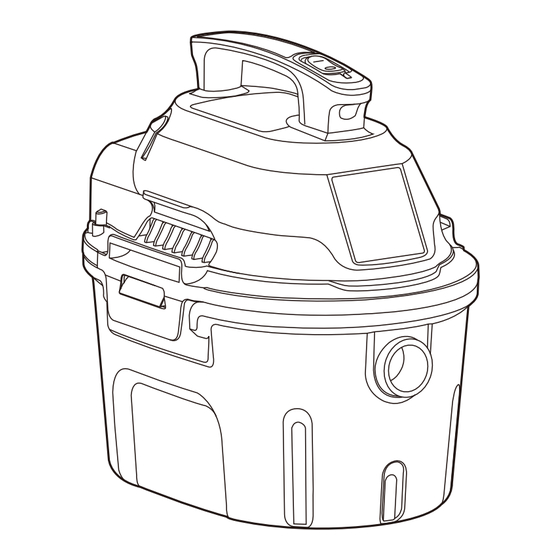
When using as blower: • Direct air discharge only at work area. • Do not use wet/dry vacuum as a sprayer. • Do not direct air at bystanders. • Keep children away when blowing. • Wear safety goggles. SAVE THESE INSTRUCTIONS DOUBLE INSULATION INSTRUCTIONS This wet/dry vacuum is double-insulated, eliminating the need for a separate grounding system. - Page 8 054-0297-6 | contact us 1-800-689-9928 Description Description Blower Port Handle Deluxe Car Nozzle On/Off Switch 2-in-1 Utility Nozzle with Brush Accessory Storage Hose Power Head Crevice Tool Hose Storage Detail Brush Nozzle Latch Blower/Adaptor Nozzle Vacuum Port Foam Wet Filter...
- Page 9 UNPACKING YOUR WET/DRY VACUUM AND GENERAL ASSEMBLY Verify that the power cord is disconnected from the outlet. Undo the latches. Lift the power head off the collection tank. Remove the contents from inside the collection tank. Make sure you have all contents listed on page 8.
- Page 10 054-0297-6 | contact us 1-800-689-9928 For dry vacuum cleaning, install the supplied reusable cloth filter. For filter installation instructions, see page 19. For wet vacuum cleaning, install the supplied foam filter. For filter installation instructions, see page 21.
- Page 11 Choose the desired accessories and insert onto the end of the hose. POLARIZED PLUG To reduce the risk of electrical shock, this appliance has a polarized plug (one blade wider than the other). This plug will fit in a polarized outlet only one way. If the plug does not fit fully in the outlet, reverse the plug.
-
Page 12: Dry Vacuuming
054-0297-6 | contact us 1-800-689-9928 DRY VACUUMING Verify that the power cord is disconnected from the outlet. In order to prepare your vacuum for dry vacuuming, make sure the filter is completely covering the filter cage against the power head. - Page 13 Insert the larger end of the hose into the vacuum port on the tank. Push the required attachment onto the free end of the hose or extension. Plug the power cord into the outlet. Turn the motor on by flipping the switch to the ‘I’ ON position, and begin vacuuming.
- Page 14 054-0297-6 | contact us 1-800-689-9928 LIQUID VACUUMING Verify that the power cord is disconnected from the outlet. Remove reusable cloth filter, then carefully install the foam wet filter over the filter cage and place the power head back on the collection tank. For filter installation instructions, see page 21.
- Page 15 Insert the larger end of the hose into the vacuum port on the tank. Fit the desired nozzle to the free end of the vacuum hose. Verify that the switch is in the ‘O’ OFF position before plugging the power cord into the outlet.
- Page 16 054-0297-6 | contact us 1-800-689-9928 This wet/dry vacuum has blowing capabilities only when the hose is inserted into the blower port. To use the blower feature follow the instructions listed. Verify that the power cord is disconnected from the outlet.
-
Page 17: Emptying The Collection Tank
Ensure the power switch is turned off, and plug into the power supply. Before turning on the vacuum, firmly hold the loose end of the hose. Turn the motor on by flipping the switch to the ‘I’ ON position. EMPTYING THE COLLECTION TANK Verify that the power cord is disconnected from the outlet. - Page 18 054-0297-6 | contact us 1-800-689-9928 Undo the latches and remove the power head from the collection tank. Clear all dirt or debris from the collection tank and hose. Clean or replace the filters. Check the hose, attachments, and power cord to verify that they have not been damaged.
- Page 19 INSTALLING REUSABLE CLOTH FILTER Verify that the power cord is disconnected from the outlet. Remove the power head and place it in an upside-down position. Slide reusable cloth filter down over the filter cage making sure the cage is completely covered. Replace the power head onto the collection tank.
- Page 20 054-0297-6 | contact us 1-800-689-9928 REMOVING AND CLEANING REUSABLE CLOTH FILTER Remove the power head and place it in an upside-down position. Carefully remove the reusable cloth filter from the filter cage. Clean the filter by gently tapping or brushing dirt off.
- Page 21 INSTALLING FOAM WET FILTER Verify that the power cord is disconnected from the outlet. Remove power head and place in upside down position. Follow instructions to remove cloth filter. Carefully slide foam wet filter down over the filter cage, making sure the cage is completely covered.
- Page 22 054-0297-6 | contact us 1-800-689-9928 SYMPTOM POSSIBLE CAUSE CORRECTIVE ACTION Vacuum will not operate.. No power supply. Check the power-supply cord, breakers, and fuses. Faulty power cord. Unplug and check the power cord. If damaged, have it repaired by a professional.
- Page 23 ® Additional accessories for your Mastervac Wet/Dry Vacuum are available. Consumables 054-0151-2 Foam Sleeve/Wet Filter 054-0140-8 Dry Reusable Filter 054-0149-0 Dust Collection Bag 1 1/4" Accessories 054-0120-6 Multi-surface Nozzle 054-0009-4 Micro Kit 054-0084-2 Round Brush 054-0085-0 Crevice Tool 054-0086-8 Utility Nozzle...
- Page 24 054-0297-6 | contact us 1-800-689-9928...
- Page 25 Part Description Power Head Assembly Float and Filter Cage Reusable Cloth Filter Collection Tank Operator’s Manual Hose 2-in-1 Utility Nozzle With Brush Crevice Tool Foam Wet Filter Deluxe Car Nozzle Blower/Adaptor Nozzle Detail Brush Nozzle If any parts are missing or damaged, or if you have any questions, please call the toll-free helpline at 1-800-689-9928.
-
Page 26: Year Limited Warranty
054-0297-6 | contact us 1-800-689-9928 3-YEAR LIMITED WARRANTY This Mastervac product is guaranteed for a period of three (3) years from the date of original retail purchase against defects in materials and workmanship. Subject to the conditions and limitations described below, this product, if returned to us with proof of purchase within the stated warranty period and if covered under this warranty, will be repaired or replaced (with the same model, or one of equal value or specification), at our option.
Need help?
Do you have a question about the 054-0297-6 and is the answer not in the manual?
Questions and answers