
Related Manuals for Euromatic PAC26KW


Summary of Contents for Euromatic PAC26KW
- Page 1 2.63 kW Portable Air Conditioner With Dehumidifier USER MANUAL Model Number PAC26KW After Sales Support (AU) 1300 886 649 (NZ) 0800 836 761 | tempo.org/support...
-
Page 2: Table Of Contents
Contents Important Safety Instructions Product Overview Getting Started Installation Instructions FAQs and Troubleshooting Guide Other Useful Information After Sales Support (AU) 1300 886 649 (NZ) 0800 836 761 | tempo.org/support... -
Page 3: Important Safety Instructions
Important Safety Instructions IMPORTANT SAFETY INSTRUCTIONS READ CAREFULLY AND KEEP FOR FUTURE REFERENCE Read this manual thoroughly before first use, even if you are familiar with this type of product. The safety precautions enclosed herein reduce the risk of fire, electric shock and injury when correctly adhered to. - Page 4 Important Safety Instructions (Cont.) Usage Conditions and Restrictions • Intended use: This appliance is intended for air conditioning domestic environments. It is not suitable for commercial, industrial or trade use. Do not use it for any other purpose (such as drying clothes, cooling food, etc.), and only use it as described in this manual. • Common sense: These instructions are not intended to cover every possible condition and situation.
- Page 5 Important Safety Instructions (Cont.) • Service and repair: The air conditioner has no user-serviceable parts contained inside. Do not attempt to disassemble, modify or conduct repairs on this unit. It has been built in accordance with relevant safety and performance standards. An electrical specialist must carry out all repairs.
- Page 6 Important Safety Instructions (Cont.) Important Safety Precautions Concerning Refrigerant R290 WARNING: Combustible & Dangerous This symbol alerts you to take care as the appliance contains a flammable refrigerant: R290 (propane). Take extra care when installing the unit and when carrying out maintenance. R290 is a colourless and odourless hydrocarbon gas.
- Page 7 Important Safety Instructions (Cont.) Disposal • This air conditioner contains a flammable refrigerant, which must be removed before disposal. Contact your municipal authorities for any codes or regulations concerning the disposal of such materials. • At the end of its working life, do not throw this appliance out with your household waste. Electrical and electronic products contain substances that can have a detrimental effect on the environment and human health if disposed of inappropriately.
-
Page 8: Product Overview
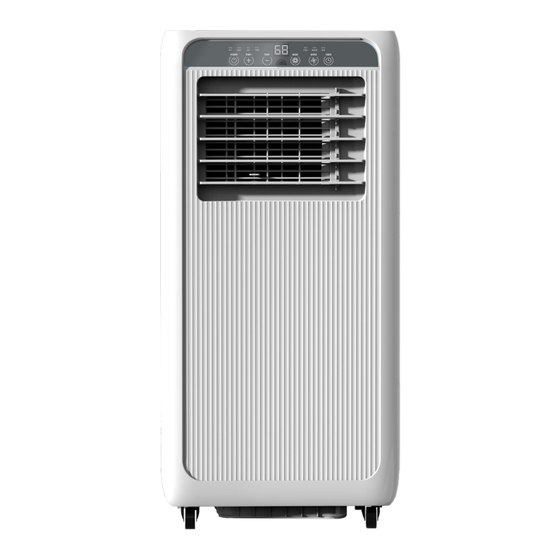
Product Overview Scope of Delivery Front View Back View Portable Air Conditioner Control Panel Cold Air Outlet Signal Receptor Remote Control Transport Handle Exhaust Duct Evaporator Inlet Drain Accessories Air Exhaust Duct 10. Air Exhaust Duct Adaptor Documentation (Not Shown) 11. -
Page 9: Getting Started
Getting Started Before You Start • Unpacking: This product has been packaged to protect it against transportation damage. Unpack the appliance and keep the original packaging materials in a safe place. It will help prevent any damage if the product needs to be transported in the future, and you can use it to store the appliance when it is not in use. -
Page 10: Installation
Installation Positioning the Air Conditioner Keep the unit upright for at least two hours before installation. • This portable air conditioner is designed for rooms up to 18m in size. • Do not install or use the air conditioning in the bathroom or other humid environments. •... - Page 11 Installation (Cont.) Screw the other end of the air exhaust duct onto the window exhaust adaptor (Fig 3). Fig 3 Slide the air exhaust duct adaptor onto the back of the air conditioner (Fig 4). Fig 4 Extend the exhaust hose and insert the window slider adaptor into window slider kit (see page 12 for information on how to install the window kit).
- Page 12 Installation (Cont.) Installing the Window Kit Your window kit has been designed to fit most standard ‘horizontal’ and ‘vertical’ window applications, but for certain types of windows it may be necessary for you to improvise/ modify some aspects of the installation procedure. Adjust the window slider to the length of a horizontally (or height of a vertically) open window (Fig 5).
-
Page 13: Instructions
Instructions Using the Portable Air Conditioner Before switching the unit on for the first time, make sure you have properly installed the exhaust hose and window kit (see pages 10-12) and inserted two AAA size batteries into the remote control (see page 18). Find a place for the air conditioner where there is a power outlet nearby. -
Page 14: Control Panel
Instructions (Cont.) Control Panel Buttons and Indicators POWER Button High Fan Speed Indicator TEMP/TIMER + Button Low Fan Speed Indicator TEMP/TIMER - Button 10. Timer Indicator MODE Button 11. Display Screen SPEED Button 12. Cool Mode Indicator TIMER Button 13. Dehumidify Mode Indicator Water Indicator 14. - Page 15 Instructions (Cont.) Temperature Adjustment The temperature can be set within the range of 16 ºC to 31 ºC in intervals of 1ºC. Press the + button [ ] once to increase the temperature by 1 ºC or press the - button [ ] once to decrease the temperature by 1 ºC.
- Page 16 Instructions (Cont.) Water Full Alarm Condensation water that forms during cooling will drop into an in-built drip tray. When the water level in the drip tray is getting too full, the W.F indicator light will illuminate to alert you that the drip tray needs to be emptied. Should this error code appear during operation, proceed as follows: •...
-
Page 17: Faqs And Troubleshooting Guide
FAQs and Troubleshooting Guide Problem Possible Causes Solution The water full W.F indicator has illuminated, indicating that the drip Drain the condensation water manually. tray is full. The room temperature is lower than Reset the temperature. the set temperature. Unit does not start when The protective device has been Wait for three minutes before... -
Page 18: Other Useful Information
Other Useful Information Care and Cleaning Electric shock hazard! Before cleaning and servicing, ensure the unit is switched off and disconnected from the power outlet to prevent possible injury. Cleaning the Air Conditioner Wipe the housing with a damp cloth, moistened with water and a little mild detergent. Dry with a soft, dry cloth. -
Page 19: Battery Precautions
Other Useful Information (Cont.) Battery Precautions • Do not open the batteries or short-circuit them. • Do not mix different types of batteries. Due to increased risk of leakage, empty batteries should be removed. The batteries should also be removed from the remote control if it is not being used for long periods. -
Page 20: Technical Specifications
Other Useful Information (Cont.) Technical Specifications Model PAC26KW Cooling capacity 2630 W Dehumidifying capacity 1.0 L/h Cooling input power 950 W Cooling input current 4.3 A Air flow volume 270 m Rated voltage 220-240 V~ Rated frequency 50 Hz : 53 dB(A) -
Page 21: Responsible Disposal
Other Useful Information (Cont.) Compliance This appliance has been fully tested and meets all requirements as set out by standards AS/NZS 60335.1 and AS/NZS 60335.2.40. The RCM Mark (Regulatory Compliance Mark) indicates that the product complies with the relevant guidelines of the ACMA as well as corresponding government requirements for the safety of electrical devices. - Page 22 This page has been left blank intentionally. After Sales Support (AU) 1300 886 649 (NZ) 0800 836 761 | tempo.org/support...
- Page 23 This page has been left blank intentionally. After Sales Support (AU) 1300 886 649 (NZ) 0800 836 761 | tempo.org/support...
-
Page 24: Warranty & Returns
Please read the manual It will help you get the best out of your product. Still have questions? Call after sales support 1300 886 649 Or visit www.tempo.org Warranty returns Should you for any reason need to return this product for a warranty claim, make sure to include all accessories with the product.
Need help?
Do you have a question about the PAC26KW and is the answer not in the manual?
Questions and answers