Advertisement
Table of Contents
Advertisement
Table of Contents

Related Manuals for jbc GALE Series


Summary of Contents for jbc GALE Series
- Page 1 INSTRUCTION MANUAL GALE Guide Kits for ALE250...
-
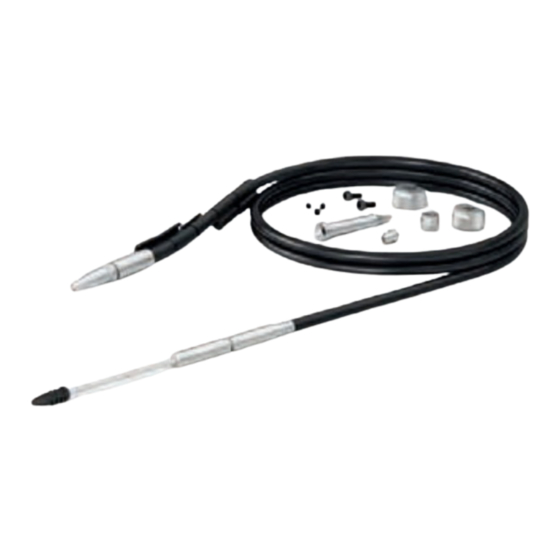
Page 2: Packing List
This manual corresponds to the following references: Without Solder Wire Perforation: With Solder Wire Perforation: GALE04D-A for wire Ø 0.38 - 0.4 mm / Ø 0.015 - 0.016 in GALE08V-A for wire Ø 0.8 mm / Ø 0.032 in GALE05D-A GALE10V-A for wire Ø... - Page 3 para manuales - color gris 200 mm 130 mm 130 mm 100 mm 80 mm 60 mm GALE Guide Kits for ALE250 without Solder Wire Perforation 50 mm Allen Screws Traction Wheel Inlet Nozzle Headless Screws Support Wheel 40 mm Clips Guide Set Counter Wheel...
- Page 4 GALE Guide Kits for ALE250...
- Page 5 para manuales - color gris 200 mm GALE Guide Kits for ALE250 130 mm 130 mm 100 mm 80 mm 60 mm 50 mm 40 mm...
- Page 6 Speed 5.0mm/s Place the �n on the gears Con�nuous and press: Feeder parameters lock Discon�nuous Tin reload process 1.00mm Wire diameter Program Forward Backward None Power Wire clogging detec�on Backward Back Back Press ok to exit Guide Tube Set Assembly Open the guide tube set screw (1) and insert the guide tube set.
- Page 7 para manuales - color gris ºC ºC ºC 200 mm Feeder se�ngs Tool se�ngs Sel. Temp. Sel. Temp. Sel. Temp. 350ºC 350ºC 350ºC Sta�on se�ngs Power Discon�nuous Power Program #1 Con�nuous Counters mm/s 10.0 Language Supplied: 0 mm mm/s Reset Solder Wire Unloading Ø...
- Page 8 eep delay 0min Working hrs eep temp º Sleep hrs berna�on delay 10min Hiber hrs Changing Guide Kits eripher. No tools hrs Disassembly Sleep cyc Back For this operation, disconnect the device from the mains. Unload any solder wire running inside the Fed cyc guide tube, disconnect the tool from the control unit and open its cover.
- Page 9 Sleep delay 0min para manuales - color gris Workin 200 mm Sleep temp º Sleep h Hiberna�on delay 10min Hiber h Peripher. No too Assembly with Solder Wire Perforation: 130 mm 130 mm Sleep c Back Counter Fed cy Wheel Assemble the counter wheel (7).
- Page 10 Sleep hrs Hiber hrs No tools hrs Assembly without Solder Wire Perforation: Sleep cyc Assemble the counter wheel in the same way as shown on the previous page (7), (8) and (9). Fed cyc Insert the intermediate nozzle (10) until its collar rests against the housing and tighten its screw. Fed mm 22786 Assemble the inlet nozzle (11).
- Page 11 para manuales - color gris 200 mm Solder Reel Assembly 130 mm 130 mm Axis Reel Locking 100 mm Reel Locking Screw Solder Reel Solder Wire 80 mm Guidance 60 mm Solder Wire 19:29 19:29 19:29 Mode Con�nuous Tin reload process º...
-
Page 12: Main Menu Screen
USE ONLY WITH A 250 V FUSE To assemble the reel locking, its conical side must be pointing downwards. EARTH FUSE F1.25 A EARTH FUSE F1.25 A Align the flat side of the axis (5) with the inner flat side (the one with the screw) of the reel locking and reassemble it to the axis (6). - Page 13 Hiberna�on delay 10min Hiber hrs 1.00mm para manuales - color gris 24.0 200 mm mm/s Peripher. No tools hrs None Supplied: 12 mm Sleep cyc Back Ø 1.00 mm Fed cyc Fed mm 22786 Inlet Nozzle 130 mm 130 mm Tin reload process Select “Tin reload process”...
- Page 14 Outlet Nozzle Replacement Flux can cause clogging at the outlet nozzle of the guide tube set and it can be necessary to replace the worn or clogged outlet nozzle. Note: There is a nozzle size for each soldering wire diameter. The use of the nozzle is necessary as its inner diameter is adjusted to the solder wire diameter and guides the wire with greater precision.
-
Page 15: Specifications
para manuales - color gris 200 mm Specifications 130 mm 130 mm GALE Guide Kits for ALE250 Total Net Weight: Package Weight: 100 mm With Perforation: 108 g / 0.24 lb 200 g / 0.44 lb Ref.: GALE08V-A wire Ø 0.8 mm / Ø 0.032 in 108 g / 0.24 lb 200 g / 0.44 lb Ref.: GALE10V-A... -
Page 16: Warranty
Warranty JBC’s 2 year warranty covers this equipment against all manufacturing defects, including the replacement of defective parts and labour. Warranty does not cover product wear or misuse. In order for the warranty to be valid, equipment must be returned, postage paid, to the dealer where it was purchased.
Need help?
Do you have a question about the GALE Series and is the answer not in the manual?
Questions and answers