Table of Contents
Advertisement
Quick Links
Advertisement
Table of Contents

Related Manuals for Planitar iGUIDE PLANIX R1

Summary of Contents for Planitar iGUIDE PLANIX R1
- Page 1 PLANIX R1 User Instruction Manual v1.0 | Nov. 2024...
-
Page 2: Table Of Contents
Table of Contents Table of Contents ..........................1 Regulatory Information ........................4 Compliance ..............................4 ⚠ Warnings ............................6 PLANIX R1 Warnings ..........................6 Battery Warnings ............................6 What’s Included in the box? .......................8 System Overview ..........................9 System Components ..........................10 Handling and Storage of the PLANIX R1 ....................12 How to Assemble and Install the Battery .................... - Page 3 Connect Using QR Code ........................... 18 Manually Connect Using Wi-Fi Password ....................19 Typical Project Workflow ......................... 20 Survey ............................. 21 Create a New Project ..........................22 Create a New Floor ..........................22 Camera Settings ............................23 Capture a Property ..........................24 Real-Time Tags ............................
- Page 4 iOS device to Windows computer ......................31 System Settings ..........................32 Specifications........................... 33 Battery Specifications ..........................34 Warranty ............................35 / 35...
-
Page 5: Regulatory Information
Regulatory Information Manufacturer: Planitar Inc. Product Name: iGUIDE PLANIX R1 Model Number: IMS-R1 Compliance This product has been tested and was found to comply with the following standards: • FCC CFR 47, PART 15, SUBPART B, Class B – Unintentional Radiators •... - Page 6 Connect the equipment to an outlet on a circuit different from that to which the receiver is connected. • Consult the dealer or an experienced radio/TV technician for help. WARNING: Any product modifications not expressly approved by Planitar could void the user’s authority to operate PLANIX equipment under FCC rules. INNOVATION, SCIENCE AND ECONOMIC DEVELOPMENT (ISED) CANADA This device complies with Industry Canada license-exempt RSS standard(s).
-
Page 7: Warnings
⚠ Warnings Read and follow all safety warnings and instructions. Failure to do so may result in electric shock, fire, and serious injury. PLANIX R1 Warnings • The Ricoh THETA X 360° camera incorporated into the PLANIX R1 system contains custom configurations and is not user-serviceable. - Page 8 Charging improperly or at temperatures outside the specified range may damage the battery and increase the fire risk. • Have servicing performed by Planitar using only identical replacement parts. This will ensure that the safety of the product is maintained. •...
-
Page 9: What's Included In The Box
What’s Included in the box? Every PLANIX R1 kit includes the items listed below (see Figure 1): 1. PLANIX R1 Camera System with Ricoh THETA X 2. System Shield 3. Battery with battery cover 4. Battery charger 5. USB power supply 6. -
Page 10: System Overview
System Overview The PLANIX R1 is an iGUIDE camera system designed to measure and photograph spaces simultaneously to create floor plans, detailed drawings, and iGUIDE 3D virtual tours. The R1 uses a built-in laser scanner to gather laser measurement data and a Ricoh THETA X 360° camera to capture panorama images. The scanner's laser beam is infrared and invisible. -
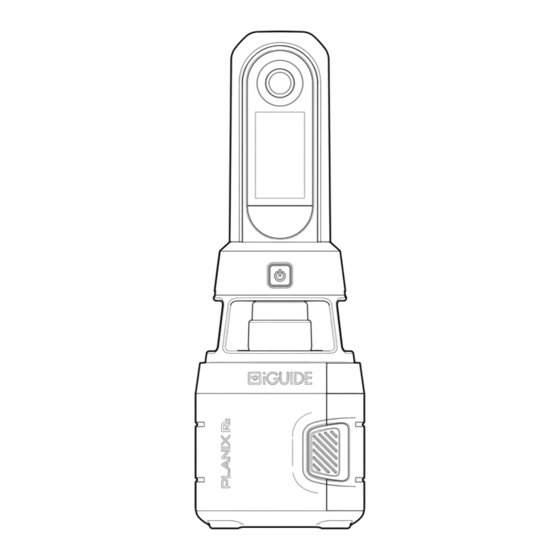
Page 11: System Components
System Components 1. Ricoh THETA X 360° camera a. Fisheye lens: One on each side. b. LCD panel: Displays QR code for Wi-Fi connection upon startup, system status information and the 360° image preview when operating. c. Panel button: Press to wake the LCD panel. d. - Page 12 Figure 3 - System components continued / 35...
-
Page 13: Handling And Storage Of The Planix R1
Handling and Storage of the PLANIX R1 • Protect the R1 by keeping the System Shield attached to the system during travel, storage, and setup. • The R1 should be handled by gripping two opposing sides of its body or by firmly gripping one side of its body. -
Page 14: How To Remove The Battery
How to Remove the Battery 1. While the battery is attached to the PLANIX R1, take the R1 in one hand and grasp the base on the side opposite the battery compartment. 2. Using the other hand, simultaneously press and hold both battery door buttons (see Figure 4) using a finger and thumb. -
Page 15: How To Remove And Attach The System Shield
How to Remove and Attach the System Shield Take the PLANIX R1 in one hand, grasping the base of the R1 system (below the System Shield). Using the other hand, press and hold both System Shield buttons (one on each side) simultaneously using a finger and thumb (see Figure 6). -
Page 16: Charging
6. Install the battery into the PLANIX R1 by aligning the pins and sliding it into the battery compartment until you hear a click. Notes • Use only the provided iGUIDE PLANIX R1 battery charger to charge the battery (refer to System Components). •... - Page 17 • A battery outside the normal temperature range will cause the battery charger’s red light to flash. Charging will continue but at a reduced rate. If the battery temperature returns to the normal range, the red light will stop flashing, and charging will continue at a regular rate. •...
-
Page 18: Setup
Setup 1. Ensure both your Wi-Fi-enabled smart device and PLANIX R1 battery is charged. 2. Remove the PLANIX R1 camera system from the carrying case. 3. Set up your tripod and level the ball head on the tripod. 4. Attach your quick-release (QR) plate to the PLANIX R1 and then the QR plate to the tripod's ball head. -
Page 19: Connecting To A Smart Device
Connecting to a Smart Device The iGUIDE PLANIX app connects a compatible smart device to the PLANIX R1 via Wi-Fi. The connection instructions below assume all steps to set up the PLANIX R1 have already been completed. Connect Using QR Code 1. -
Page 20: Manually Connect Using Wi-Fi Password
Manually Connect Using Wi-Fi Password 1. Open the iGUIDE PLANIX app on your smart device. • Note: To communicate with your PLANIX R1, the iGUIDE PLANIX app will request permission to find and connect to devices on your local network. 2. -
Page 21: Typical Project Workflow
Typical Project Workflow To produce an iGUIDE, scans in every room are necessary to create 360° panoramas and collect laser measurement data, forming a map of the space during the survey process. The PLANIX R1 can be controlled from any compatible smartphone or tablet via Wi-Fi using the iGUIDE PLANIX app. Scans are captured in the Survey section of the iGUIDE PLANIX app and surveyed laser data and images are saved locally to your smart device. -
Page 22: Survey
Survey The Survey interface within the iGUIDE PLANIX app is unique to each PLANIX system. The Survey interface is used to operate your PLANIX R1 camera system when capturing scans for your project. The R1 Survey menu ( ) presents the following options (see Figure 7): 1. -
Page 23: Create A New Project
Create a New Project 1. Tap in the blank field on the Project menu, enter a name, and select “Create” (see Figure 8). 2. Optional: Enter the exterior wall thickness in the field provided. This information is used to draft the exterior wall thickness on the provided floor plans and to calculate the area. -
Page 24: Camera Settings
Camera Settings HDR: Retains more details in bright and dark areas of the 360° images by merging images with different exposure settings. Toggle on to choose from the following options: High (-5EV/+2EV), Medium (- 3EV/+3EV), Low (-1EV/+2EV). Noise Reduction: Captures multiple images and then combines them to make a smoother-looking final output that exceeds the performance of what the camera’s sensor can natively create. -
Page 25: Capture A Property
Capture a Property 1. Place the PLANIX R1 in a suitable location and move yourself out of view. 2. Tap the Scan button (see Figure 11) and wait for the chime on your device. A 360° image and laser scan data will be captured simultaneously. -
Page 26: Real-Time Tags
Real-Time Tags The real-time tags feature in PLANIX R1 Survey empowers users to create iGUIDE tags while surveying a property. iGUIDE tags are interactive visual markers that you can use to draw a viewer’s attention to something in your iGUIDE tour. Tags can be added to any new or existing Survey project that contains one or more scans. -
Page 27: Two-Shot Mode
Two-Shot Mode 1. Tap the Two-Shot mode button (see Figures 11 or 12). 2. Stand facing the back side of the PLANIX R1 (the side with the power button) and tap the Scan button. A 180° image and laser measurement data will be captured. 3. -
Page 28: Change Display Modes
Change Display Modes 1. Tap the Change Display button at the top right of the screen to enter Laser Display mode (see Figure 16). 2. Tap the button again to enter Pano Display mode (see Figure 16) and again to return to Split Display mode (see Figure 11). -
Page 29: Slam
Laser data (point cloud data) can be aligned in both Survey (in-app) and Stitch (stand-alone desktop application). Ensuring all data is well aligned before uploading it to the iGUIDE portal for drafting is critical. The automatic alignment tools featured in the PLANIX R1 Survey will do well in typical building environments. -
Page 30: Data Transfer
Data Transfer Project data for PLANIX R1 is stored on the smart device used to operate the R1 to capture a space. To use the Stitch software on a Mac or Windows computer, the project data must be transferred from the smart device to the computer before it can be opened in Stitch. -
Page 31: Android Device To Mac Computer
Android device to Mac computer Caution: The following steps recommend using a third-party application. Please use your discretion. 1. Connect the smart device to the computer via a USB cable. a. Choose a working cable in good condition. b. Ensure the cable is capable of data transfer. 2. -
Page 32: Ios Device To Windows Computer
6. Select one or more project folders, then drag them to the destination folder in the left sidebar or another Finder window. 7. Safely disconnect the smart device. 8. Open the project folder on your computer in Stitch. Notes • Project folders may also be copied from the Mac to the iOS device. -
Page 33: System Settings
System Settings • Save Settings - (Top right) Save changes to system settings. All unsaved changes will be lost. • Coverage Opacity - Change the opacity of measured areas when looking at the laser measurement data. • Show Live Lidar Data - Show the active lidar scan. Toggle on or off. •... -
Page 34: Specifications
Specifications Product Name • iGUIDE PLANIX R1 Product Model • IMS-R1 Performance • Measurement Range: Up to 40m • Measurement Uncertainty: +/- 25mm up to max range (raw point cloud), typically +/- 10mm from camera to wall (minimum 60cm wall length) •... -
Page 35: Battery Specifications
Mechanical • System Unit Weight: 725g (1.76lb) without cover, 986g (2.2lb) with cover • System Unit Dimensions (without System Shield): W: 9.90cm (3.90") x D: 7.75cm (3.05") x H: 28.89cm (11.375") • System Unit Dimensions (with System Shield): W: 9.90cm (3.90") x D: 7.75cm (3.05") x H: 29.53cm (11.625") •... -
Page 36: Warranty
No. or serial No. sticker of the Hardware; vi) damage to the System arising out of the use of any accessories other than those supplied by Planitar; or vii) any defect that is the result of physical breakage, electric connection or electrical faults external to the System.
Need help?
Do you have a question about the iGUIDE PLANIX R1 and is the answer not in the manual?
Questions and answers