Advertisement
Quick Links
1
2
3
4
5
6
In addition to the UltraSling III ER
DJO Global offers a complete line
of shoulder immobilization products.
your
english
Before Using the Device, please reaD the following
instrUctions completely anD carefUlly. correct
english
english
application is vital to the proper fUnctioning of the
english
Before Using the Device, please reaD the following
english
Before Using the Device, please reaD the following
Device.
Before Using the Device, please reaD the following
instrUctions completely anD carefUlly. correct
Before using this device please read the following instructions completely and
english
Before Using the Device, please reaD the following
instrUctions completely anD carefUlly. correct
instrUctions completely anD carefUlly. correct
application is vital to the proper fUnctioning of the
indications: For protocols involving immobilization in
application is vital to the proper fUnctioning of the
instrUctions completely anD carefUlly. correct
Before Using the Device, please reaD the following
application is vital to the proper fUnctioning of the
Device.
carefully. Correct application is vital to the proper functioning of this device.
external rotation: • Glenohumeral dislocation/subluxation
Device.
application is vital to the proper fUnctioning of the
instrUctions completely anD carefUlly. correct
• Capsular Shifts • Use after posterior shoulder stabilizations
Device.
indications: For protocols involving immobilization in
Device.
• Postoperative Bankart procedures • Soft tissue strains/
application is vital to the proper fUnctioning of the
indications: For protocols involving immobilization in
external rotation: • Glenohumeral dislocation/subluxation
indications: For protocols involving immobilization in
repairs • Post operative positioning after release of severe
Device.
external rotation: • Glenohumeral dislocation/subluxation
indications: For protocols involving immobilization in
• Capsular Shifts • Use after posterior shoulder stabilizations
external rotation: • Glenohumeral dislocation/subluxation
anterior capsule contracture
• Capsular Shifts • Use after posterior shoulder stabilizations
1
• Postoperative Bankart procedures • Soft tissue strains/
external rotation: • Glenohumeral dislocation/subluxation
• Capsular Shifts • Use after posterior shoulder stabilizations
• Postoperative Bankart procedures • Soft tissue strains/
indications: For protocols involving immobilization in
repairs • Post operative positioning after release of severe
• Capsular Shifts • Use after posterior shoulder stabilizations
• Postoperative Bankart procedures • Soft tissue strains/
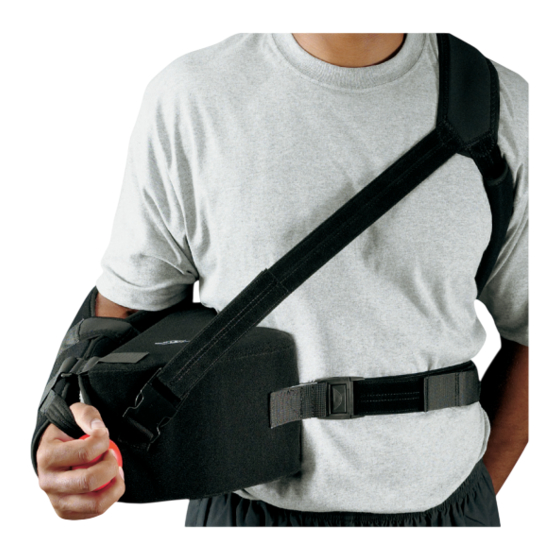
Step 1
repairs • Post operative positioning after release of severe
external rotation: • Glenohumeral dislocation/subluxation
anterior capsule contracture
• Postoperative Bankart procedures • Soft tissue strains/
repairs • Post operative positioning after release of severe
1) Unfasten the Velcro straps at the forearm and wrist posi-
anterior capsule contracture
1
• Capsular Shifts • Use after posterior shoulder stabilizations
repairs • Post operative positioning after release of severe
anterior capsule contracture
1
tions on the outside of the sling.
1
• Postoperative Bankart procedures • Soft tissue strains/
Step 1
anterior capsule contracture
1)
2) Insert arm into the sling, resting the cushion on your
Step 1
A. Unfasten the Velcro straps at the forearm and wrist
1
repairs • Post operative positioning after release of severe
1) Unfasten the Velcro straps at the forearm and wrist posi-
Step 1
hip. Place your arm as far back as possible in the sling
1) Unfasten the Velcro straps at the forearm and wrist posi-
anterior capsule contracture
tions on the outside of the sling.
Step 1
1) Unfasten the Velcro straps at the forearm and wrist posi-
and the thumb strap between the thumb and first finger.
tions on the outside of the sling.
positions on the outside of the sling.
1
2) Insert arm into the sling, resting the cushion on your
1) Unfasten the Velcro straps at the forearm and wrist posi-
tions on the outside of the sling.
3) Reattach both the forearm and wrist straps on top of
2) Insert arm into the sling, resting the cushion on your
Step 1
hip. Place your arm as far back as possible in the sling
2) Insert arm into the sling, resting the cushion on your
tions on the outside of the sling.
the sling to secure the arm.
hip. Place your arm as far back as possible in the sling
B. Insert arm into the sling, resting the cushion on your hip.
1) Unfasten the Velcro straps at the forearm and wrist posi-
and the thumb strap between the thumb and first finger.
hip. Place your arm as far back as possible in the sling
2) Insert arm into the sling, resting the cushion on your
and the thumb strap between the thumb and first finger.
3) Reattach both the forearm and wrist straps on top of
tions on the outside of the sling.
hip. Place your arm as far back as possible in the sling
and the thumb strap between the thumb and first finger.
Place your arm as far back as possible in the sling and
3) Reattach both the forearm and wrist straps on top of
Step 2
the sling to secure the arm.
2) Insert arm into the sling, resting the cushion on your
3) Reattach both the forearm and wrist straps on top of
and the thumb strap between the thumb and first finger.
the sling to secure the arm.
Align cushion on the injured side at waist level with the
3) Reattach both the forearm and wrist straps on top of
hip. Place your arm as far back as possible in the sling
the sling to secure the arm.
the thumb strap between the thumb and first finger.
ball (front) away from your body. Place the pillow so the
Step 2
the sling to secure the arm.
Step 2
and the thumb strap between the thumb and first finger.
line on top of the pillow is paralell to the front of your
Align cushion on the injured side at waist level with the
Step 2
C. Reattach both the forearm and wrist straps on
Align cushion on the injured side at waist level with the
3) Reattach both the forearm and wrist straps on top of
body. (If you stand at a table, the line should be parallel to
ball (front) away from your body. Place the pillow so the
Align cushion on the injured side at waist level with the
ball (front) away from your body. Place the pillow so the
Step 2
the sling to secure the arm.
the table.)
line on top of the pillow is paralell to the front of your
top of the sling to secure the arm.
Align cushion on the injured side at waist level with the
ball (front) away from your body. Place the pillow so the
line on top of the pillow is paralell to the front of your
body. (If you stand at a table, the line should be parallel to
line on top of the pillow is paralell to the front of your
body. (If you stand at a table, the line should be parallel to
ball (front) away from your body. Place the pillow so the
2
Step 2
Step 3
the table.)
body. (If you stand at a table, the line should be parallel to
the table.)
line on top of the pillow is paralell to the front of your
Align cushion on the injured side at waist level with the
A) Bring waist strap around from the back of cushion
the table.)
body. (If you stand at a table, the line should be parallel to
2)
ball (front) away from your body. Place the pillow so the
around your waist, inserting into and attaching to the
2
2
Align cushion on the injured side at waist level with the ball
Step 3
Step 3
the table.)
line on top of the pillow is paralell to the front of your
front buckle.
2
A) Bring waist strap around from the back of cushion
A) Bring waist strap around from the back of cushion
Step 3
body. (If you stand at a table, the line should be parallel to
B) Adjust waist strap for proper fit.
2
around your waist, inserting into and attaching to the
around your waist, inserting into and attaching to the
(front) away from your body. Place the pillow so the line
A) Bring waist strap around from the back of cushion
Step 3
the table.)
front buckle.
front buckle.
around your waist, inserting into and attaching to the
A) Bring waist strap around from the back of cushion
Step 4
B) Adjust waist strap for proper fit.
B) Adjust waist strap for proper fit.
front buckle.
on top of the pillow is paralell to the front of your body. (If you
around your waist, inserting into and attaching to the
2
Unfasten the shoulder strap buckle at the front of the
Step 3
B) Adjust waist strap for proper fit.
front buckle.
cushion. Using your free arm, reach behind your body and
A) Bring waist strap around from the back of cushion
Step 4
Step 4
B) Adjust waist strap for proper fit.
stand at a table, the line should be parallel to the table.)
slip your arm through the shoulder strap. This motion will
around your waist, inserting into and attaching to the
Unfasten the shoulder strap buckle at the front of the
Unfasten the shoulder strap buckle at the front of the
Step 4
be similar to putting on a backpack, with the wide strap on
cushion. Using your free arm, reach behind your body and
front buckle.
cushion. Using your free arm, reach behind your body and
Unfasten the shoulder strap buckle at the front of the
Step 4
the clavicular area and the thin pad in the underarm area.
slip your arm through the shoulder strap. This motion will
slip your arm through the shoulder strap. This motion will
B) Adjust waist strap for proper fit.
cushion. Using your free arm, reach behind your body and
Unfasten the shoulder strap buckle at the front of the
3)
be similar to putting on a backpack, with the wide strap on
be similar to putting on a backpack, with the wide strap on
A. Bring waist strap around from the back of cushion around
slip your arm through the shoulder strap. This motion will
cushion. Using your free arm, reach behind your body and
Step 5
the clavicular area and the thin pad in the underarm area.
the clavicular area and the thin pad in the underarm area.
Step 4
be similar to putting on a backpack, with the wide strap on
slip your arm through the shoulder strap. This motion will
Reattach the shoulder strap to buckle at front of cushion.
Unfasten the shoulder strap buckle at the front of the
the clavicular area and the thin pad in the underarm area.
your waist, inserting into and attaching to the front buckle.
be similar to putting on a backpack, with the wide strap on
Step 5
Step 5
cushion. Using your free arm, reach behind your body and
the clavicular area and the thin pad in the underarm area.
Reattach the shoulder strap to buckle at front of cushion.
Step 6
Reattach the shoulder strap to buckle at front of cushion.
Step 5
slip your arm through the shoulder strap. This motion will
B. Adjust waist strap for proper fit.
3
Adjust all straps for adequate stabilization of injured
Reattach the shoulder strap to buckle at front of cushion.
be similar to putting on a backpack, with the wide strap on
Step 5
Step 6
shoulder.
Step 6
the clavicular area and the thin pad in the underarm area.
Reattach the shoulder strap to buckle at front of cushion.
3
Adjust all straps for adequate stabilization of injured
3
Adjust all straps for adequate stabilization of injured
Step 6
shoulder.
4)
3
use and care
shoulder.
Adjust all straps for adequate stabilization of injured
Unfasten the shoulder strap buckle at the front of the cushion.
Step 6
Step 5
• Hand wash with mild soap in lukewarm water. Rinse
shoulder.
3
Adjust all straps for adequate stabilization of injured
Reattach the shoulder strap to buckle at front of cushion.
use and care
use and care
thoroughly. AIR DRY.
Using your free arm, reach behind your body and slip your arm
shoulder.
• Hand wash with mild soap in lukewarm water. Rinse
• Hand wash with mild soap in lukewarm water. Rinse
NOTE: If not rinsed thoroughly, residual soap may cause
use and care
Step 6
thoroughly. AIR DRY.
skin irritation or deteriorate the material.
thoroughly. AIR DRY.
• Hand wash with mild soap in lukewarm water. Rinse
through the shoulder strap. This motion will be similar to
use and care
3
Adjust all straps for adequate stabilization of injured
NOTE: If not rinsed thoroughly, residual soap may cause
• Latex Free.
NOTE: If not rinsed thoroughly, residual soap may cause
thoroughly. AIR DRY.
• Hand wash with mild soap in lukewarm water. Rinse
skin irritation or deteriorate the material.
shoulder.
• This product is intended for use on a single patient.
skin irritation or deteriorate the material.
NOTE: If not rinsed thoroughly, residual soap may cause
thoroughly. AIR DRY.
putting on a backpack, with the wide strap on the clavicular
• Latex Free.
• Latex Free.
skin irritation or deteriorate the material.
• This product is intended for use on a single patient.
NOTE: If not rinsed thoroughly, residual soap may cause
use and care
Warning: This product is to be used under the
• This product is intended for use on a single patient.
• Latex Free.
skin irritation or deteriorate the material.
area and the thin pad in the underarm area.
• Hand wash with mild soap in lukewarm water. Rinse
supervision of a medical professional. this device is not
• This product is intended for use on a single patient.
Warning: This product is to be used under the
• Latex Free.
thoroughly. AIR DRY.
Warning: This product is to be used under the
intended for unsupervised public use. If you experience
supervision of a medical professional. this device is not
• This product is intended for use on a single patient.
NOTE: If not rinsed thoroughly, residual soap may cause
supervision of a medical professional. this device is not
Warning: This product is to be used under the
any pain, swelling, sensation changes, or any unusual
intended for unsupervised public use. If you experience
5)
skin irritation or deteriorate the material.
intended for unsupervised public use. If you experience
supervision of a medical professional. this device is not
reactions while using this product, consult your medical
any pain, swelling, sensation changes, or any unusual
Reattach the shoulder strap to buckle at front of cushion.
Warning: This product is to be used under the
any pain, swelling, sensation changes, or any unusual
• Latex Free.
professional immediately.
intended for unsupervised public use. If you experience
reactions while using this product, consult your medical
supervision of a medical professional. this device is not
reactions while using this product, consult your medical
• This product is intended for use on a single patient.
4
any pain, swelling, sensation changes, or any unusual
professional immediately.
intended for unsupervised public use. If you experience
professional immediately.
reactions while using this product, consult your medical
4
Warranty: DJO, LLC will repair or replace all or part of
any pain, swelling, sensation changes, or any unusual
6)
4
professional immediately.
the unit and its accessories for material or workmanship
Warranty: DJO, LLC will repair or replace all or part of
Warning: This product is to be used under the
Adjust all straps for adequate stabilization of injured shoulder.
reactions while using this product, consult your medical
4
Warranty: DJO, LLC will repair or replace all or part of
defects for a period of six months from the date of sale.
the unit and its accessories for material or workmanship
supervision of a medical professional. this device is not
professional immediately.
the unit and its accessories for material or workmanship
Warranty: DJO, LLC will repair or replace all or part of
defects for a period of six months from the date of sale.
intended for unsupervised public use. If you experience
4
defects for a period of six months from the date of sale.
the unit and its accessories for material or workmanship
for single patient use only
any pain, swelling, sensation changes, or any unusual
Warranty: DJO, LLC will repair or replace all or part of
for single patient use only
defects for a period of six months from the date of sale.
rx product
reactions while using this product, consult your medical
the unit and its accessories for material or workmanship
for single patient use only
rx product
professional immediately.
defects for a period of six months from the date of sale.
rx product
for single patient use only
4
rx product
Warranty: DJO, LLC will repair or replace all or part of
for single patient use only
the unit and its accessories for material or workmanship
rx product
Protocol:
defects for a period of six months from the date of sale.
for single patient use only
1) Read insert before use. Follow manufacturer's instructions,
rx product
5
5
5
2) Follow physician's orders for appropriateness, duration of
5
5
3) Train all staff on proper application.
5
4) Do not alter DJO Global UltraSling III ER in any way or
notice: While every effort has been made in state-of-the-art
notice: While every effort has been made in state-of-the-art
transfer products from one facility to another.
techniques to obtain the maximum compatibility of function,
techniques to obtain the maximum compatibility of function,
strength, durability and comfort, this device is only one element
strength, durability and comfort, this device is only one element
notice: While every effort has been made in state-of-the-art
in the overall treatment program administered by a medical
in the overall treatment program administered by a medical
techniques to obtain the maximum compatibility of function,
professional. there is no guarantee that injury Will be prevented
notice: While every effort has been made in state-of-the-art
professional. there is no guarantee that injury Will be prevented
strength, durability and comfort, this device is only one element
through the use of this product.
techniques to obtain the maximum compatibility of function,
through the use of this product.
in the overall treatment program administered by a medical
5) Do not expose to open flame.
strength, durability and comfort, this device is only one element
professional. there is no guarantee that injury Will be prevented
notice: While every effort has been made in state-of-the-art
in the overall treatment program administered by a medical
through the use of this product.
techniques to obtain the maximum compatibility of function,
professional. there is no guarantee that injury Will be prevented
strength, durability and comfort, this device is only one element
through the use of this product.
caution: federal laW (u.s.a.) restricts this device to sale by or on
6
caution: federal laW (u.s.a.) restricts this device to sale by or on
in the overall treatment program administered by a medical
the order of a licensed health care professional.
6
the order of a licensed health care professional.
professional. there is no guarantee that injury Will be prevented
through the use of this product.
caution: federal laW (u.s.a.) restricts this device to sale by or on
6
the order of a licensed health care professional.
caution: federal laW (u.s.a.) restricts this device to sale by or on
6
the order of a licensed health care professional.
notice: While every effort has been made in state-of-the-art
techniques to obtain the maximum compatibility of function,
caution: federal laW (u.s.a.) restricts this device to sale by or on
6
strength, durability and comfort, this device is only one element
the order of a licensed health care professional.
in the overall treatment program administered by a medical
professional. there is no guarantee that injury Will be prevented
through the use of this product.
caution: federal laW (u.s.a.) restricts this device to sale by or on
6
the order of a licensed health care professional.
APPLICATION
english
english
english
english
english
english
hospital protocol, and state or federal laws.
application and frequency of use.
spanish
spanish
ULTRASLING
spanish
spanish
spanish
espaÑol
spanish
antes De UtiliZar este Dispositivo, lea por favor
estas instrUcciones completa y DeteniDamente. el Uso
espaÑol
espaÑol
correcto es fUnDamental para el fUncionamiento
espaÑol
antes De UtiliZar este Dispositivo, lea por favor
espaÑol
antes De UtiliZar este Dispositivo, lea por favor
apropiaDo De este Dispositivo.
antes De UtiliZar este Dispositivo, lea por favor
estas instrUcciones completa y DeteniDamente. el Uso
espaÑol
antes De UtiliZar este Dispositivo, lea por favor
estas instrUcciones completa y DeteniDamente. el Uso
estas instrUcciones completa y DeteniDamente. el Uso
correcto es fUnDamental para el fUncionamiento
indicaciones: Para casos que requieren inmobilización
correcto es fUnDamental para el fUncionamiento
estas instrUcciones completa y DeteniDamente. el Uso
antes De UtiliZar este Dispositivo, lea por favor
correcto es fUnDamental para el fUncionamiento
apropiaDo De este Dispositivo.
de la rotación externa: • Luxación/subluxación
apropiaDo De este Dispositivo.
correcto es fUnDamental para el fUncionamiento
estas instrUcciones completa y DeteniDamente. el Uso
apropiaDo De este Dispositivo.
glenohumeral • Desplazamientos capsulares • Después de
indicaciones: Para casos que requieren inmobilización
apropiaDo De este Dispositivo.
estabilizaciones del hombro trasero • Postoperatorio de
correcto es fUnDamental para el fUncionamiento
indicaciones: Para casos que requieren inmobilización
de la rotación externa: • Luxación/subluxación
indicaciones: Para casos que requieren inmobilización
procedimientos de Bankart • Distensiones/reparaciones de
apropiaDo De este Dispositivo.
de la rotación externa: • Luxación/subluxación
glenohumeral • Desplazamientos capsulares • Después de
indicaciones: Para casos que requieren inmobilización
de la rotación externa: • Luxación/subluxación
tejidos blandos • Reposición postoperatoria después de
glenohumeral • Desplazamientos capsulares • Después de
estabilizaciones del hombro trasero • Postoperatorio de
de la rotación externa: • Luxación/subluxación
glenohumeral • Desplazamientos capsulares • Después de
una contractura aguda de la cápsula anterior
estabilizaciones del hombro trasero • Postoperatorio de
indicaciones: Para casos que requieren inmobilización
procedimientos de Bankart • Distensiones/reparaciones de
glenohumeral • Desplazamientos capsulares • Después de
estabilizaciones del hombro trasero • Postoperatorio de
procedimientos de Bankart • Distensiones/reparaciones de
de la rotación externa: • Luxación/subluxación
tejidos blandos • Reposición postoperatoria después de
estabilizaciones del hombro trasero • Postoperatorio de
procedimientos de Bankart • Distensiones/reparaciones de
Paso 1
tejidos blandos • Reposición postoperatoria después de
glenohumeral • Desplazamientos capsulares • Después de
una contractura aguda de la cápsula anterior
procedimientos de Bankart • Distensiones/reparaciones de
tejidos blandos • Reposición postoperatoria después de
1) Desabroche las tiras de Velcro que hay en la posición
una contractura aguda de la cápsula anterior
estabilizaciones del hombro trasero • Postoperatorio de
tejidos blandos • Reposición postoperatoria después de
una contractura aguda de la cápsula anterior
del antebrazo y la muñeca en la parte exterior del
procedimientos de Bankart • Distensiones/reparaciones de
Paso 1
una contractura aguda de la cápsula anterior
Paso 1
cabestrillo.
tejidos blandos • Reposición postoperatoria después de
1) Desabroche las tiras de Velcro que hay en la posición
Paso 1
2) Inserte el brazo en el cabestrillo, apoyando la almoh-
1) Desabroche las tiras de Velcro que hay en la posición
una contractura aguda de la cápsula anterior
del antebrazo y la muñeca en la parte exterior del
Paso 1
1) Desabroche las tiras de Velcro que hay en la posición
adilla en la cadera. Ponga el brazo tan atrás como sea
del antebrazo y la muñeca en la parte exterior del
cabestrillo.
1) Desabroche las tiras de Velcro que hay en la posición
del antebrazo y la muñeca en la parte exterior del
posible en el cabestrillo y la tira del pulgar entre los
cabestrillo.
2) Inserte el brazo en el cabestrillo, apoyando la almoh-
Paso 1
del antebrazo y la muñeca en la parte exterior del
cabestrillo.
2) Inserte el brazo en el cabestrillo, apoyando la almoh-
dedos pulgar e índice.
1) Desabroche las tiras de Velcro que hay en la posición
adilla en la cadera. Ponga el brazo tan atrás como sea
2) Inserte el brazo en el cabestrillo, apoyando la almoh-
cabestrillo.
adilla en la cadera. Ponga el brazo tan atrás como sea
3) Ajuste las tiras del antebrazo y la muñeca por encima
posible en el cabestrillo y la tira del pulgar entre los
del antebrazo y la muñeca en la parte exterior del
2) Inserte el brazo en el cabestrillo, apoyando la almoh-
adilla en la cadera. Ponga el brazo tan atrás como sea
posible en el cabestrillo y la tira del pulgar entre los
del cabestrillo para asegurar el brazo.
dedos pulgar e índice.
cabestrillo.
adilla en la cadera. Ponga el brazo tan atrás como sea
posible en el cabestrillo y la tira del pulgar entre los
dedos pulgar e índice.
3) Ajuste las tiras del antebrazo y la muñeca por encima
dedos pulgar e índice.
posible en el cabestrillo y la tira del pulgar entre los
3) Ajuste las tiras del antebrazo y la muñeca por encima
2) Inserte el brazo en el cabestrillo, apoyando la almoh-
Paso 2
del cabestrillo para asegurar el brazo.
3) Ajuste las tiras del antebrazo y la muñeca por encima
dedos pulgar e índice.
del cabestrillo para asegurar el brazo.
adilla en la cadera. Ponga el brazo tan atrás como sea
Ponga la almohadilla en la parte del hombro dañado a la
del cabestrillo para asegurar el brazo.
3) Ajuste las tiras del antebrazo y la muñeca por encima
posible en el cabestrillo y la tira del pulgar entre los
altura de la cintura con la bola frontal fuera del cuerpo.
Paso 2
del cabestrillo para asegurar el brazo.
Paso 2
dedos pulgar e índice.
Ponga la faja de forma que la línea de la parte superior
Ponga la almohadilla en la parte del hombro dañado a la
Paso 2
Ponga la almohadilla en la parte del hombro dañado a la
3) Ajuste las tiras del antebrazo y la muñeca por encima
quede paralela a la parte delantera de su cuerpo. (Si está
altura de la cintura con la bola frontal fuera del cuerpo.
Ponga la almohadilla en la parte del hombro dañado a la
altura de la cintura con la bola frontal fuera del cuerpo.
Paso 2
del cabestrillo para asegurar el brazo.
en frente de una mesa, la línea debería ser paralela a la
Ponga la faja de forma que la línea de la parte superior
Ponga la faja de forma que la línea de la parte superior
altura de la cintura con la bola frontal fuera del cuerpo.
Ponga la almohadilla en la parte del hombro dañado a la
mesa).
quede paralela a la parte delantera de su cuerpo. (Si está
quede paralela a la parte delantera de su cuerpo. (Si está
Ponga la faja de forma que la línea de la parte superior
altura de la cintura con la bola frontal fuera del cuerpo.
Paso 2
en frente de una mesa, la línea debería ser paralela a la
en frente de una mesa, la línea debería ser paralela a la
quede paralela a la parte delantera de su cuerpo. (Si está
Ponga la faja de forma que la línea de la parte superior
Ponga la almohadilla en la parte del hombro dañado a la
Paso 3
mesa).
mesa).
en frente de una mesa, la línea debería ser paralela a la
quede paralela a la parte delantera de su cuerpo. (Si está
A) Lleve la cinta de la cintura desde la parte trasera de la
altura de la cintura con la bola frontal fuera del cuerpo.
mesa).
en frente de una mesa, la línea debería ser paralela a la
almohadilla alrededor de la cintura, insertándola y
Ponga la faja de forma que la línea de la parte superior
Paso 3
Paso 3
mesa).
fijándola a la hevilla frontal.
quede paralela a la parte delantera de su cuerpo. (Si está
A) Lleve la cinta de la cintura desde la parte trasera de la
A) Lleve la cinta de la cintura desde la parte trasera de la
Paso 3
B) Ajuste la cinta para que se adapte correctamente.
en frente de una mesa, la línea debería ser paralela a la
almohadilla alrededor de la cintura, insertándola y
almohadilla alrededor de la cintura, insertándola y
A) Lleve la cinta de la cintura desde la parte trasera de la
Paso 3
mesa).
fijándola a la hevilla frontal.
fijándola a la hevilla frontal.
almohadilla alrededor de la cintura, insertándola y
A) Lleve la cinta de la cintura desde la parte trasera de la
Paso 4
B) Ajuste la cinta para que se adapte correctamente.
B) Ajuste la cinta para que se adapte correctamente.
fijándola a la hevilla frontal.
almohadilla alrededor de la cintura, insertándola y
Fije la tira del hombro para abrocharla a la parte delantera
Paso 3
B) Ajuste la cinta para que se adapte correctamente.
fijándola a la hevilla frontal.
de la almohadilla. Tire su otro brazo hacia atrás del cuerpo
Paso 4
Paso 4
A) Lleve la cinta de la cintura desde la parte trasera de la
B) Ajuste la cinta para que se adapte correctamente.
y deslícelo a través de la tira del hombro. Este movimiento
Fije la tira del hombro para abrocharla a la parte delantera
Fije la tira del hombro para abrocharla a la parte delantera
almohadilla alrededor de la cintura, insertándola y
Paso 4
de la almohadilla. Tire su otro brazo hacia atrás del cuerpo
será similar a ponerse una mochila, con la tira ancha en el
de la almohadilla. Tire su otro brazo hacia atrás del cuerpo
fijándola a la hevilla frontal.
Fije la tira del hombro para abrocharla a la parte delantera
Paso 4
y deslícelo a través de la tira del hombro. Este movimiento
área clavicular y la tira delgada bajo el brazo.
y deslícelo a través de la tira del hombro. Este movimiento
de la almohadilla. Tire su otro brazo hacia atrás del cuerpo
B) Ajuste la cinta para que se adapte correctamente.
Fije la tira del hombro para abrocharla a la parte delantera
será similar a ponerse una mochila, con la tira ancha en el
será similar a ponerse una mochila, con la tira ancha en el
y deslícelo a través de la tira del hombro. Este movimiento
de la almohadilla. Tire su otro brazo hacia atrás del cuerpo
área clavicular y la tira delgada bajo el brazo.
Paso 5
área clavicular y la tira delgada bajo el brazo.
será similar a ponerse una mochila, con la tira ancha en el
Paso 4
y deslícelo a través de la tira del hombro. Este movimiento
Fije la tira del hombro para abrocharla a la parte delantera
área clavicular y la tira delgada bajo el brazo.
Fije la tira del hombro para abrocharla a la parte delantera
será similar a ponerse una mochila, con la tira ancha en el
Paso 5
de la almohadilla.
Paso 5
de la almohadilla. Tire su otro brazo hacia atrás del cuerpo
área clavicular y la tira delgada bajo el brazo.
Fije la tira del hombro para abrocharla a la parte delantera
Fije la tira del hombro para abrocharla a la parte delantera
Paso 5
y deslícelo a través de la tira del hombro. Este movimiento
de la almohadilla.
Paso 6
de la almohadilla.
Fije la tira del hombro para abrocharla a la parte delantera
Paso 5
será similar a ponerse una mochila, con la tira ancha en el
Ajuste todas las tiras para una estabilización adecuada del
de la almohadilla.
Fije la tira del hombro para abrocharla a la parte delantera
área clavicular y la tira delgada bajo el brazo.
Paso 6
hombro dañado.
Paso 6
de la almohadilla.
Ajuste todas las tiras para una estabilización adecuada del
Ajuste todas las tiras para una estabilización adecuada del
Paso 6
hombro dañado.
Paso 5
uso y cuidado
hombro dañado.
Ajuste todas las tiras para una estabilización adecuada del
Paso 6
Fije la tira del hombro para abrocharla a la parte delantera
• Lavar a mano con jabón suave en agua templada.
hombro dañado.
uso y cuidado
Ajuste todas las tiras para una estabilización adecuada del
de la almohadilla.
uso y cuidado
Enjuagar exhaustivamente. SECAR AL AIRE.
• Lavar a mano con jabón suave en agua templada.
hombro dañado.
• Lavar a mano con jabón suave en agua templada.
NOTA: si no se enjuaga exhaustivamente, los restos de
uso y cuidado
Enjuagar exhaustivamente. SECAR AL AIRE.
Paso 6
jabón pueden provocar irritación de la piel o deteriorar
Enjuagar exhaustivamente. SECAR AL AIRE.
• Lavar a mano con jabón suave en agua templada.
NOTA: si no se enjuaga exhaustivamente, los restos de
uso y cuidado
Ajuste todas las tiras para una estabilización adecuada del
NOTA: si no se enjuaga exhaustivamente, los restos de
el material.
Enjuagar exhaustivamente. SECAR AL AIRE.
jabón pueden provocar irritación de la piel o deteriorar
• Lavar a mano con jabón suave en agua templada.
hombro dañado.
jabón pueden provocar irritación de la piel o deteriorar
• No contiene látex. Hipoalergénico.
NOTA: si no se enjuaga exhaustivamente, los restos de
el material.
Enjuagar exhaustivamente. SECAR AL AIRE.
el material.
jabón pueden provocar irritación de la piel o deteriorar
• Este producto es para ser usado en un solo paciente.
• No contiene látex. Hipoalergénico.
NOTA: si no se enjuaga exhaustivamente, los restos de
• No contiene látex. Hipoalergénico.
uso y cuidado
el material.
• Este producto es para ser usado en un solo paciente.
jabón pueden provocar irritación de la piel o deteriorar
• Este producto es para ser usado en un solo paciente.
• Lavar a mano con jabón suave en agua templada.
advertencia: este producto se ha de utilizar bajo
• No contiene látex. Hipoalergénico.
el material.
• Este producto es para ser usado en un solo paciente.
supervisión de un profesional médico. Este aparato no está
Enjuagar exhaustivamente. SECAR AL AIRE.
advertencia: este producto se ha de utilizar bajo
• No contiene látex. Hipoalergénico.
advertencia: este producto se ha de utilizar bajo
pensado para uso público sin supervisión. Si experimenta
supervisión de un profesional médico. Este aparato no está
NOTA: si no se enjuaga exhaustivamente, los restos de
• Este producto es para ser usado en un solo paciente.
supervisión de un profesional médico. Este aparato no está
advertencia: este producto se ha de utilizar bajo
dolores, hinchazón, cambios de sensibilidad o cualquier
pensado para uso público sin supervisión. Si experimenta
jabón pueden provocar irritación de la piel o deteriorar
pensado para uso público sin supervisión. Si experimenta
dolores, hinchazón, cambios de sensibilidad o cualquier
supervisión de un profesional médico. Este aparato no está
reacción fuera de lo común mientras utiliza este producto,
el material.
advertencia: este producto se ha de utilizar bajo
dolores, hinchazón, cambios de sensibilidad o cualquier
pensado para uso público sin supervisión. Si experimenta
reacción fuera de lo común mientras utiliza este producto,
consulte de inmediato con un profesional médico.
• No contiene látex. Hipoalergénico.
supervisión de un profesional médico. Este aparato no está
reacción fuera de lo común mientras utiliza este producto,
consulte de inmediato con un profesional médico.
dolores, hinchazón, cambios de sensibilidad o cualquier
• Este producto es para ser usado en un solo paciente.
pensado para uso público sin supervisión. Si experimenta
consulte de inmediato con un profesional médico.
reacción fuera de lo común mientras utiliza este producto,
garantÍa: DJO, LLC se compromete a reparar o sustituir
dolores, hinchazón, cambios de sensibilidad o cualquier
garantÍa: DJO, LLC se compromete a reparar o sustituir
consulte de inmediato con un profesional médico.
la totalidad o parte del producto y sus accesorios, por
advertencia: este producto se ha de utilizar bajo
reacción fuera de lo común mientras utiliza este producto,
la totalidad o parte del producto y sus accesorios, por
garantÍa: DJO, LLC se compromete a reparar o sustituir
defectos del material o de la fabricación, durante los seis
supervisión de un profesional médico. Este aparato no está
consulte de inmediato con un profesional médico.
defectos del material o de la fabricación, durante los seis
la totalidad o parte del producto y sus accesorios, por
garantÍa: DJO, LLC se compromete a reparar o sustituir
meses siguientes a la fecha de venta.
pensado para uso público sin supervisión. Si experimenta
defectos del material o de la fabricación, durante los seis
meses siguientes a la fecha de venta.
la totalidad o parte del producto y sus accesorios, por
garantÍa: DJO, LLC se compromete a reparar o sustituir
dolores, hinchazón, cambios de sensibilidad o cualquier
meses siguientes a la fecha de venta.
defectos del material o de la fabricación, durante los seis
para uso exclusivo de cada paciente
la totalidad o parte del producto y sus accesorios, por
reacción fuera de lo común mientras utiliza este producto,
para uso exclusivo de cada paciente
meses siguientes a la fecha de venta.
producto de venta con receta médica
defectos del material o de la fabricación, durante los seis
consulte de inmediato con un profesional médico.
producto de venta con receta médica
para uso exclusivo de cada paciente
meses siguientes a la fecha de venta.
producto de venta con receta médica
para uso exclusivo de cada paciente
garantÍa: DJO, LLC se compromete a reparar o sustituir
producto de venta con receta médica
para uso exclusivo de cada paciente
la totalidad o parte del producto y sus accesorios, por
producto de venta con receta médica
defectos del material o de la fabricación, durante los seis
meses siguientes a la fecha de venta.
para uso exclusivo de cada paciente
producto de venta con receta médica
aviso: si bien se han hecho todos los esfuerZos con tÉcnicas
aviso: si bien se han hecho todos los esfuerZos con tÉcnicas
avanZadas para obtener la mÁxima compatibilidad de funcionalidad,
avanZadas para obtener la mÁxima compatibilidad de funcionalidad,
durabilidad de la resistencia y comodidad, este dispositivo no
durabilidad de la resistencia y comodidad, este dispositivo no
aviso: si bien se han hecho todos los esfuerZos con tÉcnicas
es mÁs que un elemento en el programa de tratamiento general
es mÁs que un elemento en el programa de tratamiento general
avanZadas para obtener la mÁxima compatibilidad de funcionalidad,
administrado por el profesional mÉdico. no hay garantÍa de que se
aviso: si bien se han hecho todos los esfuerZos con tÉcnicas
administrado por el profesional mÉdico. no hay garantÍa de que se
durabilidad de la resistencia y comodidad, este dispositivo no
evitarÁn lesiones con el uso de este producto.
evitarÁn lesiones con el uso de este producto.
avanZadas para obtener la mÁxima compatibilidad de funcionalidad,
es mÁs que un elemento en el programa de tratamiento general
durabilidad de la resistencia y comodidad, este dispositivo no
administrado por el profesional mÉdico. no hay garantÍa de que se
aviso: si bien se han hecho todos los esfuerZos con tÉcnicas
es mÁs que un elemento en el programa de tratamiento general
evitarÁn lesiones con el uso de este producto.
avanZadas para obtener la mÁxima compatibilidad de funcionalidad,
administrado por el profesional mÉdico. no hay garantÍa de que se
precauciÓn: la ley federal (ee.uu.) restrige la venta de este
durabilidad de la resistencia y comodidad, este dispositivo no
evitarÁn lesiones con el uso de este producto.
precauciÓn: la ley federal (ee.uu.) restrige la venta de este
dispositivo por parte de o a pedido de profesionales de atenciÓn
es mÁs que un elemento en el programa de tratamiento general
dispositivo por parte de o a pedido de profesionales de atenciÓn
mÉdica matriculados.
administrado por el profesional mÉdico. no hay garantÍa de que se
mÉdica matriculados.
precauciÓn: la ley federal (ee.uu.) restrige la venta de este
evitarÁn lesiones con el uso de este producto.
dispositivo por parte de o a pedido de profesionales de atenciÓn
precauciÓn: la ley federal (ee.uu.) restrige la venta de este
mÉdica matriculados.
dispositivo por parte de o a pedido de profesionales de atenciÓn
aviso: si bien se han hecho todos los esfuerZos con tÉcnicas
mÉdica matriculados.
precauciÓn: la ley federal (ee.uu.) restrige la venta de este
avanZadas para obtener la mÁxima compatibilidad de funcionalidad,
dispositivo por parte de o a pedido de profesionales de atenciÓn
durabilidad de la resistencia y comodidad, este dispositivo no
mÉdica matriculados.
es mÁs que un elemento en el programa de tratamiento general
administrado por el profesional mÉdico. no hay garantÍa de que se
evitarÁn lesiones con el uso de este producto.
precauciÓn: la ley federal (ee.uu.) restrige la venta de este
dispositivo por parte de o a pedido de profesionales de atenciÓn
mÉdica matriculados.
GuIDE
III ER
®
deutsch
vor geBraUch Der
geBraUchsanweis
deutsch
deutsch
einwanDfreie fUn
d
vor geBraUch De
de
vor geBraUch De
richtigem anlegen
vor
geBraUchsanwe
deutsch
vor g
geBraUchsanwe
geB
einwanDfreie fU
indiKationen: Fü
einwanDfreie fU
geBr
vor geBraUc
einw
richtigem anleg
externer Drehung: •
richtigem anleg
einw
geBraUchsan
rich
• Kapselverschiebun
indiKationen: F
richt
hinteren Schulterber
einwanDfrei
indiKationen: F
externer Drehung:
ind
• Bei Weichteilreizun
richtigem an
externer Drehung:
• Kapselverschiebu
indiK
exte
Positionierung nach
• Kapselverschiebu
hinteren Schulterb
exter
• Ka
Kontraktur der vorde
hinteren Schulterb
indiKatione
• Bei Weichteilreizu
• Kaps
hint
• Bei Weichteilreizu
externer Drehu
Positionierung nac
hinte
• Be
Schritt 1
Positionierung nac
• Kapselversch
Kontraktur der vor
• Bei W
Posi
1) Klettverschlüsse f
Kontraktur der vor
hinteren Schul
Positi
Kon
Außenseite der Sc
• Bei Weichteilr
Schritt 1
Kontr
2) Den Arm in die Sc
Schritt 1
Positionierung
1) Klettverschlüsse
Schr
1) Klettverschlüsse
der Hüfte ablegen
Kontraktur der
Außenseite der
Schrit
1) K
hinten in die Schli
Außenseite der
2) Den Arm in die S
1) Kle
A
2) Den Arm in die S
zwischen Daumen
der Hüfte ableg
Schritt 1
2) D
Au
der Hüfte ableg
3) Die Klettverschlüs
hinten in die Sch
1) Klettverschl
d
2) De
hinten in die Sch
der Oberseite der
zwischen Daum
Außenseite
de
h
zwischen Daum
fixieren.
3) Die Klettverschl
2) Den Arm in
hin
z
3) Die Klettverschl
der Oberseite de
3) D
zw
der Oberseite de
der Hüfte ab
Schritt 2
fixieren.
d
3) Die
fixieren.
hinten in die
Das Polster auf der S
fi
de
zwischen Da
Taillenhöhe mit dem
Schritt 2
Schritt 2
fixi
3) Die Klettver
weg ausrichten. Das
Das Polster auf der
Schr
Das Polster auf der
der Obersei
die Markierung an d
Taillenhöhe mit de
Das
Taillenhöhe mit de
Schrit
fixieren.
Vorderseite Ihres Kör
weg ausrichten. Da
weg ausrichten. Da
Taill
Das P
Tisch stehen, muss d
die Markierung an
die Markierung an
weg
Taillen
Schritt 2
Vorderseite Ihres K
Vorderseite Ihres K
die
weg a
Das Polster auf
Schritt 3
Tisch stehen, muss
Tisch stehen, muss
Vord
die M
A) Das Taillenband v
Taillenhöhe mi
Tisc
Vorde
Hüfte führen, in d
weg ausrichten
Schritt 3
Schritt 3
Tisch
festziehen.
die Markierung
A) Das Taillenband
A) Das Taillenband
Schr
B) Taillenband zurec
Vorderseite Ihr
Hüfte führen, in
Hüfte führen, in
A) D
Schrit
Tisch stehen, m
festziehen.
festziehen.
H
A) Da
Schritt 4
B) Taillenband zure
B) Taillenband zure
fe
Hü
Das Schulterband au
Schritt 3
B) T
fes
Polstervorderseite lö
Schritt 4
Schritt 4
A) Das Taillenb
B) Tai
greifen und den Arm
Das Schulterband a
Das Schulterband a
Hüfte führe
Schr
Polstervorderseite
führen. Diese Beweg
Polstervorderseite
Das
festziehen.
Schrit
greifen und den Ar
Aufsetzen eines Ruc
greifen und den Ar
Pols
B) Taillenband
Das S
führen. Diese Bewe
Ende im Schlüsselbe
führen. Diese Bewe
grei
Polste
Aufsetzen eines Ru
Unterarmbereich ver
Aufsetzen eines Ru
führ
Schritt 4
greife
Ende im Schlüsselb
Ende im Schlüsselb
Aufs
Das Schulterba
führe
Unterarmbereich v
Schritt 5
Unterarmbereich v
End
Aufse
Polstervorders
Das Schulterband wi
Unt
Ende
greifen und de
Schritt 5
Polstervorderseite b
Schritt 5
Unter
führen. Diese B
Das Schulterband w
Das Schulterband w
Schr
Aufsetzen eine
Polstervorderseite
Schritt 6
Polstervorderseite
Das
Schrit
Ende im Schlüs
Alle Bänder so einste
Pols
Das S
Schritt 6
Unterarmberei
ausreichend stabilisi
Schritt 6
Polste
Alle Bänder so eins
Alle Bänder so eins
Schr
ausreichend stabil
Schritt 5
pflegehinWeise
ausreichend stabil
Alle
Schrit
Das Schulterba
• In einer milden, lau
ausr
pflegehinWeise
Alle B
Polstervorders
pflegehinWeise
waschen. Gründlic
• In einer milden, l
ausre
• In einer milden, l
HINWEIS: Seifenrü
pfl
waschen. Gründl
Schritt 6
waschen. Gründl
Materialverschleiß
• In
HINWEIS: Seifenr
pfle
Alle Bänder so
HINWEIS: Seifenr
w
• Latexfrei. Hypoalle
Materialverschle
• In e
ausreichend st
Materialverschle
H
• Dieses Produkt ist
• Latexfrei. Hypoa
wa
• Latexfrei. Hypoa
Patienten vorgese
M
• Dieses Produkt i
HIN
• Dieses Produkt i
pflegehinW
• La
Patienten vorge
Ma
Patienten vorge
• D
WarnhinWeis: Die
• In einer mild
• Lat
Pa
unter ärztlicher Aufs
WarnhinWeis: D
waschen. Grü
• Die
WarnhinWeis: D
unter ärztlicher Au
Selbstbehandlung b
HINWEIS: Se
Pat
unter ärztlicher Au
Wa
Selbstbehandlung
Schmerzen, Schwellu
Materialvers
Schmerzen, Schwe
Selbstbehandlung
unte
ungewöhnliche Reak
• Latexfrei. Hy
War
Schmerzen, Schwe
ungewöhnliche Re
Selb
behandelnde Arzt au
• Dieses Produ
unter
behandelnde Arzt
ungewöhnliche Re
Schm
Patienten vo
Selbs
behandelnde Arzt
ung
garantie: DJO, LLC
Schm
garantie: DJO, L
beh
Herstellungsdefekte
WarnhinWe
unge
garantie: DJO, L
Herstellungsdefek
der kompletten Vorr
behan
unter ärztliche
der kompletten Vo
Herstellungsdefek
gar
Vorrichtung und alle
Selbstbehandl
Vorrichtung und al
der kompletten Vo
Hers
Zeitraum von sechs M
gara
Schmerzen, Sc
Zeitraum von sech
Vorrichtung und al
der
Herst
ungewöhnlich
Zeitraum von sech
Vorr
nur zum gebrauch
der ko
nur zum gebrauc
behandelnde A
Zeit
rx-produkt
Vorric
rx-produkt
nur zum gebrauc
Zeitra
garantie: DJ
rx-produkt
nur
Herstellungsde
rx-p
nur z
der komplette
rx-pr
Vorrichtung un
Zeitraum von s
nur zum gebr
rx-produkt
hinWeis: es Wurde
hinWeis:
es
Wurd
verfahrensWeisen s
verfahrensWeisen sÄm
grÖsstmÖgliche Ko
grÖsstmÖgliche Komp
hinWeis: es
Wurd
und bequemlichKei
und bequemlichKeit Z
verfahrensWeisen s
ein bestandteil des
hi
ein bestandteil des g
grÖsstmÖgliche Ko
behandlungsprogr
ve
behandlungsprogram
und bequemlichKei
Keine garantie Zur v
Keine garantie Zur vo
gr
ein bestandteil des
hin
un
behandlungsprogr
ver
ei
Keine garantie Zur v
grÖ
be
vorsicht: nach us-am
vorsicht: nach us-amer
und
Ke
nur durch oder auf
nur durch oder auf an
ein
einer mediZinischen f
beh
einer mediZinischen fa
vorsicht: nach us-am
Kein
nur durch oder auf
vor
einer mediZinischen f
nur
hinWeis: es
eine
verfahrensWe
vorsi
grÖsstmÖglich
nur d
und bequemlic
einer
ein bestandtei
behandlungsp
Keine garantie
vorsicht: nach u
nur durch oder
einer mediZinisc
Advertisement

Related Manuals for DJO Global Donjoy UltraSling III ER


Summary of Contents for DJO Global Donjoy UltraSling III ER
- Page 1 3) Train all staff on proper application. nur zum gebr rx-produkt 4) Do not alter DJO Global UltraSling III ER in any way or notice: While every effort has been made in state-of-the-art notice: While every effort has been made in state-of-the-art...
- Page 2 = 5 = XL 15”+ (38cm+) For single patient use only. (RX Product) Latex free For more information, please contact your DonJoy Territory Manager or Authorized Distributor DJO, LLC A DJO Global Company 800.336.6569 760.727.1280 800.936.6569 1430 Decision Street Vista, CA 92081-8553 U.S.A.
Need help?
Do you have a question about the Donjoy UltraSling III ER and is the answer not in the manual?
Questions and answers