Table of Contents
Advertisement
Quick Links
Advertisement
Table of Contents

Related Manuals for twin busch TW436P


Summary of Contents for twin busch TW436P
-
Page 2: Table Of Contents
Manual 4-post lift TW436P / TW436P-G Table of contents 1. General information ..........................1 2. Identification of the instructions for use ....................1 3. Technical data ............................1 4. Modification of the product ........................1 5. Safety-related information ........................2 5.1 Safety instructions ............................ - Page 3 Manual 4-post lift TW436P / TW436P-G 13.4 Circuit diagrams ............................29 13.5 Detailed drawing and parts description of the lifting platform ..............32 13.6 Spare parts list ............................37 Further attachment: EU Declaration of Conformity ⋅ TW436P_TW436P-G_4-Post_Lifts_Manual_uk_00_20240723.pdf Version: -00, 23.07.2024...
- Page 4 Manual 4-post lift TW436P / TW436P-G Important information: ASSEMBLY You can find the assembly video for this lift on https://youtu.be/ID3WAlbF7YY YouTube: or scan the QR code. PRODUCT PRESENTATION You can find the product presentation video for this lift on YouTube: https://youtu.be/i8-ZDY8okJ8...
- Page 5 24/7 Service Center: Our 24/7 Self-Service Center is a mobile website designed for self-diagnosis of issues with your Twin Busch lift. Here, we provide an extensive video collection covering a wide range of relevant topics for your Twin Busch lift, from fine-tuning and maintenance to component replacement.
-
Page 6: General Information
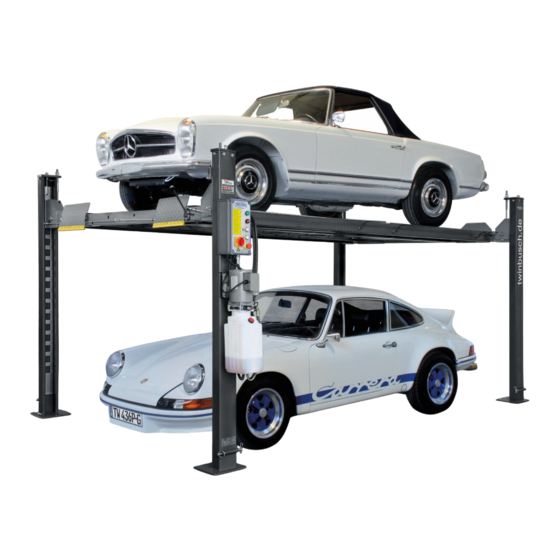
The TW 436P / TW 436P-G 4-post parking lift was designed and developed for parking two vehicles on a small footprint. Using the optionally available TW436P-VP offset plates, it is possible to offset the hydraulic unit and the control unit by 90° in order to save additional space and provide convenient, frontal access to the control unit. -
Page 7: Safety-Related Information
Manual 4-post lift TW436P / TW436P-G 5. Safety-related information Read the operating instructions carefully before operating the lift. Keep the instructions in a safe place for future reference. Follow the instructions carefully to achieve the best performance from the machine and to avoid damage due to personal negligence. -
Page 8: Warnings And Symbols
Manual 4-post lift TW436P / TW436P-G 5.2 Warnings and symbols All warning labels are clearly visible on the lift to ensure that the user uses the equipment in a safe and appropriate manner. The warning signs must be kept clean and replaced if they are damaged or missing. Please read the signs carefully and memorise their meaning for future operations. -
Page 9: Safety Equipment
Manual 4-post lift TW436P / TW436P-G 5.3 Safety equipment For safe operation of the lifting platform, it is equipped with the following safety devices *): ⋅ Safety detents ⋅ Throttle valve in hydraulic line ⋅ Limit switch ⋅ Lifting carriage lock ⋅... -
Page 10: Conformity With The Product
Manual 4-post lift TW436P / TW436P-G 6. Conformity with the product The TW436P / TW436P-G 4-post lift is CE-certified and compliant with the Machinery Directive 2006/42/EC fulfilling the standards EN 1493:2022, EN 60204-1:2018 (look at: EU Declaration of Conformity, at the end of the user manual). -
Page 11: Structure Of Lifting Platform
Manual 4-post lift TW436P / TW436P-G 8. Structure of lifting platform 8.1 Before installation Tools and equipment required: ⋅ Suitable lifting tool for bulky and heavy components ⋅ Hammer, pliers ⋅ Phillips and slotted screwdriver ⋅ Set of Allen spanners ⋅... - Page 12 Manual 4-post lift TW436P / TW436P-G 7) After removing the remaining packaging, the next step is to turn the lower track. To do this, place wood underneath and then remove the retaining screws. The track can now be turned by two people.
- Page 13 Manual 4-post lift TW436P / TW436P-G Figure: Column cover assembly Direction of travel d) Insert a bolt from the outside and a washer and nut from the inside. Once you have reinserted the 4 screws, place the washer and nut on the threaded rod of the ladder.
- Page 14 Manual 4-post lift TW436P / TW436P-G a) Once you have removed all the cable ties, the next step is to guide the cable ends out of the track. To do this, however, you must first unscrew the nuts from the cable ends. To do this, insert the short cable end, threaded rod first, through the opening at the front right into the front track.
- Page 15 Manual 4-post lift TW436P / TW436P-G c) Remove the pre-assembled cable ends for the cable slack protection switches from the crossbars. d) Align the crossbar with the rear track, as this will be bolted on first. Raise it slightly with a motorised jack and lower it after you have removed the tresle.
- Page 16 Manual 4-post lift TW436P / TW436P-G Figure: Rope slack protection d) At the tip, insert the end of the cable into the hole provided and secure it with a nut. Insert the bolt under the pulley to secure the steel cable and secure it again with a lock nut on the inside.
- Page 17 Manual 4-post lift TW436P / TW436P-G Figure: Linkage with ball element e) The ball element is now screwed back on and then attached to the locking lever on the crossbar. f) On the opposite side, unscrew the ball element to ensure that it remains as vertical as possible during the subsequent assembly on the unlocking mechanism.
- Page 18 Manual 4-post lift TW436P / TW436P-G Figure: Long unlocking bar 18) Mounting the switch box a) Carefully remove the bag with the multi-cable and the limit switch. Unscrew the switch box and remove the mounting screws and cable ties. Now open the bag with the multi-cable and the limit switch. Screw the switch box to the main pillar.
- Page 19 Manual 4-post lift TW436P / TW436P-G a) Make sure that all hose ends are clean and free of dirt. b) Tighten the nut on the motor unit securely. c) Fit the breather pipe to the engine and cylinder. Figure: Vent pipe 20) Fit the oil hose.
- Page 20 Manual 4-post lift TW436P / TW436P-G Attention: This cable consists of three connections that are not numbered! The blue and brown cables are the power supply for the motor and are connected to the cables with the letters W and U.
- Page 21 Manual 4-post lift TW436P / TW436P-G 23) Electrical connections a) To do this, connect the multi-cable to the switch box. This cable is used to connect the cable slack protection switches to the switch box. At the other end of the multi-cable, remove the mounting nut and pull it over the electrical connections.
- Page 22 Manual 4-post lift TW436P / TW436P-G Figure: Cable under the carriageway f) Lower the platform. Before doing so, however, open the oil tank cover by half a turn to allow air to escape! Then pull the unlocking lever towards you to unlock the platform and lower the platform completely using the "Down"...
-
Page 23: Test Points After Assembly
Manual 4-post lift TW436P / TW436P-G c) Hold the threaded rod with one open-end spanner and tighten the cable using the nut. You can use a spirit level to determine exactly how far you need to tighten the nuts to level the tracks. First place this in the centre of the track and adjust the cable nut on the main column so that the track is level. -
Page 24: Commissioning
Manual 4-post lift TW436P / TW436P-G 9. Commissioning 9.1 Safety precautions a) If the safety devices are defective or show abnormalities, the lift must not be put into operation under any circumstances! b) Check that all connections of the hydraulic lines are tight and functional. If there are no leaks, the lifting process can be started. -
Page 25: Lifting And Lowering Process Flow Chart
Manual 4-post lift TW436P / TW436P-G 9.3 Lifting and lowering process flow chart Lifting process Lowering process Start Start Switch on the power Switch on the power Press the UP button (push-button), Press the UP button (push-button) lift approx. 5 cm... -
Page 26: Operating Instructions
Manual 4-post lift TW436P / TW436P-G 9.4 Operating instructions 9.4.1 Lifting process 1. Read and understand the operating instructions before starting work. 2. Connect the power supply and switch the main switch to ON. 3. Place the vehicle with its centre of gravity in the middle between the pillars on the platforms. -
Page 27: Troubleshooting
10. Troubleshooting Attention: Do not hesitate to contact the expert staff of Twin Busch GmbH if you are unable to rectify an error yourself. We will be happy to assist you in rectifying the problem. In this case, document the error and send us pictures and a precise description of the error so that we can identify and remedy the cause as quickly as possible. -
Page 28: Maintenance
Manual 4-post lift TW436P / TW436P-G 11. Maintenance Regular maintenance of your lift will ensure a long and safe service life. Suggestions for maintenance intervals and the activities to be carried out are listed below. How often you service your lift depends on the ambient conditions, the degree of soiling and, of course, the stress and load on the lift. -
Page 29: Behavior In The Event Of An Incident
If the lift malfunctions, simple faults may be the cause. Use the following list for troubleshooting *). If the cause of the error is not listed or cannot be found, please contact the expert Twin Busch GmbH team. Never attempt to carry out repairs yourself, especially on safety devices or electrical system parts. -
Page 30: Appendix
Manual 4-post lift TW436P / TW436P-G 13. Appendix 13.1 Lifting platform dimensions Page | 25 Misprints, errors and changes excepted. -
Page 31: Foundation Requirements And Working Area
Manual 4-post lift TW436P / TW436P-G 13.2 Foundation requirements and working area Requirements for the concrete: - Concrete C20/25 according to DIN 1045-2 (previous designation: DIN 1045 concrete B25). - The floor must be level and have a flatness of less than 5 mm/m. - Page 32 Manual 4-post lift TW436P / TW436P-G The following must be observed for soil exposed to frost: For frost exposure, the concrete must comply with exposure class XF4, as dripping de-icing agent cannot be ruled out. This results in the following minimum requirements for the concrete when exposed to frost:...
-
Page 33: Hydraulic System
Manual 4-post lift TW436P / TW436P-G 13.3 Hydraulic system 1. Cylinder 2. Emergency release valve 3. Throttle valve adjustable 4. Motor 5. Clutch 6. Pump 7. Non-return valve 8. Pressure relief valve 9. Throttle check valve 10. Spring-loaded non-return valve... - Page 34 Manual 4-post lift TW436P / TW436P-G 13.4 Circuit diagrams Page | 29 Misprints, errors and changes excepted.
- Page 35 Manual 4-post lift TW436P / TW436P-G Page | 30 Misprints, errors and changes excepted.
- Page 36 Manual 4-post lift TW436P / TW436P-G Page | 31 Misprints, errors and changes excepted.
- Page 37 Manual 4-post lift TW436P / TW436P-G 13.5 Detailed drawing and parts description of the lifting platform Page | 32 Misprints, errors and changes excepted.
- Page 38 Manual 4-post lift TW436P / TW436P-G Page | 33 Misprints, errors and changes excepted.
- Page 39 Manual 4-post lift TW436P / TW436P-G Spare part Name Specification Material Remark number Enquiry Main column FL-8448P-A1-B1 Welded part On request Secondary column FL-8448P-A2-B1 Welded part E-HEB0225 Manager FL-8448P-A1-B2 Welded part On request Mother Standard GB/T 6170-2000 E-HEB0198 Steel cable L=8260...
- Page 40 Manual 4-post lift TW436P / TW436P-G On request Mounting plate 1 FL-8448T-A7-B2-C1 Q235A borrow On request Mounting plate 2 FL-8448T-A7-B4 Q235A borrow On request Screw standard On request Socket 2 FL-8448T-A5-B4 Q235A On request Traverse FL-8448P-A4-B1 Welded part On request...
- Page 41 Manual 4-post lift TW436P / TW436P-G On request Screw M18*160 standard On request Unwind fuse FL-8448P-A9 Q235A On request disc FL-8448P-A11 Welded part φ8,straight and bent E-HEB0220 Hydraulic hose Component L=1700 φ8, Both ends pass =NO.93 Hydraulic hose Component through L=1700 NPT3/8-G1/4(with...
- Page 42 Manual 4-post lift TW436P / TW436P-G 13.6 Spare parts list Spare part Name Specification Quantity Remark number E-HEB0002 Main switch LW26GS-20/04 On request Button TN2BFW/A/B E-HEB001 Chandelier AD17-22G-AC24 Transformer JBK3-40VA 220V-24V equal to 7 Transformer JBK3-40VA 230V-24V equal to 7...
Need help?
Do you have a question about the TW436P and is the answer not in the manual?
Questions and answers