Advertisement
Quick Links
FREECURVE 3 FREECURVE 4
ELEGANCE
ALLIANCE
CLASSIC
HANDICARE 1000
181001.52118
181001.52119
CHARGING ISSUES
1000
ELEGANCE
SMART
ALLIANCE
OUTDOOR
CLASSIC
4000
1100
SIMPLICITY
STYLE
STYLE
SMART
OUTDOOR
I N S T R U C T I O N
INSTRUCCIÓN
INSTRUCTIE
ANLEITUNG
INSTRUCTION
ISTRUZIONE
I T
ES
FR
NL
DE
EN
Advertisement

Related Manuals for Handicare 1000


Summary of Contents for Handicare 1000
- Page 1 FREECURVE 3 FREECURVE 4 1000 4000 1100 ELEGANCE ELEGANCE SMART SIMPLICITY STYLE ALLIANCE ALLIANCE OUTDOOR STYLE CLASSIC CLASSIC SMART OUTDOOR HANDICARE 1000 I N S T R U C T I O N INSTRUCCIÓN INSTRUCTIE ANLEITUNG INSTRUCTION ISTRUZIONE 181001.52118 181001.52119 CHARGING ISSUES...
-
Page 2: Tools Required
CHARGING ISSUES TOOLS REQUIRED 181001.52118 181001.52119 4 mm AA18588 1 CHARGING ISSUES INSTRUCTION... - Page 3 EXPLANATION Only a technician certified for this lift should service this lift (for more detailled information about the required competence see the installation manual). The latest instructions for the lift and instructions for options are available for download at www.handicarepartners.com. [1]Check that all the components of the concerning kit are present.
- Page 4 CHARGING ISSUES POWERED OPTIONS INSTALLED DISABLED REINSTALL THE LIFT SEE MANUAL AA30068 3 CHARGING ISSUES INSTRUCTION...
- Page 5 EXPLANATION [3]Remove the top cap from the power pack. [4]Disconnect the grey wire from the communication pin (M12) on the PCB H125{A} and connect the wire to the ground pin (M2) on the PCB{B}. Note: in case powered options are installed on the lift, shifting of the grey wire will disable the powered functions. [5]Reinstall the back cover.
- Page 6 CHARGING ISSUES 4 mm UPSTAIRS and DOWNSTAIRS UPSTAIRS and DOWNSTAIRS CHARGER SITE ! 5 CHARGING ISSUES INSTRUCTION...
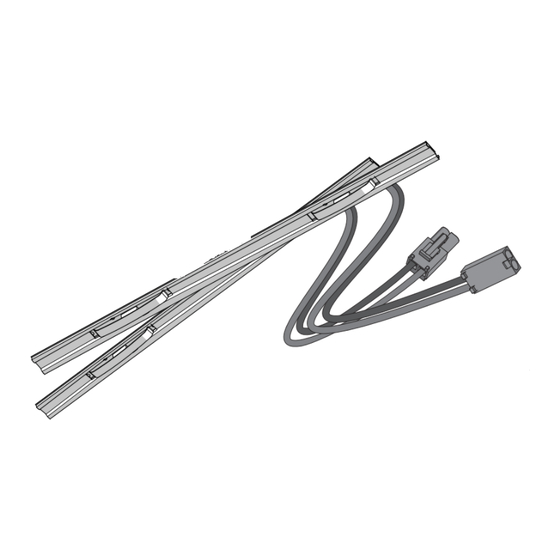
- Page 7 EXPLANATION [8]Remove the end caps and brackets. [9]Disconnect the charger. [10]Remove the old charge strips. [11]Connect both new charging strips to each other{A} and lower 1 strip (~119 if the charger is at the bottom, otherwise ~118) through the rail{B}. [8]Verwijder de eindkappen en houders.
- Page 8 CHARGING ISSUES UPSTAIRS and DOWNSTAIRS LEFT HAND LIFT RIGHT HAND LIFT UPSTAIRS or DOWNSTAIRS UPSTAIRS or DOWNSTAIRS 7 CHARGING ISSUES INSTRUCTION...
- Page 9 EXPLANATION [12]Fit the charge strips on the rail ( contact (red wire) on down side in case of a left hand lift, contact (red wire) on upper side in case of a right hand lift !). [13]Upstairs or downstairs: fasten the +wire (white) of the charger in this block{A}. Fasten the - wire (black) of the charger and the earthwire in another connector block{B}.
- Page 10 CHARGING ISSUES UPSTAIRS and DOWNSTAIRS UPSTAIRS and DOWNSTAIRS 0 Nm 4 mm UPSTAIRS and DOWNSTAIRS 15 sec. 9 CHARGING ISSUES INSTRUCTION...
- Page 11 EXPLANATION [15]Put the wires in the main chamber of the rail{A}. Slide the end cap bracket into the rail{B}. [16]Reinstall and carefully fasten (handtight) the end cap. [17]Reconnect the charger{A}. Turn on lift lift{B}. [18]Drive the lift UP / DOWN to the charging points to confirm that the lift is charging normally: the display shows a “2”...
-
Page 12: Contenu De Ce Manuel
Questo manuale contiene: Questo kit deve essere installato da un tecnico certificato. È possibile scaricare le più recenti istruzioni relative al montascale e alle varie opzioni dal sito Web www.handicarepartners.com. Handicare Stairlifts B.V. Handicare Montascale Newtonstraat 35 Via Chiaviche 17...
Need help?
Do you have a question about the 1000 and is the answer not in the manual?
Questions and answers