
Subscribe to Our Youtube Channel
Related Manuals for Amica EWA 34660 W


Summary of Contents for Amica EWA 34660 W
- Page 1 OPERATING INSTRUCTIONS IO-WMS-3447 (11.2023/1) EWA 34660 W ONLY USE THE APPLIANCE WHEN YOU HAVE READ AND UNDERSTAND THE WASHING MACHINES OPERATING INSTRUCTIONS...
-
Page 2: Table Of Contents
CONTENTS ECOLOGY IN PRACTICE BASIC INFORMATION SAFETY AND GERMENT CARE LABELS INSTALL THE APPLIANCE PRODUCT DESCRIPTION TROUBLESHOOTING PRACTICAL TIPS ON WASHING... -
Page 3: Ecology In Practice
ECOLOGY IN PRACTICE For many years, Amica has consistently pursued pro-ecological policy. Concern for the environment is as important for us as the use of modern technology. The development of technology has enabled our factories to become more environmentally friendly – we use less and less water, electricity and less waste water and solid waste is gener- ated in the production. - Page 4 UNPACKING During transportation, protective packaging was used to protect the appliance against any damage. Af- ter unpacking, please dispose of all elements of packaging in a way that will not cause damage to the environ- ment. All materials used for packaging the appliance are environmentally friendly;...
-
Page 5: Disposal Of Old Appliance
DISPOSAL OF OLD APPLIANCE In accordance with European Directive 2012/19/EU and local legislation re- garding used electrical and electronic goods, this appliance is marked with the symbol of the crossed-out waste container. This marking indicates that the appliance must not be disposed of together with other household waste after it has been used. - Page 6 Store these operating instructions in a safe place to use them for reference when- ever needed. These Operating Instructions contain all the necessary information that will make the use of your Amica appliance simple and fun. We also encourage you to find out more about other Amica appliances.
-
Page 7: Basic Information
BASIC INFORMATION This washing machine is intended for domestic use only to wash tex- tiles and clothes designed to be machine washed in a detergent bath. Before plugging the washing machine into the mains, remove the safety packaging and ensure the machine is level. The manufacturer reserves the right to introduce changes, which do not affect operation of the appliance. -
Page 8: Safety And Germent Care Labels
SAFETY AND GERMENT CARE LABELS The risk of death! This appliance should not be used by children under 8 years of age, persons with reduced physical or mental capabilities, and persons who do not have sufficient skills to use this type of appliance. Such persons should be offered proper supervision or instructions on safe handling of appliance and related... -
Page 9: Eye/Skin Irritation
SAFETY AND GERMENT CARE LABELS Risk of burns! If laundry is washed at high tem- perature, door glass becomes hot. Prevent children from touching the hot door. Eye/skin irritation! Contact with detergents and softeners may cause eye or skin irritation. In case of eye/skin contact, thoroughly rinse eyes/ skin to remove fabric detergent/ softener. - Page 10 SAFETY AND GERMENT CARE LABELS Risk of electric shock. The power cord and the ground- Risk of fire/damage to ed wall socket fit together and property/appliance! the grounding system has been properly installed. Power cord cross section is suf- ficient. Power plug is always accessible.
- Page 11 SAFETY AND GERMENT CARE LABELS Risk of fire/damage to The use of extension cords or property/appliance! splitters may result in fire due to overheating or short circuit. Connect the appliance directly to a properly grounded wall socket. Do not use extension cords, splitters or power strips.
- Page 12 SAFETY AND GERMENT CARE LABELS Risk of injury! This appliance has sharp edges that can cause a hand injury. Do not hold the appliance by sharp edges. Only lift the appliance after you put on the gloves. If the hoses or electrical cables are not routed properly, you can trip and sustain an injury.
- Page 13 SAFETY AND GERMENT CARE LABELS Important! Use only hoses supplied with Damage to property/ the appliance, or the original appliance hoses up designed for the appli- ance. The appliance is secured for transport with transit bolts. If you don’t remove transit bolts before using the appliance, the appliance may be damaged.
-
Page 14: Risk Of Injury
SAFETY AND GERMENT CARE LABELS Risk of poisoning! Cleaning agents containing solvents may give off poisonous vapours. Do not use cleaning agents con- taining solvents. Risk of injury! Do not lean against/sit on open appliance door as this can lead to the appliance tipping over. - Page 15 SAFETY AND GERMENT CARE LABELS Eye/skin irritation! Fabric detergents and soften- ers may splash, if the detergent drawer remains open during operation. In case of eye/skin contact, thoroughly rinse eyes/skin to remove fabric detergent/sof- tener. In the event of accidental in- gestion, consult your doctor.
- Page 16 SAFETY AND GERMENT CARE LABELS SAFETY AND GERMENT CARE LABELS The risk of death!! The appliance is powered by electricity. Touching live ele- ments poses a risk of electric shock. Therefore, remember: Turn off the appliance: Unplug the appliance from the wall outlet.
- Page 17 SAFETY AND GERMENT CARE LABELS SAFETY AND GERMENT CARE LABELS Risk of poisoning! Cleaning agents containing solvents may give off poisonous vapours. Do not use cleaning agents con- taining solvents. Risk of electric shock / If water penetrates into the damage to property / appliance, it may cause a short appliance!
-
Page 18: Understanding The Symbols On Clothes Labels
SAFETY AND GERMENT CARE LABELS Important! Make sure there is no contact Damage to property/ with the appliance surface. appliance Clean the appliance with a damp cloth only. UNDERSTANDING THE SYMBOLS ON CLOTHES LABELS Washing boil at 90°C normal wash at 60°C normal wash at 40°C Do NOT wash! delicate... -
Page 19: Install The Appliance
INSTALL THE APPLIANCE Remove the transit bolts (keep the bolts for future use, e.g. when moving house). stop up the holes with the stoppers enclosed unscrew the 4 transit bolts in the accessories bag. with a spanner, remove the rubber and plastic transport brackets from the sockets along with the washers and bolts. - Page 20 Connect the water supply Use only the new hoses supplied with the machine. Do not re-use hoses. A supply hose with seals is inside the drum of the machine. Water pressure min 0.05 MPa (0.5 bar), max 1 MPa (10 bar). 1).
- Page 21 Connect to power supply Electrical wall outlet where the appliance is connects must be in a visible and accessible place, Only plug the appliance into a properly installed socket with an earthing pin, Do not use an extension cord to connect the appliance, in the event of the power cord being damaged, it must be replaced by an authorised service...
-
Page 22: Features And Components
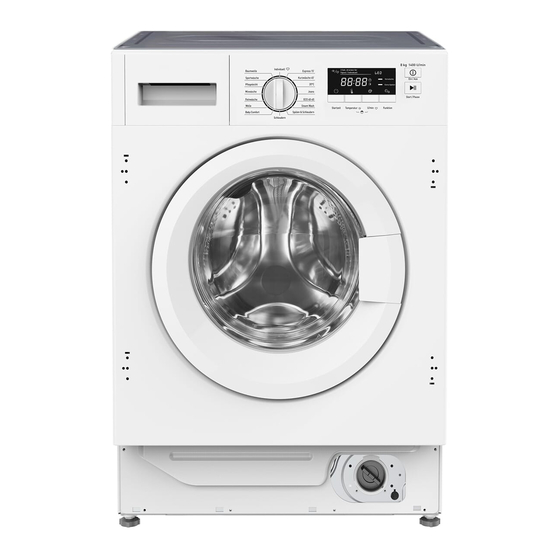
FEATURES AND COMPONENTS DESCRIPTION OF THE APPLIANCE 1. Detergent drawer 2. Drum 3. Control Panel 4. Door handle 5. Pump filter cover Accessories: Transport Hole plug Inlet pipe Inlet pipe H Outlet hose hole plug (optional) (optional) support (optional) - Page 24 DISPLA Y AND CONTROL PANEL 1. Programme selector dial 2. Display 3. Button for the additional function Start delay 4. Button for the selection of the Temperature 5. Button for the selection of the Spin speed 6. Button for the selection of the Function 4+5.
- Page 25 Programme selector dial The user can select an appropriate wash programme according to the degree of soiling, the type and amount of the laundry in order to ensure a better and more efficient result. Once the programme has started, the parameters of the selected wash programme can no longer be changed by setting the programme button in a different position.
- Page 26 Function selection button The multifunction button can be one of two functions (extra rinse or pre-wash) or both functions can be selected simultaneously. If this function is started, the LED above the symbol of the selected function lights up. Attention! The functions Extra Rinse/Prewash and are not available for all wash- ing programs (see: Program table).
- Page 27 Standby button Switch the washing on/off and abort the wash programme. Switching the sound signal on/off In order to activate this function, keep the button pressed for about 3 seconds. The sound signal confirms the activation of this function. In order to re-enable the function, push the button and hold it for about 3 seconds.
-
Page 28: Description Of The Appliance
DESCRIPTION OF THE APPLIANCE SPECIAL PROGRAMMES Wash programme Baby Comfort: This wash programme is intended for children and persons with sensitive skin. The main wash is always at 60°C (possible temperatur settings are 90/60/40/30/20—“cold”). Wash programme Rapid 15’: These wash programmes serve to refreshen clothes. They include all the wash cycles: - main wash - rinse... -
Page 29: Using The Appliance
USING THE APPLIANCE Select Programme Set the programme selector turning it left or right. Customize the programme to your needs – you can change the temperature, spin speed, or enable additional features. Press the Start/ Pause button Time Remaining To set the Time Remaining: Close the appliance door. -
Page 30: Troubleshooting
TROUBLESHOOTING Problem Probable cause/Solution The washing machine is not working Open the water supply tap. - clean the mesh filter on the supply hose - close the door - press the Start/ Pause button Water Leakage - Properly connect the water supply hose. The load in the appliance has not been - Replace the load evenly in the drum, clean the pump filter. - Page 31 Problem Probable cause/Solution Appliance vibrating - Check if transit bolts are removed - level the washing machine, - lock the washing machine feet by tightening the nuts. Foam leaks from the detergent drawer. - Reduce the amount of detergent used - Check the water hardness and the amount of detergent used, - Use detergent according to manufacturer instruction on the box indicated for your water hardness.
- Page 32 THE FAUL T INDICATOR LIGHTS The washing machine has an alarm system, which helps solving minor problems connected with incor- rect operation by means of “ERROR CODES” indicated in the display. With the ERROR CODES you can locate the defect and establish the cause. If an error is found, the display shows information in accordance with the following table: Display Reason...
-
Page 33: Maintenance And Cleaning
TROUBLESHOOTING MAINTENANCE AND CLEANING Never clean the appliance body or plastic parts using solvents or harsh, abrasive deter- gents (e.g. washing powders or creams)! Use mild liquid detergents and soft cloths only. Do not use sponges. Clean the pump filter Clean the pump filter every 20 washes or so. -
Page 34: Practical Tips On Washing
PRACTICAL TIPS ON WASHING DETERGENTS AND LAUNDRY ADDITIVES It is recommended to use a general-purpose laundry detergent powder or liquid for the full range of temperatures according to the manufacturer's instructions on the detergent packaging. Detergents Pour the detergent into the drawer compartment marked Pour the pre-wash detergent into the drawer compart- ment marked... -
Page 35: First Wash
FIRST WASH Before washing for the first time, put the appliance through one high temperature cycle without a load, according to the following procedure: 1). connect the washing machine to the power supply, 2). open the water valve, 3). set the programme selector dial to washing at high temperature, add a suitable detergent and press Start/Pause. -
Page 36: Water Hardness
WATER HARDNESS Hard water causes scale deposition. Information about water hardness is available from the nearest water works. We recommend that you use water softener for each washing. POWER OUTAGE (PROGRAMME MEMORY) Power outage or unplugging the appliance does not cancel the set programme. The programme is memorised and resumes when power is restored. -
Page 37: Add Detergent
DOOR LOCK The washing machine is equipped with a lock which prevents the door from being opened during wash cycle. Once a wash cycle is complete, the door lock is automatically released. In order to open the door during the wash program, press PAUSE button and wait to unlock the door. - Page 38 LOAD DISTRIBUTION CONTROL BUILT-IN INSTALLATION Overview Before you install the washing machine, please read these instructions carefully and keep them for future reference. This appliance has been designed to be built into the kitchen furniture. The recess should have the dimensions shown in Fig. 600mm 580mm 825mm...
- Page 39 Appendix 1.Self-tapping screws 2.Hinges 3.Counter magnet 4.Spacer 5.Fixed position paper (ST4*12) (M5*12) (ST4.8*15) Tools 1.Screw Driver 2.Automatic Driver 3.Ruler 4.Pencil Preparation the Fixed position paper Make the mark on the door according to the cupboard and washing machine height. Position Paper...
- Page 40 Fixed position paper on the door. Position Paper Position Paper Left Open Right Open Paste on the Door(The Shear fixed position Paste on the Door(The door on the left) paper door on the right) Drill hole on the door Drill the hole on the door according to the fixed position paper. 35mm Installation the hinges and spacer Fix the hinges to the machine by means of the screws.
- Page 41 Installation the counter magnet The appliance is prearranged for a magnetic closure of the door. To enable a correct operation of this device, it is necessary to screw the counter-magnet into the inner side of the door. Installation the door WARNING: Maxiumim allowed mass of fornt furniture front panel is 7,5 kg.
-
Page 42: Warranty And After-Sales Service
For more information about the product, please refer to the EU EPREL Product Database at https://eprel.ec.europa.eu. For more informa- tion, please use your mobile device to scan the QR code on the energy label or enter the product model listed on the energy label in the EPREL search engine https://eprel.ec.europa.eu/ WARRANTY AND AFTER SALES SERVICE... - Page 44 AMICA S.A. UL. MICKIEWICZA 52 64-510 WRONKI TEL. 67 25 46 100 FAX 67 25 40 320 WWW.AMICA.PL...
Need help?
Do you have a question about the EWA 34660 W and is the answer not in the manual?
Questions and answers