Auriol 424645 2301 Operation And Safety Notes
Radio-controlled wall clock
Hide thumbs
Also See for 424645 2301:
- Short manual (113 pages) ,
- Operation and safety notes (70 pages)

Subscribe to Our Youtube Channel
Related Manuals for Auriol 424645 2301


Summary of Contents for Auriol 424645 2301
- Page 1 OWIM GmbH & Co. KG Stiftsbergstraße 1 74167 Neckarsulm GERMANY Model No.: HG06544A-DCF / HG06544B-DCF Version: 06/2023 IAN 424645_2301...
- Page 2 FUNKWANDUHR / RADIO-CONTROLLED WALL CLOCK / HORLOGE MURALE RADIOGUIDÉE FUNKWANDUHR NÁSTENNÉ HODINY Bedienungs- und Sicherheitshinweise Pokyny pre obsluhu a bezpečnostné pokyny RADIO-CONTROLLED WALL CLOCK RELOJ DE PARED Operation and safety notes RADIOCONTROLADO Instrucciones de utilización y de seguridad HORLOGE MURALE RADIOGUIDÉE Instructions d‘utilisation et consignes de sécurité...
- Page 3 DE/AT/CH Bedienungs- und Sicherheitshinweise Seite GB/IE Operation and safety notes Page FR/BE Instructions d‘utilisation et consignes de sécurité Page NL/BE Bedienings- en veiligheidsinstructies Pagina Wskazówki dotyczące obsługi i bezpieczeństwa Strona Pokyny pro obsluhu a bezpečnostní pokyny Strana Pokyny pre obsluhu a bezpečnostné pokyny Strana Instrucciones de utilización y de seguridad Página...
- Page 4 RESET KINGVY Q U A R T Z KV2008 NO(O)JEWELS UNADJUSTED 1.5V AA LR6 R6P...
-
Page 8: Table Of Contents
Liste der verwendeten Piktogramme ..... . Seite Einleitung ..........Seite Bestimmungsgemäßer Gebrauch. -
Page 9: Liste Der Verwendeten Piktogramme
Liste der verwendeten Piktogramme Gleichstrom/-spannung Funksteuerung Batterie im Lieferumfang Zerbrechlich enthalten Temperaturanzeige Das CE-Zeichen bestätigt Konformität mit den für das Produkt zutreffenden EU- Richtlinien. Feuchtigkeitsanzeige Außerhalb der Reichweite Nicht neue und gebrauchte von Kindern aufbewahren Batterien kombinieren Nicht in Feuer entsorgen Nicht aufladen Von Wasser und Nicht falsch einlegen... -
Page 10: Einleitung
Nicht verformen / Nicht kurzschließen beschädigen Nicht öffnen / demontieren Richtig einlegen Warnung: Lesen Sie Nicht verschiedene Typen die entsprechenden Sicherheitshinweise in der und Marken kombinieren Bedienungsanleitung FUNKWANDUHR ˜ Einleitung Wir beglückwünschen Sie zum Kauf Ihres neuen Produkts. Sie haben sich damit für ein hochwertiges Produkt entschieden. -
Page 11: Lieferumfang
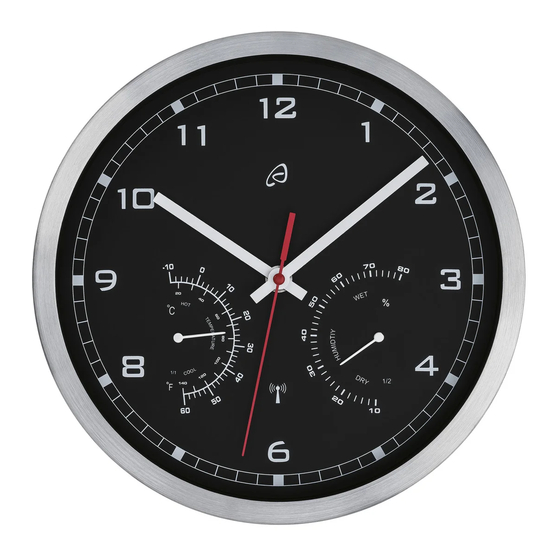
˜ Lieferumfang Überprüfen Sie unmittelbar nach dem Auspacken den Lieferumfang auf Vollständigkeit und auf einwandfreien Zustand des Produkts und aller Teile. 1 Funkwanduhr 1 Batterie 1×1,5 V AA, LR6 (mitgeliefert) 1 Bedienungsanleitung ˜ Teilebeschreibung Montagehalterung SET-Taste Aufnahmetaste (REC) Rückstelltaste Batteriefach ˜... -
Page 12: Sicherheitshinweise
Sicherheitshinweise WARNUNG! Lesen Sie alle Sicherheitshinweise und Anweisungen. Versäumnisse bei der Einhaltung der Sicherheitshinweise und Anweisungen können Brand und schwere Verletzungen verursachen. Allgemeine Sicherheitshinweise WARNUNG! LEBENS- UND UNFALLGEFAHR FÜR KLEINKINDER UND KINDER! Lassen Sie Kinder niemals unbeaufsichtigt mit dem Verpackungsmaterial. Es besteht Erstickungsgefahr durch Verpackungsmaterial. -
Page 13: Sicherheitshinweise Für Batterien/Akkus
Sicherheitshinweise für Batterien/Akkus m LEBENSGEFAHR! Halten Sie Batterien/Akkus außer Reichweite von Kindern. Suchen Sie im Falle eines Verschluckens sofort einen Arzt auf! Verschlucken kann zu Verbrennungen, Perforation von Weichgewebe und Tod führen. Schwere Verbrennungen können innerhalb von 2 Stunden nach dem Verschlucken auftreten. - Page 14 Risiko der Beschädigung des Produkts Verwenden Sie ausschließlich den angegebenen Batterietyp/Akkutyp! Setzen Sie Batterien/Akkus gemäß der Polaritätskennzeichnung (+) und (–) an Batterie/Akku und Produkt ein. Reinigen Sie Kontakte an Batterie/Akku und im Batteriefach vor dem Einlegen mit einem trockenen, fusselfreien Tuch oder Wattestäbchen! Entfernen Sie erschöpfte Batterien/Akkus umgehend aus dem Produkt.
- Page 15 Stellen Sie vor dem Bohren eines Lochs sicher, dass sich an dieser Stelle keine Gas-, Wasser- oder Stromleitungen in der Wand befinden, die sie beim Bohren beschädigen könnten. 1. Markieren Sie das Bohrloch an der Wand. 2. Bohren Sie das Loch mit einem Elektrobohrer. 3.
- Page 16 2. Das Produkt beginnt automatisch mit der Suche nach dem DCF-Funksignal. Dieser Vorgang nimmt 3 bis 12 Minuten in Anspruch. Innerhalb von 4 Minuten bewegen sich die Zeiger auf 12 Uhr. Der Funksignalempfang wird eingeleitet, sobald alle Zeiger auf der 12-Uhr-Position stehen.
- Page 17 HINWEIS: Nach 8 Sekunden ohne Druck auf die SET-Taste verlässt das Produkt den manuellen Modus und die Zeit läuft normal weiter. Sobald ein Empfang des DCF-Funksignals erfolgreich ist, werden die manuell eingestellten Werte überschrieben. ˜ Einstellungen zurücksetzen Drücken Sie die Rückstelltaste mit einem spitzen Gegenstand (z.
-
Page 18: Gerät Entsorgen
Produkt: Das Produkt inkl. Zubehör und die Verpackungsmaterialien sind recyclebar und unterliegen einer erweiterten Herstellerverantwortung. Entsorgen Sie diese getrennt, den abgebildeten Info-tri (Sortierinformation) folgend, für eine bessere Abfallbehandlung. Das Triman-Logo gilt nur für Frankreich. Möglichkeiten zur Entsorgung des ausgedienten Produkts erfahren Sie bei Ihrer Gemeinde oder Stadtverwaltung. - Page 19 Defekte oder verbrauchte Batterien / Akkus müssen gemäß Richtlinie 2006/66/ EG und deren Änderungen recycelt werden. Geben Sie Batterien / Akkus und / oder das Produkt über die angebotenen Sammeleinrichtungen zurück. Umweltschäden durch falsche Entsorgung der Batterien / Akkus! Das Symbol der durchgestrichenen Mülltonne auf Batterien oder Akkus bedeutet, dass Sie Batterien und Akkus nicht im Hausmüll entsorgen dürfen.
- Page 20 zu vermeiden. Prüfen Sie Möglichkeiten, Batterien einer Wiederverwendung zuzuführen, anstatt diese zu entsorgen, beispielsweise durch Instandsetzung der Batterie. ˜ Vereinfachte EU-Konformitätserklärung Hiermit erklärt OWIM GmbH & Co. KG, Stiftsbergstraße 1, 74167 Neckarsulm, DEUTSCHLAND, dass das Produkt FUNKWANDUHR, HG06544A-DCF, HG06544B-DCF den Richtlinien 2014/53/EU und 2011/65/EU entspricht. Der vollständige Text der EU-Konformitätserklärung ist unter der folgenden Internetadresse verfügbar: www.owim.com ˜...
- Page 21 ˜ Abwicklung im Garantiefall Um eine schnelle Bearbeitung Ihres Anliegens zu gewährleisten, folgen Sie den folgenden Hinweisen: Halten Sie für alle Anfragen den Kassenbon und die Artikelnummer (IAN 424645_2301) als Nachweis für den Kauf bereit. Die Artikelnummer entnehmen Sie bitte dem Typenschild, einer Gravur, dem Titelblatt Ihrer Bedienungsanleitung (unten links) oder einem Aufkleber auf der Rück- oder Unterseite des Produkts.
- Page 22 List of pictograms used . . . . . . . . . . . . . . . . . . . . . . . . . . . . . . . . . . . page 20 Introduction .
-
Page 23: List Of Pictograms Used
List of pictograms used Direct current/voltage Radio control Fragile Battery included Temperature display CE mark indicates conformity with relevant EU directives applicable for this product . Humidity display Keep out of reach of Do not mix new and used children Do not dispose of in fire Do not charge Keep away from water... -
Page 24: Introduction
Do not open / dismantle Insert correctly Warning: Read the related Do not mix different types safety instructions in the or brands user manual RADIO-CONTROLLED WALL CLOCK ˜ Introduction We congratulate you on the purchase of your new product . You have chosen a high quality product . -
Page 25: Description Of Parts
1 Battery 1×1 .5 V AA, LR6 (included) 1 Instructions for use ˜ Description of parts Mounting hole SET button REC button RESET button Battery compartment ˜ Technical data Temperature display: –10 to 60 °C (functional range: 10 °C to 40 °C) Humidity display: 10 to 80% (functional range: 20 % to 80 %) Battery type:... -
Page 26: Safety Instructions
Safety instructions WARNING! Read all safety information and instructions . Failure to comply with the safety information and instructions may result in fire and severe injuries . General safety information WARNING! DANGER TO LIFE AND ACCIDENT HAZARD FOR TODDLERS AND SMALL CHILDREN! Never allow children to play unsupervised with the packaging material . -
Page 27: Safety Instructions For Batteries/Rechargeable Batteries
Safety instructions for batteries/rechargeable batteries m DANGER TO LIFE! Keep batteries/rechargeable batteries out of reach of children . If accidentally swallowed seek immediate medical attention . Swallowing may lead to burns, perforation of soft tissue, and death . Severe burns can occur within 2 hours of ingestion . -
Page 28: Before Initial Use
Risk of damage to the product Only use the specified type of battery/rechargeable battery! Insert batteries/rechargeable batteries according to polarity marks (+) and (–) on the battery/rechargeable battery and the product . Use a dry lint-free cloth or cotton swab to clean the contacts on the battery/ ... - Page 29 Before drilling the drill hole, ensure that there are no gas, water or electrical lines that could be drilled into or damaged in the area where you will be drilling . 1 . Mark the drill hole on the wall . 2 .
-
Page 30: Operation (Fig. A)
˜ Operation (Fig. A) ˜ Receiving the DCF radio time signal 1 . Insert a 1 .5 V AA/LR6 battery according to the polarity marks into the battery compartment on the back of the product . 2 . The product automatically starts to search for the DCF radio time signal . This process takes about 3 to 12 minutes to complete . -
Page 31: Resetting The Settings
3 . Briefly pressing the SET button moves the hands forward in one minute steps to enable you to set the current time manually . NOTE: After 8 seconds without pressing the SET button, the product switches out of manual mode and keeps the time as normal . The manually set value is overwritten as soon as the reception of the DCF radio time signal is successful . -
Page 32: Disposal
˜ Disposal The packaging is made entirely of recyclable materials, which you may dispose of at local recycling facilities . Observe the marking of the packaging materials for waste separation, which are marked with abbreviations (a) and numbers (b) with following meaning: 1 –... -
Page 33: Simplified Eu Declaration Of Conformity
Environmental damage through incorrect disposal of the batteries rechargeable batteries! Batteries/rechargeable batteries may not be disposed of with the usual domestic waste . They may contain toxic heavy metals and are subject to hazardous waste treatment rules and regulations . The chemical symbols for heavy metals are as follows: Cd = cadmium, Hg = mercury, Pb = lead . -
Page 34: Warranty Claim Procedure
to you . This warranty becomes void if the product has been damaged, or used or maintained improperly . The warranty applies to defects in material or manufacture . This warranty does not cover product parts subject to normal wear, thus possibly considered consumables (e .g . - Page 35 Liste des pictogrammes utilisés . . . . . . . . . . . . . . . . . . . . . . . . . . . . page 33 Introduction .
-
Page 36: Liste Des Pictogrammes Utilisés
Liste des pictogrammes utilisés Courant/tension continu Radiocommande Fragile Pile incluse Affichage de la La marque CE indique la température conformité aux directives UE applicables à ce produit . Affichage de l‘humidité Garder hors de la portée Ne pas mélanger des piles des enfants neuves et usées Ne pas jeter dans le feu... -
Page 37: Introduction
Ne pas ouvrir / démonter Insérer correctement Avertissement : lisez les Ne pas mélanger des consignes de sécurité types ou des marques correspondantes dans le manuel d‘utilisation HORLOGE MURALE RADIOGUIDÉE ˜ Introduction Nous vous félicitons pour l‘achat de votre nouveau produit . Vous avez opté pour un produit de grande qualité... -
Page 38: Description Des Pièces
1 Horloge murale radioguidée 1 Pile 1×1,5 V AA, LR6 (incluse) 1 Instructions d'utilisation ˜ Description des pièces Trou de montage Bouton SET Bouton REC Bouton RESET Compartiment de la pile ˜ Données techniques Affichage de la température : –10 à 60 °C (plage de fonctionnement : 10 °C à 40 °C) Affichage du taux d’humidité : 10 à... -
Page 39: Informations Générales Relatives À La Sécurité
Informations générales relatives à la sécurité AVERTISSEMENT ! DANGER DE MORT ET D'ACCIDENT DANGER POUR LES BÉBÉS ET LES PETITS ENFANTS ! Ne laissez jamais des enfants sans surveillance jouer avec les matériaux d’emballage . Il existe un risque d'étouffement avec les matériaux d'emballage . -
Page 40: Instructions De Sécurité Pour Les Piles/Batteries Rechargeables
Instructions de sécurité pour les piles/batteries rechargeables m DANGER DE MORT ! Maintenez les piles/batteries rechargeables hors de portée des enfants . En cas d'ingestion accidentelle, consultez immédiatement un médecin . L’ingestion peut entraîner des brûlures, la perforation des tissus mous et la ... -
Page 41: Avant La Première Utilisation
PORTEZ DES GANTS DE PROTECTION ! Les piles/batteries rechargeables qui présentent une fuite on sont endommagées peuvent causer des brûlures lors du contact avec la peau . Portez des gants de protection appropriés à tout moment si un tel événement se produit . En cas de fuite des piles/batteries rechargeables, retirez-les immédiatement du ... - Page 42 , en plaçant d'abord le contact -, puis 3 . Insérez la pile dans son compartiment en appuyant sur le contact + . 4 . Votre produit est maintenant prêt à être utilisé . Installation du produit (Fig. B) REMARQUE : Vous aurez besoin d'une vis et d'une cheville pour installer l’horloge, ces dernières n’étant pas fournies avec votre produit .
-
Page 43: Fonctionnement (Fig. A)
REMARQUE : La réception du signal peut être considérablement réduite par des obstructions (par exemple, des murs en béton) ou des sources d'interférence (par exemple, d'autres appareils électriques) . En cas de problèmes de réception, déplacez votre appareil (placez-le par exemple près d'une fenêtre) . ˜... -
Page 44: Réglage De L'heure Manuellement
REMARQUE : Pour les produits destinés à la Roumanie, Chypre, la Bulgarie, la Finlande et la Grèce, l'affichage s'arrête à « 01:00 » . ˜ Réglage de l’heure manuellement 1 . Appuyez sur le bouton REC et maintenez-le enfoncé à l'aide d'un objet pointu (par exemple, un crayon) pendant au moins 3 secondes . -
Page 45: Mise Au Rebut
minutes continuent cependant d'indiquer l'heure exacte jusqu'à ce que la tension de la pile soit bien trop faible . Le produit s'arrête alors complètement . Remplacez la pile par une neuve dès que cela se produit . ˜ Mise au rebut L’emballage se compose de matières recyclables pouvant être mises au rebut dans les déchetteries locales . -
Page 46: Déclaration Ue De Conformité Simplifiée
Les piles / piles rechargeables défectueuses ou usagées doivent être recyclées conformément à la directive 2006/66/CE et ses modifications . Les piles et / ou piles rechargeables et / ou le produit doivent être retournés dans les centres de collecte proposés . Pollution de l’environnement par la mise au rebut incorrecte des piles / piles rechargeables ! Les piles / piles rechargeables ne doivent pas être mises au rebut avec les ordures... -
Page 47: Garantie Et Service
˜ Garantie et service ˜ Garantie Article L217-16 du Code de la consommation Lorsque l‘acheteur demande au vendeur, pendant le cours de la garantie commerciale qui lui a été consentie lors de l‘acquisition ou de la réparation d‘un bien meuble, une remise en état couverte par la garantie, toute période d‘immobilisation d‘au moins sept jours vient s‘ajouter à... - Page 48 • s‘il présente les qualités qu‘un acheteur peut légitimement attendre eu égard aux déclarations publiques faites par le vendeur, par le producteur ou par son représentant, notamment dans la publicité ou l‘étiquetage ; 2° Ou s‘il présente les caractéristiques définies d‘un commun accord par les parties ou être propre à...
-
Page 49: Faire Valoir Sa Garantie
Si un problème matériel ou de fabrication devait survenir dans 3 ans suivant la date d‘achat de ce produit, nous assurons à notre discrétion la réparation ou le remplacement du produit sans frais supplémentaires . La garantie prend fin si le produit est endommagé... -
Page 50: Service Après-Vente
˜ Service après-vente Service après-vente France Tél .: 0800904879 E-Mail: owim@lidl .fr Service après-vente Belgique Tél .: 080071011 Tél .: 80023970 (Luxembourg) E-Mail: owim@lidl .be FR/BE... - Page 51 Lijst met gebruikte pictogrammen . . . . . . . . . . . . . . . . . . . . . . . Pagina 49 Inleiding .
-
Page 52: Lijst Met Gebruikte Pictogrammen
Lijst met gebruikte pictogrammen Gelijkstroom/-spanning Radiobediening Breekbaar Batterij meegeleverd De CE-markering duidt op Temperatuurweergave conformiteit met relevante EU-richtlijnen die van toepassing zijn op dit Vochtigheidsgraadweergave product . Buiten bereik van kinderen Niet nieuw en gebruikt bewaren door elkaar gebruiken Niet weggooien in vuur Niet opladen Weg houden van water en Niet onjuist plaatsen... -
Page 53: Inleiding
Niet openen / demonteren Juist plaatsen Waarschuwing: Lees Niet verschillende soorten de bijbehorende merken door elkaar veiligheidsinstructies in de gebruiken gebruiksaanwijzing RADIOGESTUURDE WANDKLOK ˜ Inleiding Hartelijk gefeliciteerd met de aankoop van uw nieuwe product . U heeft voor een hoogwaardig product gekozen . De gebruiksaanwijzing is een deel van het product . -
Page 54: Beschrijving Van De Onderdelen
1 Radiogestuurde wandklok 1 Batterij 1×1,5 V AA, LR6 (meegeleverd) 1 Gebruiksaanwijzing ˜ Beschrijving van de onderdelen Montage-opening SET-knop REC-knop RESET-knop Batterijvak ˜ Technische gegevens Temperatuurweergave: –10 tot 60 °C (functioneel bereik: 10 °C tot 40 °C) Weergave van vochtigheid: 10 tot 80 % (functioneel bereik: 20 % tot 80 %) Batterijtype: 1×1,5 V... -
Page 55: Veiligheidsinstructies
Veiligheidsinstructies WAARSCHUWING! Lees alle veiligheidsinformatie en aanwijzingen . Het niet naleven van de veiligheidsinformatie en -aanwijzingen kan leiden tot brand en ernstig letsel . Algemene veiligheidsinformatie WAARSCHUWING! GEVAAR VOOR OVERLIJDEN EN ONGELUKKEN BIJ KLEUTERS EN KLEINE KINDEREN! Laat kinderen nooit zonder toezicht spelen met het verpakkingsmateriaal . -
Page 56: Veiligheidsrichtlijnen Voor Batterijen/Oplaadbare Accu's
Veiligheidsrichtlijnen voor batterijen/ oplaadbare accu's m LEVENSGEVAAR! Houd batterijen/oplaadbare batterijen buiten het bereik van kinderen . Neem direct contact op met een arts als ze per ongeluk zijn ingeslikt . Inslikken kan leiden tot brandwonden, perforatie van zacht weefsel en de ... -
Page 57: Voor Het Eerste Gebruik
In geval van lekkende batterijen/oplaadbare accu's, moet u deze direct uit het product verwijderen om schade te voorkomen Verwijder batterijen/oplaadbare batterijen als u het product gedurende langere tijd niet gebruikt . Gevaar voor schade aan het product Gebruik alleen het opgegeven type batterijen/oplaadbare accu's! ... - Page 58 Het product monteren (Afb. B) OPMERKING: U vereist een schroef en een plug voor het monteren van het product omdat deze niet zijn meegeleverd met uw product . U hebt ook een elektrische boor en een schroevendraaier nodig . OPMERKING: Zorg ervoor dat de schroef en de plug geschikt zijn voor de wand .
-
Page 59: Gebruik (Afb. A)
˜ Gebruik (Afb. A) ˜ Het DCF-radiotijdsignaal ontvangen 1 . Plaats een 1,5 V AA/LR6-batterij overeenkomstig de polariteitsmarkeringen in het batterijvak op de achterkant van het product . 2 . Het product begint automatisch te zoeken naar het DCF-radiotijdsignaal . Het voltooien van dit proces duurt ongeveer 3 tot 12 minuten . -
Page 60: De Instellingen Resetten
2 . Houd de INSTELLEN-knop opnieuw ingedrukt tot de wijzers de voor u juiste positie bereiken om de tijd in te stellen . 3 . Door kort op de INSTELLEN-knop te drukken, wordt de wijzer in stappen van één minuut vooruit bewogen zodat u de huidige tijd handmatig kunt instellen . OPMERKING: Na 8 seconden zonder te drukken op de INSTELLEN-knop, schakelt het product uit de handmatige modus en houdt de tijd als normaal . - Page 61 Neem de aanduiding van de verpakkingsmaterialen voor de afvalscheiding in acht . Deze zijn gemarkeerd met de afkortingen (a) en een cijfers (b) met de volgende betekenis: 1–7: kunststoffen / 20–22: papier en vezelplaten / 80–98: composietmaterialen . Product: Het product, waaronder het toebehoren, en de verpakkingsmaterialen kunnen worden gerecycled en zijn onderhevig aan een uitgebreide verantwoordelijkheid van de fabrikant .
-
Page 62: Vereenvoudigde Eu-Conformiteitsverklaring
Batterijen / accu‘s mogen niet via het huisvuil worden weggegooid . Ze kunnen giftige zware metalen bevatten en vallen onder het chemisch afval . De chemische symbolen van de zware metalen zijn: Cd = cadmium, Hg = kwik, Pb = lood . Geef verbruikte batterijen / accu‘s daarom af bij een gemeentelijk inzamelpunt . -
Page 63: Afwikkeling In Geval Van Garantie
beschadigingen aan breekbare onderdelen, zoals bijv . schakelaars, accu’s of dergelijke onderdelen, die gemaakt zijn van glas . ˜ Afwikkeling in geval van garantie Om een snelle afhandeling van uw reclamatie te waarborgen dient u de volgende instructies in acht te nemen: Houd bij alle vragen alstublieft de kassabon en het artikelnummer (IAN 424645_2301) als bewijs van aankoop bij de hand . - Page 64 Lista zastosowanych piktogramów . . . . . . . . . . . . . . . . . . . . . Strona 62 Wstęp .
-
Page 65: Lista Zastosowanych Piktogramów
Lista zastosowanych piktogramów Prąd stały/napięcie Sterowanie radiowe Delikatny Dostarczona bateria Znak CE wskazuje Wyświetlacz temperatury zgodność z odpowiednimi Dyrektywami UE dotyczącymi tego Wyświetlacz wilgotności produktu . Trzymać poza zasięgiem Nie mieszać nowych dzieci i używanych Nie wrzucać do ognia Nie ładować Nie wkładać... -
Page 66: Wstęp
Nie otwierać/demontować Wkładać prawidłowo Ostrzeżenie: Prosimy Nie mieszać rożnych przeczytać instrukcje typów lub marek dotyczące bezpieczeństwa podane w instrukcji obsługi ZEGAR ŚCIENNY STEROWANY RADIOWO z Wstęp Gratulujemy Państwu zakupu nowego produktu . Tym samym zdecydowali się Państwo na zakup produktu wysokiej jakości . Instrukcja obsługi jest częścią tego produktu . -
Page 67: Zakres Dostawy
z Zakres dostawy Po rozpakowaniu należy natychmiast sprawdzić, czy w opakowaniu znajdują się wszystkie elementy oraz, czy produkt i wszystkie części są w dobrym stanie . 1 Zegar ścienny sterowany radiowo 1 Bateria 1×1,5 V AA, LR6 (dostarczona) 1 Instrukcja obsługi z Opis części Otwór montażowy Przycisk SET... -
Page 68: Instrukcje Bezpieczeństwa
Instrukcje bezpieczeństwa OSTRZEŻENIE! Przeczytaj wszystkie informacje i instrukcje . Nie zastosowanie się do informacji bezpieczeństwa i instrukcji, może spowodować pożar i poważne obrażenia . Ogólne informacje dotyczące bezpieczeństwa OSTRZEŻENIE! ZAGROŻENIE ŻYCIA I NIEBEZPIECZEŃSTWO WYPADKU DLA MAŁYCH DZIECI! Nigdy nie należy pozostawiać dzieci bez nadzoru, gdy w pobliżu znajdują... -
Page 69: Instrukcje Dotyczące Bezpiecznego Użytkowania
Instrukcje dotyczące bezpiecznego użytkowania baterii/akumulatorów m ZAGROŻENIE ŻYCIA! Baterie/akumulatory należy przechowywać w miejscu niedostępnym dla dzieci . W razie przypadkowego połknięcia należy niezwłocznie skontaktować się z lekarzem . Połknięcie może spowodować poparzenia, perforację miękkich tkanek i śmierć . W ciągu 2 tygodni po połknięciu, może wystąpić silne poparzenie . NIEBEZPIECZEŃSTWO WYBUCHU! Nie należy nigdy ładować... -
Page 70: Przed Pierwszym Użyciem
Jeśli produkt nie będzie używany przez dłuższy czas, należy wyjąć z niego baterie/akumulatory . Ryzyko uszkodzenia produktu Należy używać wyłącznie z określonego typu baterii nieładowalnej/ ładowalnej! Baterie/akumulatory należy wkładać zgodnie z oznaczeniami biegunów (+) i (–) na baterii/akumulatorze i na produkcie . Przed włożeniem należy użyć... - Page 71 Montaż produktu (Rys. B) UWAGA: Do montażu produktu będzie wymagana śruba i kołek, które nie są dostarczane z produktem . Potrzebna będzie także elektryczna wiertarka i śrubokręt . UWAGA: Należy się upewnić, że śruba i kołek są odpowiednie dla ściany . Przed wywierceniem otworu, należy się...
-
Page 72: Obsługa (Rys. A)
z Obsługa (Rys. A) z Odbieranie radiowego sygnału czasu DCF 1 . Włóż baterię 1,5 V AA/LR6 , zgodnie z oznaczeniami biegunów, do wnęki baterii z tyłu produktu . 2 . Produkt automatycznie rozpoczyna wyszukiwanie radiowego sygnału czasu DCF . Proces ten trwa około 3 do 12 minut . W ciągu 4 minut, wskazówki przestawią... -
Page 73: Czyszczenie I Konserwacja
3 . Krótkie naciśnięcie przycisku SET przesuwa wskazówki do przodu w jednominutowych przyrostach, aby umożliwić ręczne ustawienie czasu . UWAGA: Po 8 sekundach bez naciśnięcia przycisku SET, produkt wyłączy tryb ręczny i utrzyma normalny czas . Wartość ręcznego ustawienia jest zastępowana po pomyślnym odbiorze radiowego sygnału czasu DCF . -
Page 74: Utylizacja
z Utylizacja Opakowanie wykonane jest z materiałów przyjaznych dla środowiska, które można przekazać do utylizacji w lokalnym punkcie przetwarzania surowców wtórnych . Przy segregowaniu odpadów prosimy zwrócić uwagę na oznakowanie materiałów opakowaniowych, oznaczone są one skrótami (a) i numerami (b) o następującym znaczeniu: 1–7: Tworzywa sztuczne / 20–22: Papier i tektura / 80–98: Materiały kompozytowe . -
Page 75: Uproszczoną Deklarację Zgodności Ue
Należy postępować zgodnie z obowiązującymi w Polsce przepisami dotyczącymi selektywnej zbiórki urządzeń elektrycznych i elektronicznych . Zużyty sprzęt może mieć szkodliwy wpływ na środowisko i zdrowie ludzi z uwagi na potencjalną zawartość niebezpiecznych substancji, mieszanin oraz części składowych . Gospodarstwo domowe spełnia ważną rolę w przyczynianiu się do ponownego użycia i odzysku surowców wtórnych, w tym recyklingu zużytego sprzętu . -
Page 76: Gwarancja I Serwis
z Gwarancja i serwis z Gwarancja Produkt wyprodukowano według wysokich standardów jakości i poddano skrupulatnej kontroli przed wysyłką . W przypadku wad produktu nabywcy przysługują ustawowe prawa . Gwarancja nie ogranicza ustawowych praw nabywcy produktu . Produkt objęte jest 3 gwarancją, licząc od daty zakupu . Gwarancja wygasa w razie zawinionego przez użytkownika uszkodzenia produktu, niewłaściwego użycia lub konserwacji . -
Page 77: Serwis
Numery artykułów można znaleźć na tabliczce znamionowe, na grawerunku, na stronie tytułowej jego instrukcji (na dole po lewej stronie) lub jako naklejkę na stronie odwrotnej lub spodniej . W razie wystąpienia błędów w działaniu lub innych wad, należy skontaktować się najpierw z wymienionym poniżej działem serwisowym telefonicznie lub pocztą elektroniczną... - Page 78 Seznam použitých piktogramů . . . . . . . . . . . . . . . . . . . . . . . . . . . Strana 76 Úvod .
-
Page 79: Seznam Použitých Piktogramů
Seznam použitých piktogramů Stejnosměrný proud/napětí Rádiové ovládání Baterie je součástí Křehké dodávky Zobrazení teploty Značka CE vyjadřuje soulad s příslušnými směrnicemi EU, které se vztahují na tento výrobek . Zobrazení vlhkosti Uchovávejte mimo dosah Nekombinujte nové dětí a použité Nepalte Nenabíjejte Uchovávejte mimo dosah Nezaměňujte polaritu vody a nadměrné... -
Page 80: Úvod
Neotevírejte / Dodržujte správnou nerozebírejte polaritu Upozornění: Přečtěte si Nekombinujte různé typy související bezpečnostní nebo značky pokyny v uživatelské příručce NÁSTĚNNÉ HODINY ŘÍZENÉ RÁDIOVÝM SIGNÁLEM z Úvod Blahopřejeme Vám ke koupi nového výrobku . Rozhodli jste se pro kvalitní produkt . Návod k obsluze je součástí... -
Page 81: Popis Součástí
1 Nástěnné hodiny řízené rádiovým signálem 1 Baterie 1×1,5 V AA, LR6 (součást dodávky) 1 Návod k použití z Popis součástí Montážní otvor Tlačítko SET Tlačítko REC Tlačítko RESET Přihrádka na baterii z Technické údaje Zobrazení teploty: –10 až 60 °C (funkční rozsah: 10 °C až 40 °C) Zobrazení... -
Page 82: Bezpečnostní Pokyny
Bezpečnostní pokyny VAROVÁNÍ! Přečtěte si všechny bezpečnostní informace a pokyny . Nedodržení bezpečnostních informací a pokynů může vést k požáru a závažným zraněním . Obecné bezpečnostní informace VAROVÁNÍ! NEBEZPEČÍ OHROŽENÍ ŽIVOTA A NEBEZPEČÍ ÚRAZU PRO BATOLA A MALÉ DĚTI! V žádném případě... -
Page 83: Bezpečnostní Pokyny Pro Baterie/Nabíjecí Baterie
Bezpečnostní pokyny pro baterie/nabíjecí baterie m OHROŽENÍ ŽIVOTA! Uchovávejte baterie/nabíjecí baterie mimo dosah dětí . Dojde-li k náhodnému spolknutí, ihned vyhledejte lékařskou pomoc . Spolknutí může vést k popáleninám, perforaci měkkých tkání a smrti . K vážným popáleninám může dojít do 2 hodin od spolknutí . NEBEZPEČÍ... -
Page 84: Před Prvním Použitím
Nebezpečí poškození výrobku Používejte pouze stanovený typ baterie/nabíjecí baterie! Vložte baterie/nabíjecí baterie podle značek polarity (+) a (-) na baterii/ nabíjecí baterii a na produktu . Před vložením očistěte kontakty baterie/nabíjecí baterie a kontakty v přihrádce suchým hadříkem nepouštějícím vlákna nebo vatovým tamponem! Vybité... -
Page 85: Používání (Obr. A)
1 . Označte místo pro vyvrtání otvoru na stěně . 2 . Elektrickou vrtačkou vyvrtejte otvor . 3 . Zasuňte hmoždinku do vyvrtaného otvoru . 4 . Šroubovákem zašroubujte šroub ze ¾ do hmoždinky . 5 . Zavěste výrobek na šroub za montážní otvor 1 na zadní straně výrobku . Rádiový... -
Page 86: Ruční Nastavení Času
Příjem rádiového časového signálu DCF výrobkem lze také spustit ručně: Pomocí špičatého předmětu (např . tužky) stiskněte a podržte tlačítko REC po dobu alespoň 5 sekund . Výrobek se pokusí přijmout rádiový časový signál DCF . Dokončení tohoto procesu trvá několik minut . POZNÁMKA: Pokud výrobek nemůže přijmout rádiový... -
Page 87: Čištění A Údržba
z Čištění a údržba Vnější povrch výrobku otřete pouze měkkým a suchým hadříkem . Nebudete-li výrobek používat, vyjměte baterii . POZNÁMKA: Když se baterie přibližně po 9 měsících vybije (v závislosti na kvalitě příjmu), vteřinová ručička se přestane pohybovat . Hodinová a minutová ručička však budou neustále ukazovat správný... -
Page 88: Zjednodušené Eu Prohlášení O Shodě
V zájmu ochrany životního prostředí vysloužilý výrobek nevyhazujte do domovního odpadu, ale předejte k odborné likvidaci . O sběrnách a jejich otevíracích hodinách se můžete informovat u příslušné správy města nebo obce . Vadné nebo vybité baterie resp . akumulátory se musí, podle směrnice 2006/66/ES a jejích příslušných změn, recyklovat . -
Page 89: Záruka A Servis
z Záruka a servis z Záruka Výrobek byl vyroben s nejvyšší pečlivostí podle přísných kvalitativních směrnic a před odesláním prošel výstupní kontrolou . V případě závad máte možnost uplatnění zákonných práv vůči prodejci . Vaše práva ze zákona nejsou omezena naší... -
Page 90: Servis
Výrobek registrovaný jako vadný potom můžete s přiloženým dokladem o zakoupení (pokladní stvrzenkou) a údaji k závadě a kdy k ní došlo, bezplatně zaslat na adresu servisu, která Vám byla sdělena . z Servis Servis Česká republika Tel .: 800600632 E-Mail: owim@lidl .cz... - Page 91 Zoznam použitých piktogramov . . . . . . . . . . . . . . . . . . . . . . . . Strana 89 Úvod .
-
Page 92: Zoznam Použitých Piktogramov
Zoznam použitých piktogramov Jednosmerný prúd/ Rádiové ovládanie jednosmerné napätie Batéria je súčasťou Krehké dodávky Zobrazenie teploty Značka CE uvádza zhodu s príslušnými smernicami EÚ platnými pre tento výrobok . Zobrazenie vlhkosti Uchovávajte mimo dosahu Nemiešajte nové a použité detí Nelikvidujte v ohni Nenabíjajte Uchovávajte mimo vody a Nevkladajte nesprávne... -
Page 93: Úvod
Neotvárajte / Vkladajte správne nerozoberajte Upozornenie: Prečítajte Nemiešajte rôzne typy si príslušné bezpečnostné značiek pokyny v používateľskej príručke NÁSTENNÉ HODINY z Úvod Blahoželáme Vám ku kúpe Vášho nového výrobku . Rozhodli ste sa pre veľmi kvalitný výrobok . Návod na obsluhu je súčasťou tohto výrobku . Obsahuje dôležité upozornenia týkajúce sa bezpečnosti, používania a likvidácie . -
Page 94: Popis Jednotlivých Častí
1 Nástenné hodiny 1 Batéria 1×1,5 V AA, LR6 (súčasť dodávky) 1 Návod na používanie z Popis jednotlivých častí Montážny otvor Tlačidlo SET Tlačidlo REC Tlačidlo RESET Priestor pre batériu z Technické údaje Zobrazenie teploty: –10 až 60 °C (funkčný rozsah: 10 °C až 40 °C) Zobrazenie vlhkosti: 10 až... -
Page 95: Bezpečnostné Pokyny
Bezpečnostné pokyny VÝSTRAHA! Prečítajte si všetky bezpečnostné informácie a pokyny . Nedodržanie bezpečnostných informácií a pokynov môže viesť k vzniku požiaru a vážnym zraneniam . Všeobecné bezpečnostné informácie VÝSTRAHA! OHROZENIE ŽIVOTA A RIZIKO ÚRAZU PRE BATOĽATÁ A MALÉ DETI! Nikdy nedovoľte deťom, aby sa bez dozoru hrali s baliacim materiálom . -
Page 96: Bezpečnostné Pokyny Týkajúce Sa Batérií/Nabíjateľných Batérií
Bezpečnostné pokyny týkajúce sa batérií/ nabíjateľných batérií m OHROZENIE ŽIVOTA! Batérie/nabíjateľné batérie uchovávajte mimo dosahu detí . Ak dôjde k náhodnému prehltnutiu, ihneď vyhľadajte lekársku pomoc . Prehltnutie môže viesť k poleptaniu, perforácii mäkkého tkaniva a usmrteniu . Závažné poleptanie sa môže objaviť v priebehu 2 hodín od požitia . NEBEZPEČENSTVO VÝBUCHU! Nikdy nenabíjajte nenabíjateľné... -
Page 97: Pred Prvým Použitím
Riziko poškodenia výrobku Používajte len určený typ batérií/nabíjateľných batérií! Vložte batérie/nabíjateľné batérie podľa označenia polarity (+) a (–) na batérii/nabíjateľnej batérii a na výrobku . Pred vložením použite na vyčistenie kontaktov na batérii/nabíjateľnej batérii a v priestore pre batériu suchú handričku, ktorá neuvoľňuje vlákna, alebo vatový tampón! Vybité... -
Page 98: Používanie (Obr. A)
1 . Vyznačte otvor na vŕtanie na stene . 2 . Vyvŕtajte otvor pomocou elektrickej vŕtačky . 3 . Vložte príchytku do vyŕtaného otvoru . 4 . Pomocou skrutkovača zaskrutkujte skrutku na ¾ dĺžky do príchytky . 5 . Zaveste výrobok na skrutku pomocou montážneho otvoru 1 v zadnej časti výrobku . -
Page 99: Manuálne Nastavenie Času
Príjem rádiového časového signálu DCF výrobkom je možné spustiť aj manuálne: Minimálne na 5 sekúnd podržte stlačené tlačidlo REC pomocou ostrého predmetu (napr . ceruza) . Výrobok sa pokúsi prijať rádiový časový signál DCF . Dokončenie tohto procesu trvá niekoľko minút . POZNÁMKA: Ak výrobok nebol schopný... -
Page 100: Čistenie A Starostlivosť
z Čistenie a starostlivosť Čistite len vonkajšie časti výrobku pomocou mäkkej, suchej handričky . Ak sa výrobok nebude používať, vyberte batériu . POZNÁMKA: Keď sa batéria vybije približne po 9 mesiacoch (v závislosti od kvality príjmu), pohyb sekundovej ručičky sa zastaví . Hodinová a minútová ručička budú... -
Page 101: Zjednodušené Eú Vyhlásenie O Zhode
O možnostiach likvidácie opotrebovaného výrobku sa môžete informovať na Vašej obecnej alebo mestskej správe . Ak výrobok doslúžil, v záujme ochrany životného prostredia ho neodhoďte do domového odpadu, ale odovzdajte na odbornú likvidáciu . Informácie o zberných miestach a ich otváracích hodinách získate na Vašej príslušnej správe . -
Page 102: Záruka A Servis
z Záruka a servis z Záruka Tento výrobok bol dôkladne vyrobený podľa prísnych akostných smerníc a pred dodaním svedomito testovaný . V prípade nedostatkov tohto výrobku Vám prináležia zákonné práva voči predajcovi produktu . Tieto zákonné práva nie sú našou nižšie uvedenou zárukou obmedzené . Na tento produkt poskytujeme 3-ročnú... -
Page 103: Servis
Ak sa vyskytnú funkčné poruchy alebo iné nedostatky, najskôr telefonicky alebo e-mailom kontaktujte následne uvedené servisné oddelenie . Produkt označený ako defektný potom môžete s priloženým dokladom o kúpe (pokladničný lístok) a uvedením, v čom spočíva nedostatok a kedy sa vyskytol, bezplatne odoslať... - Page 104 Lista de pictogramas utilizados . . . . . . . . . . . . . . . . . . . . . . . . . Página 102 Introducción .
-
Page 105: Lista De Pictogramas Utilizados
Lista de pictogramas utilizados Voltaje y corriente Control de radio continuos Frágil Batería incluida Pantalla de temperatura La marca CE indica la conformidad con las directivas de la UE aplicables a este producto . Pantalla de humedad Mantener fuera del No mezclar pilas nuevas y alcance de los niños usadas... -
Page 106: Introducción
No abrir/desmontar Insertar correctamente Advertencia: Lea las No mezclar tipos o marcas instrucciones de seguridad diferentes en el manual del usuario RELOJ DE PARED RADIOCONTROLADO z Introducción Enhorabuena por la adquisición de su nuevo producto . Ha optado por un producto de alta calidad . -
Page 107: Descripción De Las Partes
1 Reloj de pared radiocontrolado 1 Pila 1×1,5 V AA, LR6 (incluida) 1 Instrucciones de uso z Descripción de las partes Orificio de montaje Botón ESTABLECER Botón GRABAR Botón RESTABLECER Compartimento de la pila z Datos técnicos Visualización de la temperatura: De –10 a 60 °C (intervalo de funcionamiento: de 10 °C a 40 °C) Visualización de... -
Page 108: Instrucciones De Seguridad
Instrucciones de seguridad ¡ADVERTENCIA! Lea todas las instrucciones e información de seguridad El incumplimiento de la información y de las instrucciones de seguridad puede causar incendios y/o lesiones graves . Información de seguridad general ¡ADVERTENCIA! ¡PELIGRO PARA LA VIDA Y RIESGO ... - Page 109 m ¡PELIGRO PARA LA VIDA! Mantenga las pilas y las pilas recargables fuera del alcance de los niños . Si se tragan por accidente, acuda a un médico inmediatamente . La deglución puede provocar quemaduras, perforación de tejidos blandos y ...
-
Page 110: Antes Del Uso Inicial
Riesgo de daños en el producto Utilice únicamente el tipo especificado de pila o pila recargable . Inserte las pilas o las pilas recargables conforme a las marcas de polaridad (+) y (–) que se encuentran en las mismas y en el producto . ¡Use un paño seco sin pelusa o un bastoncillo de algodón para limpiar los ... -
Page 111: Funcionamiento (Fig. A)
agua o líneas eléctricas que puedan perforarse o dañarse en el área donde perforará . 1 . Marque el orificio de taladro en la pared . 2 . Haga el orificio con un taladro eléctrico . 3 . Inserte el taco adecuado en el orificio taladrado . 4 . -
Page 112: Establecer La Hora Manualmente
2 . El producto comienza automáticamente a buscar la señal horaria de radio DCF . Este proceso tarda entre 3 y 12 minutos en completarse . Antes de que transcurran 4 minutos, las manecillas se moverán a las 12 en punto . La recepción de la señal de radio se inicia una vez que todas las manecillas se han movido a la posición de las 12 en punto . -
Page 113: Restablecer La Configuración
NOTA: Después de 8 segundos sin presionar el botón ESTABLECER, el producto sale del modo manual y mantiene la hora normal . El valor establecido manualmente se sobrescribe tan pronto como la señal horaria de radio DCF se reciba correctamente . z Restablecer la configuración Presione el botón RESTABLECER utilizando un objeto puntiagudo (por... - Page 114 Producto: El producto, incluidos los accesorios, y el material de embalaje son reciclables y están sujetos a la responsabilidad extendida del fabricante . Deséchelos por separado siguiendo la información ilustrada de recogida selectiva para un mejor tratamiento de los residuos . El logotipo Triman se aplica solo para Francia .
-
Page 115: Declaración Ue De Conformidad Simplificada
z Declaración UE de conformidad simplificada Por la presente, OWIM GmbH & Co . KG, Stiftsbergstrase 1, 74167 Neckarsulm, ALEMANIA, declara que el producto RELOJ DE PARED CONTROLADO POR RADIO HG06544A-DCF, HG06544B-DCF, es conforme con las Directivas 2014/53/UE y 2011/65/UE . El texto completo de la declaración UE de conformidad está... -
Page 116: Tramitación De La Garantía
z Tramitación de la garantía Para garantizar una rápida tramitación de su consulta, tenga en cuenta las siguientes indicaciones: Para realizar cualquier consulta, tenga a mano el recibo y el número de artículo (IAN 424645_2301) como justificante de compra . Encontrará... - Page 117 Liste over brugte piktogrammer . . . . . . . . . . . . . . . . . . . . . . . . . . Side 115 Indledning .
-
Page 118: Liste Over Brugte Piktogrammer
Liste over brugte piktogrammer Jævnstrøm/spænding Radiostyring Skrøbelig Batteri medfølger CE-mærket indikerer Temperaturvisning at produktet er i overensstemmelse med relevante EU-direktiver Fugtighedsvisning gældende for produktet . Må ikke bruges med Skal holdes ud af børns forskellige typer eller rækkevidde mærker Må ikke brændes ved Må... -
Page 119: Indledning
Må ikke åbnes/skilles ad Skal sættes rigtigt i Advarsel: Læs Bland ikke forskellige typer de relaterede og mærker af batterier sikkerhedsinstruktioner i denne brugsvejledning RADIOSTYRET UR z Indledning Hjerteligt tillykke med købet af deres nye produkt . Du har besluttet dig for et produkt af høj kvalitet . -
Page 120: Beskrivelse Af Delene
1 Radiostyret ur 1 Batteri 1×1,5 V AA, LR6 (medfølger) 1 Brugsvejledninger z Beskrivelse af delene Monteringshul SET-knap REC-knap RESET-knap Batterirum z Tekniske data Temperaturvisning: –10 til 60 °C (virker inden for området: 10 °C til 40 °C) Fugtighedsvisning: 10 til 80 % (virker inden for området: 20 % til 80 %) Batteritype: 1×1,5 V AA, LR6 ikke-genopladeligt... -
Page 121: Sikkerhedsinstruktioner
Sikkerhedsinstruktioner ADVARSEL! Læs alle sikkerhedsoplysninger og instruktioner . Manglende overholdelse af sikkerhedsoplysningerne og instruktionerne, kan føre til brand og alvorlige personskader . Generelle sikkerhedsoplysninger ADVARSEL! FARE FOR BABYER OG SMÅ BØRN! Efterlad aldrig børn uden opsyn med emballagematerialet . Emballagen udgør en risiko for kvælning . -
Page 122: Sikkerhedsinstruktioner Til Batterier/Genopladelige Batterier
Sikkerhedsinstruktioner til batterier/ genopladelige batterier m LIVSFARILGT! Batterier/genopladelige batterier skal holdes ude af børns rækkevidde . Hvis en del sluges ved et uheld, skal du straks søge lægehjælp . Indtagelse kan føre til forbrændinger, perforering af blødt væv og dødsfald . ... -
Page 123: Før Første Brug
Risiko for beskadigelse af produktet Brug kun batterier/genopladelige batterier, der er beregnet til produktet . Sæt batterier/genopladelige batterier i enheden i henhold til polaritetsmærkerne (+) og (-) på batteriet/genopladelige batteri og produktet . Brug en tør fnugfri klud eller vatpind til at rengøre kontaktene på batteriet/ ... -
Page 124: Betjening (Fig. A)
1 . Marker borehullet på væggen . 2 . Bor hullet med en elektrisk boremaskine . 3 . Sæt dyblen i det boret hul . 4 . Skru skruen ¾ ind i dyblen med en skruetrækker . 5 . Hæng produktet på skruen, og sørg for at skruer sidder i monteringshullet 1 bag på... -
Page 125: Manuel Indstilling Af Tiden
Viserne sættes på klokken 12 inden for 4 minutter . Radiosignalmodtagelsen starter, når alle viserne står på klokken 12 . Uret modtager signalet efter Efter 3 til 10 minutter, og det indstiller sig selv til det nøjagtige tidspunkt . Produktets modtagelse af DCF-radiotidssignalet kan også startes manuelt: Hold REC-knappen nede med en spids genstand (fx en blyant) i mindst 5 sekunder . -
Page 126: Rengøring Og Pleje
og sætte det i igen . Produktet begynder nu automatisk, at søge efter DCF- radiotidssignalet . z Rengøring og pleje Produktet må kun rengøres på ydersiden med en blød, tør klud . Hvis produktet ikke skal bruges, skal du tage batteriet ud . BEMÆRK: Når batteriet er brugt op efter ca . -
Page 127: Forenklet Eu-Overensstemmelseserklæring
De får oplyst muligheder til bortskaffelse af det udtjente produkt hos deres lokale myndigheder eller bystyre . For miljøets skyld, så må produktet aldrig smides ud sammen med husholdningsaffaldet, når det er udtjent, men skal afleveres til en fagmæssig korrekt bortskaffelse . De kan informere Dem vedrørende opsamlingssteder og deres åbningstider hos deres ansvarlige forvaltning . -
Page 128: Garanti Og Service
z Garanti og service z Garanti Produktet blev produceret omhyggeligt efter de strengeste kvalitetskrav og kontrolleret grundigt inden levering . Hvis der forekommer mangler ved dette produkt, så har de juridiske rettigheder over for sælgeren af dette produkt . Disse juridiske rettigheder indskrænkes ikke af vores garanti, der beskrives i det følgende . -
Page 129: Service
Et produkt, der er registreret som defekt, kan De derefter sende portofrit til den meddelte serviceadresse ved vedlæggelse af købsbeviset (kassebon) og angivelsen af, hvori manglen består, og hvornår den er opstået . z Service Service Danmark Tel .: 80253972 E-Mail: owim@lidl .dk 126 DK... - Page 130 Elenco di pittogrammi utilizzati . . . . . . . . . . . . . . . . . . . . . . . . . . Pagina 128 Introduzione .
-
Page 131: Elenco Di Pittogrammi Utilizzati
Elenco di pittogrammi utilizzati Corrente continua/tensione Controllo radio Fragile Batteria inclusa Display della temperatura Il marchio CE indica la conformità con le rilevanti direttive UE applicabili a questo prodotto . Display dell‘umidità Tenere fuori dalla portata Non mischiare nuovo dei bambini e usato Non smaltire nel fuoco Non caricare... -
Page 132: Introduzione
Non aprire/smontare Inserire correttamente Attenzione: leggere Non mischiare tipi o le relative istruzioni di marche diversi sicurezza nel manuale dell‘utente . OROLOGIO DA PARETE RADIOCONTROLLATO z Introduzione Congratulazioni per l‘acquisto del vostro nuovo prodotto . Avete optato per un prodotto di alta qualità . Le istruzioni d‘uso sono parte integrante di questo prodotto . -
Page 133: Descrizione Delle Parti
1 Orologio da parete radiocontrollato 1 Batteria 1×1,5 V AA, LR6 (inclusa) 1 Istruzioni per l'uso z Descrizione delle parti Foro di montaggio Tasto SET Tasto REC Tasto RESET Vano batterie z Dati tecnici Display della temperatura: Da –10 a 60 °C (gamma funzionale: Da 10 °C a 40 °C) Display dell’umidità: Da 10 a 80 % (gamma funzionale: Da 20 % a 80 %) Tipo di batteria: 1×1,5 V... -
Page 134: Istruzioni Per La Sicurezza
Istruzioni per la sicurezza AVVERTENZA! Leggere tutte le informazioni sulla sicurezza e le istruzioni . La mancata osservanza delle informazioni sulla sicurezza e delle istruzioni potrebbe provocare incendi e lesioni gravi . Informazioni generali sulla sicurezza AVVERTENZA! PERICOLO DI MORTE E RISCHIO DI ... -
Page 135: Istruzioni Per La Sicurezza Delle Batterie/Batterie Ricaricabili
Istruzioni per la sicurezza delle batterie/ batterie ricaricabili m PERICOLO DI MORTE! Tenere le batterie/batterie ricaricabili lontano dalla portata dei bambini . Se vengono accidentalmente ingerite, consultare immediatamente un medico . L’ingestione potrebbe provocare ustioni, perforazione dei tessuti molli e morte . ... -
Page 136: Prima Dell'uso Iniziale
Rischio di danni al prodotto Utilizzare solo il tipo di batterie/batterie ricaricabili specificato! Inserire le batterie/batterie ricaricabili osservando le polarità (+) e (–) sulle batterie/batterie ricaricabili e sul prodotto . Utilizzare un panno asciutto privo di peluria o un batuffolo di cotone per ... -
Page 137: Funzionamento (Fig. A)
Prima di eseguire il foro, assicurarsi che non vi siano linee del gas, dell'acqua o elettriche che potrebbero essere perforate o danneggiate nell'area in cui si pratica il foro . 1 . Contrassegnare il foro nella parete . 2 . Praticare il foro con un trapano elettrico . 3 . -
Page 138: Impostazione Manuale Dell'ora
2 . Il prodotto avvia automaticamente la ricerca del segnale orario radio DCF . Il completamento di questo processo richiede circa 3–12 minuti . Entro 4 minuti, le lancette si sposteranno alle ore 12 . La ricezione del segnale radio viene avviata quando tutte le lancette si sono spostate nella posizione delle ore 12 . -
Page 139: Ripristino Delle Impostazioni
viene sovrascritto non appena la ricezione del segnale orario radio DCF ha esito positivo . z Ripristino delle impostazioni Premere il tasto RESET utilizzando un oggetto appuntito (es . matita) per ripristinare le impostazioni del prodotto . In alternativa, rimuovere la batteria dal prodotto e reinserirla . - Page 140 Prodotto: Il prodotto , i suoi accessori e i materiali di imballaggio sono riciclabili e soggetti alla responsabilità estesa del produttore . Per un migliore trattamento dei rifiuti, smaltirli separatamente seguendo i diversi simboli della raccolta differenziata . Il logo Triman è valido solamente per la Francia . E’...
-
Page 141: Dichiarazione Di Conformità Ue Semplificata
z Dichiarazione di conformità UE semplificata Il fabbricante, OWIM GmbH & Co . KG, Stiftsbergstraße 1, 74167 Neckarsulm, GERMANIA dichiara che il prodotto OROLOGIO DA PARETE RADIOCOMANDATO HG06544A-DCF, HG06544B-DCF, è conforme alle direttive 2014/53/UE e 2011/65/UE . Il testo completo della dichiarazione di conformità UE è disponibile al seguente indirizzo Internet: www .owim .com z Garanzia e assistenza z Garanzia... -
Page 142: Gestione Dei Casi In Garanzia
z Gestione dei casi in garanzia Per garantire un rapido disbrigo delle proprie pratiche, seguire le istruzioni seguenti: Per ogni richiesta si prega di conservare lo scontrino e il codice dell’articolo (IAN 424645_2301) come prova d’acquisto . Il numero d’articolo può essere dedotto dalla targhetta, da un’incisione, dal frontespizio delle istruzioni (in basso a sinistra) oppure dall’adesivo applicato sul retro o sul lato inferiore . - Page 143 Az útmutatóban előforduló piktogramok listája . . . . . . . . . . Oldal 141 Bevezető . . . . . . . . . . . . . . . . . . . . . . . . . . . . . . . . . . . . . . . . . . . . . . . . Oldal 142 Alkalmazási terület .
-
Page 144: Az Útmutatóban Előforduló Piktogramok Listája
Az útmutatóban előforduló piktogramok listája Egyenáram/Feszültség Rádióvezérlés Törékeny Tartozék akkumulátor Hőmérséklet kijelző A CE-jelzés a termékre vonatkozó releváns EU- irányelvek betartását jelöli . Páratartalom kijelző Gyermekektől elzárva Ne keverje az új és tartandó használt elemeket Ne dobja tűzbe Ne töltse fel Tartsa távol a víztől és a Ne helyezze be helytelenül túlzott nedvességtől... -
Page 145: Bevezető
Helyes irányban helyezze Ne nyissa ki / szedje szét Figyelmeztetés: Olvassa Ne keverje a különböző el a vonatkozó biztonsági típusokat vagy márkákat utasításokat a felhasználói kézikönyvben RÁDIÓVEZÉRELT FALIÓRA z Bevezető Gratulálunk új termékének vásárlása alkalmából . Ezzel a döntésével vállalatunk értékes terméke mellett döntött . -
Page 146: A Részek Leírása
1 Rádióvezérelt falióra 1 Elem 1×1,5 V AA, LR6 (tartozék) 1 Használati utasítás z A részek leírása Rögzítő furat SET gomb REC gomb RESET gomb Elemtartó rekesz z Műszaki adatok Hőmérséklet kijelző: –10 és 60 °C között (működési tartomány: 10 °C és 40 °C között) Páratartalom kijelző: 10 és 80 % között (működési tartomány: 20 % és 80 % között) -
Page 147: Biztonsági Előírások
Biztonsági előírások FIGYELMEZTETÉS! Olvassa el az összes biztonsági utasítást és információt . A biztonsági utasítások és információ figyelmen kívül hagyása tüzet vagy súlyos sérüléssel járó balesetet okozhat . Általános biztonsági tudnivalók FIGYELMEZTETÉS! ÉLET- ÉS BALESETVESZÉLY CSECSEMŐK ÉS KISGYERMEKEK SZÁMÁRA! Soha ne engedje, hogy gyermekek felügyelet nélkül játsszanak a csomagolóanyaggal . -
Page 148: Biztonsági Előírások - Elemek/Akkumulátorok
Biztonsági előírások - Elemek/Akkumulátorok m ÉLETVESZÉLY! Az elemek/újratölthető akkumulátorok gyermekektől elzárva tartandók . Véletlen lenyelés esetén azonnal forduljon orvoshoz . A lenyelés vegyi égéshez, a lágyszövetek perforációjához és halálhoz vezethet . Súlyos égések fordulhatnak elő a lenyeléstől számított 2 órán belül . ROBBANÁSVESZÉLY! Ne próbáljon nem tölthető... -
Page 149: Használat Előtt
A termék rongálódásának kockázata Kizárólag a megadott típusú elemet/újratölthető akkumulátort használja! Az elemeket/újratölthető akkumulátorokat a rajtuk lévő (+) és (–) jelölésnek megfelelően helyezze be a termékbe . Behelyezés előtt tisztítsa meg az elem/újratölthető akkumulátor és a elemtartó rekesz érintkezőit egy száraz, szöszmentes kendővel vagy fültisztítóval . -
Page 150: Működés (A Ábra)
A furat fúrása előtt győződjön meg arról, hogy a fúrás helyén nincsenek gáz-, víz- vagy elektromos vezetékek, amelyekbe véletlenül belefúrhatna vagy megsérülnének . 1 . Jelölje meg a lyuk helyét a falon . 2 . Fúrja ki a lyukat a falban az elektromos fúrógéppel . 3 . -
Page 151: Az Idő Kézi Beállítása
2 . A termék automatikusan megkezdi a DCF-rádióidőjel keresését . Ez a folyamat körülbelül 3–12 percet vesz igénybe . 4 percen belül a mutatók 12 órára mozdulnak . A rádiójel vétele akkor indul el, amikor az összes mutató a 12 órai pozícióba került . 3–10 perc múlva az óra fogadja a jelet, és beállítja magát a pontos időre . -
Page 152: A Beállítások Visszaállítása
z A beállítások visszaállítása Nyomja meg a RESET gombot egy hegyes tárgy (pl . ceruza) segítségével a termék beállításainak visszaállításához . Másik lehetőségként vegye ki az elemet a termékből, és helyezze be újra . A termék most automatikusan megkezdi a DCF-rádióidőjel keresését . z Tisztítás és gondozás A termék külső... - Page 153 Termék: A termék, beleértve a tartozékokat és a csomagolóanyagokat is, újrahasznosítható, és a gyártó kiterjesztett felelőssége alá tartozik . A jobb hulladékkezelés érdekében az ábrán látható információk (szortírozási információk) alapján külön ártalmatlanítsa őket . A Triman-logó csak Franciaországra vonatkozik . A kiszolgált termék megsemmisítési lehetőségeiről lakóhelye illetékes önkormányzatánál tájékozódhat .
-
Page 154: Egyszerűsített Eu-Megfelelőségi Nyilatkozat
z Egyszerűsített EU-megfelelőségi nyilatkozat Az OWIM GmbH & Co . KG, Stiftsbergstraße 1, 74167 Neckarsulm, NÉMETORSZÁG kijelenti, hogy a termék RÁDIÓVEZÉRLÉSŰ FALIÓRa HG06544A-DCF, HG06544B-DCF, megfelel a 2014/53/EU és 2011/65/EU irányelvek előírásainak . Az EU-megfelelőségi nyilatkozat teljes szövege elérhető a következő internetes címen: www .owim .com z Garancia és szerviz z Garancia... -
Page 155: Garanciális Ügyek Lebonyolítása
z Garanciális ügyek lebonyolítása Ügyének gyors elintézhetősége céljából, kérjük kövesse az alábbi útmutatást: Kérjük, kérdések esetére készítse elő a pénztárblokkot és a cikkszámot (IAN 424645_2301) a vásárlás tényének az igazolására . Kéjük, hogy a cikkszámot olvassa le a típustábláról, a gravírozásból, az Útmutató címoldaláról (balra lent), illetve a hátoldalon, vagy a termék alján található...
Need help?
Do you have a question about the 424645 2301 and is the answer not in the manual?
Questions and answers