Advertisement
Quick Links
CANYON LAKE COLLECTION
Read all the instructions, identify all components, and be sure you have all parts prior to assembly.
-
DO NOT Use substitute parts. Contact your local Rooms To Go or visit www.ROOMSTOGO.COM
-
for replacement parts and instructional literature if needed.
Choose your configuration, read all the instructions, identify all components, and be sure you have all parts prior to assembly
Reference page 3-5 for assembly steps
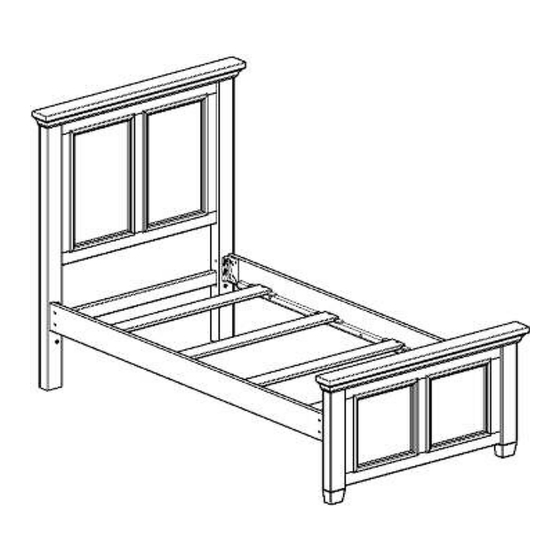
TWIN PANEL BED
3413400P JAVA
3413401P ASH GRAY
Reference page 11-13 for assembly steps
FULL PANEL BED
3423400P JAVA
3423401P ASH GRAY
1/17/2023
T T H H A A N N K K Y Y O O U U F F O O R R Y Y O O U U R R P P U U R R C C H H A A S S E E
CONFIGURATIONS
Reference page 6-8 for assembly steps
TWIN PANEL BED WITH ONE STORAGE RAIL
3733400P JAVA
Reference page 14-16 for assembly steps
FULL PANEL BED WITH ONE STORAGE RAIL
3753400P JAVA
AIS34940-0
3733402P ASH GRAY
FULL PANEL BED WITH STORAGE RAIL & TRUNDLE BED
3753402P ASH GRAY
Reference page 9-10 for assembly steps
TWIN PANEL BED WITH TWO STORAGE RAILS
3743400P JAVA
3743402P ASH GRAY
Reference page 17-19 for assembly steps
3763400P JAVA
3763402P ASH GRAY
Page 1 of 40
Advertisement

Related Manuals for ROOMS TO GO CANYON LAKE 3413400P JAVA


Summary of Contents for ROOMS TO GO CANYON LAKE 3413400P JAVA
- Page 1 T T H H A A N N K K Y Y O O U U F F O O R R Y Y O O U U R R P P U U R R C C H H A A S S E E Read all the instructions, identify all components, and be sure you have all parts prior to assembly. DO NOT Use substitute parts. Contact your local Rooms To Go or visit www.ROOMSTOGO.COM for replacement parts and instructional literature if needed.
- Page 2 CONFIGURATIONS Choose your configuration, read all the instructions, identify all components, and be sure you have all parts prior to assembly Reference page 20-21 for assembly steps Reference page 22-24 for assembly steps Reference page 25-27 for assembly steps FULL PANEL BED WITH TWO STORAGE RAILS TWIN BOOKCASE BED TWIN BOOKCASE BED WITH ONE STORAGE RAIL 3773400P JAVA...
-
Page 3: Parts List
P A R T S L I S T 3413400P TWIN PANEL BED JAVA RTG SKU # STYLE # ITEM DESCRIPTION 34434009 34C-115 TWIN PANEL HEADBOARD 34534001 34C-116 TWIN PANEL FOOTBOARD 34834007 34C-771 2 PC SIDE RAILS 38000232 100-645 TWIN SLAT PACK (4) 34934009 34C-744 TRUNDLE BED OPTIONAL 3413401P TWIN PANEL BED ASH GRAY... - Page 4 ASSEMBLY INSTRUCTIONS THERE ARE TWO POSSIBLE SETTINGS, HIGH (FACTORY SETTINGS) AND LOW STEP 1 IF YOU PURCHASE A TRUNDLE BED DO HIGH SETTINGS, IF NOT DO LOW SETTINGS. HIGH SETTING STEPS 1-5 LOW SETTING STEPS 6-9 Loosen bolts in headboard & footboard posts (1/4" approx.) Do not remove, BOLTS ARE PRE-ASSEMBLED.
- Page 5 ASSEMBLY INSTRUCTIONS STEP 5 STEP 6 For optional Trundle bed follow assembly instructions inside Remove bolts from top setting then install in the lower setting, do not Trundle bed box, then slide under the bed as shown. tighten, allow 1/4" space between post and bolt head, repeat for all posts. STEP 7 Assemble side rails STEP 8...
- Page 6 P A R T S L I S T 3733400P TWIN PANEL BED WITH ONE STORAGE RAIL JAVA RTG SKU # STYLE # ITEM DESCRIPTION 34434009 34C-115 TWIN PANEL HEADBOARD 34534001 34C-116 TWIN PANEL FOOTBOARD 36834009 34C-938 1 PC SIDE RAIL 36934001 34C-940 2 DOOR 2 DRW PEDESTAL 38000232...
- Page 7 ASSEMBLY INSTRUCTIONS STEP 2 STEP 1 LEFT RIGHT Remove bolts from top setting (Factory setting) from the choose side First choose which side the pedestal fits your needs (left or right) (left or right), both headboard and footboard save them for next step. STEP 3 Assemble pedestal first aligning the pedestal bracket with holes in the bottom set of holes of the headboard and footboard then fasten using the bolts previously removed MAKE SURE ALL BOLTS ARE TIGHTENED COMPLETELY.
- Page 8 ASSEMBLY INSTRUCTIONS STEP 6 Install slats, one on each space between the small blocks, then fasten with 1 1/4" screws. Page 8 of 40 1/17/2023 AIS34940-0...
- Page 9 P A R T S L I S T 3743400P TWIN PANEL BED WITH TWO STORAGE RAILS JAVA RTG SKU # STYLE # ITEM DESCRIPTION 34434009 34C-115 TWIN PANEL HEADBOARD 34534001 34C-116 TWIN PANEL FOOTBOARD 36934001 34C-940 2 DOOR 2 DRW PEDESTAL 36934001 34C-940 2 DOOR 2 DRW PEDESTAL 38000232...
- Page 10 ASSEMBLY INSTRUCTIONS STEP 1 Remove bolts from top setting (Factory setting) from both headboard and footboard save them for next step. STEP 2 Assemble pedestal first aligning the pedestal bracket with holes in the bottom set of holes of the headboard and footboard then fasten using the bolts previously removed MAKE SURE ALL BOLTS ARE TIGHTENED COMPLETELY.
- Page 11 P A R T S L I S T 3423400P FULL PANEL BED JAVA RTG SKU # STYLE # ITEM DESCRIPTION 34634003 34C-117 FULL PANEL HEADBOARD 34734005 34C-118 FULL PANEL FOOTBOARD 34834007 34C-771 2 PC SIDE RAILS 38000234 100-646 FULL SLAT PACK (4) 34934009 34C-744 TRUNDLE BED OPTIONAL...
- Page 12 ASSEMBLY INSTRUCTIONS THERE ARE TWO POSSIBLE SETTINGS, HIGH (FACTORY SETTINGS) AND LOW STEP 1 IF YOU PURCHASE A TRUNDLE BED DO HIGH SETTINGS, IF NOT DO LOW SETTINGS. HIGH SETTING STEPS 1-5 LOW SETTING STEPS 6-9 Loosen bolts in headboard & footboard posts (1/4" approx.) Do not remove, BOLTS ARE PRE-ASSEMBLED.
- Page 13 ASSEMBLY INSTRUCTIONS STEP 5 STEP 6 For optional Trundle bed follow assembly instructions inside Remove bolts from top setting then install in the lower setting, do not Trundle bed box, then slide under the bed as shown. tighten, allow 1/4" space between post and bolt head, repeat for all posts. STEP 7 Assemble side rails STEP 8...
- Page 14 P A R T S L I S T 3753400P FULL PANEL BED WITH ONE STORAGE RAIL JAVA RTG SKU # STYLE # ITEM DESCRIPTION 34634003 34C-117 FULL PANEL HEADBOARD 34734005 34C-118 FULL PANEL FOOTBOARD 36834009 34C-938 1 PC SIDE RAIL 36934001 34C-940 2 DOOR 2 DRW PEDESTAL 38000234...
- Page 15 ASSEMBLY INSTRUCTIONS STEP 1 STEP 2 LEFT RIGHT Remove bolts from top setting (Factory setting) from the choose side First choose which side the pedestal fits your needs (left or right) (left or right), both headboard and footboard save them for next step. STEP 3 Assemble pedestal first aligning the pedestal bracket with holes in the bottom set of holes of the headboard and footboard then fasten using the bolts previously removed MAKE SURE ALL BOLTS ARE TIGHTENED COMPLETELY.
- Page 16 ASSEMBLY INSTRUCTIONS STEP 6 Install slats, one on each space between the small blocks, then fasten with 1 1/4" screws. Page 16 of 40 1/17/2023 AIS34940-0...
- Page 17 P A R T S L I S T 3763400P FULL PANEL BED WITH STORAGE RAIL & TRUNDLE JAVA RTG SKU # STYLE # ITEM DESCRIPTION 34634003 34C-117 FULL PANEL HEADBOARD 34734005 34C-118 FULL PANEL FOOTBOARD 36834009 34C-938 1 PC SIDE RAIL 36934001 34C-940 2 DOOR 2 DRW PEDESTAL 38000234...
- Page 18 ASSEMBLY INSTRUCTIONS STEP 1 STEP 2 LEFT RIGHT Remove bolts from top setting (Factory setting) from the choose side First choose which side the pedestal fits your needs (left or right) (left or right), both headboard and footboard save them for next step. STEP 3 Assemble pedestal first aligning the pedestal bracket with holes in the bottom set of holes of the headboard and footboard then fasten using the bolts previously removed MAKE SURE ALL BOLTS ARE TIGHTENED COMPLETELY.
- Page 19 ASSEMBLY INSTRUCTIONS STEP 7 STEP 6 Install slats, one on each space between the small blocks, For optional Trundle bed follow assembly instructions inside then fasten with 1 1/4" screws. tighten, allow 1/4" space between post and bolt head, repeat for all posts. Page 19 of 40 1/17/2023 AIS34940-0...
- Page 20 P A R T S L I S T 3773400P FULL PANEL BED WITH TWO STORAGE RAILS JAVA RTG SKU # STYLE # ITEM DESCRIPTION 34634003 34C-117 FULL PANEL HEADBOARD 34734005 34C-118 FULL PANEL FOOTBOARD 36934001 34C-940 2 DOOR 2 DRW PEDESTAL 36934001 34C-940 2 DOOR 2 DRW PEDESTAL 38000234...
- Page 21 ASSEMBLY INSTRUCTIONS STEP 1 Remove bolts from top setting (Factory setting) from both headboard and footboard save them for next step. STEP 2 Assemble pedestal first aligning the pedestal bracket with holes in the bottom set of holes of the headboard and footboard then fasten using the bolts previously removed MAKE SURE ALL BOLTS ARE TIGHTENED COMPLETELY.
- Page 22 P A R T S L I S T 3583400P TWIN BOOKCASE BED JAVA RTG SKU # STYLE # ITEM DESCRIPTION 36634005 34C-812 TWIN BOOKCASE HEADBOARD 34534001 34C-116 TWIN PANEL FOOTBOARD 34834007 34C-771 2 PC SIDE RAILS 38000232 100-645 TWIN SLAT PACK (4) 34934009 34C-744 TRUNDLE BED OPTIONAL 3583402P TWIN BOOKCASE BED ASH GRAY...
- Page 23 ASSEMBLY INSTRUCTIONS THERE ARE TWO POSSIBLE SETTINGS, HIGH (FACTORY SETTINGS) AND LOW STEP 1 IF YOU PURCHASE A TRUNDLE BED DO HIGH SETTINGS, IF NOT DO LOW SETTINGS. HIGH SETTING STEPS 1-5 LOW SETTING STEPS 6-9 Loosen bolts in headboard & footboard posts (1/4" approx.) Do not remove, BOLTS ARE PRE-ASSEMBLED.
- Page 24 ASSEMBLY INSTRUCTIONS STEP 5 STEP 6 For optional Trundle bed follow assembly instructions inside Remove bolts from top setting then install in the lower setting, do not Trundle bed box, then slide under the bed as shown. tighten, allow 1/4" space between post and bolt head, repeat for all posts. STEP 7 Assemble side rails STEP 8...
- Page 25 P A R T S L I S T 3603400P TWIN BOOKCASE BED WITH ONE STORAGE RAIL JAVA RTG SKU # STYLE # ITEM DESCRIPTION 36634005 34C-812 TWIN BOOKCASE HEADBOARD 34534001 34C-116 TWIN PANEL FOOTBOARD 36834009 34C-938 1 PC SIDE RAIL 36934001 34C-940 2 DOOR 2 DRW PEDESTAL 38000232...
- Page 26 ASSEMBLY INSTRUCTIONS STEP 1 STEP 2 LEFT RIGHT Remove bolts from top setting (Factory setting) from the choose side First choose which side the pedestal fits your needs (left or right) (left or right), both headboard and footboard save them for next step. STEP 3 Assemble pedestal first aligning the pedestal bracket with holes in the bottom set of holes of the headboard and footboard then fasten using the bolts previously removed MAKE SURE ALL BOLTS ARE TIGHTENED COMPLETELY.
- Page 27 ASSEMBLY INSTRUCTIONS STEP 6 Install slats, one on each space between the small blocks, then fasten with 1 1/4" screws. Page 27 of 40 1/17/2023 AIS34940-0...
- Page 28 P A R T S L I S T 3613400P TWIN BOOKCASE BED WITH TWO STORAGE RAILS JAVA RTG SKU # STYLE # ITEM DESCRIPTION 36634005 34C-812 TWIN BOOKCASE HEADBOARD 34534001 34C-116 TWIN PANEL FOOTBOARD 36934001 34C-940 2 DOOR 2 DRW PEDESTAL 36934001 34C-940 2 DOOR 2 DRW PEDESTAL 38000232...
- Page 29 ASSEMBLY INSTRUCTIONS STEP 1 Remove bolts from top setting (Factory setting) from both headboard and footboard save them for next step. STEP 2 Assemble pedestal first aligning the pedestal bracket with holes in the bottom set of holes of the headboard and footboard then fasten using the bolts previously removed MAKE SURE ALL BOLTS ARE TIGHTENED COMPLETELY.
- Page 30 P A R T S L I S T 3623400P FULL BOOKCASE BED JAVA RTG SKU # STYLE # ITEM DESCRIPTION 36734007 34C-814 FULL BOOKCASE HEADBOARD 34734005 34C-118 FULL PANEL FOOTBOARD 34834007 34C-771 2 PC SIDE RAILS 38000234 100-646 FULL SLAT PACK (4) 34934009 34C-744 TRUNDLE BED OPTIONAL 3623402P FULL BOOKCASE BED ASH GRAY...
- Page 31 ASSEMBLY INSTRUCTIONS THERE ARE TWO POSSIBLE SETTINGS, HIGH (FACTORY SETTINGS) AND LOW STEP 1 IF YOU PURCHASE A TRUNDLE BED DO HIGH SETTINGS, IF NOT DO LOW SETTINGS. HIGH SETTING STEPS 1-5 LOW SETTING STEPS 6-9 Loosen bolts in headboard & footboard posts (1/4" approx.) Do not remove, BOLTS ARE PRE-ASSEMBLED.
- Page 32 ASSEMBLY INSTRUCTIONS STEP 5 STEP 6 For optional Trundle bed follow assembly instructions inside Remove bolts from top setting then install in the lower setting, do not Trundle bed box, then slide under the bed as shown. tighten, allow 1/4" space between post and bolt head, repeat for all posts. STEP 7 Assemble side rails STEP 8...
- Page 33 P A R T S L I S T 3633400P FULL BOOKCASE BED WITH ONE STORAGE RAIL JAVA RTG SKU # STYLE # ITEM DESCRIPTION 36734007 34C-814 FULL BOOKCASE HEADBOARD 34734005 34C-118 FULL PANEL FOOTBOARD 36834009 34C-938 1 PC SIDE RAIL 36934001 34C-940 2 DOOR 2 DRW PEDESTAL 38000234...
- Page 34 ASSEMBLY INSTRUCTIONS STEP 1 STEP 2 LEFT RIGHT Remove bolts from top setting (Factory setting) from the choose side First choose which side the pedestal fits your needs (left or right) (left or right), both headboard and footboard save them for next step. STEP 3 Assemble pedestal first aligning the pedestal bracket with holes in the bottom set of holes of the headboard and footboard then fasten using the bolts previously removed MAKE SURE ALL BOLTS ARE TIGHTENED COMPLETELY.
- Page 35 ASSEMBLY INSTRUCTIONS STEP 6 Install slats, one on each space between the small blocks, then fasten with 1 1/4" screws. Page 35 of 40 1/17/2023 AIS34940-0...
- Page 36 P A R T S L I S T 3643400P FULL BOOKCASE BED WITH ONE STORAGE RAIL&TRUNDLE JAVA RTG SKU # STYLE # ITEM DESCRIPTION 36734007 34C-814 FULL BOOKCASE HEADBOARD 34734005 34C-118 FULL PANEL FOOTBOARD 36834009 34C-938 1 PC SIDE RAIL 36934001 34C-940 2 DOOR 2 DRW PEDESTAL 38000234...
- Page 37 ASSEMBLY INSTRUCTIONS STEP 1 STEP 2 LEFT RIGHT Remove bolts from top setting (Factory setting) from the choose side First choose which side the pedestal fits your needs (left or right) (left or right), both headboard and footboard save them for next step. STEP 3 Assemble pedestal first aligning the pedestal bracket with holes in the bottom set of holes of the headboard and footboard then fasten using the bolts previously removed MAKE SURE ALL BOLTS ARE TIGHTENED COMPLETELY.
- Page 38 ASSEMBLY INSTRUCTIONS STEP 6 Install slats, one on each space between the small blocks, For optional Trundle bed follow assembly instructions inside then fasten with 1 1/4" screws. tighten, allow 1/4" space between post and bolt head, repeat for all posts. Page 38 of 40 1/17/2023 AIS34940-0...
- Page 39 P A R T S L I S T 3653400P FULL BOOKCASE BED WITH TWO STORAGE RAILS JAVA RTG SKU # STYLE # ITEM DESCRIPTION 36734007 34C-814 FULL BOOKCASE HEADBOARD 34734005 34C-118 FULL PANEL FOOTBOARD 36934001 34C-940 2 DOOR 2 DRW PEDESTAL 36934001 34C-940 2 DOOR 2 DRW PEDESTAL 38000234...
- Page 40 ASSEMBLY INSTRUCTIONS STEP 1 Remove bolts from top setting (Factory setting) from both headboard and footboard save them for next step. STEP 2 Assemble pedestal first aligning the pedestal bracket with holes in the bottom set of holes of the headboard and footboard then fasten using the bolts previously removed MAKE SURE ALL BOLTS ARE TIGHTENED COMPLETELY.
Need help?
Do you have a question about the CANYON LAKE 3413400P JAVA and is the answer not in the manual?
Questions and answers