Table of Contents
Advertisement
Quick Links
Viper
™
Lysing Heater
User's Manual
(for BD Viper System)
™
Becton, Dickinson and Company
7 Loveton Circle
Sparks, Maryland 21152 USA
Australian and New Zealand Sponsors:
Becton Dickinson Pty Ltd.
66 Waterloo Road
Macquarie Park NSW 2113, Australia
Becton Dickinson Limited
14B George Bourke Drive
Mt. Wellington Auckland 1060, New Zealand
8018634(10) 2022-04
440976
English
Advertisement
Table of Contents

Related Manuals for BD Viper 440975


Summary of Contents for BD Viper 440975
- Page 1 Viper ™ Lysing Heater User’s Manual (for BD Viper System) ™ Becton, Dickinson and Company 7 Loveton Circle Sparks, Maryland 21152 USA Australian and New Zealand Sponsors: Becton Dickinson Pty Ltd. 66 Waterloo Road Macquarie Park NSW 2113, Australia Becton Dickinson Limited 14B George Bourke Drive Mt.
-
Page 2: Change History
Updated Manufacturing symbol. Updated MD to Maryland. BD, the BD Logo, BD ProbeTec, and BD Viper are trademarks of Becton, Dickinson and Company or its affiliates. © 2022 BD. All rights reserved. All rights reserved. No part of this publication may be reproduced, transmitted, transcribed, stored in... -
Page 3: Table Of Contents
Contents Unpacking Instructions ............1 Intended Use . - Page 4 BD Viper™ Lysing Heater Manual...
-
Page 5: Unpacking Instructions
Intended Use The BD Viper™ Lysing Heater is part of the BD Viper™ system. The heater is for use only with the BD ProbeTec™ ET amplified nucleic acid probe assay(s) intended for use in the in vitro detection of... -
Page 6: Symbols Used On The Equipment
BD Viper™ Lysing Heater Manual Symbols Used on the Equipment The following symbols appear on the BD Viper™ Lysing Heater: Fuse Alternating Current Protective Earth Caution: Biohazard Caution: Refer to Accompanying Documentation. Consult the operator’s manual in all cases where... -
Page 7: Summary Of Warnings And Cautions
The line cord is the disconnect device. Do not position the equipment so it is difficult to operate the disconnecting device. Do not use any other materials in the heater other than those supplied by BD for use with the system. -
Page 8: Summary Of Specifications
BD Viper™ Lysing Heater Manual Dispose of all used reagents and any other contaminated disposable materials following procedures for infectious or potentially infectious waste. It is the responsibility of each laboratory to handle solid and liquid waste according to their nature and degree of hazardousness and to treat and dispose of them (or have them treated and disposed of) in accordance with any applicable regulations. -
Page 9: Thermal Requirements
Thermal Requirements Lysing Heater Fluid Temperature >100 °C at 20 minutes... -
Page 10: Initial Set-Up
BD Viper™ Lysing Heater Manual Initial Set-up Place the heater in an area free of air currents. Air currents can affect temperature stability. Ensure that the surface on which the unit is placed will withstand typical heat produced by the unit. -
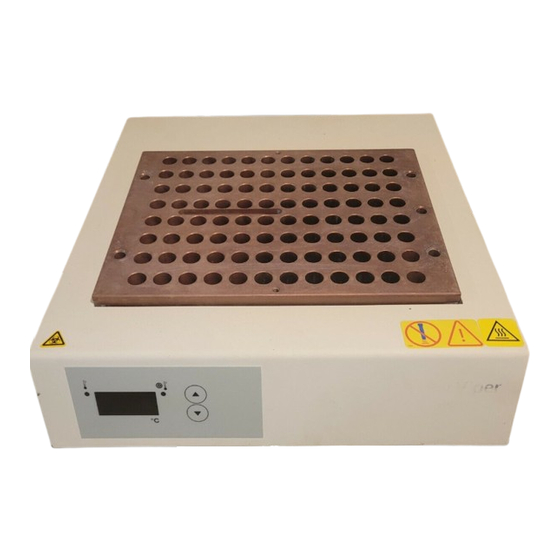
Page 11: Instrument Controls
Instrument Controls Each heater has it’s own LED readout. The display alternates between the actual and setpoint temperatures. The three controls are defined below: Actual Temperature Indicator The Actual temperature indicator is located at the front of the unit, at top left. It is marked with a “thermometer”... -
Page 12: Operation
BD Viper™ Lysing Heater Manual Operation Turn the power switch on the back of the heater to ON or I. The display alternates between the actual temperature and the setpoint temperature. To set the desired temperature, use the up arrow and down arrow keys. Holding either key down will cause the setpoint temperature to change rapidly. -
Page 13: Maintenance And Servicing
NOTE No user serviceable components are inside the unit. Technical Service and Support: In the United States contact BD at 1.800.638.8663 or bd.com. For regions outside of the United States, contact your local BD representative or bd.com. For a complete list of International Contacts, see your BD Viper™ Instrument User’s Manual. -
Page 14: Heater Calibration
5 seconds. The temperature is now fixed in Actual Temperature mode and the small green indicators no longer flash from Setpoint to Actual temperature. Use the small flathead screwdriver (included in BD Viper™ System Start-up Kit) to turn the calibration control screw to adjust the temperature readout to match the measured (thermometer) temperature. -
Page 15: Cleaning Procedure
• The user is responsible for cleaning and decontamination. • Do not use cleaning or decontamination materials other than those specified. Contact BD if there is any question concerning acceptable cleaning materials. • Wipe each unit with paper towels wetted with 1% (v/v) sodium hypochlorite solution. Re-wipe the unit with paper towels dampened with water. -
Page 16: Failure Indications
If the unit display flashes “SSSS” it may mean there is a faulty temperature sensor or a break in the wiring from the sensor. If the unit display flashes “HHHH” it is exceeding the maximum allowable temperature. In either case, switch the unit off and contact your BD representative for repairs. - Page 17 Manufacturer’s Manual Part Number: S5 3037-00...
Need help?
Do you have a question about the Viper 440975 and is the answer not in the manual?
Questions and answers