Table of Contents
Advertisement
Quick Links
Advertisement
Table of Contents

Subscribe to Our Youtube Channel
Related Manuals for PIAB piSAFE Pi12-2


Summary of Contents for PIAB piSAFE Pi12-2
- Page 1 piSAFE® Decentralized Pump with Vacuum Safety Valve...
- Page 2 This manual is available in the following languages at piab.com The original manual is written in English. English Français Deutsch Italiano Polski Português (Brasil) Русский Español Svenska Copyright © 2024 Piab AB Specifications subject to change without notice.
-
Page 3: Table Of Contents
Table of Contents 1. Introduction to the manual ......................5 1.1. About the manual ......................... 5 1.2. Safety signs used in the manual ................... 5 1.2.1. Warning signs ......................5 1.2.2. Mandatory signs ......................6 1.3. Target group ......................... 6 1.4. - Page 4 11. Warranty ............................. 35 12. Recycling and disposal ....................... 36 Page 4 of 40 piSAFE®...
-
Page 5: Introduction To The Manual
Introduction to the manual 1. Introduction to the manual 1.1. About the manual ® This is the complete manual for the decentralized piSAFE vacuum pump with vacuum safety valve (VSV). • The responsible party for the production site must ensure that this manual will be read and understood. •... -
Page 6: Mandatory Signs
Introduction to the manual 1.2.2. Mandatory signs Notice Information that needs extra attention! Important Wear eye protection Important Wear ear protection 1.3. Target group This manual, especially the section about safety, shall be read by all staff who will perform any type of work with the product or equipment: •... -
Page 7: Safety Instructions
2. Safety instructions 2.1. Disclaimer Piab AB is not responsible for installation and operation of piSAFE® in a robot system. The required steps must be undertaken in supervision and approval by authorized integrators. Piab AB is not responsible for safety of a complete robot system with piSAFE® installed. The required steps must be undertaken in supervision and approval by authorized integrators. -
Page 8: Installation
Safety instructions 2.3.1. Installation Compressed air may be dangerous if used by unskilled personnel. Installing, using, and maintaining the product should solely be carried out by experienced and specially trained personnel. Prior to assembly and disassembly of the product, turn off electrical supply and compressed air supply. Install and maintain the product only after thoroughly reading and understanding this manual. -
Page 9: Storage
Safety instructions 2.3.4. Storage For a correct storage of the product and its spare parts, avoid outdoor areas, areas exposed to the elements, direct sunlight, and areas with excessive humidity. 2.3.5. Starting and operating The final evaluation of the safety systems to be applied for starting up the product, after the assembly, is the task of the final manufacturer of machinery. -
Page 10: Introduction To The Pisafe
SWEDEN 3.2. Identification label Each unit is identified by a label with identification information. For any communication with Piab AB or service centers always refer to the label information and state both the Product code and Serial number. Figure 1. Identification label on the cover lid. - Page 11 Introduction to the piSAFE® ® Figure 2. piSAFE pump with (left) and without (right) Energy Saving function piSAFE® Page 11 of 40...
-
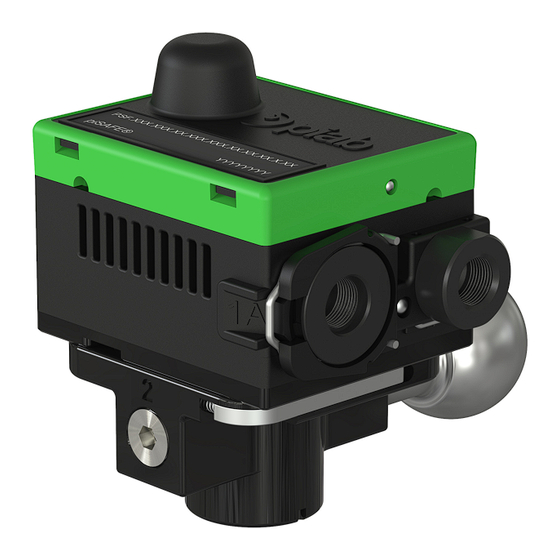
Page 12: Overview
Overview 4. Overview 4.1. Pump unit ® Figure 3. piSAFE Pump with Vacuum Safety Valve (VSV) Page 12 of 40 piSAFE®... -
Page 13: Release Functions
Overview Position Description Note Bracket interface plate Non-return valve Sealing Housing Release function cartridge 3 choices: BO, AQR NC or AQR NO Release function lock clip Compressed air connection EC20 lock clip ® ® COAX cartridge with holder 2 choices: COAX Mini Pi12-2 or Xi10-2 ES Lid Green color... -
Page 14: Mounting
Overview Figure 4. Blow-Off (A), AQR NC (B) and AQR NO (C) check valve. 4.3. Mounting The pump can be attached to the quick connect mounting bracket without the need to use any tools. Figure 5. Overview of the Quick connect mounting bracket. Position Description Pivot arm... -
Page 15: Connections
Connections 5. Connections ® Figure 6. The piSAFE decentralized pump with and without ES function share the same connection options. The figure shows the fitting options that are underlined in the table below. Position Description Fitting options Compressed air to generate vacuum NPSF 1/8”... -
Page 16: Installation
Installation 6. Installation ® piSAFE is fully pneumatic and not dependent on electricity to operate. Warning • Do not install or operate your piSAFE® if damaged during transport, handling, or use. A damaged product may result in bursting and cause injury or property damage. •... - Page 17 Installation Figure 7. Pump with ES (fixed) and BO. Figure 8. Pump with ES (fixed) and AQR NC. Figure 10. Pump with ES (adjustable) and BO. Figure 9. Pump with ES (fixed) and AQR NO. Figure 11. Pump with ES (adjustable) and AQR Figure 12.
-
Page 18: Mounting
Installation Figure 13. Pump with BO and no ES. Figure 14. Pump with AQR NC and no ES. Figure 15. Pump with AQR NO and no ES. 6.2. Mounting The pump is connected to the quick connect mounting bracket without the need to use any tools. The two locking knobs on the pump fit into the mounting bracket and by turning the lock ring clockwise, by hand, the pump is securely locked to the bracket. -
Page 19: Mounting With Quick Connect
® right-hand (RH) mounting to retrofit piSAFE to robotic tooling arms that already have a Piab PMAT system in place with a left-hand or right-hand direction of mounting. The table presents the different mounting styles and directions that can be attached to the quick connect mounting bracket. -
Page 20: Mounting Direction
Installation Mounting Style Mounting direction Figure Screw mount Universal Ball joint (28.6 mm or 32 mm) Universal, LH retrofit* RH retrofit* Lock pin (19 mm or PMAT variant 16 mm) Universal Profile mount (M8 or M6) Universal ® * Cup position (x, y, z) for 28.6 mm ball joint is equal to that of a PMAT vacuum check valve with ball joint. -
Page 21: Mounting With Level Compensator
Installation Figure 21. Quick connect mounting bracket in the universal (A through D) and retrofit (E and F) versions with their available mounting styles. 6.2.2. Mounting with level compensator In order to compensate for differences in level of objects, the option of using a level compensator is available. -
Page 22: Vacuum Switch
Installation ® Figure 23. piSAFE mounted directly Figure 22. Level compensator with its available mounting to an extension rod on an FSCM styles: Left Hand in the left column and Right Hand in the product (to the left), and to a level right column. -
Page 23: Operation
Operation 7. Operation 7.1. Modify the ES level ® Make sure that your piSAFE pump has a pneumatic Energy Saving (ES) function and that the ES level is in fact adjustable and not fixed. Notice Fixed (non-adjustable) ES functions have red coating on the ES screw. The fixed ES vacuum levels are factory pre-set to values selected when ordering. - Page 24 Operation Notice Adjustable ES and part present signal: If you are us- ing a vacuum switch for part present, make sure that the ES low level is always set to below the Part Present (PP) signal. Page 24 of 40 piSAFE®...
-
Page 25: Service And Maintenance
Service and maintenance 8. Service and maintenance Caution Always make sure the unit is in a depressurized and idle state before doing service and maintenance work on it. ® piSAFE is readily serviced and maintained by its quick release of the ejector unit from the mounting bracket without the need to use tools. -
Page 26: Vacuum Safety Non-Return Valve
Service and maintenance 8.2. Vacuum safety non-return valve How to replace the non-return flap valve: ® Dismount piSAFE from the quick connect mounting bracket. Undo the 6 MRT M3x5 (T10 Torx) screws and remove the bracket interface plate. Remove the non-return flap valve with a small flat head screwdriver. -
Page 27: Release Function Sealing Configuration
Service and maintenance Figure 32. Apply O-ring grease on the O-rings. With the coiled pin in a horizontal position, insert the new release function cartridge. 8.4. Release function sealing configuration ® piSAFE comes assembled according to the release function chosen when ordering. The Blow-off and AQR NC are normally closed (NC) release functions whereas AQR NO is normally open (NO). -
Page 28: Compressed Air Connection, Ec20
Service and maintenance 8.5. Compressed air connection, EC20 How to replace the EC20 compressed air connection: Push a small screwdriver between the EC20 lock clip and the plastic body. If necessary, twist the screwdriver gently to release the clip from its position. Note the small notch that holds the clip in place. -
Page 29: O-Ring On The Bottom Plate
Service and maintenance 8.7. O-ring on the bottom plate The O-ring (Ø12.1 x 1.6 mm) located on the bottom interface plate of the pump should be inspected regularly and replaced if worn or damaged (available in the O-ring kit). Apply O-ring grease to the O-ring. Figure 37. -
Page 30: Technical Data
Technical Data 9. Technical Data 9.1. General Description Unit Value Materials PA, POM, NBR, Viton, TPU, Aluminum, SS, Brass. Noise level at optimum pressure dB(A) <75 without silencer <60 with silencer Temperature range °C [°F] 0-50 [32-122] Leaking rate, max. kPa/min [inHg/min] <0.75 [<... - Page 31 Technical Data 3) No air consumption during use, only pilot air for activation, internally (AQR NO) or from outer tubing (AQR NC). 4) Atmospheric flow only. piSAFE® Page 31 of 40...
-
Page 32: Spare Parts And Accessories
Spare parts and accessories 10. Spare parts and accessories ® To ensure the longevity of piSAFE and its functions, it is recommended to use Piab’s original spare parts and accessories. 10.1. Spare parts Spare part description Art no ® COAX... -
Page 33: Accessories
• Inline vacuum filter: Can be installed between the mounting bracket and the suction cup. • Adaptor to be connected to the piSAFE mounting bracket, using G1/4” thread for vacuum connection or M4 screws for mounting of piSTAMP. Datasheets and information are available at piab.com Accessory description Art no... - Page 34 Spare parts and accessories Figure 45. Adaptor G1/4" thread for vacuum connection, or two M4 screw holes for mounting of piSTAMP. Page 34 of 40 piSAFE®...
-
Page 35: Warranty
Warranty 11. Warranty The Seller gives its Customers a five-year warranty from the receipt of the Products for vacuum pump Prod- ucts (excluding vacuum pumps with electronics/controls, electro-mechanical vacuum pumps, accessories, and controls). The Seller gives its Customers a one-year warranty from the receipt of the Products for all other Products (i.e. -
Page 36: Recycling And Disposal
Recycling and disposal 12. Recycling and disposal Environmental aspects are considered in the development process of Piab’s products to make sure that a minimal environmental footprint is used. Piab AB is certified with ISO-14001:2015. Piab AB also complies with: • RoHS2 (2011/65/EU) •... - Page 40 +33 (0)16-430 82 67 +33 (0)16-430 82 67 +46 (0)8-630 25 00 +46 (0)8-630 25 00 +55 (0)11-449 290 50 +55 (0)11-449 290 50 +86 21 5237 6545 +86 21 5237 6545 info-france@piab.com info-france@piab.com info-sweden@piab.com info-sweden@piab.com info-brasil@piab.com info-brasil@piab.com info-china@piab.com info-china@piab.com...
Need help?
Do you have a question about the piSAFE Pi12-2 and is the answer not in the manual?
Questions and answers