Advertisement
Quick Links
1
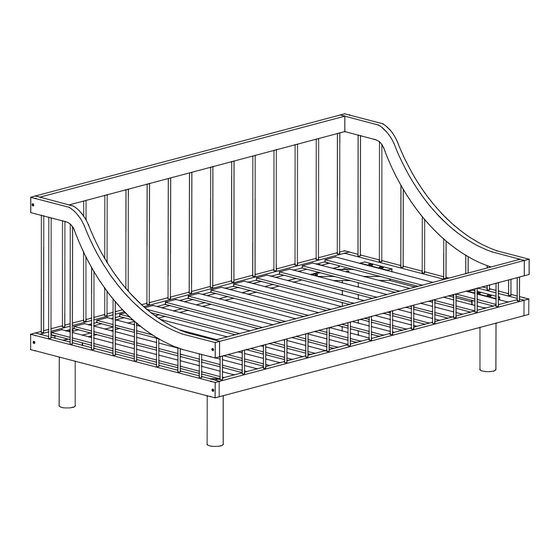
Assembled View
2
Parts in this Box
Side Panel
A
(Left Hand) x 1
D
3
Hardware in this Box
1
M6 x 70mm JCB
x 8
Spring
6
Washer
x 16
0223 Day Bed
Side Panel
B
(Right Hand) x 1
C
Back Panel x 1
Front Panel x 1
2
M6 x 40mm JCB
x 8
M6 Flat
7
Washer
x 16
Assembly Instructions
Slats are packed in separately in Box B
Support
E
Panel x 4
M6 x 50mm JCB
3
x 16
8
Barrel Nut
x 8
Note: Do not assemble
This can cause the bolts
to be overtightened
G
Set of Slats x 1
M8 x
4
50mm JCB
x 8
9
M4 Allen Key
x 1
WI-0723
Use 2 People
using power tools.
F
Post x 4
5
Wood Screw
(M4 x 32mm)
x 18
10
M5 Allen Key
x 1
Page 1 of 4
Advertisement

Related Manuals for Baxton Studio Helio 0223


Summary of Contents for Baxton Studio Helio 0223
- Page 1 0223 Day Bed Assembly Instructions WI-0723 Assembled View Use 2 People Note: Do not assemble using power tools. This can cause the bolts to be overtightened Parts in this Box Slats are packed in separately in Box B Side Panel Side Panel (Left Hand) x 1 (Right Hand) x 1...
- Page 2 0223 Day Bed Assembly Instructions WI-0723 Fit the Post (F) to the Support Panel (E). x2 x4 Assemble the Side Panel (A & B) to the Support Panel (E). x2 x2 Page 2 of 4...
- Page 3 0223 Day Bed Assembly Instructions WI-0723 Assemble the Side Panel (A & B) to the Back Panel (C) & Front Panel (D). Bolt the Support Panel (E) to Back Panel (C) & Use 2 People Front Panel (D). Page 3 of 4...
- Page 4 0023 Day Bed Assembly Instructions WI-0723 Bolt the Set of Slats (G) between the Back Panel (C) and Front Panel (D). Screw the Set of Slats (G) between the Back Panel (C) and Front Panel (D). Page 4 of 4...
Need help?
Do you have a question about the Helio 0223 and is the answer not in the manual?
Questions and answers