Table of Contents
Advertisement
Quick Links
ICEfx
Cryoablation System
en
User's Manual ������������������������������������������ 2
es
Manual del usuario ������������������������������� 83
fr
Manuel d'utilisation ����������������������������� 171
de
Bedienungsanleitung ��������������������������257
it
Manuale dell'utente ��������������������������� 343
nl
Gebruikershandleiding ���������������������� 428
pt-eu
Manual do Utilizador ���������������������������514
CV01
Cryoablation System
™
Black (K) ∆E ≤5.0
Advertisement
Chapters
Table of Contents

Subscribe to Our Youtube Channel
Related Manuals for Boston Scientific ICEfx


Summary of Contents for Boston Scientific ICEfx
- Page 1 ICEfx Cryoablation System ™ Cryoablation System User’s Manual ������������������������������������������ 2 Manual del usuario ������������������������������� 83 Manuel d’utilisation ����������������������������� 171 Bedienungsanleitung ��������������������������257 Manuale dell’utente ��������������������������� 343 Gebruikershandleiding ���������������������� 428 pt-eu Manual do Utilizador ���������������������������514 CV01 Black (K) ∆E ≤5.0...
-
Page 2: Table Of Contents
Figure 2� Console Rear View ������������������������������������������������������������������������������������������������������������������������������ 8 Touch Screen Monitor ���������������������������������������������������������������������������������������������������������������������������������������������� 8 ICEfx Cryoablation Cart ������������������������������������������������������������������������������������������������������������������������������������������� 10 Figure 3� ICEfx Cryoablation Cart ���������������������������������������������������������������������������������������������������������������������� 10 Figure 4� ICEfx Cryoablation Cart - Wheel Lock Levers ������������������������������������������������������������������������������������ 10 Operating Principle ������������������������������������������������������������������������������������������������������������������������������������������������� 11 Materials ����������������������������������������������������������������������������������������������������������������������������������������������������������������� 11 Non-pyrogenic �������������������������������������������������������������������������������������������������������������������������������������������������������� 11 User Information �����������������������������������������������������������������������������������������������������������������������������������������������������... - Page 3 System Setup ��������������������������������������������������������������������������������������������������������������������������������������������������������� 26 Table 6� System Setup Flow ����������������������������������������������������������������������������������������������������������������������������� 26 Figure 5� Position ICEfx Cryoablation Console on Cart ������������������������������������������������������������������������������������� 27 Figure 6� Tighten Retaining Screw on Cart ������������������������������������������������������������������������������������������������������ 27 Figure 7� Argon Shutoff Valve - ON Position ���������������������������������������������������������������������������������������������������� 28 Connecting the Argon Gas �������������������������������������������������������������������������������������������������������������������������������������...
- Page 4 Screen 10: Procedure Screen – Change MTS Identifier Name ��������������������������������������������������������������������������40 Table 16� Change MTS Name ����������������������������������������������������������������������������������������������������������������������������40 Screen 11: Procedure Screen during Testing �����������������������������������������������������������������������������������������������������41 Table 17� Test Controls ���������������������������������������������������������������������������������������������������������������������������������������41 Initiating a Freeze Cycle ����������������������������������������������������������������������������������������������������������������������������������������� 42 Screen 12: Procedure Screen during Freezing �������������������������������������������������������������������������������������������������� 42 Table 18�...
- Page 5 Shutting Down the System �������������������������������������������������������������������������������������������������������������������������������������61 Figure 15� Vent Valve – Fully Open ��������������������������������������������������������������������������������������������������������������������61 Figure 16� (same as Figure 8) Vent Valve - Fully Closed ������������������������������������������������������������������������������������61 Post-Procedure������������������������������������������������������������������������������������������������������������������������������������������������������� 62 Cleaning the ICEfx Cryoablation System ���������������������������������������������������������������������������������������������������������������� 62 Disposal ����������������������������������������������������������������������������������������������������������������������������������������������������������������� 62 TROUBLESHOOTING ���������������������������������������������������������������������������������������������������������������������������������������������������� 63 Software Recovery ������������������������������������������������������������������������������������������������������������������������������������������������� 63 Replacing Fuses �����������������������������������������������������������������������������������������������������������������������������������������������������...
-
Page 6: Reuse Warning
Contents One (1) ICEfx Cryoablation Console One (1) Optional ICEfx Cryoablation Cart: The cart provides storage for up to four cryoablation needle boxes and provides a hook to hold an accessory bag� One (1) ICEfx Cryoablation System User Manual: The User Manual may be physical copy or available online at www�IFU-BSCI�com�... -
Page 7: Icefx Cryoablation Console
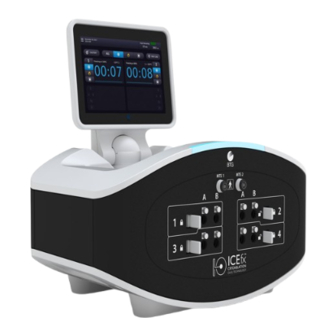
ICEfx Cryoablation Console The ICEfx Cryoablation Console is a portable helium-free desktop cryoablation unit� The front of the Console contains four needle connection channels (each supporting two needle ports), two Multi-Point 1�5 Thermal Sensor Device (MTS) ports, and a recessed 10�1 inch touch screen monitor�... -
Page 8: Touch Screen Monitor
MTS Connection Ports Two MTS Connection Ports are located above the Needle Connection Channels to support connection of the Boston Scientific MTS used to monitor temperature within and near the cryoablation target site� Needle Channels The Needle Connection Panel contains four numbered needle channels; each channel contains two ports to support connection of up to two cryoablation needles�... -
Page 9: Communication Port
Two handles, one on each side are available for lifting the Console� The handles are recessed cutouts in the underside of the base� CAUTION: If the Console is attached to the ICEfx Cryoablation Cart, use the cart handles to lift the system� Power Switch The Power Switch powers ON the Console in preparation for a cryoablation procedure�... -
Page 10: Icefx Cryoablation Cart
Wheel Lock Levers Use the Wheel Lock Levers to lock the ICEfx Cryoablation Cart in place during a procedure (Figure 4)� The wheel lock levers can be locked from either side� Pressing the wheel lock lever DOWN locks the wheel and prevents movement during the procedure�... -
Page 11: Operating Principle
See Boston Scientific cryoablation needle and accessory product IFUs for specific information on pyrogenicity� User Information The ICEfx Cryoablation System is designed to be operated by medical professionals who have a thorough understanding of the technical principles, clinical applications, and risks associated with cryoablation procedures� Optional education is available from your Boston Scientific representative�... -
Page 12: Indications For Use
• The ICEfx Cryoablation System should not be used adjacent to or stacked with other equipment� • If the ICEfx Cryoablation Console is mounted on a cart, lock the wheels on the cart prior to using the system to avoid inadvertent movement of the system during a procedure�... - Page 13 • Ensure that the argon gas cylinder is chained to a wall or an approved cart to prevent inadvertent tipping of the cylinder� • Do not connect the ICEfx Cryoablation System to a gas supply exceeding 6000 psi (414 bar, 41�4 MPa) to avoid damage to internal system components�...
- Page 14 • Portable RF communications equipment (including peripherals such as antenna cables and external antennas) should be used no closer than 30 cm (12 in) to any part of the ICEfx Cryoablation System, including cables specified for use with the system� Otherwise, degradation of the performance of this equipment could result�...
-
Page 15: Precautions
• Use care when lowering or swiveling the touch screen monitor to avoid the potential for pinching fingers� • If the Console is attached to the ICEfx Cryoablation Cart, use the cart handles to lift the system to clear any threshold that is higher than 2 cm�... - Page 16 Procedural • The ICEfx Cryoablation System should be placed in close proximity for accessible needle connection and use� • Turn the ICEfx Cryoablation Console ON before connecting the argon cylinder to ensure the proper diagnostic tests are conducted� • Confirm that the Vent Valve is closed and Argon Shutoff Valve is in the ON position before connecting the gas line to the Console�...
-
Page 17: Adverse Events
ADVERSE EVENTS The potential adverse events associated with the device and/or cryoablation procedure include, but are not limited to: • Angina • Arrhythmia • Atelectasis • Bladder spasms • Bleeding/hemorrhage • Burn/frostbite • Cerebrovascular Accident (CVA)/stroke • Cryoshock Phenomenon (e�g� multi organ failure, severe coagulopathy, disseminated intravascular coagulation (DIC)) •... - Page 18 • Neuropathy • Obstruction • Pain/discomfort • Perforation (including organ and adjacent structures) • Pericardial Effusion • Perirenal fluid collection • Pleural effusion • Pneumatosis (air or gas in an abnormal quantity and/or place in the body) • Pneumothorax • Post ablation syndrome (e�g� fever, pain, nausea, vomiting, malaise, myalgia) •...
-
Page 19: Conformance To Standards
WARNING: Portable RF communications equipment (including peripherals such as antenna cables and external antennas) should be used no closer than 30 cm (12 inches) to any part of the ICEfx Cryoablation System, including cables specified for use with the system� Otherwise, degradation of the performance of this equipment could result�... - Page 20 The ICEfx Cryoablation System is intended for use in a professional healthcare facility electromagnetic environment with the compliance levels specified below� The customer or the user of the ICEfx Cryoablation System should assure that it is used in such an environment�...
-
Page 21: Voltage Dips, Short Interruptions And Voltage Variations On Power Supply Input Lines
The ICEfx Cryoablation System is intended for use in a professional healthcare facility electromagnetic environ- ment with the immunity compliance levels specified below� The customer or the user of the ICEfx Cryoablation System should assure that it is used in such an environment�... -
Page 22: Recommended Separation Distance
RF transmitters, an electromagnetic site survey should be considered� If the measured field strength in the location in which the ICEfx Cryoablation System is used exceeds the applicable RF compliance level above, the ICEfx Cryoablation System should be observed to verify normal operation�... -
Page 23: And The Icefx Cryoablation System
Recommended separation distances between portable and mobile RF communications equipment and the ICEfx Cryoablation System The ICEfx Cryoablation System is intended for use in an electromagnetic environment in which radiated RF disturbances are controlled� The customer or the user of the ICEfx Cryoablation System can help prevent... -
Page 24: How Supplied
• Relative Humidity: 10 % to 90 % Transportation Conditions When shipping the ICEfx Cryoablation System, use the original shipping container to prevent damage from occurring during transport� If the original shipping container is not available, the customer takes responsibility to ensure proper transport conditions are satisfied or contacts Boston Scientific Technical Assistance Center to obtain the appropriate shipping container�... -
Page 25: Operational Instructions
Contact Boston Scientific Technical Assistance Center to order Cryoablation Needle Channel ID Stickers� • Boston Scientific MTS: The MTS contain four sensor locations along the distal shaft of the needle to monitor temperature near the target site and adjacent critical structures�... -
Page 26: Preparation
The ICEfx Cryoablation System will display a reminder on the screen approximately one month prior to when the preventive maintenance is due� If the reminder message appears and the preventive maintenance has not yet been scheduled, contact Boston Scientific Technical Assistance Center to schedule the service�... - Page 27 Attaching the Console to the ICEfx Cryoablation Cart 1� Position the Console on the ICEfx Cryoablation Cart� The depression on the bottom of the Console rests on the dome on top of the ICEfx Cryoablation Cart� Figure 5. Position ICEfx Cryoablation Console on Cart 2�...
- Page 28 3� Plug the power cord into a hospital grade power outlet (electrical mains outlet) with a ground connection� Boston Scientific recommends using a stable and uninterruptible power outlet� NOTE: If the power supply to the ICEfx Cryoablation Console is not stable or is noisy, the MTS temperature readings may be inaccurate�...
- Page 29 • The username and password are not case-sensitive� Numbers are displayed when the keyboard is in upper case� To change text case, use the shift button on the virtual keyboard� • If you leave the user interface idle for a pre-set time with no activity, the ICEfx Cryoablation System software requires you to re-enter your password to unlock the user interface�...
-
Page 30: Connecting The Argon Gas
Connecting the Argon Gas WARNING: Do not connect the ICEfx Cryoablation System to a gas supply exceeding 6000 psi (414 bar, 41�4 MPa) to avoid damage to internal system components� WARNING: Ensure that the argon gas cylinder is chained to a wall or an approved cart to prevent inadvertent tipping of the cylinder�... - Page 31 5� Connect the argon high-pressure gas supply line to the argon cylinder by securing the gauge assembly adapter onto the cylinder connection (see Figure 11)� Figure 11. Gas Cylinder Setup 6� Carefully turn the cylinder valve on the argon gas cylinder counterclockwise for one quarter turn� Ensure that the pressure reading on the gauge responds immediately�...
-
Page 32: Screen 1: Gas Indicator
• Failure to operate the ICEfx Cryoablation Console within the working pressure limits may affect iceball formation� • If the Console produces a continuous hissing sound, verify that the Vent Valve is fully closed� If the Vent Valve is fully closed and the hissing sounds persists, shut OFF the system using the power switch located on the rear of the Console (Figure 2)�... -
Page 33: Document Conventions
Getting Started With The User Interface The ICEfx Cryoablation System provides a graphical user interface that facilitates rapid communication between the user and the system through a touch screen interface� This section provides information to help familiarize the user with the software user interface�... -
Page 34: Options Menu
Options Menu The Options Menu provides access to additional features, such as accessing reports and changing settings� To view and select options, press the icon in the upper left of the screen and select the desired option from the expanded menu� Screen 3: Options Menu Table 9. -
Page 35: Screen 4: Start Case Screen
Starting the Procedure After logging into the system, the Start Case Screen appears� Press START CASE to start a cryoablation procedure� Pressing START CASE displays the Select Tissue Type Screen � Select an organ and the Start Case wizard is activated� Screen 4: Start Case Screen Table 10. -
Page 36: Screen 6: Edit Case Information Screen
Entering Case Information Use the Edit Case Information Screen to provide additional information on the cryoablation procedure� This is an optional step� The Edit Case Information Screen is displayed at the beginning and end of a cryoablation procedure� At the end of the procedure, an option is provided to save the case information�... -
Page 37: Screen 7: Initial Procedure Screen
Using the Procedure Screen Use the Procedure Screen to control and monitor a cryoablation procedure� Initially, only the controls related to needle testing are displayed as shown in Screen 7� After successful completion of Needle Integrity and Functionality Testing, the freeze (Screen 12) and thaw (Screen 13) controls are enabled for the tested needles� Screen 7: Initial Procedure Screen Table 13 describes the controls common to the test, freeze, and thaw functions�... -
Page 38: Screen 8: Timer During Fastthaw Function
Viewing the Timer The timer displays the elapsed time during freezing or thawing� The timer counts down from two minutes during testing� The timer counts down from the selected duration during the cautery function� The upper left and upper right portions of the timer provide additional data for the freeze, thaw, and cautery functions�... -
Page 39: Indicator Function
Control Description Temperature For CX needles, the upper right portion of the timer displays temperature data for the current Indicator function: • Testing — Displays the needle temperature� • Freezing — Displays the internal gas temperature at the needle tip� •... -
Page 40: Screen 10: Procedure Screen - Change Mts Identifier Name
Changing the MTS Identifier Click the MTS identifier (MTS 1, MTS 2) to open the Procedure Screen - Change MTS Identifier Name This screen makes it possible to change the MTS name� In this example, the name is changed to A4� Screen 10: Procedure Screen –... -
Page 41: Initiating Testing
Initiating Testing WARNING: If a needle needs to be added during a procedure, connect the needle to an open channel� If there is no open channel available, reference the Adding a CX Needle during a Cryoablation Procedure Section for the instructions for adding a CX needle to a channel with an open port�... -
Page 42: Initiating A Freeze Cycle
Select a freeze intensity from the menu or select “Stick” intensity� NOTE: The ICEfx Cryoablation System controls freeze intensity by adjusting the duration of argon flow over each 10 second block of time (e�g�, 30% freeze intensity freezes for 3 seconds and idles for 7 seconds)�... -
Page 43: Screen 13: Expanded Channel History
Screen 13 shows the result of clicking the progress indicator bar� Screen 13: Expanded Channel History Initiating a Thaw Cycle (CX needles only) CAUTION: Needles without CX functionality do not support i-Thaw Function or FastThaw Function� Needle release from an iceball will only be achievable with passive thaw� WARNING: The needle handle and distal needle shaft may become warm during active thawing�... -
Page 44: Screen 14: Procedure Screen During Thawing (Fastthaw Function)
Thaw Controls Screen 14: Procedure Screen during Thawing (FastThaw Function) Table 19. Thaw Controls Control Description Displays the currently selected thaw mode (i-Thaw Function or FastThaw Function)� NOTE: The FastThaw Function generates a temperature that is higher than that generated for i-Thaw Function, resulting in a faster thaw time�... -
Page 45: Screen 15: Cautery Function Screen
To use cautery function: 1� From the Procedure Screen , press the CAUTERY button to display the cautery function controls� 2� Press the desired needle port (A or B) on each channel containing a needle you wish to track ablate� Only one needle per channel may activate the cautery function at a given time�... -
Page 46: Advanced Channel Controls
Table 20. Cautery Function Controls # Control Description PROCEDURE button – Press to exit Cautery function mode and return to the Procedure Screen � Cautery button – Press the Cautery button to select the cautery function duration� Press Start to initiate cautery function� 4 Cautery Function Displays the Cautery Function Status�... -
Page 47: Screen 16: Needle Type List
Select Needle Type Control 1� To select or change the needle type for a channel, press the Channel button to display the needle type list� Screen 16: Needle Type List 2� Select the proper needle type from the list� Retest a Needle To retest a needle, press the Channel button and then press to initiate a needle retest�... -
Page 48: Screen 18: Program Cycles Dialog
To program freeze-thaw cycles: 1� To program freeze-thaw cycles for a specific channel, press the individual channel button or the ALL channel button, and then press PROGRAM CYCLES� 2� Press NEW on the Program Cycles dialog� Screen 18: Program Cycles Dialog The Programming Cycles Screen displays for the selected channel�... -
Page 49: Screen 20: Save Cycle Sequence Screen
Reports from the expanded menu to view the saved procedure reports (when there is no active case)� The All Reports Screen displays a list of all saved reports in the ICEfx Cryoablation System� Select the report you want to view and press VIEW REPORT. -
Page 50: Screen 22: Procedure Report
Sorting a Report To sort the list by Report Name, Hospital Name, Doctor Name, or Organ Type, press the appropriate header section of the report list� Exporting a Report From the All Reports Screen , press VIEW REPORT to display the report you would like to export� From the View Report Screen , click EXPORT to export the report details and select the export file type and name�... -
Page 51: Configuring Settings
Volume cylinder volume can only be changed by administrative or service personnel� Time Zone The time zone can be changed by administrative or service personnel� The ICEfx Cryoablation System automatically adjusts for Daylight Saving Time� Volume Units Select the argon cylinder volume units according to the standard in the geographical region�... -
Page 52: Administrative Options
2� Press the ADMIN button� Software Update Manual Software Update Administrative and service users can manually update the ICEfx Cryoablation System software via the Boston Scientific supplied USB flash drive� 1� Press the ADMIN button on the Settings Screen �... -
Page 53: End Procedure
Procedure Performing The Cryoablation Procedure Table 23 outlines the steps for testing the cryoablation needles and MTS and initiating the cryoablation procedure� This section describes each step in-detail� Table 23. Cryoablation Procedure Flow Needle/MTS • Press the START CASE button Testing •... -
Page 54: Pre-Procedure Needle/Mts Testing
Pre-Procedure Needle/MTS Testing WARNING: Prior to starting a cryoablation procedure, set up the ICEfx Cryoablation System (reference the System Setup Section) and then perform Needle Integrity and Functionality Tests� Tests must be successfully completed in order to begin the to proceed with procedure�... - Page 55 OPTIONAL: If additional testing is required, press the Test button again to repeat the test� NOTE: For CX needles, if a previously tested needle is moved to a new channel during a procedure, the ICEfx Cryo- ablation System will recognize the needle has successfully completed the Needle Integrity and Functionality Test�...
- Page 56 Upon successful completion of the Needle Integrity and Functionality Test, the remaining control buttons on the channel become active� The needle(s) are ready for use� 10� When using MTS, prepare the desired number of sensors for testing� The ICEfx Cryoablation System supports use of two thermal sensors�...
-
Page 57: Initiating A Cryoablation Procedure
WARNING: If a needle without CX functionality is connected to the ICEfx Cryoablation System, active thawing is not possible� Needle release from an iceball will only be achievable with passive thaw� Use image guidance to ensure adequate thawing�... - Page 58 NOTE: Selecting ALL will initiate a Freeze phase at the intensity selected for each channel� To conduct freezing in all active channels at the same intensity, press the Freeze button for the ALL channel and select the freeze intensity to apply to all active channels� After selecting the freeze intensity, press the Start button for the ALL channel to initiate freezing on all active channels simultaneously�...
-
Page 59: Adding A Cx Needle During A Cryoablation Procedure
If there are no open channels, use the following procedure to add a new CX needle� CAUTION: Boston Scientific recommends that only needles of the same type be placed together in a single channel� Using needles of differing types in a channel may affect the accuracy of the Gas Indicator�... - Page 60 Standard Argon Cylinder Setup 1� Plan the appropriate time to change a cylinder by estimating the argon required to complete the procedure� The Gas Indicator indicates how many minutes of argon is remaining based on the selected gas flow intensity, type and number of needles being used�...
-
Page 61: System Shutdown
SYSTEM SHUTDOWN Shutting Down the System WARNING: Warn procedure personnel prior to venting the ICEfx Cryoablation System to avoid startling them� 1� If the Console was not vented at the end of the procedure, perform these steps to vent the system�... -
Page 62: Post-Procedure
Any serious incident that occurs in relation to this device should be reported to the manufacturer and to the relevant local regulatory authority� For customers in Australia, report any serious incident that occurs in relation to this device to Boston Scientific and to the Therapeutic Goods Administration (https://www�tga�gov�au)�... -
Page 63: Troubleshooting
TROUBLESHOOTING Boston Scientific suggests the following options for troubleshooting the ICEfx Cryoablation System� If the suggested approaches do not resolve the issue or you experience an issue not referenced below, contact Boston Scientific Technical Assistance Center� Software Recovery In the event of software corruption or failure, the software may be restored to the previous software version�... - Page 64 3� If steps 1 and 2 are unsuccessful, select a new needle for use� Contact Boston Scientific Technical Assistance Center to arrange return of the non-operational needle� 4� The channel may be defective� Do not use this channel� Move the needle(s) to a different channel�...
-
Page 65: Replacing Fuses
Contact Boston Scientific Technical Assistance Center to obtain the replacement fuses required for this procedure� Turn the Power Switch OFF on the rear of the ICEfx Cryoablation Console� Pull on the red cable retention mechanism to disconnect the power cable from the power inlet�... - Page 66 Instruction Photo Insert a small screwdriver into the slot on the top of the fuse holder and flip down the cover of the fuse holder� Insert a small screwdriver underneath the edge of the fuse holder to remove the fuse holder from the power outlet� While holding your hand under the fuse holder, carefully slide the fuse holder out of the power inlet�...
- Page 67 Replace the fuses in the fuse holder with the two replacement fuses supplied from Boston Scientific Technical Assistance Center� NOTE: Use only Boston Scientific specified fuses in the ICEfx Cryoablation Console� Plug in the power cord� Call Boston Scientific Technical Assistance Center to schedule a service call to determine the cause of the blown fuses, to determine if service is required, and to order replacement fuses�...
- Page 68 1� Disconnect the needle and move the needle to a different channel� was started using the Test, 2� Conduct the Needle Integrity and Functionality Test again on the needle� Freeze or Thaw buttons 3� Contact Boston Scientific Technical Assistance Center� Black (K) ∆E ≤5.0...
- Page 69 Cryoablation System� the cylinder valve • Close the cylinder valve and vent the gas from the ICEfx Cryoablation System and the gas supply line using the Vent Valve (Figure 3)� Verify the system is depressurized� Loosen and remove the gauge assembly adapter� Verify no debris is on the gas cylinder connection point;...
- Page 70 2� If the problem persists, connect a new needle into a different channel and test the needle� Continue the procedure with the newly tested needle� 3� Contact Boston Scientific Technical Assistance Center for further instructions upon completion of the procedure�...
-
Page 71: Displayed Messages
Displayed Messages The ICEfx Cryoablation System displays a message on the user interface when a user requests assistance or when user, needle or system errors are detected� NOTE: Record and report the message number (e�g�, 10-01, 80-02) if assistance is required from Boston Scientific Technical Assistance Center�... - Page 72 Customer Service • Relay the Challenge on the screen below Solutions: • Enter the Response provided by Customer 1� Contact Boston Scientific Technical Assistance Center and relay Service the Challenge displayed on the screen� • Press the Login button 2�...
- Page 73 Message Reason for Appearance / Solutions 20-03 Test All Reason for Appearance: • You selected to control all needles User selected Test button in ALL channel to control all active simultaneously channels� • Do you want to initiate test in all needles Solutions: now? Confirm testing of all connected needles�...
- Page 74 Solutions: 1� Disconnect and segregate the needle� 2� Connect a supported needle type and select the needle type from the drop down menu� 3� Contact Boston Scientific Technical Assistance Center if further guidance is needed� 40-03 Recalled Needle Reason for Appearance: •...
- Page 75 Message Reason for Appearance / Solutions 40-04 Expired Needle Reason for Appearance: • The needle ‘Use by’ date is in the The needle expiration date was identified as an expired date� The channel past will be disabled until an appropriate needle is connected� •...
- Page 76 • Retry update Solutions: 1� Retry the update� 2� Contact Boston Scientific Technical Assistance Center if the update fails� 60-02 Update Failed Reason for Appearance: • An error occurred during the upload During log data upload of the system, an error occurred that prevented process completion of the upload�...
- Page 77 1� Remove the USB flash drive from the USB port on the Console� Wait a few seconds and reconnect the USB flash drive to the USB port� 2� If the problem persists, contact Boston Scientific Technical Assistance Center for a replacement USB flash drive�...
- Page 78 If the restart fails, the system is not usable� • Restarting ICEfx Cryoablation Solutions: System 1� Restart the ICEfx Cryoablation Console� • If problem persists, contact Boston 2� Contact Boston Scientific Technical Assistance Center if the problem Scientific Technical Assistance Center persists� 80-02 Startup Failure Reason for Appearance: •...
- Page 79 Solutions: performance� Reduce the number of 1� Reduce the number of active needles� active needles� 2� Contact Boston Scientific Technical Assistance Center for further guidance� 80-36 System Error Reason for Appearance: • The gas flow rate exceeds the...
- Page 80 90-03 System End of Life Reason for Appearance: • The ICEfx Cryoablation System is at The ICEfx Cryoablation System reached the end of its operating life� the end of operational life Solutions: • Contact Boston Scientific Technical Contact Boston Scientific Technical Assistance Center to schedule service�...
-
Page 81: System Specifications
± 5 seconds over any 10 minute interval Essential Performance The ICEfx Cryoablation System essential performance is defined as: • The ability to turn on and turn off the flow or argon to the connected cryoablation needles via command inputs from the user interface •... -
Page 82: Boston Scientific Technical Assistance Center
The physician should consider the following points while counseling the patient on the use of the ICEfx Cryoablation System in association with the interventional procedure: • Discuss the risks and benefits, including review of potential adverse events listed in the IFUs for the ICEfx Cryoablation System and accessory products used to conduct Cryoablation procedures and for other interventional treatments likely to be employed�... - Page 83 Monitor de pantalla táctil ���������������������������������������������������������������������������������������������������������������������������������������89 Carro de crioablación ICEfx ��������������������������������������������������������������������������������������������������������������������������������������91 Figura 3� Carro de crioablación ICEfx �����������������������������������������������������������������������������������������������������������������91 Figura 4� Carro de crioablación ICEfx - Palancas de bloqueo de ruedas ����������������������������������������������������������91 Principios de funcionamiento �������������������������������������������������������������������������������������������������������������������������������� 92 Materiales �������������������������������������������������������������������������������������������������������������������������������������������������������������� 92 Apirógeno �������������������������������������������������������������������������������������������������������������������������������������������������������������� 92 Información del usuario �����������������������������������������������������������������������������������������������������������������������������������������...
- Page 84 Configuración del sistema������������������������������������������������������������������������������������������������������������������������������������ 108 Tabla 6� Flujo de configuración del sistema ��������������������������������������������������������������������������������������������������� 108 Figura 5� Coloque la consola de crioablación ICEfx en el carro ���������������������������������������������������������������������� 109 Figura 6� Apriete el tornillo de retención en el carro�������������������������������������������������������������������������������������� 109 Figura 7� Válvula de cierre de Argon (Argón) - Posición ON (encendido) ��������������������������������������������������������110 Figura 8�...
- Page 85 Tabla 15. Controles MTS ����������������������������������������������������������������������������������������������������������������������������������122 Pantalla 10: Pantalla Procedimiento - Cambiar nombre de identificador MTS �����������������������������������������������123 Tabla 16. Cambiar nombre de MTS �����������������������������������������������������������������������������������������������������������������123 Pantalla 11: Pantalla Procedimiento durante las pruebas �������������������������������������������������������������������������������124 Tabla 17. Controles de prueba �������������������������������������������������������������������������������������������������������������������������124 Iniciar un ciclo de congelación ������������������������������������������������������������������������������������������������������������������������������124 Pantalla 12: Pantalla Procedimiento durante la congelación ��������������������������������������������������������������������������125 Tabla 18.
- Page 86 Figura 15� Válvula Vent (Purga): totalmente abierta ���������������������������������������������������������������������������������������145 Figura 16� (igual que la Figura 8) Válvula Vent (Purga): totalmente cerrada ���������������������������������������������������145 Después de la intervención ��������������������������������������������������������������������������������������������������������������������������������� 146 Limpieza del sistema de crioablación ICEfx ��������������������������������������������������������������������������������������������������������� 146 Eliminación ���������������������������������������������������������������������������������������������������������������������������������������������������������� 146 RESOLUCIÓN DE PROBLEMAS ������������������������������������������������������������������������������������������������������������������������������������147 Recuperación del software������������������������������������������������������������������������������������������������������������������������������������147...
-
Page 87: Advertencia Con Respecto A La Reutilización
ADVERTENCIA CON RESPECTO A LA REUTILIZACIÓN Los dispositivos de un solo uso que se utilizan con el sistema de crioablación ICEfx son estériles� La reutilización, el reprocesamiento o la reesterilización pueden comprometer la integridad estructural del dispositivo o causar su fallo, lo que a su vez puede resultar en lesiones al paciente, enfermedad o la muerte�... -
Page 88: Consola De Crioablación Icefx
Consola de crioablación ICEfx La consola de crioablación ICEfx es una unidad de crioablación portátil de escritorio sin helio� El frente de la consola contiene cuatro canales de conexión de agujas (cada uno admite dos puertos de aguja), dos puertos del dispositivo Multi-Point 1�5 Thermal Sensor (MTS) y un monitor táctil empotrado de 10,1 inch�... -
Page 89: Figura 2. Vista Posterior De La Consola
Los dos puertos de conexión MTS están ubicados sobre los canales de conexión de la aguja y permiten la conexión del MTS de Boston Scientific que se utiliza para supervisar la temperatura de la zona objetivo de crioablación y del entorno cercano�... -
Page 90: Interruptor De Encendido/Apagado
Válvula Vent (Purga) La válvula Vent (Purga) se utiliza para purgar el gas argón a alta presión en la consola de crioablación ICEfx� Entrada de gas argón La línea de suministro de gas conecta el suministro de gas argón del cilindro de gas argón con la entrada de gas argón a través de un conector de conexión rápida�... -
Page 91: Carro De Crioablación Icefx
Carro de crioablación ICEfx El carro de crioablación ICEfx opcional ofrece una plataforma segura para la consola� El carro de crioablación ICEfx tiene cuatro ruedas de bloqueo para asegurarse de que el carro no se mueva durante un procedimiento de crioablación� La abertura dentro del carro ofrece almacenamiento para hasta cuatro cajas de agujas de crioablación�... -
Page 92: Principios De Funcionamiento
El sistema de crioablación ICEfx utiliza gas argón de alta presión que circula a través de las agujas de crioablación de punta cerrada para inducir la congelación de tejido� La congelación se consigue potenciando el efecto de Joule-Thomson con un intercambiador de calor por recuperación que llevan las agujas de crioablación�... -
Page 93: Uso Indicado
INDICACIONES DE USO El sistema de crioablación ICEfx está diseñado para utilizarse como herramienta crioquirúrgica en los campos de cirugía general, dermatología, neurología (incluyendo crioanalgesia), cirugía torácica (con excepción de tejido cardiaco), ginecología, oncología y urología� Este sistema se ha diseñado para destruir tejido mediante la aplicación de temperaturas extremadamente frías (incluidos tejido prostático y de riñón, metástasis de hígado, tumores y... -
Page 94: Advertencias
• El sistema de crioablación ICEfx no debe utilizarse junto a otros equipos o apilado sobre ellos� • Si la consola de crioablación ICEfx está montada sobre el carro, bloquee las ruedas del carro antes de usar el sistema para evitar movimientos inadvertidos del mismo durante un procedimiento�... - Page 95 • Asegúrese de que el cilindro de gas argón está sujeto a la pared o a un carro aprobado para evitar el movimiento inadvertido del cilindro� • No conecte el sistema de crioablación ICEfx a un suministro de gas que supere los 6000 psi (414 bar, 41,4 MPa) para evitar daño en los componentes internos del sistema�...
- Page 96 Asegúrese de llevar a cabo una descongelación adecuada mediante guía por imágenes� • No toque la consola de crioablación ICEfx mientras toca al paciente para evitar el riesgo de descarga sobre el paciente si se produce un fallo eléctrico involuntario�...
-
Page 97: Precauciones
• Tenga cuidado al bajar o girar el monitor de pantalla táctil para evitar pellizcarse los dedos� • Si la consola está acoplada al carro de crioablación ICEfx, utilice las asas del carro para levantar el sistema para superar cualquier obstáculo que mida más de 2 cm. Para ello, dos personas (una a cada lado del sistema) deben levantarlo sujetándolo por las asas�... - Page 98 • El sistema de crioablación ICEfx debe colocarse lo suficientemente cerca como para conectar la aguja y utilizarse fácilmente� • ENCIENDA la consola de crioablación ICEfx antes de conectar el cilindro de argón para asegurarse de que se realizan las pruebas diagnósticas adecuadas�...
-
Page 99: Episodios Adversos
EPISODIOS ADVERSOS Entre los posibles episodios adversos asociados al dispositivo o a la intervención de crioablación se incluyen los siguientes: • Angina • Arritmia • Atelectasia • Espasmos de la vejiga • Sangrado/hemorragia • Quemadura/congelación • Accidente cerebrovascular (ACV) o ictus •... - Page 100 • Dolor/molestias • Perforación (incluidas estructuras orgánicas y adyacentes) • Derrame pericárdico • Acumulación de líquido perirrenal • Derrame pleural • Neumotosis (aire o gas en una cantidad o en un lugar anormales en el cuerpo) • Neumotórax • Síndrome posterior a la ablación (p. ej., fiebre, dolor, náuseas, vómitos, malestar general o mialgia) •...
-
Page 101: Conformidad Normativa
(CEM) y es necesario que se instale siguiendo la información CEM que se ofrece a continuación� El sistema de crioablación ICEfx se ha probado en un entorno de quirófano para cumplimiento de compatibilidad electromagnética (CEM) e interferencia electromagnética (IEM)� Se ha probado que el sistema de crioablación ICEfx cumple con IEC 60601-1-2 y EN 55011. -
Page 102: Tabla 2. Emisiones Electromagnéticas
Directrices y declaración del fabricante: emisiones electromagnéticas El sistema de crioablación ICEfx está diseñado para utilizarse en un entorno electromagnético de una instalación profesional para la salud con los niveles de cumplimiento indicados a continuación� El cliente o el usuario del sistema de crioablación ICEfx deben asegurarse de que se usa en dicho entorno�... -
Page 103: Tabla 3. Inmunidad Electromagnética
Directrices y declaración del fabricante: inmunidad electromagnética El sistema de crioablación ICEfx está diseñado para utilizarse en un entorno electromagnético de una instalación profesional para la salud con los niveles de cumplimiento indicados a continuación� El cliente o el usuario del sistema de crioablación ICEfx deben asegurarse de que se usa en dicho entorno�... -
Page 104: Tabla 4. Inmunidad Electromagnética De Sistemas Que No Son De Soporte Vital
RF, se debería plantear una revisión electromagnética del lugar� Si la intensidad de campo medida en la ubicación donde se emplea el sistema de crioablación ICEfx supera el nivel de cumplimiento de RF correspondiente especificado con anterioridad, se debe supervisar el sistema de crioablación ICEfx para comprobar... -
Page 105: Móviles, Y El Sistema De Crioablación Icefx
RF (transmisores) portátiles y móviles, y el sistema de crioablación ICEfx, tal y como se recomienda a continuación, y en función de la potencia de salida máxima de dichos equipos�... -
Page 106: Presentación
• Humedad relativa: del 10% al 90% Condiciones de transporte Cuando envíe el sistema de crioablación ICEfx, utilice el paquete original para evitar daños durante el transporte� Si no se dispone del paquete original, el cliente asume la responsabilidad de garantizar que las condiciones de transporte sean adecuadas o de ponerse en contacto con el Centro de asistencia técnica de Boston Scientific para obtener el... -
Page 107: Instrucciones De Funcionamiento
Boston Scientific para pedir adhesivos de identificación de canal de agujas para crioablación� • MTS de Boston Scientific: los MTS cuentan con cuatro sensores, a lo largo del cuerpo distal de la aguja, para supervisar la temperatura cerca de la zona objetivo y en las estructuras críticas adyacentes�... -
Page 108: Instalación, Calibración Y Servicio Técnico
Centro de asistencia técnica de Boston Scientific para programarlo� Preparación Configuración del sistema La Tabla 6 ilustra el orden y los pasos de configuración del sistema de crioablación ICEfx� En esta sección se describe cada paso con detalle� Tabla 6. Flujo de configuración del sistema... -
Page 109: Figura 5. Coloque La Consola De Crioablación Icefx En El Carro
Fijar la consola al carro de crioablación ICEfx 1� Coloque la consola en el carro de crioablación ICEfx� La depresión en la parte inferior de la consola se apoya sobre la cúpula encima del carro de crioablación ICEfx� Figura 5. Coloque la consola de crioablación ICEfx en el carro 2�... -
Page 110: Figura 7. Válvula De Cierre De Argon (Argón) - Posición On (Encendido)
Boston Scientific recomienda utilizar una toma de alimentación estable e ininterrumpida� NOTA: Si el suministro de energía de la consola de crioablación ICEfx no es estable o es ruidoso, las lecturas de temperatura del MTS pueden ser imprecisas�... - Page 111 Si el software del sistema de crioablación ICEfx detecta gas presurizado en el sistema y la línea de suministro de gas no está conectada, se muestra un mensaje solicitándole que purgue manualmente el gas del sistema�...
-
Page 112: Conectar El Gas Argón
Después de iniciar sesión correctamente, aparece la pantalla Start Case (Iniciar caso) (Pantalla 4)� Conectar el gas argón ADVERTENCIA: No conecte el sistema de crioablación ICEfx a un suministro de gas que supere los 6000 psi (414 bar, 41,4 MPa) para evitar daño en los componentes internos del sistema ADVERTENCIA: Asegúrese de que el cilindro de gas argón esté... -
Page 113: Figura 10. Conecte La Línea De Suministro De Gas Argón
4� Conecte la línea de suministro de gas argón de alta presión a la entrada de argón de la consola utilizando el conector de conexión rápida en la parte posterior de la consola (consulte la Figura 10)� Figura 10. Conecte la línea de suministro de gas argón 5�... -
Page 114: Figura 13. Adaptador Para Dos Cilindros Ez-Connect2
OPCIONAL: El adaptador de cilindro doble EZ-Connect2 conecta dos cilindros de gas argón a la consola para aceptar un procedimiento de crioablación� En un conjunto adaptador de cuatro vías con manómetro de argón se pueden conectar una línea de suministro de gas, el cilindro de gas principal y una línea de suministro de gas auxiliar� Si utiliza el adaptador para dos cilindros EZ-Connect2 opcional, debe conectar la línea de suministro de gas con conjunto adaptador de manómetro de cuatro vías al cilindro de argón principal;... -
Page 115: Pantalla 1: Indicador De Gas
Para garantizar un desempeño optimo, sustituya el cilindro de argón si la presión cae por debajo del límite de presión operativa más bajo� • No utilizar la consola de crioablación ICEfx dentro de los limites de presión de trabajo puede afectar la formación de bolas de hielo�... -
Page 116: Navegación Por La Interfaz De Usuario
Muestra la presión suministrada del cilindro de gas argón� indicador de gas NOTA: El sistema de crioablación ICEfx contiene un regulador interno que regula la presión de argón a los límites de trabajo adecuados� El indicador de gas se actualiza en tiempo real al desconectar agujas o conectar otras adicionales, así... -
Page 117: Menú Opciones
Menú Opciones El menú Opciones ofrece acceso a características adicionales, como acceder a informes y cambiar la configuración� Para ver y elegir opciones, pulse el icono en la parte superior izquierda de la pantalla y elija la opción deseada desde el menú extendido� Pantalla 3: Menú... -
Page 118: Pantalla 4: Pantalla Start Case (Iniciar Caso)
Inicio del procedimiento Después de iniciar sesión en el sistema, aparece la pantalla Start Case (Iniciar caso)� Pulse START CASE (Iniciar caso) para iniciar un procedimiento de crioablación� Pulsando START CASE (Iniciar caso) se muestra la pantalla Select Tissue Type (Seleccionar el tipo de tejido)� Seleccione un órgano y se activará el asistente Iniciar caso� Pantalla 4: Pantalla Start Case (Iniciar caso) Tabla 10. -
Page 119: Pantalla 6: Pantalla Edit Case Information (Editar Información Del Caso)
Introducir información del caso Utilice la pantalla Edit Case Information (Editar información del caso) para ofrecer información adicional en el procedimiento de crioablación� Este es un paso opcional� La pantalla Edit Case Information (Editar información del caso) se muestra al inicio y al final de un procedimiento de crioablación�... -
Page 120: Pantalla 7: Pantalla Procedimiento Inicial
Uso de la pantalla Procedimiento Use la pantalla Procedimiento para controlar y supervisar un procedimiento de crioablación� Inicialmente, solo se muestran los controles relacionados con la prueba de la aguja, tal como se muestra en la Pantalla 7� Una vez finalizadas con éxito las pruebas de integridad y funcionalidad de la aguja, se habilitarán los controles congelar (Pantalla 12) y descongelar (Pantalla 13) para las agujas probadas�... -
Page 121: Pantalla 8: Cronómetro Durante La Función Fastthaw
Ver el cronómetro El cronómetro muestra el tiempo transcurrido durante el congelamiento o el descongelamiento� El cronómetro realiza una cuenta atrás de dos minutos durante la prueba� El cronómetro cuenta atrás desde la duración seleccionada durante la función de cauterización� Las partes superior izquierda y derecha del cronómetro ofrecen información adicional para las funciones de congelación, descongelación y cauterización�... -
Page 122: Mts
N.º Control Descripción Indicador de Para agujas CX, la parte superior derecha del cronómetro muestra los datos de la temperatura temperatura de la función actual: • Prueba: muestra la temperatura de la aguja� • Congelación: muestra la temperatura interna del gas en la punta de la aguja� •... -
Page 123: Pantalla 10: Pantalla Procedimiento - Cambiar Nombre De Identificador Mts
Cambiar el identificador MTS Haga clic en el identificador MTS (MTS 1, MTS 2) para abrir la pantalla Procedimiento -Cambiar nombre de identificador MTS� Esta pantalla permite cambiar el nombre del MTS� En este ejemplo, el nombre se ha cambiado a A4� Pantalla 10: Pantalla Procedimiento - Cambiar nombre de identificador MTS Tabla 16. -
Page 124: Pantalla 11: Pantalla Procedimiento Durante Las Pruebas
Iniciar pruebas ADVERTENCIA: Si fuera necesario añadir una aguja durante un procedimiento, conecte la aguja a un canal abierto� Si no hay un canal abierto disponible, consulte en la sección Añadir una aguja CX durante un procedimiento de crioablación las instrucciones para añadir una aguja CX a un canal con un puerto abierto� Pulse el botón Iniciar para iniciar las pruebas de funcionalidad e integridad de la aguja�... -
Page 125: Pantalla 12: Pantalla Procedimiento Durante La Congelación
Elija una intensidad de congelación del menú o elija intensidad “Stick” (Varilla)� congelación NOTA: Para controlar la intensidad de congelación, el sistema de crioablación ICEfx ajusta la duración del flujo de argón en cada período de tiempo de 10 segundos (por ejemplo, si la intensidad de congelación es del 30%, se realiza la congelación durante 3 segundos y en los... -
Page 126: Pantalla 13: Historial De Canal Ampliado
La Pantalla 13 muestra el resultado de hacer clic en la barra del indicador de progreso� Pantalla 13: Historial de canal ampliado Iniciar un ciclo de descongelación (solo para agujas CX) PRECAUCIÓN: Las agujas sin funcionalidad CX no admiten la función i-Thaw ni función FastThaw� La liberación de la aguja de una bola de hielo únicamente será... -
Page 127: Pantalla 14: Pantalla Procedimiento Durante La Descongelación (Función Fastthaw)
Controles de descongelación Pantalla 14: Pantalla Procedimiento durante la descongelación (función FastThaw) Tabla 19. Controles de descongelación N.º Control Descripción Muestra el modo de descongelación seleccionado (función i-Thaw o función FastThaw)� NOTA: La función FastThaw genera una temperatura superior a la generada para la función i-Thaw, lo que conlleva un tiempo de descongelación más rápido�... - Page 128 PRECAUCIÓN: • Las agujas sin funcionalidad CX no admiten la función de cauterización para fines de ablación de trayectoria� • La función de cauterización no se debe poner en marcha si es posible ver el indicador de zona activa fuera de la piel del paciente�...
-
Page 129: Pantalla 15: Pantalla Función De Cauterización
Controles de la función cauterización Pantalla 15: Pantalla Función de cauterización Tabla 20. Controles de la función de cauterización N.º Control Descripción Botón PROCEDURE (Procedimiento): pulse para salir del modo de función de cauterización y volver a la pantalla Procedimiento � Botón Cauterización: pulse el botón Cauterización para escoger la duración de la cauterización�... -
Page 130: Pantalla 16: Lista De Tipos De Aguja
Selección de control de tipo de aguja 1� Para escoger o cambiar el tipo de aguja para un canal, pulse el botón Canal para mostrar la lista de tipos de aguja� Pantalla 16: Lista de tipos de aguja 2� Seleccione el tipo de aguja adecuado de la lista� Volver a probar una aguja Para volver a probar una aguja, pulse el botón Canal y luego pulse para reiniciar la prueba de la aguja�... -
Page 131: Pantalla 18: Diálogo Program Cycles (Programar Ciclos)
Programar ciclos de congelación-descongelación: 1� Para programar ciclos congelación-descongelación para un canal específico, pulse el botón de canal individual o el botón de canal ALL (Todos), y luego pulse PROGRAM CYCLES (Programar ciclos)� 2� Pulse NEW (Nuevo) en el diálogo Program Cycles (Programar ciclos)� Pantalla 18: Diálogo Program Cycles (Programar ciclos) La pantalla Programar ciclos muestra el canal seleccionado�... -
Page 132: Pantalla 20: Pantalla Guardar La Secuencia De Ciclo
La pantalla All Reports (Todos los informes) muestra una lista de todos los informes guardados en el sistema de crioablación ICEfx� Seleccione el informe que quiera ver y pulse VIEW REPORT (Ver informe)� Pantalla 21: Pantalla All Reports (Todos los informes) Cuando se selecciona un informe de la Pantalla All Reports (Todos los informes), el informe que muestra ofrece las opciones de eliminar o exportar el informe�... -
Page 133: Pantalla 22: Informe De Procedimiento
Elegir un informe Para ordenar la lista por Report Name (Nombre del informe), Hospital Name (Nombre del hospital), Doctor Name (Nombre del médico) u Organ Type (Tipo de órgano), pulse la sección del encabezamiento de la lista del informe� Exportar un informe En la pantalla All Reports (Todos los informes), pulse VIEW REPORT (Ver informe) para ver el informe que quiera exportar�... -
Page 134: Configuración De Los Ajustes
Solo el personal administrativo o de servicio técnico puede modificar la zona horaria� horaria) El sistema de crioablación ICEfx ajusta de forma automática el horario de verano. Volume Units Escoja las unidades del volumen del cilindro de argón según el estándar de la región (Unidades de geográfica�... - Page 135 Ajuste Descripción Button Sound Click Seleccione On (Encendido) u Off (Apagado) en el sonido de clic cuando se pulsa un botón� (Sonido de clic de los botones) MTS Display Coldest Seleccione On (Encendido) u Off (Apagado) en la visualización de la ubicación más fría del (Visualización más MTS�...
-
Page 136: Tabla 22. Pantalla Settings (Ajustes) - Botones De Control
Actualización manual del software Los usuarios administrativos y de mantenimiento pueden actualizar manualmente el software del sistema de crioablación ICEfx mediante la unidad flash USB suministrada por Boston Scientific� 1� Pulse el botón ADMIN (Administración) en la pantalla Settings (Ajustes)�... -
Page 137: Intervención
Modo de demostración Modo de demostración es solo para fines de formación� Seleccione Demo Mode (Modo de demostración) y haga clic debajo del indicador de gas argón para simular la presión del argón� No fluirá gas ni se formarán bolas de hielo� Para eliminar la presión simulada, vuelva a hacer clic� La funcionalidad de cauterización y descongelación no calentará... -
Page 138: Prueba Preprocedimiento De La Aguja/Mts
Prueba preprocedimiento de la aguja/MTS ADVERTENCIA: Antes de iniciar una intervención de crioablación, configure el sistema de crioablación ICEfx (consulte la sección Configuración del sistema) y, a continuación, realice las pruebas de integridad y funcionalidad de la aguja� Las pruebas deben completarse con éxito para poder iniciar la intervención�... -
Page 139: Figura 14. Bloqueo De La Aguja En El Canal
Un botón de canal gris oscuro indica un canal con agujas conectadas� Para agujas CX, el sistema de crioablación ICEfx detecta automáticamente el tipo de aguja que se usa, el número de lote y la fecha de caducidad del producto� Si el sistema detecta que ha pasado la fecha de caducidad, aparece un mensaje que indica que la aguja ha caducado y el flujo de gas a ese canal está... - Page 140 En este momento, las agujas están listas para utilizarse� 10� Al utilizar los MTS, prepare el número de sensores deseado para la prueba� El sistema de crioablación ICEfx acepta el uso de dos sensores térmicos�...
-
Page 141: Inicio Del Procedimiento De Crioablación
(p. ej., toallas) o de emplear otro método para evitar que el tubo de la aguja toque la piel del paciente� ADVERTENCIA: Si se conecta una aguja CX sin funcionalidad al sistema de crioablación ICEfx, no es posible la descongelación activa� La liberación de la aguja de una bola de hielo únicamente será posible con descongelación pasiva�... - Page 142 2� Pulse el botón Congelar en los canales seleccionados que contengan agujas para escoger la intensidad de la congelación, y luego pulse el botón Iniciar para iniciar la fase de congelamiento inicial del procedimiento� Si desea más información relacionada con el congelamiento, consulte la sección Iniciar un ciclo de congelación� Para ajustar la intensidad de congelación, pulse el botón Congelar y seleccione el modo deseado de intensidad del menú�...
-
Page 143: Añadir Una Aguja Cx Durante Un Procedimiento De Crioablación
Si no hay canales abiertos, utilice el siguiente procedimiento para añadir una aguja CX� PRECAUCIÓN: Boston Scientific recomienda utilizar únicamente agujas del mismo tipo en cada canal individual� El uso de distintos tipos de agujas en un canal puede afectar la precisión del indicador de gas. -
Page 144: Cambio De Los Cilindros De Argón Durante Un Procedimiento
5� Una vez completada la prueba, desbloquee el canal y vuelva a conectar la aguja retirada de la consola en el paso 2. 6� Bloquee el canal y continúe con el procedimiento de crioablación� Añadir una aguja que no sea CX durante un procedimiento de crioablación Si fuera necesario añadir agujas adicionales durante un procedimiento de crioablación, añádala en un canal abierto, bloquee la aguja en el canal y realice la prueba�... -
Page 145: Apagado Del Sistema
APAGADO DEL SISTEMA Apagado del sistema ADVERTENCIA: Antes de ventilar el sistema de crioablación ICEfx, avise al personal encargado de llevar a cabo el procedimiento para que esté advertido� 1� Si no se purgó la consola al final del procedimiento, realice estos pasos para purgar el sistema�... -
Page 146: Después De La Intervención
Todas las superficies externas y accesibles de este dispositivo deben limpiarse según las instrucciones de limpieza del sistema de crioablación ICEfx incluidas en el Manual del usuario� Incluya cables desmontables comunes (cable de alimentación, cables de vídeo, cables de parches, etc�)� Revise el Manual del usuario para identificar si hay materiales peligrosos presentes�... -
Page 147: Resolución De Problemas
El dispositivo se debe desechar en condiciones seguras, de acuerdo con las normas hospitalarias, administrativas o de las autoridades locales, o devolver a Boston Scientific� Para obtener un kit de producto devuelto, póngase en contacto con el Centro de asistencia técnica de Boston Scientific�... - Page 148 ENCIENDE (es decir, ENCIENDA el sistema� el ventilador no se 2� El cable de alimentación a la consola de crioablación ICEfx está desconectado del pone en marcha) o enchufe de alimentación o del panel posterior de la consola� Conecte el cable de se apaga durante la alimentación a la consola y verifique que el mismo queda bien conectado�...
-
Page 149: Sustitución De Los Fusibles
Póngase en contacto con el centro de asistencia técnica de Boston Scientific para obtener los fusibles de repuesto necesarios para este procedimiento� Apague el interruptor en la parte posterior de la consola de crioablación ICEfx� Tire del mecanismo de retención del cable rojo para desconectar el cable de alimentación de la entrada de corriente�... - Page 150 Instrucción Fotografía Introduzca un pequeño destornillador en la ranura en la parte superior del portafusibles y baje la tapa del mismo� Introduzca un pequeño destornillador por debajo del borde del portafusibles para retirarlo de la entrada de corriente� Coloque la mano por debajo del portafusibles y deslice con cuidado el mismo para extraerlo de la entrada�...
- Page 151 ICEfx� Enchufe el cable de alimentación� Llame al Centro de asistencia técnica de Boston Scientific para programar una visita de mantenimiento con el fin de determinar la causa de que el fusible se haya fundido y si hace falta una reparación, y de hacer un pedido de fusibles de repuesto�...
- Page 152 2� Realice de nuevo la prueba de integridad y funcionalidad de las agujas en la gas con los botones aguja� Prueba, Congelación o 3� Póngase en contacto con el Centro de asistencia técnica de Boston Scientific� Descongelación Black (K) ∆E ≤5.0...
- Page 153 2� Es posible que la barra de bloqueo presente defectos� Cambie la aguja a otro canal� agujas en la posición de Póngase en contacto con el Centro de asistencia técnica de Boston Scientific para bloqueo programar una visita de servicio técnico�...
- Page 154 • Cierre la válvula del cilindro y purgue el gas del sistema de crioablación ICEfx cilindro y de la línea de suministro de gas mediante la válvula Vent (Purga) (Figura 3).
-
Page 155: Mensajes En Pantalla
Scientific� Mensajes en pantalla El sistema de crioablación ICEfx muestra un mensaje en la interfaz del usuario cuando un usuario pide asistencia o cuando se detectan errores del sistema, de la aguja o del usuario� NOTA: Registre y notifique el número de mensaje (p. ej., 10-01, 80-02) si necesita la intervención del Centro de asistencia técnica de Boston Scientific�... - Page 156 Motivo por el que aparece/Soluciones 10-03 Reset Password Challenge Motivo por el que aparece: • To reset your password, contact Boston Scientific Technical El usuario olvidó la contraseña, pulsó el botón Assistance Center Forgot Password (¿Olvidó la contraseña?) y recibió...
- Page 157 Motivo por el que aparece: • You have not entered the correct response El usuario ha intentado acceder al Inicio de sesión • Contact Boston Scientific Technical Assistance Center for a de emergencia y no ha respondido correctamente Response to the on-screen Challenge a la pregunta de control�...
- Page 158 Mensaje Motivo por el que aparece/Soluciones 20-02 Argon Shut Off Valve Motivo por el que aparece: • The argon shut off valve may be closed En la puesta en marcha del sistema, el sistema detectó • Check and open if necessary que el gas estaba conectado, pero no entra gas en el 20-02 Válvula de cierre de argón...
- Page 159 Mensaje Motivo por el que aparece/Soluciones 20-18 System Shutdown Motivo por el que aparece: • You selected to control all needles simultaneously El usuario ha seleccionado Shutdown (Apagar) en la pantalla de Inicio de sesión para apagar el sistema� • Do you want to initiate [x%] freeze for all active needles now? Soluciones: Confirme que desea apagar el sistema�...
- Page 160 1� Desconecte y aísle la aguja� 2� Conecte una aguja de un tipo admitido y seleccione el tipo en el menú desplegable� 3� Póngase en contacto con el Centro de asistencia técnica de Boston Scientific para obtener más información� 40-03 Recalled Needle Motivo por el que aparece: •...
- Page 161 1� Vuelva a intentar la actualización� • Vuelva a intentar la actualización 2� Póngase en contacto con el Centro de asistencia técnica de Boston Scientific si no se puede completar la actualización� 60-02 Update Failed Motivo por el que aparece: •...
- Page 162 60-03 Software incompatible Soluciones: • El software del sistema de crioablación ICEfx no es 1� Si precisa asistencia adicional, póngase en contacto compatible con aprobaciones normativas con el Centro de asistencia técnica de Boston Scientific�...
- Page 163 • Es posible que dicha unidad no esté conectada o que suficiente espacio� esté llena 2� Si precisa asistencia adicional, póngase en contacto con el Centro de asistencia técnica de Boston Scientific� Mensajes de información Mensaje Motivo por el que aparece/Soluciones...
- Page 164 Espere unos segundos y vuelva a conectar la unidad al mismo puerto� 2� Si el problema persiste, póngase en contacto con el Centro de asistencia técnica de Boston Scientific para obtener una unidad flash USB de sustitución� Mensajes del sistema NOTA: Los mensajes de error del sistema se muestran en el centro de la barra de títulos�...
- Page 165 2� Purgue el sistema con la válvula Vent (Purga)� 80-04 Temperature Warning Motivo por el que aparece: • The internal temperature of the ICEfx Cryoablation System La temperatura interna del sistema superó los exceeds appropriate operating limits límites de funcionamiento adecuados�...
- Page 166 Motivo por el que aparece: • Channel X is defective� Choose another channel� At the Se ha detectado un solenoide defectuoso en el conclusion of the procedure, contact Boston Scientific canal X; debería seleccionarse otro canal� Technical Assistance Center� Soluciones:...
- Page 167 90-02 Service Due Motivo por el que aparece: • Service for the ICEfx Cryoablation System is past due No se ha realizado el mantenimiento del sistema de • Contact Boston Scientific Technical Assistance Center crioablación ICEfx en la fecha programada� Durante los...
-
Page 168: Especificaciones Del Sistema
System End of Life Motivo por el que aparece: • The ICEfx Cryoablation System is at the end of El sistema de crioablación ICEfx ha llegado al final de su operational life vida operativa� • Contact Boston Scientific Technical Assistance Center... -
Page 169: Funcionamiento Esencial
±5 segundos en cualquier intervalo de 10 minutos Funcionamiento esencial El funcionamiento esencial del sistema de crioablación ICEfx se define como: • La capacidad de encender o apagar el flujo o argón a las agujas de crioablación conectadas a través de las entradas desde la interfaz del usuario •... -
Page 170: Información De Asesoramiento Para El Paciente
• Comente los riesgos y beneficios, incluida la revisión de los posibles episodios adversos enumerados en las instrucciones de uso del sistema de crioablación ICEfx, de los productos accesorios utilizados para realizar las intervenciones de crioablación y de otros tratamientos intervencionistas que probablemente se utilicen�... - Page 171 Moniteur à écran tactile ���������������������������������������������������������������������������������������������������������������������������������������� 177 Chariot de cryoablation ICEfx ��������������������������������������������������������������������������������������������������������������������������������178 Figure 3� Chariot de cryoablation ICEfx �����������������������������������������������������������������������������������������������������������179 Figure 4� Chariot de cryoablation ICEfx - Leviers de blocage des roues ���������������������������������������������������������179 Principe de fonctionnement ���������������������������������������������������������������������������������������������������������������������������������179 Matériel ���������������������������������������������������������������������������������������������������������������������������������������������������������������� 180 Apyrogène ����������������������������������������������������������������������������������������������������������������������������������������������������������� 180 Informations relatives aux utilisateurs�����������������������������������������������������������������������������������������������������������������...
- Page 172 Configuration du système �������������������������������������������������������������������������������������������������������������������������������������195 Tableau 6. Déroulement de la configuration du système �������������������������������������������������������������������������������195 Figure 5� Placez la console de cryoablation ICEfx sur le chariot ��������������������������������������������������������������������� 196 Figure 6� Resserrage de la vis de retenue sur le chariot �������������������������������������������������������������������������������� 196 Figure 7� Vanne d’arrêt de l’argon - position ON (OUVERTE) ��������������������������������������������������������������������������197 Figure 8�...
- Page 173 Tableau 15. Commandes MTS ������������������������������������������������������������������������������������������������������������������������209 Écran 10 : Écran de procédure – Modifier le nom d’identification du MTS ����������������������������������������������������� 210 Tableau 16. Modifier le nom du MTS ������������������������������������������������������������������������������������������������������������� 210 Écran 11 : Écran de procédure pendant les tests ��������������������������������������������������������������������������������������������� 211 Tableau 17. Commandes de test ��������������������������������������������������������������������������������������������������������������������� 211 Lancement d’un cycle de congélation ������������������������������������������������������������������������������������������������������������������...
- Page 174 Figure 15� Valve Vent (Décharge des gaz) - Complètement ouverte ���������������������������������������������������������������231 Figure 16. (identique à la Figure 8) Valve Vent (Décharge des gaz) - Complètement fermée ����������������������� 232 Après la procédure ����������������������������������������������������������������������������������������������������������������������������������������������� 233 Nettoyage du système de cryoablation ICEfx ������������������������������������������������������������������������������������������������������ 233 Mise au rebut ������������������������������������������������������������������������������������������������������������������������������������������������������� 233 DÉPANNAGE �������������������������������������������������������������������������������������������������������������������������������������������������������������� 233 Récupération du logiciel ��������������������������������������������������������������������������������������������������������������������������������������...
-
Page 175: Mise En Garde Concernant La Réutilisation
Un (1) cordon d’alimentation Un (1) couvercle de console : le couvercle de la console sert à protéger la console de cryoablation ICEfx pendant son stockage� Un (1) lecteur mémoire flash USB (4 Go) avec son étui : le lecteur mémoire flash USB sert à transférer les rapports de procédure sur l’ordinateur d’un client à... -
Page 176: Console De Cryoablation Icefx
Console de cryoablation ICEfx La console de cryoablation ICEfx est une unité de cryoablation portable à poser sans hélium� L’avant de la console comporte quatre canaux de connexion d’aiguilles (chacun comprenant deux ports d’aiguille), deux ports de capteurs Multi-Point 1�5 Thermal Sensor (MTS) et un moniteur à écran tactile encastré de 10,1 inch�... -
Page 177: Moniteur À Écran Tactile
Ports de connexion MTS Deux ports de connexion MTS sont situés au dessus des canaux de connexion d’aiguilles pour prendre en charge la connexion du MTS Boston Scientific utilisé pour contrôler la température à l’intérieur et autour du site ciblé par la cryoablation�... -
Page 178: Interrupteur D'alimentation
GAS ON (GAZ OUVERT)� Ne fermez la vanne de l’argon qu’en cas d’urgence� Valve Vent (Décharge des gaz) La valve Vent (Décharge des gaz) sert à purger le gaz argon haute pression de la console de cryoablation ICEfx� Arrivée d’argon La tubulure d’alimentation en gaz connecte la réserve de gaz argon de la bouteille à... -
Page 179: Principe De Fonctionnement
Figure 4. Chariot de cryoablation ICEfx - Leviers de blocage des roues Principe de fonctionnement Le système de cryoablation ICEfx est un système portable destiné à la destruction de tissus par cryoablation à l’aide d’une procédure mini-invasive� Le système est piloté par ordinateur à l’aide d’une interface utilisateur à écran tactile, qui permet de commander et de surveiller la procédure�... -
Page 180: Matériel
Informations relatives aux utilisateurs Le système de cryoablation ICEfx est conçu pour être manipulé par des professionnels de la santé qui ont une connaissance approfondie des principes techniques, des applications cliniques et des risques associés aux procédures de cryoablation�... -
Page 181: Indications
MISES EN GARDE Généralités • Le système de cryoablation ICEfx est conçu pour être manipulé par des professionnels de la santé qui ont une connaissance approfondie des principes techniques, des applications cliniques et des risques associés aux procédures de cryoablation�... - Page 182 • Ne connectez pas le système de cryoablation ICEfx à une alimentation en gaz supérieure à 6 000 psi (414 bar, 41,4 MPa) pour éviter d’endommager les composants internes du système. • Le système de cryoablation ICEfx ne doit pas être utilisé en présence de vapeurs inflammables telles que des anesthésiques inflammables ou des substances volatiles�...
- Page 183 être utilisé à une distance inférieure à 30 cm (12 in) de toute pièce du système de cryoablation ICEfx, y compris des câbles spécifiés pour être utilisés avec le système. Le non-respect de cette précaution peut provoquer une dégradation des performances de l’équipement�...
-
Page 184: Précautions
Dégager l’aiguille d’un glaçon ne sera réalisable qu’avec une décongélation passive� Utilisez le guidage par imagerie pour assurer une décongélation adéquate� • Ne touchez pas la console de cryoablation ICEfx pendant que vous touchez le patient afin de lui éviter tout choc électrique en cas d’anomalie électrique accidentelle�... - Page 185 • Abaissez ou faites pivoter le moniteur à écran tactile avec prudence pour éviter de vous pincer les doigts� • Si la console est fixée sur le chariot de cryoablation ICEfx, utilisez les poignées du chariot pour soulever le système afin de franchir tout seuil d’une hauteur supérieure à 2 cm. Deux personnes, une de chaque côté, doivent soulever le système par les poignées�...
-
Page 186: Événements Indésirables
• Les aiguilles dépourvues de la fonctionnalité CX ne prennent pas en charge les fonctions i-Thaw ou FastThaw� Dégager l’aiguille d’un glaçon n’est réalisable qu’avec une décongélation passive� • Les aiguilles dépourvues de la fonctionnalité CX ne prennent pas en charge la fonction de cautérisation dans le cadre d’une « track ablation ». - Page 187 • Hernie • Hypertension • Hypotension • Hypothermie • Iléus • Impuissance • Infection/abcès/septicémie • Inflammation • Spasmes musculaires • Infarctus du myocarde • Nécrose • Nécessité d’une intervention ou d’une chirurgie supplémentaire • Lésion nerveuse • Neuropathie • Obstruction •...
-
Page 188: Conformité Aux Normes
émissions accrues ou une immunité réduite du système de cryoablation ICEfx� MISE EN GARDE : Le système de cryoablation ICEfx ne doit pas être utilisé près d’un autre équipement ni empilé dessus�... -
Page 189: Tableau 2. Émissions Électromagnétiques
Le système de cryoablation ICEfx est conçu pour être utilisé dans l’environnement électromagnétique d’un établissement de santé professionnel répondant aux niveaux de conformité indiqués ci-dessous� Le client ou l’utilisateur du système de cryoablation ICEfx doit veiller à ce qu’il soit utilisé dans un environnement de cette nature�... -
Page 190: Tableau 3. Immunité Électromagnétique
Le système de cryoablation ICEfx est conçu pour être utilisé dans l’environnement électromagnétique d’un établissement de santé professionnel répondant aux niveaux de conformité en matière d’immunité indiqués ci-dessous� Le client ou l’utilisateur du système de cryoablation ICEfx doit veiller à ce qu’il soit utilisé dans un environnement de cette nature�... -
Page 191: Tableau 4. Immunité Électromagnétique Des Systèmes Hors Assistance Vitale
Pour évaluer l’environnement électromagnétique dû à des émetteurs RF fixes, un relevé des émissions électromagnétiques du site doit être envisagé� Si la puissance du champ à l’emplacement où le système de cryoablation ICEfx est utilisé dépasse le niveau de conformité... -
Page 192: Et Mobile Et Le Système De Cryoablation Icefx
Distances de séparation recommandées entre l’équipement de communication RF portable et mobile et le système de cryoablation ICEfx Le système de cryoablation ICEfx est destiné à être utilisé dans un environnement électromagnétique où les perturbations RF sont contrôlées� Le client ou l’utilisateur du système de cryoablation ICEfx peut contribuer à... -
Page 193: Présentation
PRÉSENTATION Détails concernant le dispositif Le système de cryoablation ICEfx est livré non stérile� Les accessoires Boston Scientific nécessaires pour effectuer la procédure de cryoablation sont fournis séparément� Ne pas utiliser si l’emballage est endommagé ou a été ouvert accidentellement avant utilisation�... -
Page 194: Instructions D'utilisation
INSTRUCTIONS D’UTILISATION MISE EN GARDE : Le système de cryoablation ICEfx est conçu pour être utilisé par des professionnels de la santé ayant une connaissance approfondie des principes techniques, des applications cliniques et des risques associés aux procédures de cryoablation� Des formations optionnelles sont disponibles auprès de votre représentant Boston Scientific�... -
Page 195: Installation, Étalonnage Et Entretien
à préserver les performances et la sécurité du système� MISE EN GARDE : Ne modifiez en aucun cas le système de cryoablation ICEfx� Seul le personnel autorisé de Boston Scientific ou le personnel autorisé formé par Boston Scientific est habilité à réparer les systèmes de cryoablation ICEfx�... - Page 196 Fixation de la console au chariot de cryoablation ICEfx 1� Placez la console sur le chariot de cryoablation ICEfx� Le creux à la base de la console repose sur le dôme du dessus du chariot de cryoablation ICEfx� Figure 5. Placez la console de cryoablation ICEfx sur le chariot 2�...
- Page 197 à la terre� Boston Scientific conseille d’utiliser une prise stable et ininterruptible� REMARQUE : Si l’alimentation électrique du système de cryoablation ICEfx est instable ou bruyante, les valeurs de température des MTS peuvent être inexactes� MISE EN GARDE : Pour éviter tout risque de choc électrique, cet équipement doit être raccordé exclusivement à...
- Page 198 Service clientèle� Consultez la section Messages affichés pour plus d’informations sur les messages affichés� Si le logiciel du système de cryoablation ICEfx détecte du gaz sous pression dans le système alors que la tubulure d’alimentation en gaz n’est pas raccordée, un message vous invite à décharger le gaz du système�...
-
Page 199: Raccordement De L'argon
Une fois la connexion réussie, l’ écran Start Case (Démarrer le cas) s’affiche (écran 4). Raccordement de l’argon MISE EN GARDE : Ne connectez pas le système de cryoablation ICEfx à une alimentation en gaz supérieure à 6 000 psi (414 bar, 41,4 MPa) pour éviter d’endommager les composants internes du système. - Page 200 4� Raccordez la tubulure d’alimentation d’argon haute pression à l’arrivée d’argon de la console à l’aide du raccord rapide situé au dos de la console� (voir Figure 10)� Figure 10. Raccordement de la tubulure d’alimentation en argon 5� Raccordez la tubulure d’alimentation en argon haute pression à la bouteille d’argon en fixant l’adaptateur du manomètre sur le raccord de la bouteille (voir Figure 11)�...
- Page 201 FACULTATIF : L’adaptateur pour deux bouteilles EZ-Connect2 raccorde deux bouteilles d’argon à la console pour prendre en charge une procédure de cryoablation� Un adaptateur à quatre voies avec manomètre de pression de l’argon se raccorde à une tubulure d’alimentation en gaz, à la bouteille de gaz principale et à une tubulure d’alimentation en gaz auxiliaire� Si vous utilisez l’adaptateur pour deux bouteilles EZ-Connect2, raccordez la tubulure d’alimentation en gaz avec l’adaptateur de manomètre à...
-
Page 202: Écran 1 : Manomètre
Pour obtenir un fonctionnement optimal, remplacez la bouteille d’argon lorsque la pression descend en dessous de la limite basse de pression de service� • L’utilisation de la console de cryoablation ICEfx en dehors des limites de pression de service peut affecter la formation de glaçons�... -
Page 203: Navigation Dans L'interface Utilisateur
Manomètre Affiche la pression fournie de la bouteille d’argon� REMARQUE : Le système de cryoablation ICEfx contient des régulateurs internes qui régulent la pression de l’argon selon les limites de service appropriées� Le manomètre s’actualise en temps réel lorsque des aiguilles sont déconnectées ou que des aiguilles supplémentaires sont connectées et lorsque l’intensité... -
Page 204: Menu D'options
Menu d’options Le menu d’options permet d’accéder à des fonctionnalités supplémentaires, telles que l’accès aux rapports et la modification des paramètres� Pour afficher et sélectionner des options, appuyez sur l’icône en haut à gauche de l’écran et sélectionnez l’option souhaitée dans le menu étendu� Écran 3 : Menu d’options Tableau 9. -
Page 205: Écran 4 : Écran Start Case (Démarrer Le Cas)
Démarrage de la procédure Une fois connecté au système, l’écran Start case (Démarrer le cas) s’affiche� Appuyez sur START CASE (DÉMARRER LE CAS) pour commencer une procédure de cryoablation� Lorsque l’utilisateur appuie sur START CASE (DÉMARRER LE CAS), l’ écran Select Tissue Type (Sélectionner le type de tissu) s’affiche� Sélectionnez un organe� L’assistant de démarrage de cas est alors activé�... -
Page 206: Écran 6 : Edit Case Information (Modifier Les Informations Sur Le Cas)
Saisie des informations sur le cas Utilisez l’ écran Edit Case Information (Modifier les informations sur le cas) pour saisir des informations supplémentaires sur la procédure de cryoablation� Ceci est une étape facultative� L’ écran Edit Case Information (Modifier les informations sur le cas) s’affiche au début et à la fin d’une procédure de cryoablation�... -
Page 207: Écran 7 : Écran Procedure (Procédure) Initial
Utilisation de l’écran procédure Utilisez l’ écran procédure pour contrôler et surveiller une procédure de cryoablation� Initialement, seules les commandes relatives au test de l’aiguille sont affichées comme indiqué dans l’écran 7� Une fois les tests d’intégrité et de fonctionnement de l’aiguille terminés, les commandes de congélation (écran 12) et de décongélation (écran 13) sont activées pour les aiguilles testées�... -
Page 208: Écran 8 : Chronomètre Pendant La Fonction Fastthaw
Affichage du chronomètre Le chronomètre affiche le temps écoulé pendant la congélation ou la décongélation� Le chronomètre démarre le compte à rebours à deux minutes pendant le test� Le chronomètre démarre le compte à rebours à la durée sélectionnée pendant la cautérisation� Les parties supérieures gauche et droite du chronomètre fournissent des données supplémentaires pour les fonctions de congélation, de décongélation et de cautérisation�... -
Page 209: Mts
Nº Commande Description Indicateur de Pour les aiguilles CX, la partie supérieure droite du chronomètre affiche les données de température température pour la fonction active : • Test - Affiche la température de l’aiguille� • Congélation - Affiche la température interne du gaz à l’extrémité de l’aiguille� •... -
Page 210: Écran 10 : Écran De Procédure - Modifier Le Nom D'identification Du Mts
Modification de l’identifiant du MTS Cliquez sur l’identifiant du MTS (MTS 1, MTS 2) pour ouvrir l’ écran de procédure - Modifier le nom d’identification du MTS� Cet écran permet de modifier le nom du MTS� Dans cet exemple, le nom est remplacé par A4� Écran 10 : Écran de procédure –... -
Page 211: Écran 11 : Écran De Procédure Pendant Les Tests
Lancement des tests MISE EN GARDE : Si une aiguille doit être ajoutée pendant une procédure, connectez l’aiguille à un canal ouvert� Si aucun canal ouvert n’est disponible, consultez la section Ajouter une aiguille CX au cours d’une procédure de cryoablation pour connaître les instructions instructions relatives à l’ajout d’une aiguille CX à un canal comportant un port ouvert�... -
Page 212: Écran 12 : Écran De Procédure Pendant La Congélation
Sélectionnez une intensité de congélation dans le menu ou sélectionnez l’intensité de la fonction « Stick » (Collage). REMARQUE : Le système de cryoablation ICEfx commande l’intensité de congélation en ajustant la durée du débit d’argon sur chaque bloc temporel de 10 secondes (p. ex., une intensité... -
Page 213: Écran 13 : Historique De Tous Les Canaux
L’Écran 13 affiche le résultat lorsque vous cliquez sur la barre de l’indicateur de progression. Écran 13 : Historique de tous les canaux Lancement d’un cycle de décongélation (aiguilles CX uniquement) AVERTISSEMENT : Les aiguilles dépourvues de la fonctionnalité CX ne prennent pas en charge les fonctions i-Thaw ni FastThaw�... -
Page 214: Écran 14 : Écran De Procédure Pendant La Congélation (Fonction Fastthaw)
Commandes de décongélation Écran 14 : Écran de procédure pendant la congélation (fonction FastThaw) Tableau 19. Commandes de décongélation Nº Commande Description Affiche le mode de décongélation actuellement sélectionné (i-Thaw ou FastThaw)� REMARQUE : La fonction FastThaw génère une température supérieure à celle produite par la fonction i-Thaw, réduisant ainsi le délai de décongélation�... - Page 215 AVERTISSEMENT : • Les aiguilles dépourvues de la fonctionnalité CX ne prennent pas en charge la fonction de cautérisation dans le cadre d’une « track ablation ». • La fonction de cautérisation ne doit pas être lancée si l’indicateur de zone active est visible à l’extérieur de la peau du patient�...
-
Page 216: Écran 15 : Écran De La Fonction De Cautérisation
Commandes de cautérisation Écran 15 : Écran de la fonction de cautérisation Tableau 20. Commandes de cautérisation Nº Commande Description Bouton PROCEDURE (PROCÉDURE) – Appuyez sur ce bouton pour quitter le mode de cautérisation et revenir à l’ écran de procédure � Bouton Cautérisation – Appuyez sur le bouton Cautérisation pour sélectionner la durée de cautérisation�... -
Page 217: Écran 16 : Liste Des Types D'aiguille
Commande Select Needle Type (Sélectionner le type d’aiguille) 1� Pour sélectionner ou changer le type d’aiguille pour un canal, appuyez sur le bouton Canal pour afficher la liste des types d’aiguilles� Écran 16 : Liste des types d’aiguille 2� Sélectionnez le type d’aiguille approprié dans la liste� Retester une aiguille Pour retester une aiguille, appuyez sur le bouton Canal, puis appuyez sur pour lancer un nouveau test... -
Page 218: Écran 18 : Boîte De Dialogue Program Cycles (Programmer Des Cycles)
Pour programmer des cycles de congélation-décongélation : 1� Pour programmer les cycles de congélation-décongélation pour un canal spécifique, appuyez sur le bouton d’un canal individuel ou sur le bouton des canaux ALL (TOUS), puis appuyez sur PROGRAM CYCLES (PROGRAMMER DES CYCLES)� 2�... -
Page 219: Écran 20 : Écran D'enregistrement De La Séquence Des Cycles
L’ écran All Reports (Tous les rapports) affiche la liste de tous les rapports enregistrés dans le système de cryoablation ICEfx� Sélectionnez le rapport que vous voulez afficher et appuyez sur VIEW REPORT (AFFICHER LE RAPPORT)� Écran 21 : Écran All Reports (Tous les rapports) Lorsqu’un rapport est sélectionné... -
Page 220: Écran 22 : Rapport De Procédure
Exportation d’un rapport Dans l’ écran All Reports (Tous les rapports) , appuyez sur VIEW REPORT (AFFICHER LE RAPPORT) pour afficher le rapport à exporter� Dans l’ écran View Report (Afficher le rapport) , cliquez sur EXPORT (EXPORTER) pour exporter les détails du rapport et sélectionnez le type et le nom du fichier d’exportation�... - Page 221 Le fuseau horaire peut être modifié par le personnel administratif ou de maintenance� (Fuseau horaire) Le système de cryoablation ICEfx s’ajuste automatiquement à l’heure d’été� Volume Units Sélectionnez les unités de volume de la bouteille d’argon conformément à la norme en (Unités de volume)
-
Page 222: Tableau 22. Écran Settings (Paramètres) - Boutons De Commande
Les administrateurs et les utilisateurs de maintenance peuvent mettre à jour manuellement le logiciel du système de cryoablation ICEfx par le biais du lecteur mémoire flash USB fourni par Boston Scientific� 1� Appuyez sur le bouton ADMIN (ADMINISTRATEUR) dans l’ écran Settings (Paramètres) �... -
Page 223: Procédure
Le mode de démonstration est désactivé lorsque vous éteignez l’appareil ou lorsque vous cliquez à nouveau sur le bouton Demo Mode (Mode de démonstration)� Procédure Réalisation de la procédure de cryoablation Le Tableau 23 décrit les étapes à suivre pour tester les aiguilles de cryoablation et les capteurs MTS et réaliser la procédure de cryoablation�... -
Page 224: Test De L'aiguille/Des Mts Avant La Procédure
Test de l’aiguille/des MTS avant la procédure MISE EN GARDE : Avant de commencer une procédure de cryoablation, installez le système de cryoablation ICEfx (consultez la section Configuration du système), puis procédez aux tests d’intégrité et de fonctionnement des aiguilles� Les tests doivent être réalisés avec succès pour pouvoir commencer la procédure�... - Page 225 Un bouton de canal gris foncé indique un canal avec des aiguilles connectées� Pour les aiguilles CX, le système de cryoablation ICEfx détecte automatiquement le type d’aiguille utilisé, le numéro de lot et la date de péremption du produit Si le système détecte que la date de péremption est dépassée, un message indique que l’aiguille est périmée et le débit de gaz vers ce canal est désactivé�...
- Page 226 REMARQUE : Pour les aiguilles CX, si une aiguille testée précédemment est déplacée vers un nouveau canal au cours d’une procédure, le système de cryoablation ICEfx reconnaîtra l’aiguille comme ayant réussi le test de fonctionnalité et d’intégrité� Pendant le test, observez attentivement le comportement suivant de chaque aiguille : Rinçage :...
-
Page 227: Réalisation D'une Procédure De Cryoablation
(comme des serviettes) ou toute autre méthode afin d’éviter que la tubulure de l’aiguille ne touche la peau du patient� MISE EN GARDE : Si une aiguille dépourvue de la fonctionnalité CX est connectée au système ICEfx, la décongélation active n’est pas possible� Dégager l’aiguille d’un glaçon ne sera réalisable qu’avec une décongélation passive�... -
Page 228: Écran 24 : Argon Remaining (Argon Restant)
Écran 24 : Argon Remaining (Argon restant) 2� Appuyez sur le bouton Congélation sur les canaux sélectionnés contenant des aiguilles pour sélectionner l’intensité de congélation, puis appuyez sur le bouton Démarrer pour commencer la phase de congélation initiale de la procédure� Consultez la section Démarrer un cycle de congélation pour plus d’informations sur la congélation�... - Page 229 8. Répétez les étapes 2 à 6 jusqu’à ce que le nombre voulu de cycles de congélation-décongélation soit effectué. 9� FACULTATIF : Appuyez sur le bouton Canal, puis sélectionnez Program Cycles (Programmer des cycles) pour programmer des cycles de congélation-décongélation pour un canal individuel� Consultez la section Command Program Cycles (Programmer des cycles) pour plus d’informations sur la programmation des cycles de congélation-décongélation�...
-
Page 230: Ajout D'une Aiguille Cx Pendant Une Procédure De Cryoablation
S’il n’y a aucun canal ouvert, utilisez la procédure suivante pour ajouter une nouvelle aiguille CX� AVERTISSEMENT : Boston Scientific conseille de placer uniquement des aiguilles de même type dans un même canal� L’utilisation d’aiguilles de types différents dans un canal peut affecter la précision du manomètre�... -
Page 231: Arrêt Du Système
ARRÊT DU SYSTÈME Arrêter le système MISE EN GARDE : Avertissez le personnel de la salle d’opération avant de purger le système de cryoablation ICEfx pour éviter de le surprendre� 1� Si la décharge de gaz de la console n’a pas été effectuée en fin de procédure, purgez le système en procédant comme suit�... - Page 232 8� Nettoyez le système après chaque utilisation selon les instructions décrites à la section Nettoyage du système de cryoablation ICEfx� Vérifiez que le système est sec avant de le ranger� 9� Abaissez le moniteur à écran tactile dans son compartiment de rangement avant de ranger le système�...
-
Page 233: Après La Procédure
Le dispositif doit être mis au rebut en toute sécurité conformément aux réglementations hospitalières, administratives et/ou gouvernementales locales ou il doit être renvoyé à Boston Scientific� Pour obtenir un kit de retour de produit, contactez le centre d’assistance technique de Boston Scientific�... -
Page 234: Récupération Du Logiciel
Récupération du logiciel En cas de détérioration ou de défaillance du logiciel, celui-ci peut être restauré à la version précédente� Les administrateurs et les utilisateurs de maintenance peuvent mettre à jour le logiciel avec un lecteur mémoire flash USB approprié� 1�... - Page 235 (Figure 2). Mettez l’alimentation en marche. le ventilateur ne 2. Le câble d’alimentation de la console de cryoablation ICEfx est débranché de la prise tourne pas) ou murale ou du panneau arrière de la console. Branchez le câble d’alimentation à la console, l’alimentation est...
-
Page 236: Remplacement Des Fusibles
Remplacement des fusibles Instruction Photo Contactez le centre d’assistance technique de Boston Scientific pour obtenir les fusibles de rechange requis pour cette procédure� Tournez en position d’ARRÊT l’interrupteur d’alimentation situé au dos de la console de cryoablation ICEfx� Tirez sur le mécanisme de retenue du câble rouge pour débrancher le câble d’alimentation de l’entrée d’alimentation�... - Page 237 Les deux fusibles restant dans le porte-fusibles font partie du circuit du système. Remplacez les fusibles dans le porte-fusible par deux fusibles de rechange fournis par le centre d’assistance technique de Boston Scientific REMARQUE : Utilisez uniquement les fusibles spécifiés par Boston Scientific avec la console de cryoablation ICEfx� Black (K) ∆E ≤5.0...
- Page 238 Instruction Photo Branchez le cordon d’alimentation� Contactez le centre d’assistance technique de Boston Scientific afin de planifier une intervention pour déterminer la cause des fusibles défectueux ou si une intervention est requise, et pour commander les fusibles de rechange� Problèmes liés au gaz...
- Page 239 Manifestation Causes possibles/Solutions Il est difficile de desserrer La tubulure de gaz n’a pas été déchargée et est encore sous pression� le manomètre raccordé MISE EN GARDE : S’il est difficile de desserrer le manomètre connecté à la bouteille à la bouteille ou vous ne ou si la tubulure d’alimentation en argon ne peut pas être déconnectée des raccords parvenez pas à...
- Page 240 Boston Scientific pour commander de nouveaux accessoires� endommagé Une fuite de gaz a été • Serrez le raccord avec la clé fournie avec le système de cryoablation ICEfx� détectée entre l’adaptateur du • Fermez la vanne de la bouteille et déchargez le gaz du système de manomètre et la vanne de la...
- Page 241 2� Si le problème persiste, connectez une nouvelle aiguille dans un canal différent et spécifique testez l’aiguille� Poursuivez la procédure avec l’aiguille que vous venez de tester� 3� Contactez le centre d’assistance technique de Boston Scientific pour obtenir des instructions supplémentaires une fois la procédure terminée� Pour les aiguilles non-CX : 1.
-
Page 242: Messages Affichés
Messages affichés Le système de cryoablation ICEfx affiche un message dans l’interface utilisateur lorsqu’un utilisateur demande de l’aide ou lorsque des erreurs humaines ou relatives à l’aiguille ou au système sont détectées� REMARQUE : Consignez et indiquez le numéro du message (p� ex� 10-01, 80-02) si vous avez besoin d’une assistance de la part du centre d’assistance technique de Boston Scientific�... - Page 243 Confirm Password (Confirmer le mot de passe)� 10-05 Emergency Login Motif de l’affichage : • To obtain an emergency login, contact Boston Scientific L’utilisateur a demandé une connexion d’urgence et Technical Assistance Center a reçu une question de probation à relayer au service •...
- Page 244 Motif de l’affichage : • You have not entered the correct response L’utilisateur a essayé d’utiliser la connexion d’urgence • Contact Boston Scientific Technical Assistance Center for et n’a pas répondu correctement à la question de a Response to the on-screen Challenge probation�...
- Page 245 Message Motif de l’affichage/Solutions 20-02 Argon Shut Off Valve Motif de l’affichage : • The argon shut off valve may be closed Au démarrage, le système a détecté le raccordement de • Check and open if necessary gaz, mais le gaz n’entre pas dans le système� La vanne 20-02 Vanne d’arêt de l’Argon d’arrêt de la bouteille d’argon est peut-être fermée�...
- Page 246 Message Motif de l’affichage/Solutions 20-18 System Shutdown Motif de l’affichage : • You selected to control all needles simultaneously L’utilisateur a sélectionné Shutdown (Arrêt) dans l’ écran de connexion pour arrêter le système� • Do you want to initiate [x%] freeze for all active needles now? Solutions : Confirmez l’arrêt du système�...
- Page 247 Le canal sera • Return the needle to Boston Scientific désactivé jusqu’à ce qu’une aiguille d’un numéro de lot • Connect a needle from a different lot number to différent soit connectée�...
- Page 248 Message Motif de l’affichage/Solutions 40-06 Corrupt Memory Motif de l’affichage : • Needle Memory chip is corrupt on Channel X L’utilisateur a connecté une aiguille contenant une puce de • Manually select the needle type mémoire endommagée� 40-06 Mémoire endommagée Solutions : •...
- Page 249 Motif de l’affichage/Solutions 60-03 Incompatible Software Motif de l’affichage : • The ICEfx Cryoablation System software is not Le logiciel a été vérifié par rapport aux versions autorisées compatible with regulatory approvals du logiciel dans les dossiers réglementaires pour chaque • If problem persists, contact Boston Scientific marché...
- Page 250 1� Retirez le lecteur mémoire flash USB du port USB indiqué sur la console� Attendez quelques secondes avant de le reconnecter au port USB� 2� Si le problème persiste, contactez le centre d’assistance technique de Boston Scientific pour remplacer le lecteur mémoire flash USB� Black (K) ∆E ≤5.0...
- Page 251 • Reconnection attempt failed avoir essayé de réinitialiser la communication� Si le • Restarting ICEfx Cryoablation System redémarrage échoue, le système est inutilisable� • If problem persists, contact Boston Scientific Technical Solutions : Assistance Center 1� Redémarrez la console de cryoablation ICEfx�...
- Page 252 Motif de l’affichage/Solutions 80-04 Temperature Warning Motif de l’affichage : • The internal temperature of the ICEfx Cryoablation La température interne du système a dépassé les limites System exceeds appropriate operating limits de fonctionnement appropriées� • Discontinue the cryoablation procedure as soon as Solutions :...
- Page 253 Motif de l’affichage : • Channel X is defective� Choose another channel� At the Un solénoïde défectueux sur le canal X a été détecté ; un conclusion of the procedure, contact Boston Scientific autre canal doit être sélectionné� Technical Assistance Center� Solutions : 80-32 Erreur système...
- Page 254 Scientific pour planifier une intervention� 90-03 System End of Life Motif de l’affichage : • The ICEfx Cryoablation System is at the end of operational Le système de cryoablation ICEfx a atteint sa fin de life vie opérationnelle� • Contact Boston Scientific Technical Assistance Center to Solutions :...
-
Page 255: Caractéristiques Du Système
± 5 secondes sur tout intervalle de 10 minutes Performances essentielles Les performances essentielles du système de cryoablation ICEfx sont définies comme suit : • Capacité de démarrer et d’arrêter le débit d’argon vers les aiguilles de cryoablation connectées par le biais d’invites de commande dans l’interface utilisateur�... -
Page 256: Centre D'assistance Technique De Boston Scientific
• Discuter des risques et des bénéfices, en tenant compte notamment des événements indésirables potentiels répertoriés dans le mode d’emploi du système de cyroablation ICEfx et des produits accessoires utilisés pour les procédures de cryoablation et pour les autres traitements interventionnels susceptibles d’être employés�... - Page 257 Abbildung 2� Rückansicht der Konsole ���������������������������������������������������������������������������������������������������������� 263 Touchscreen-Monitor ������������������������������������������������������������������������������������������������������������������������������������������� 263 ICEfx Kryoablationswagen ����������������������������������������������������������������������������������������������������������������������������������� 264 Abbildung 3� ICEfx Kryoablationswagen ������������������������������������������������������������������������������������������������������� 265 Abbildung 4� ICEfx Kryoablationswagen - Rad-Hebelbremsen �������������������������������������������������������������������� 265 Funktionsprinzip �������������������������������������������������������������������������������������������������������������������������������������������������� 266 Materialien ����������������������������������������������������������������������������������������������������������������������������������������������������������� 266 Nicht pyrogen ������������������������������������������������������������������������������������������������������������������������������������������������������ 266 Informationen für den Anwender ������������������������������������������������������������������������������������������������������������������������ 266 VERWENDUNGSZWECK ���������������������������������������������������������������������������������������������������������������������������������������������...
- Page 258 Vorbereitung ��������������������������������������������������������������������������������������������������������������������������������������������������������280 Systemeinrichtung �����������������������������������������������������������������������������������������������������������������������������������������������280 Tabelle 6� Ablauf der Systemeinrichtung �������������������������������������������������������������������������������������������������������280 Abbildung 5� ICEfx Kryoablationskonsole auf Wagen positionieren ��������������������������������������������������������������281 Abbildung 6� Halteschraube am Wagen festziehen �������������������������������������������������������������������������������������� 282 Abbildung 7. Argon-Absperrventil (Argon) − Position ON (EIN) �������������������������������������������������������������������� 283 Abbildung 8� Entlüftungsventil (Vent) – Vollständig geschlossen ���������������������������������������������������������������� 283 Anschließen des Argongases ������������������������������������������������������������������������������������������������������������������������������284...
- Page 259 Tabelle 15� MTS-Bedienelemente ������������������������������������������������������������������������������������������������������������������ 295 Bildschirm 10: Behandlungsbildschirm – MTS-ID-Namen ändern ���������������������������������������������������������������� 296 Tabelle 16� MTS-Namen ändern ��������������������������������������������������������������������������������������������������������������������� 296 Bildschirm 11: Behandlungsbildschirm während der Tests ��������������������������������������������������������������������������� 297 Tabelle 17� Bedienelemente für Tests������������������������������������������������������������������������������������������������������������� 297 Starten eines Vereisungszyklus ��������������������������������������������������������������������������������������������������������������������������� 297 Bildschirm 12: Behandlungsbildschirm während des Vereisens ������������������������������������������������������������������� 297 Tabelle 18�...
- Page 260 TECHNISCHE DATEN DES SYSTEMS ����������������������������������������������������������������������������������������������������������������������������341 Mechanische Spezifikation �����������������������������������������������������������������������������������������������������������������������������������341 Argongaszufuhr ����������������������������������������������������������������������������������������������������������������������������������������������������341 Gaszylinder – Technische Daten����������������������������������������������������������������������������������������������������������������������������341 Genauigkeit der Anzeigewerte �����������������������������������������������������������������������������������������������������������������������������341 Wesentliche Leistungsmerkmale ��������������������������������������������������������������������������������������������������������������������������341 Boston Scientific Technical Assistance Center ������������������������������������������������������������������������������������������������������ 342 INFORMATIONEN ZUR PATIENTENBERATUNG ��������������������������������������������������������������������������������������������������������� 342 GARANTIE ������������������������������������������������������������������������������������������������������������������������������������������������������������������ 342 SYMBOLDEFINITIONEN ��������������������������������������������������������������������������������������������������������������������������������������������� 342 Black (K) ∆E ≤5.0...
-
Page 261: Warnhinweis Zur Wiederverwendung
Inhalt Eine (1) ICEfx Kryoablationskonsole Ein (1) optionaler ICEfx Kryoablationswagen: Der Wagen bietet Platz für bis zu vier Kryoablationsnadelboxen und verfügt über einen Haken zum Halten eines Zubehörbeutels� Ein (1) Benutzerhandbuch für das ICEfx Kryoablationssystem: Die Bedienungsanleitung kann eine physische Kopie sein oder online unter www�IFU-BSCI�com verfügbar sein�... -
Page 262: Icefx Kryoablationskonsole
ICEfx Kryoablationskonsole Bei der ICEfx Kryoablationskonsole handelt es sich um eine tragbare, heliumfreie Desktop-Kryoablationseinheit� Vorne an der Konsole befinden sich vier Nadelanschlusskanäle (die je zwei Nadelanschlüsse unterstützen), zwei Anschlüsse für je einen Multi-Point 1�5 Thermal Sensor und ein versenkter 10,1-inch Touchscreen-Monitor�... -
Page 263: Abbildung 2. Rückansicht Der Konsole
Auf der Rückseite der Konsole (Abbildung 2) befinden sich der Ein-/Aus-Schalter, ein USB-Anschluss, ein Ethernet- Anschluss (inaktiv), eine Taste zum Zurücksetzen der Software, ein Argoneinlass, ein Entlüftungsventil (Vent) und ein Argon-Absperrventil (Argon)� Abbildung 2. Rückansicht der Konsole 1� Netzschalter 7� Entlüftungsventil (Vent) 2�... -
Page 264: Icefx Kryoablationswagen
Zum Anheben der Konsole sind zwei Handgriffe vorhanden, auf jeder Seite einer� Bei den Handgriffen handelt es sich um Aussparungen an der Unterseite der Basis� VORSICHT: Ist die Konsole am ICEfx Kryoablationswagen befestigt, verwenden Sie zum Anheben des Systems die Griffe des Wagens�... -
Page 265: Abbildung 3. Icefx Kryoablationswagen
Haken für Zubehörbeutel Rad-Hebelbremsen Mit den Rad-Hebelbremsen können die Räder des ICEfx Kryoablationswagens während einer Behandlung festgestellt werden (Abbildung 4)� Die Rad-Hebelbremsen können von beiden Seiten betätigt werden� Durch nach UNTEN drücken der Rad-Hebelbremse wird das Rad blockiert, um eine Bewegung während der Behandlung zu verhindern� Wird die Rad-Hebelbremse nach OBEN bewegt, wird die Bremse wieder gelöst�... -
Page 266: Funktionsprinzip
Funktionsprinzip Das ICEfx Kryoablationssystem ist ein tragbares System für die Gewebezerstörung durch Kryoablation mit einem minimalinvasiven Verfahren� Das System ist computergesteuert und verfügt über eine Touchscreen-Bedienoberfläche für die Steuerung und Überwachung des Behandlungsablaufs. Das Therapieverfahren des Systems basiert auf dem Joule-Thomson-Effekt, der an komprimierten Gasen beobachtet werden kann�... -
Page 267: Verwendungszweck
Für die Verwendung des ICEfx Kryoablationssystems sind keine Kontraindikationen bekannt� WARNHINWEISE Allgemein • Das ICEfx Kryoablationssystem ist für die Bedienung durch medizinisches Fachpersonal vorgesehen, das über ein umfassendes Verständnis der technischen Prinzipien, der klinischen Anwendungen und der mit der Kryoablation verbundenen Risiken verfügt�... - Page 268 • Der Betrieb des ICEfx Kryoablationssystems neben oder auf anderen Geräten ist unzulässig� • Ist die ICEfx Kryoablationskonsole auf einem Wagen montiert, sind die Räder des Wagens vor dem Einsatz des Systems zu blockieren, damit das System während der Behandlung nicht wegrollt�...
- Page 269 Computertomographie (CT)� • Tragbare HF-Kommunikationsgeräte (einschließlich Peripheriegeräte, wie beispielsweise Antennenkabel und externe Antennen) sollten sich nicht näher als 30 cm (12 in) zu einem beliebigen Teil des ICEfx Kryoablationssystems, einschließlich der für das System spezifizierten Kabel, befinden� Andernfalls könnte eine Beeinträchtigung der Leistung die Folge sein�...
-
Page 270: Vorsichtsmassnahmen
Aktivzonenindikator, während die Nadel herausgezogen wird, um versehentliche Gewebebeschädigungen durch die heiße Nadel zu vermeiden� • Wird eine Nadel ohne CX-Funktion mit dem ICEfx Kryoablationssystem verbunden, ist ein aktives Auftauen nicht möglich� Das Freisetzen der Nadel von einer Eiskugel ist nur mit passivem Auftauen möglich� Verwenden Sie für ein adäquates Auftauen ein bildgebendes Verfahren�... - Page 271 • Beim Herunterklappen oder Schwenken des Monitors ist Vorsicht geboten� Finger nicht quetschen! • Wenn die Konsole am ICEfx Kryoablationswagen angebracht ist, verwenden Sie die Griffe des Wagens, um das System anzuheben und eine Schwelle zu überwinden, die höher als 2 cm ist� Zwei Personen, eine an jeder Seite, sollten das System an den Handgriffen anheben�...
-
Page 272: Unerwünschte Ereignisse
• Die Nichteinhaltung der auf der Bedienoberfläche (Tabelle 7) angezeigten Arbeitsdruck-Grenzwerte im Betrieb des ICEfx Kryoablationssystems kann die Eiskugelbildung beeinträchtigen� • Boston Scientific empfiehlt, in einem Kanal nur Nadeln desselben Typs zusammen einzulegen� Nadeln verschiedenen Typs in einem Kanal können die Genauigkeit der Gasanzeige beeinträchtigen�... - Page 273 • Gastrointestinale Symptome (z. B. Übelkeit, Erbrechen, Durchfall, Verstopfung) • Schlechte Heilung • Hämatom • Hämaturie • Hämothorax • Leberfunktionsstörung/-versagen • Hernie • Hypertonie • Hypotonie • Hypothermie • Ileus • Impotenz • Infektion/Abszess/Sepsis • Entzündung • Muskelkrampf • Myokardinfarkt •...
-
Page 274: Normenkonformität
Scientific als Ersatzteile für Systemkomponenten angeboten werden, kann zu erhöhten Störaussendungen und verminderter Störfestigkeit des ICEfx Kryoablationssystems führen� WARNHINWEIS: Der Betrieb des ICEfx Kryoablationssystems neben oder auf anderen Geräten ist unzulässig� WARNHINWEIS: Tragbare HF-Kommunikationsgeräte (einschließlich Peripheriegeräte, wie beispielsweise Antennenkabel und externe Antennen) sollten sich nicht näher als 30 cm (12 inches) zu einem beliebigen Teil des ICEfx Kryoablationssystems, einschließlich der für das System spezifizierten Kabel, befinden�... -
Page 275: Tabelle 2. Elektromagnetische Emissionswerte
Tabelle 2. Elektromagnetische Emissionswerte Leitlinien und Herstellererklärung – elektromagnetische Emissionen Das ICEfx Kryoablationssystem ist für den Einsatz in einer elektromagnetischen Umgebung einer Gesundheitseinrichtung unter den nachstehend angegebenen Konformitätsstufen vorgesehen� Der Kunde bzw. Betreiber des ICEfx Kryoablationssystems ist verpflichtet, die Einhaltung dieser Umgebungsbedingungen zu gewährleisten�... -
Page 276: Tabelle 3. Elektromagnetische Störfestigkeit
Leitlinien und Herstellererklärung – Elektromagnetische Störfestigkeit Das ICEfx Kryoablationssystem ist für den Einsatz in einer elektromagnetischen Umgebung einer Gesundheitseinrichtung unter den nachstehend angegebenen Störfestigkeits-Konformitätsstufen vorgesehen� Der Kunde bzw� Betreiber des ICEfx Kryoablationssystems ist verpflichtet, die Einhaltung dieser Umgebungsbedingungen zu gewährleisten� Störfestigkeitstest IEC 60601 Prüfpegel... -
Page 277: Tabelle 4. Elektromagnetische Störfestigkeit Nicht Lebensunterstützender Systeme
Um die durch stationäre HF-Sender bedingte elektromagnetische Umgebung zu beurteilen, sollte eine elektromagnetische Standortaufnahme in Betracht gezogen werden� Falls die am Einsatzort des ICEfx Kryoablationssystems gemessene Feldstärke den oben genannten Grenzwert übersteigt, muss das ordnungsgemäße Funktionieren des ICEfx Kryoablationssystems durch Beobachtung gewährleistet werden. -
Page 278: Tabelle 5. Empfohlene Abstände Zwischen Tragbaren Und Mobilen Funkkommunikationsgeräten Und
Empfohlene Abstände zwischen tragbaren und mobilen Funkkommunikationsgeräten und dem ICEfx Kryoablationssystem Das ICEfx Kryoablationssystem ist für den Einsatz in elektromagnetischen Umgebungen bestimmt, in denen elektromagnetische Störausstrahlungen kontrolliert werden� Der Kunde bzw� Benutzer des ICEfx Kryoablationssystems kann zur Vermeidung elektromagnetischer Störungen beitragen, indem er auf die Einhaltung des nachstehend empfohlenen Mindestabstandes zwischen tragbaren und mobilen Funkkommunikationsgeräten (Sendern) und dem ICEfx Kryoablationssystem entsprechend der maximalen... -
Page 279: Entfernen Der Konsole Vom Wagen
Scientific Technical Assistance Center verständigen, um Aufkleber für Kryoablationsnadeln zu bestellen� • Boston Scientific MTS: Die Überwachung der Temperatur an der Behandlungsstelle und an den benachbarten kritischen Strukturen mit den Multi-Point Thermal Sensors (MTS) erfolgt in vier Positionen am distalen Nadelschaft�... -
Page 280: Installation, Kalibrierung Und Instandhaltung
Boston Scientific Technical Assistance Center verständigen, um die Wartung zu planen� Vorbereitung Systemeinrichtung In Tabelle 6 werden die Reihenfolge und die Schritte für das Einrichten des ICEfx Kryoablationssystems dargestellt� Dieser Abschnitt beschreibt die einzelnen Schritte detailliert� Tabelle 6. Ablauf der Systemeinrichtung Einrichten der - Prüfen Sie, dass Gas, Nadeln und Zubehörkomponenten verfügbar sind�... -
Page 281: Abbildung 5. Icefx Kryoablationskonsole Auf Wagen Positionieren
Leiterplatten und Systemausfall führen� Befestigen der Konsole am ICEfx Kryoablationswagen 1� Positionieren Sie die Konsole auf dem ICEfx Kryoablationswagen� Die Vertiefung auf der Unterseite der Konsole ruht auf der Erhöhung auf dem ICEfx Kryoablationswagen� Abbildung 5. ICEfx Kryoablationskonsole auf Wagen positionieren... -
Page 282: Abbildung 6. Halteschraube Am Wagen Festziehen
3� Stecken Sie das Netzkabel in eine krankenhausgeeignete Steckdose (Netzsteckdose) mit Masseleiter� Boston Scientific empfiehlt die Verwendung einer stabilen, unterbrechungsfreien Steckdose� HINWEIS: Wenn die Stromversorgung für die ICEfx Kryoablationskonsole instabil oder gestört ist, können die MTS-Temperaturanzeigewerte ungenau sein� WARNHINWEIS: Um die Gefahr eines Stromschlags zu vermeiden, darf dieses Gerät nur an eine für den Krankenhausbetrieb zugelassene ordnungsgemäß... -
Page 283: Abbildung 7. Argon-Absperrventil (Argon) − Position On (Ein)
Abbildung 7. Argon-Absperrventil (Argon) − Position ON (EIN) 5. Überzeugen Sie sich davon, dass das Entlüftungsventil (Vent) vollständig geschlossen ist. Falls erforderlich, drehen Sie den Knopf im Uhrzeigersinn in die Stellung CLOSED (Geschlossen)� Abbildung 8. Entlüftungsventil (Vent) – Vollständig geschlossen 6�... -
Page 284: Anschließen Des Argongases
Boston Scientific Kundenservice zu wenden� Informationen zu angezeigten Meldungen finden Sie im Abschnitt Angezeigte Meldungen� Erkennt die Software des ICEfx Kryoablationsystems mit Druck beaufschlagtes Gas im System, ohne dass die Gaszufuhrleitung angeschlossen ist, werden Sie mit einer Meldung aufgefordert, das Gas aus dem System zu entfernen�... -
Page 285: Abbildung 9. Sicherheitskabel An Konsole Befestigen
(siehe Abschnitt TECHNISCHE DATEN DES SYSTEMS bzgl� der Anforderungen an die Gasreinheit)� Für jedes Verfahren sollte mindestens ein voller Ersatzzylinder vorhanden sein� VORSICHT: Schalten Sie die ICEfx Kryoablationskonsole ein, bevor Sie den Argonzylinder anschließen� Nur so ist die ordnungsgemäße Durchführung der Diagnoseroutinen gewährleistet�... -
Page 286: Abbildung 11. Einrichten Des Gaszylinders
5� Schließen Sie die Hochdruck-Gaszufuhrleitung für das Argon an den Argonzylinder an und sichern Sie den Zylinderanschluss mit dem Manometeradapter (siehe Abbildung 11)� Abbildung 11. Einrichten des Gaszylinders 6� Drehen Sie das Zylinderventil am Argonzylinder vorsichtig eine Vierteldrehung gegen den Uhrzeigersinn� Die Druckanzeige am Manometer muss unverzüglich ansprechen�... -
Page 287: Abbildung 13. Ez-Connect2 Adapter Für Dual-Zylinder
OPTIONAL: Der EZ-Connect2 Adapter für Dual-Zylinder verbindet zur Unterstützung einer Kryoablationsbehandlung zwei Argongaszylinder mit der Konsole. Über einen Vierwegeadapter mit Argondruckanzeige wird eine Gaszufuhrleitung, der Primärgaszylinder und eine zusätzliche Gaszufuhrleitung angeschlossen� Schließen Sie bei Verwendung des optionalen EZ-Connect2 Adapters für Dual-Zylinder die Gaszufuhrleitung mit dem Vierwege-Manometeradapter an den primären Argonzylinder an und sichern Sie den Anschluss durch Aufschrauben des Manometerdapters auf den Zylinderanschluss�... -
Page 288: Tabelle 7. Argongas-Arbeitsdruck
Alarmmeldung ein� Um optimale Leistung zu gewährleisten, den Argonzylinder auswechseln, wenn der Druck den unteren Grenzwert für den Arbeitsdruck unterschreitet� • Die Nichteinhaltung der Arbeitsdruck-Grenzwerte beim Betrieb der ICEfx Konsole kann die Eiskugelbildung beeinträchtigen� • Sollte an der Konsole ein kontinuierliches Zischen zu hören sein, prüfen Sie, ob das Entlüftungsventil (Vent) vollständig geschlossen ist�... -
Page 289: Navigieren In Der Benutzeroberfläche
Druckanzeige/ Zeigt den vom Argongaszylinder gelieferten Druck an� Gasanzeige HINWEIS: Das ICEfx Kryoablationssystem enthält einen internen Regler, der den Argondruck auf angemessene Grenzwerte für den Betrieb reguliert� Die Gasanzeige wird in Echtzeit je nach Entfernen von Nadeln oder Anschluss zusätzlicher Nadeln und Regelung der Vereisungsintensität aktualisiert�... -
Page 290: Optionsmenü
Optionsmenü Das Optionsmenü ermöglicht den Zugriff auf zusätzliche Funktionen� Sie können über das Menü beispielsweise Berichte aufrufen und Einstellungen ändern� Um Optionen anzuzeigen und auszuwählen, drücken Sie auf das Symbol oben links am Bildschirm und wählen die gewünschte Option aus dem erweiterten Menü aus� Bildschirm 3: Optionsmenü... -
Page 291: Bildschirm 4: Start Case (Fall Starten)
Starten des Verfahrens Nach dem Anmelden am System wird der Bildschirm Start Case (Fall starten) angezeigt� Drücken Sie auf START CASE (Fall starten), um eine Kryoablationsbehandlung zu starten� Durch Drücken auf START CASE (Fall starten) wird der Bildschirm Select Tissue Type (Gewebeart auswählen) angezeigt� Wählen Sie ein Organ aus� Der Assistent zum Starten des Falls wird aktiviert. -
Page 292: Bildschirm 6: Edit Case Information (Fallinformationen Bearbeiten)
Eingeben von Fallinformationen Verwenden Sie den Bildschirm Edit Case Information (Fallinformationen bearbeiten), um zusätzliche Informationen zur Kryoablationsbehandlung anzugeben� Dieser Schritt ist optional� Der Bildschirm Edit Case Information (Fallinformationen bearbeiten) wird beim Start und am Ende einer Kryoablationsbehandlung angezeigt� Am Ende der Behandlung können die Fallinformationen gespeichert werden� Bildschirm 6: Edit Case Information (Fallinformationen bearbeiten) Tabelle 12. -
Page 293: Bildschirm 7: Anfänglicher Behandlungsbildschirm
Verwenden des Behandlungsbildschirms Verwenden Sie den Behandlungsbildschirm , um eine Kryoablationsbehandlung zu steuern und zu überwachen� Anfänglich werden nur die Bedienelemente für die Nadeltests angezeigt, wie in Bildschirm 7 dargestellt� Nach erfolgreichem Abschluss der Nadelintegritäts- und Funktionstests werden die Bedienelemente zum Vereisen (Bildschirm 12) und zum Auftauen (Bildschirm 13) für die getesteten Nadeln aktiviert�... -
Page 294: Bildschirm 8: Timer Während Fastthaw-Funktion
Anzeigen des Timers Der Timer zeigt während dem Vereisen oder Auftauen die abgelaufene Zeit an� Während eines Tests zählt der Timer von zwei Minuten rückwärts� Während des Kauterisierens zählt der Timer für die ausgewählte Dauer rückwärts� Links und rechts oben im Timer sind zusätzliche Daten zu den Vereisungs-, Auftau- und Kauterisierungsfunktionen zu finden�... -
Page 295: Mts
Nr. Bedien element Beschreibung Tempe ratur- Für Nadeln mit CX-Funktion werden oben rechts im Timer Temperaturdaten zur aktuellen anzeige Funktion angezeigt: • Testen: Die Nadeltemperatur wird angezeigt� • Vereisen: Die interne Temperatur des Gases an der Nadelspitze wird angezeigt� • Auftauen: Der geschätzte Temperaturbereich des Nadelschaftes wird angezeigt� HINWEIS: Während der Nadelaufwärmphase wird im Timer eine sich drehende Wärmeanzeige angezeigt�... -
Page 296: Bildschirm 10: Behandlungsbildschirm - Mts-Id-Namen Ändern
Ändern der MTS-ID Drücken Sie auf die MTS-ID (MTS 1, MTS 2), um den Behandlungsbildschirm zum Ändern des MTS-ID-Namens zu öffnen� In diesem Bildschirm können Sie den MTS-Namen ändern� In diesem Beispiel wurde der Name auf A4 geändert� Bildschirm 10: Behandlungsbildschirm – MTS-ID-Namen ändern Tabelle 16. -
Page 297: Bildschirm 11: Behandlungsbildschirm Während Der Tests
Bildschirm 11: Behandlungsbildschirm während der Tests Tabelle 17. Bedienelemente für Tests Nr. Bedienelement Beschreibung Test-Schaltfläche: Zeigt an, dass der Kanal getestet werden kann� Solange der Nadeltest nicht abgeschlossen ist, sind für einen Kanal keine weiteren Bedienelemente verfügbar� Nach Abschluss der Nadelintegritäts- und Funktionstests werden die Bedienelemente des Kanals zur Behandlung aktiviert�... -
Page 298: Tabelle 18. Bedienelemente Für Das Vereisen
Wählen Sie aus dem Menü eine Vereisungsintensität oder die Intensität „Stick“ (Kleben) aus� HINWEIS: Das ICEfx Kryoablationssystem kontrolliert die Vereisungsintensität durch Einstellen der Dauer des Argonflusses über Zeitblöcke von jeweils 10 Sekunden (z. B. 30 % Vereisungsintensität: 3 Sekunden vereisen und 7 Sekunden Standby). -
Page 299: Starten Eines Auftauzyklus (Nur Nadeln Mit Cx-Funktion)
Starten eines Auftauzyklus (nur Nadeln mit CX-Funktion) VORSICHT: Nadeln ohne CX-Funktion unterstützen die i-Thaw-Funktion oder die FastThaw-Funktion nicht� Das Lösen der Nadel von einer Eiskugel ist nur mit passivem Auftauen möglich� WARNHINWEIS: Der Nadelgriff und der distale Nadelschaft können während des aktiven Auftauens warm werden� Die Position des Nadelgriffs beachten�... -
Page 300: Tabelle 19. Bedienelemente Für Das Auftauen
Tabelle 19. Bedienelemente für das Auftauen Nr. Bedienelement Beschreibung Zeigt den aktuell ausgewählten Auftaumodus an (i-Thaw-Funktion oder FastThaw- Funktion)� HINWEIS: Die FastThaw-Funktion generiert eine höhere Temperatur als die für die i-Thaw Funktion generierte, was kürzere Auftauzeiten bewirkt� Temperatur- Zeigt den geschätzten Temperaturbereich des Nadelschaftes beim Auftauen an� anzeige HINWEIS: Während der Nadelaufwärmphase wird im Timer eine sich drehende Wärmeanzeige angezeigt�... -
Page 301: Bildschirm 15: Kauterisierungsfunktion
HINWEIS: Die Dauer der Kauterisierung kann von 30 Sekunden bis zu 3 Minuten in Schritten von 30 Sekunden eingestellt werden� • Während der Nadelaufwärmphase wird im Timer eine sich drehende Wärmeanzeige angezeigt� • Wenn die Kauterisierungsschwelle erreicht ist, beginnt die Kauterisierung automatisch� –... -
Page 302: Tabelle 20. Bedienelemente Der Kauterisierungsfunktion
Tabelle 20. Bedienelemente der Kauterisierungsfunktion Nr. Bedienelement Beschreibung Schaltfläche PROCEDURE (Behandlung): Drücken Sie auf diese Schalfläche, um den Kauterisierungsmodus zu beenden und zum Behandlungsbildschirm zurückzukehren� Kauterisieren-Schaltfläche: Drücken Sie auf die Schaltfläche zum Kauterisieren, um die Kauterisierungsdauer auszuwählen� Drücken Sie auf Start, um das Kauterisieren zu starten� Status der Zeigt den Kauterisierungsstatus an�... -
Page 303: Dialogfenster Für Die Zyklenprogrammierung
Erneutes Testen einer Nadel Um eine Nadel erneut zu testen, drücken Sie auf die Kanal-Schaltfläche und anschließend auf , um einen erneuten Nadeltest zu starten� Dialogfenster für die Zyklenprogrammierung Jeder Vereisungs-/Auftauzyklus umfasst einen Vereisungszyklus gefolgt von einem Auftauzyklus. Über Program Cycles Control (Dialogfenster für die Zyklenprogrammierung) kann der Benutzer mehrere Vereisungs-/Auftauzyklen für einen einzelnen Kanal sowie für alle aktiven Kanäle gleichzeitig programmieren�... -
Page 304: Bildschirm 19: Bildschirm Zum Programmieren Von Programmzyklen
Der Bildschirm zum Programmieren von Programmzyklen für den ausgewählten Kanal wird angezeigt� Bildschirm 19: Bildschirm zum Programmieren von Programmzyklen 3� Drücken Sie unten links im Raster auf das Pluszeichen , um einen neuen Schritt zu erstellen� 4� Gehen Sie für jeden Schritt folgendermaßen vor: •... -
Page 305: Bildschirm 21: All Reports (Alle Berichte)
Sie im erweiterten Menü Reports (Berichte) aus, um die gespeicherten Behandlungsberichte anzuzeigen (wenn kein Fall aktiv ist)� Der Bildschirm All Reports (Alle Berichte) mit einer Liste aller im ICEfx Kryoablationssystem gespeicherten Berichte wird angezeigt� Wählen Sie den gewünschten Bericht aus und drücken Sie auf VIEW REPORT (Bericht anzeigen)�... -
Page 306: Bildschirm 22: Behandlungsbericht
Zylindervolumen kann nur von Administratoren oder Servicemitarbeitern geändert werden� Time Zone (Zeitzone) Die Zeitzone kann von Administratoren oder Servicemitarbeitern geändert werden� Die Korrektur für die Sommerzeit wird vom ICEfx Kryoablationssystem automatisch vorgenommen� Volume Units Wählen Sie die Einheiten für das Argonzylindervolumen nach Landesstandard (Volumeneinheiten) aus�... -
Page 307: Tabelle 22. Bildschirm Settings (Einstellungen) - Bedientasten
Einstellung Beschreibung Clock Type (Uhrzeitformat) Wählen Sie das Uhrzeitformat (12-Stunden- oder 24-Stunden-Anzeige) aus� Die Uhrzeitanzeige kann von Administratoren oder Servicemitarbeitern geändert werden� Inactivity Timeout Auswahl der gewünschten Dauer von 30 Minuten bis 180 Minuten, in der das (Timeout bei Inaktivität) System inaktiv sein kann, bevor das Passwort erneut eingegeben werden muss�... -
Page 308: Administratoroptionen
2� Drücken Sie auf die Schaltfläche ADMIN (Administrator)� Softwareaktualisierung Manuelle Softwareaktualisierung Administratoren und Servicebenutzer können die Software für das ICEfx Kryoablationssystem manuell über ein USB- Flashlaufwerk von Boston Scientific aktualisieren� 1� Drücken Sie auf die Schaltfläche ADMIN (Administrator) im Bildschirm Settings (Einstellungen)�... -
Page 309: Testen Von Nadel/Mts Vor Behandlungsbeginn
- Exportieren Sie den Bericht auf ein USB-Flashlaufwerk� Testen von Nadel/MTS vor Behandlungsbeginn WARNHINWEIS: Richten Sie vor Beginn einer Kryoablation das ICEfx Kryoablationssystem ein (siehe Abschnitt Systemeinrichtung) und führen Sie dann die Nadelintegritäts- und Funktionstests durch� Die Tests müssen erfolgreich abgeschlossen werden, um mit der Behandlung beginnen zu können�... -
Page 310: Abbildung 14. Blockieren Der Nadel Im Kanal
Kryoablationsverfahren eingesetzt werden, empfiehlt es sich, die Nadelführung mit einem Kryoablationsnadelkanal-ID-Aufkleber zu markieren� HINWEIS: Wenden Sie sich an das Boston Scientific Technical Assistance Center, um Kryoablationsnadelkanal- ID-Aufkleber für die Kryoablationsnadeln zu bestellen� 7� Wiederholen Sie für jede Kryoablationsnadel, die getestet wird, die Schritte 3 bis 6�... - Page 311 OPTIONAL: Sind weitere Tests erforderlich, noch einmal auf Test drücken, um den Test zu wiederholen� HINWEIS: Wird eine bereits getestete Nadel mit CX-Funktion während der Behandlung in einen anderen Kanal eingelegt, erkennt das ICEfx Kryoablationssystem, dass der Nadelintegritäts- und Funktionstests für diese Nadel bereits erfolgreich abgeschlossen wurde�...
-
Page 312: Einleiten Einer Kryoablationsbehandlung
Nach erfolgreichem Abschluss des Nadelintegritäts- und Funktionstests sind die übrigen Bedienschaltflächen des Kanals aktiviert� Die Nadel(n) ist (sind) einsatzbereit� 10� Wenn Sie MTS verwenden, bereiten Sie die gewünschte Anzahl von Sensoren für den Test vor� Das ICEfx Kryoablationssystem unterstützt die Verwendung von zwei Thermosensoren�... -
Page 313: Bildschirm 24: Argon Remaining (Verbleibendes Argon)
WARNHINWEIS: Wird eine Nadel ohne CX-Funktion mit dem ICEfx Kryoablationssystem verbunden, ist ein aktives Auftauen nicht möglich� Das Lösen der Nadel von einer Eiskugel ist nur mit passivem Auftauen möglich� Verwenden Sie für ein adäquates Auftauen ein bildgebendes Verfahren� WARNHINWEIS: Falls während einer Behandlung eine Nadel hinzugefügt werden muss, verbinden Sie die Nadel mit einem offenen Kanal�... - Page 314 4. Überwachen Sie die Gewebetemperatur bei Verwendung von Temperatursensoren im Bereich Temperatursensoren des Behandlungsbildschirms (siehe Abschnitt MTS)� 5� CX-Nadeln: Drücken Sie zum aktiven Abtauen der Eiskugel auf die Schaltfläche Auftauen für die Kanäle, in denen Nadeln enthalten sind, und wählen Sie den Auftaumodus aus (i-Thaw-Funktion oder FastThaw-Funktion)� Drücken Sie anschließend auf Start, um die Auftauphase zu starten�...
-
Page 315: Hinzufügen Einer Cx-Nadel Während Einer Kryoablationsbehandlung
Falls keine offenen Kanäle vorhanden sind, gehen Sie folgendermaßen vor, um eine neue CX-Nadel hinzuzufügen� VORSICHT: Boston Scientific empfiehlt, in einem Kanal nur Nadeln desselben Typs zusammen einzulegen� Nadeln verschiedenen Typs in einem Kanal können die Genauigkeit der Gasanzeige beeinträchtigen�... -
Page 316: Herunterfahren Des Systems
Uhrzeigersinn, um den Argonzylinder zu öffnen und ausreichende Gaszufuhr zu gewährleisten� HERUNTERFAHREN DES SYSTEMS Herunterfahren des Systems WARNHINWEIS: OP-Mitarbeiter vor dem Entleeren des ICEfx Kryoablationssystems warnen, um sie nicht zu erschrecken� 1� Falls die Konsole am Ende der Behandlung nicht entleert wurde, führen Sie diese Schritte durch, um das System zu entlüften�... -
Page 317: Abbildung 15. Entlüftungsventil (Vent) - Vollständig Geöffnet
Abbildung 15. Entlüftungsventil (Vent) – vollständig geöffnet c� Nach Abschluss der Entleerung drehen Sie das Entlüftungsventil (Vent) in die Stellung CLOSED (Geschlossen)� Abbildung 16. (wie Abbildung 8) Entlüftungsventil (Vent) – vollständig geschlossen 2� Trennen Sie die Hochdruckgas-Zufuhrleitungen von der Konsole und von den Argonzylindern� Verstauen Sie Gaszufuhrleitungen und Manometerbaugruppe im Zubehörbeutel�... -
Page 318: Nachbehandlung
WARNHINWEIS: Nicht am Netzkabel ziehen� Am Stecker, nicht am Netzkabel, greifen, um das Gerät von der Steckdose zu trennen� 8� Reinigen Sie die Konsole nach jedem Gebrauch gemäß den Anweisungen im Abschnitt Reinigen des ICEfx Kryoablationssystems� System nur in völlig trockenem Zustand lagern�... -
Page 319: Fehlerbehebung
Verwaltung und/oder der lokalen Behörden entsorgt werden� FEHLERBEHEBUNG Boston Scientific empfiehlt die folgenden Optionen zur Fehlerbehebung beim ICEfx Kryoablationssystem� Wenn die vorgeschlagenen Lösungsansätze das Problem nicht beheben oder ein Problem auftritt, das im Folgenden nicht erwähnt wird, wenden Sie sich an das Boston Scientific Technical Assistance Center�... - Page 320 (d. h., der Schalten Sie den Strom ein� Ventilator funktioniert 2� Das Stromkabel an der ICEfx Kryoablationskonsole ist nicht an die Steckdose oder nicht) oder der Strom fällt nicht an die Konsolenrückseite angeschlossen� Schließen Sie das Stromkabel an beim Arbeiten aus�...
-
Page 321: Auswechseln Der Sicherungen
Auswechseln der Sicherungen Anweisung Foto Wenden Sie sich an das Boston Scientific Technical Assistance Center, um die für diesen Vorgang erforderlichen Ersatzsicherungen zu erhalten� Drehen Sie den Ein-/Aus-Schalter auf der Rückseite der ICEfx Kryoablationskonsole in die Stellung aus� Ziehen Sie an der roten Haltevorrichtung des Kabels, um das Stromkabel vom Stromanschluss zu trennen�... - Page 322 Hand auf� Die beiden Sicherungen, die im Sicherungshalter verbleiben, sind Teil der Systemschaltung� Ersetzen Sie die Sicherungen im Sicherungshalter durch die beiden Ersatzsicherungen, die vom Boston Scientific Technical Assistance Center geliefert werden� HINWEIS: Verwenden Sie nur von Boston Scientific spezifizierte Sicherungen in der ICEfx Kryoablationskonsole� Black (K) ∆E ≤5.0...
- Page 323 Anweisung Foto Schließen Sie das Netzkabel an� Wenden Sie sich an das Boston Scientific Technical Assistance Center, um einen Servicetermin zur Ermittlung der Ursache für die durchgebrannten Sicherungen zu vereinbaren und um festzustellen, ob eine Wartung erforderlich ist, und um Ersatzsicherungen zu bestellen�...
- Page 324 1� Trennen Sie die Nadel vom System und legen Sie sie in einen anderen Kanal ein� Testen, Vereisen oder 2� Wiederholen Sie den Nadelintegritäts- und Funktionstests� Auftauen gestartet wurde, 3� Das Boston Scientific Technical Assistance Center verständigen� strömt Gas aus dem Nadelanschluss aus� Mechanische Probleme Symptom Mögliche Ursachen/Lösungen...
- Page 325 2� Möglicherweise ist die Verriegelung defekt� Die Nadel in einen anderen Kanal VERRIEGELUNGSSTELLUNG einlegen� Wenden Sie sich an das Boston Scientific Technical Assistance Center, um gebracht werden� einen Servicetermin zu vereinbaren� 3. Überprüfen Sie die Gasanzeige und stellen Sie sicher, dass das System nicht unter Druck steht�...
- Page 326 Kanal ein und prüfen die Nadel� Das Verfahren mit der neu getesteten Nadel Eiskugel� fortsetzen� 3� Nach Abschluss des Verfahrens sind weitere Anweisungen vom Boston Scientific Technical Assistance Center erhältlich� Nadeln ohne CX-Funktion: 1� Führen Sie nacheinander die folgenden Schritte aus: •...
-
Page 327: Angezeigte Meldungen
3� Das Boston Scientific Technical Assistance Center verständigen� Angezeigte Meldungen Das ICEfx Kryoablationssystem zeigt eine Meldung auf der Benutzeroberfläche an, wenn ein Benutzer Unterstützung anfordert oder wenn Benutzer-, Nadel- oder Systemfehler festgestellt werden� HINWEIS: Notieren und melden Sie die Fehlermeldung (z. B. 10-01, 80-02), wenn Hilfe vom Boston Scientific Technical Assistance Center benötigt wird�... - Page 328 Grund der Meldung/Lösungen 10-03 Reset Password Challenge Grund der Meldung: • To reset your password, contact Boston Scientific Technical Benutzer hat sein Passwort vergessen, betätigte Assistance Center die Schaltfläche Forgot Password (Passwort • Relay the Challenge on the screen below vergessen) und erhielt eine Aufgabe zur •...
- Page 329 Incorrect Response Grund der Meldung: • You have not entered the correct response Benutzer hat versucht, die Notfallanmeldung • Contact Boston Scientific Technical Assistance Center for a durchzuführen, hat die Frage aber nicht richtig Response to the on-screen Challenge beantwortet�...
- Page 330 Meldung Grund der Meldung/Lösungen 20-02 Argon Shut Off Valve Grund der Meldung: • The argon shut off valve may be closed Während des Startvorgangs wurde angeschlossenes Gas • Check and open if necessary erkannt, doch ist das Gas nicht ins System vorgedrungen� 20-02 Argon-Absperrventil Das Argon-Absperrventil ist evtl�...
- Page 331 Meldung Grund der Meldung/Lösungen 20-18 System Shutdown Grund der Meldung: • You selected to control all needles simultaneously Benutzer hat „Shutdown“ (Herunterfahren) im Anmeldebildschirm gewählt, um das System • Do you want to initiate [x%] freeze for all active needles now? herunterzufahren�...
- Page 332 1� Entfernen Sie die Nadel und legen Sie sie beiseite� 2� Schließen Sie den unterstützten Nadeltyp an und wählen Sie den geeigneten Nadeltyp aus dem Aufklappmenü� 3� Wenden Sie sich an das Boston Scientific Technical Assistance Center, wenn Sie weitere Unterstützung benötigen�...
- Page 333 • Während der Aktualisierung ist ein Fehler Lösungen: aufgetreten� 1� Führen Sie das Update erneut durch� • Aktualisierung erneut ausführen� 2� Wenden Sie sich an das Boston Scientific Technical Assistance Center, wenn das Update fehlschlägt� 60-02 Update Failed Grund der Meldung: •...
- Page 334 60-03 Software nicht kompatibel Lösungen: • Die Software des ICEfx Kryoablationssystems 1� Wenden Sie sich an das Boston Scientific Technical Assistance ist nicht mit den behördlichen Genehmigungen Center, wenn Sie weitere Unterstützung benötigen� kompatibel� • Wenn das Problem weiterhin besteht, das Boston Scientific Technical Assistance Center verständigen�...
- Page 335 1. Überprüfen Sie, ob das USB-Flashlaufwerk angeschlossen ist Flashlaufwerk exportiert werden und ausreichend Speicherplatz vorhanden ist� • Das USB-Flashlaufwerk ist möglicherweise 2� Wenden Sie sich an das Boston Scientific Technical Assistance nicht angeschlossen oder voll� Center, wenn Sie weitere Unterstützung benötigen� Meldungen zu Berichten Meldung Grund der Meldung/Lösungen...
- Page 336 80-01 Kommunikationsfehler 1� Starten Sie die ICEfx Kryoablationskonsole neu� • Fehler bei der internen Kommunikation� 2� Wenden Sie sich an das Boston Scientific Technical • Neuverbindungsversuch fehlgeschlagen� Assistance Center, wenn das Problem weiterhin besteht� • Neustart des ICEfx Kryoablationssystems • Wenn das Problem weiterhin besteht, das Boston Scientific Technical Assistance Center verständigen)
- Page 337 Technical Assistance Center 1� Starten Sie die ICEfx Kryoablationskonsole neu� 80-02 Startfehler 2� Wenden Sie sich an das Boston Scientific Technical • Fehler bei System-Selbstprüfungen Assistance Center, wenn das Problem weiterhin besteht� • System neu starten • Wenn das Problem weiterhin besteht, das Boston Scientific Technical Assistance Center verständigen�...
- Page 338 80-05 Service Due Grund der Meldung: • Low battery detected Das System hat einen niedrigen Batterieladezustand • Contact Boston Scientific Technical Assistance erkannt� Der Betrieb des Systems kann bei Betrieb mit Center to schedule service niedriger Batteriespannung beeinträchtigt werden� 80-05 Wartung fällig...
- Page 339 80-33 Systemfehler 2� Schließen Sie einen neuen MTS an� • Defekter MTS in Kanal [X]� Durch neuen MTS ersetzen� • Das Boston Scientific Technical Assistance Center kontaktieren� 80-34 System Error Grund der Meldung: • Fan X failure� At the conclusion of the procedure, Gebläse X wurde als „nicht in Betrieb“...
- Page 340 Center verständigen, um einen Servicetermin zu vereinbaren� 90-03 System End of Life Grund der Meldung: • The ICEfx Cryoablation System is at the end of Das ICEfx Kryoablationssystem hat das Ende seiner operational life Nutzungsdauer erreicht� • Contact Boston Scientific Technical Assistance Lösungen:...
-
Page 341: Technische Daten Des Systems
• Zeitintervalle: o ± 5 Sekunden über 10-Minuten-Intervalle Wesentliche Leistungsmerkmale Die wesentlichen Leistungsmerkmale des ICEfx Kryoablationssystems sind wie folgt definiert: • Die Fähigkeit, den Argonzufluss an die angeschlossenen Kryoablationsnadeln über Befehlseingaben aus der Bedienoberfläche ein- und auszuschalten� • Die Fähigkeit, einen ununterbrochenen Gasfluss an vom Benutzer ausgewählte Nadeln aufrechtzuerhalten, wenn der Gasfluss durch den Benutzer eingeschaltet wird�... -
Page 342: Boston Scientific Technical Assistance Center
CEtechsupportEMEA@bsci�com INFORMATIONEN ZUR PATIENTENBERATUNG Der Arzt sollte bei der Beratung des Patienten über die Verwendung des ICEfx Kryoablationssystems in Verbindung mit dem interventionellen Verfahren die folgenden Punkte berücksichtigen: • Die Risiken und Vorteile besprechen, einschließlich der Überprüfung potenzieller unerwünschter Ereignisse, die in den Gebrauchsanweisungen für das ICEfx Kryoablationssystem und die zur Durchführung von... - Page 343 Monitor touchscreen �������������������������������������������������������������������������������������������������������������������������������������������� 349 Carrello per crioablazione ICEfx ��������������������������������������������������������������������������������������������������������������������������� 350 Figura 3� Carrello per crioablazione ICEfx��������������������������������������������������������������������������������������������������������351 Figura 4� Carrello per crioablazione ICEfx - Leve di blocco delle ruote ����������������������������������������������������������351 Principio di funzionamento ��������������������������������������������������������������������������������������������������������������������������������� 352 Materiali ��������������������������������������������������������������������������������������������������������������������������������������������������������������� 352 Apirogeno ������������������������������������������������������������������������������������������������������������������������������������������������������������ 352 Informazioni per l’utente �������������������������������������������������������������������������������������������������������������������������������������...
- Page 344 Preparazione del sistema ������������������������������������������������������������������������������������������������������������������������������������� 367 Tabella 6� Flusso di impostazione del sistema ���������������������������������������������������������������������������������������������� 367 Figura 5� Posizionare la console per crioablazione ICEfx sul carrello �������������������������������������������������������������368 Figura 6� Serrare la vite di fissaggio sul carrello���������������������������������������������������������������������������������������������368 Figura 7� Valvola di arresto Argon - Posizione ON ����������������������������������������������������������������������������������������� 369 Figura 8�...
- Page 345 Tabella 15� Comandi MTS ������������������������������������������������������������������������������������������������������������������������������� 382 Schermata 10: Schermata Procedure – Modifica del nome dell’identificatore MTS ��������������������������������������� 382 Tabella 16� Modifica nome MTS ��������������������������������������������������������������������������������������������������������������������� 383 Schermata 11: Schermata della procedura durante il test ������������������������������������������������������������������������������ 383 Tabella 17� Controlli di prova �������������������������������������������������������������������������������������������������������������������������� 383 Avvio di un ciclo di congelamento �����������������������������������������������������������������������������������������������������������������������384 Schermata 12: Schermata della procedura durante il congelamento ������������������������������������������������������������384 Tabella 18�...
- Page 346 Figura 15� Valvola Vent (Di sfiato) - Completamente aperta ��������������������������������������������������������������������������404 Figura 16� (uguale a Figura 8) Valvola Vent (di sfiato) - Completamente Chiusa �������������������������������������������404 Dopo la procedura �����������������������������������������������������������������������������������������������������������������������������������������������405 Pulire il sistema di crioablazione ICEfx �����������������������������������������������������������������������������������������������������������������405 Smaltimento ��������������������������������������������������������������������������������������������������������������������������������������������������������405 RISOLUZIONE DEI PROBLEMI ������������������������������������������������������������������������������������������������������������������������������������406 Ripristino del software �����������������������������������������������������������������������������������������������������������������������������������������406...
-
Page 347: Avvertenza Sul Riutilizzo
DESCRIZIONE DEL DISPOSITIVO Descrizione del sistema Il sistema di crioablazione ICEfx è composto da una console per crioablazione ICEfx e da un carrello per crioablazione ICEfx opzionale� Contenuto Una (1) console per crioablazione ICEfx Un (1) carrello per crioablazione ICEfx opzionale: il carrello contiene fino a quattro scatole di aghi per crioablazione e fornisce un uncino per contenere una borsa degli accessori�... -
Page 348: Console Per Crioablazione Icefx
Console per crioablazione ICEfx La console per crioablazione ICEfx è un’unità per crioablazione da tavolo portatile senza elio� La parte anteriore della console contiene quattro canali di collegamento dell’ago (ciascuno dei quali supporta due porte per ago), due porte Multi-Point 1�5 Thermal Sensor (MTS) e un monitor a sfioramento incassato da 10,1 inch�... -
Page 349: Figura 2. Vista Posteriore Della Console
Porte di collegamento MTS Due Porte di collegamento MTS sono presenti sopra i canali di connessione degli aghi per supportare il collegamento MTS della Boston Scientific, utilizzato per monitorare le temperature all’interno e in prossimità del sito di crioablazione� Black (K) ∆E ≤5.0... -
Page 350: Carrello Per Crioablazione Icefx
Il carrello per crioablazione ICEfx opzionale fornisce una piattaforma sicura per la console� Il carrello per crioablazione ICEfx è dotato di quattro ruote di bloccaggio per garantire che il carrello non si muova durante una procedura di crioablazione� Un’apertura all’interno del carrello consente di conservare fino a quattro scatole di aghi per crioablazione�... -
Page 351: Figura 3. Carrello Per Crioablazione Icefx
Leva di blocco della ruota Utilizzare le leve di blocco delle ruote per bloccare il carrello per crioablazione ICEfx in posizione durante una procedura (Figura 4)� Le leve di blocco delle ruote possono essere bloccate da entrambi i lati� Premendo la leva di blocco della rotella IN BASSO si blocca la rotella e si impedisce il movimento durante la procedura�... -
Page 352: Principio Di Funzionamento
Joule-Thomson, mentre altri gas, come l’elio, aumentano la loro temperatura� Il sistema di crioablazione ICEfx utilizza gas Argon ad alta pressione, il quale circola attraverso aghi crioablativi a punta chiusa per indurre il congelamento del tessuto� Il congelamento è dovuto all’effetto Joule-Thomson incrementato da uno scambio di calore recuperativo all’interno dell’ago per crioablazione�... -
Page 353: Uso Previsto
• Chirurgia toracica - (ad eccezione del tessuto cardiaco) Dichiarazione di beneficio clinico Il sistema di crioablazione ICEfx, se utilizzato con vari prodotti accessori Boston Scientific, è indicato per la distruzione di tessuti (compresi tessuto prostatico e renale, metastasi epatiche, tumori e lesioni cutanee) mediante l’applicazione di temperature estremamente basse durante procedure minimamente invasive�... - Page 354 • Accertarsi che le bombole di gas argon siano incatenate a una parete o a un carrello approvato per evitare il ribaltamento accidentale delle bombole� • Non collegare il sistema di crioablazione ICEfx a una fonte di alimentazione di gas superiore a 6000 psi (414 bar, 41,4 MPa) per evitare danni ai componenti interni del sistema�...
- Page 355 • L’equipaggiamento portatile da comunicazione RF (incluse periferiche come antenne cavi e antenne esterne) non sono da utilizzare entro 30 cm (12 in) da qualsiasi altra componente del sistema ICEfx, compresi cavi specifici per l’utilizzo con lo stesso� In caso contrario potrebbe verificarsi la degradazione delle prestazioni di questa apparecchiatura�...
-
Page 356: Precauzioni
Il rilascio dell’ago da una sfera di ghiaccio sarà possibile solo con uno scongelamento passivo� Servirsi della guida dell’immagine per garantire uno scongelamento adeguato� • Non toccare la console del sistema per crioablazione ICEfx mentre si tocca il paziente per evitare rischi di scariche sullo stesso se dovesse avvenire un guasto elettrico�... - Page 357 • Quando si posiziona la console per crioablazione ICEfx su o si rimuove la console per crioablazione ICEfx dal carrello per crioablazione ICEfx, sollevare la console utilizzando le impugnature nella parte inferiore della base�...
-
Page 358: Effetti Indesiderati
• Durante l’uso, evitare di danneggiare l’ago con altri strumenti chirurgici� • Evitare che l’MTS tocchi l’ago per crioablazione durante l’uso; potrebbero essere visualizzate misurazioni irregolari della temperatura� • Gli aghi senza funzionalità CX non supportano la funzione i-Thaw o FastThaw� Il rilascio dell’ago da una sfera di ghiaccio sarà... - Page 359 • Ernia • Ipertensione • Ipotensione • Ipotermia • Ileo • Impotenza • Infezione/ascesso/sepsi • Infiammazione • Spasmo muscolare • Infarto miocardico • Necrosi • Necessità di chirurgia o reintervento • Lesioni al sistema nervoso • Neuropatia • Ostruzione • Dolore/disagio •...
-
Page 360: Conformità Agli Standard
30 cm (12 inches) di distanza da qualsiasi parte del sistema di crioablazione ICEfx, compresi i cavi specificati per l’utilizzo con il sistema� In caso contrario potrebbe verificarsi la degradazione delle prestazioni di questa apparecchiatura�... -
Page 361: Tabella 2. Emissioni Elettromagnetiche
Il sistema di crioablazione ICEfx è previsto per l’uso nell’ambiente elettromagnetico di una struttura sanitaria professionale con i livelli di conformità specificati di seguito� Il cliente o l’utente del sistema di crioablazione ICEfx deve garantire che il dispositivo venga usato in tale ambiente�... -
Page 362: Tabella 3. Immunità Elettromagnetica
Il sistema di crioablazione ICEfx è previsto per l’uso nell’ambiente elettromagnetico di una struttura sanitaria professionale con i livelli di conformità specificati di seguito� Il cliente o l’utente del sistema di crioablazione ICEfx deve garantire che il dispositivo venga usato in tale ambiente�... -
Page 363: Tabella 4� Immunità Elettromagnetica Per Sistemi Non Di Supporto Vitale
(RF), è opportuno effettuare un’analisi elettromagnetica del sito� Se le misurazioni di forza del campo magnetico nella zona di applicazione del sistema per crioablazione ICEfx risultasse troppo elevato rispetto gli standard di energia RF applicabile, controllare che il sistema per crioablazione ICEfx funzioni correttamente�... -
Page 364: Tabella 5. Distanza Di Separazione Consigliata Tra Apparecchiature Di Comunicazione A Radiofrequenza
Distanze di separazione raccomandate tra equipaggiamento di comunicazione RF mobile o portatile e il sistema per crioablazione ICEfx Il sistema di crioablazione ICEfx è indicato per l’uso in un ambiente elettromagnetico in cui le interferenze a radiofrequenza irradiate sono controllate� I clienti o gli utenti del sistema di crioablazione ICEfx possono prevenire... -
Page 365: Modalità Di Fornitura
MODALITÀ DI FORNITURA Dettagli del dispositivo Il sistema di crioablazione ICEfx viene fornito non sterile� I prodotti accessori Boston Scientific necessari per eseguire la procedura di crioablazione sono forniti separatamente� Non utilizzare se la confezione è danneggiata o è stata aperta involontariamente prima dell’uso�... -
Page 366: Istruzioni Per Il Funzionamento
• Set riscaldamento uretrale Boston Scientific: il set per il riscaldamento uretrale è il condotto che fa circolare soluzione fisiologica calda attraverso l’uretra durante una procedura di crioablazione prostatica� I seguenti articoli utilizzati con il sistema di crioablazione ICEfx sono riutilizzabili e devono essere puliti e/o sterilizzati in conformità alle Istruzioni per l’uso che accompagnano ciascun prodotto�... -
Page 367: Installazione, Calibrazione E Manutenzione
Preparazione per l’uso Prima di utilizzare il sistema di crioablazione ICEfx, ispezionare il telaio, il cavo di alimentazione, il freno, i cavi di sicurezza, le linee di alimentazione del gas, i collegamenti del gas e il monitor touchscreen per accertarsi che non siano danneggiati�... -
Page 368: Figura 5. Posizionare La Console Per Crioablazione Icefx Sul Carrello
Collegamento della console al carrello per crioablazione ICEfx 1� Posizionare la console sul carrello per crioablazione ICEfx� La depressione sul fondo della console poggia sulla testina sulla parte superiore del carrello per crioablazione ICEfx� Figura 5. Posizionare la console per crioablazione ICEfx sul carrello 2�... -
Page 369: Figura 7. Valvola Di Arresto Argon - Posizione On
Boston Scientific consiglia di utilizzare una presa di corrente stabile e ininterrotta� NOTA: se l’alimentazione del sistema di crioablazione ICEfx non è stabile o è rumorosa, le letture della temperatura MTS potrebbero non essere accurate� AVVERTENZA: per evitare il rischio di scosse elettriche, l’apparecchiatura deve essere collegata esclusivamente a una presa elettrica per uso ospedaliero dotata di messa a terra di protezione�... -
Page 370: Figura 8. Valvola Vent (Di Sfiato) - Completamente Chiusa
Assistenza clienti� Fare riferimento alla sezione Messaggi visualizzati sezione per informazioni sui messaggi visualizzati� Se il software di sistema per crioablazione ICEfx rilevasse del gas in pressione presente nel sistema e la linea di rifornimento del gas non fosse connessa, verrà mostrato un messaggio di richiesta di ventilazione manuale del gas�... -
Page 371: Collegare Il Gas Argon
Dopo aver fatto l’accesso, la schermata Start Case (Avvio caso) apparirà (Schermata 4)� Collegare il gas Argon AVVERTENZA: non connettere il sistema per crioablazione ICEfx a fonti di alimentazione del gas con pressione maggiore a 6000 psi (414 bar, 41,4 MPa) per evitare danni a componenti interni�... -
Page 372: Figura 9. Collegare Il Cavo Di Sicurezza Alla Console
ATTENZIONE: posizionare le bombole di gas Argon abbastanza vicine alla console da fare in modo che la linea di rifornimento non sia tesa e non possa causare inciampi� 1� Sul retro della console, assicurarsi che la valvola Vent (di sfiato) sia in posizione CLOSED (CHIUSA) (vedere Figura 8). -
Page 373: Figura 11. Impostazione Di Una Bombola Di Gas
5� Collegare la linea di alimentazione ad alta pressione del gas argon alla bombola dell’argon fissando l’adattatore del gruppo del manometro sul collegamento della bombola (Figura 11)� Figura 11. Impostazione di una bombola di gas 6� Ruotare con cautela la valvola della bombola del gas argon in senso antiorario per un quarto di giro� Verificare che la lettura della pressione sul manometro risponda immediatamente�... -
Page 374: Figura 13. Adattatore 2 In 1 Per Due Bombole Ez-Connect2
• Fare riferimento alla sezione Sostituzione delle bombole di gas durante una procedura per istruzioni sulla sostituzione della bombola di gas durante una procedura, se anche la seconda bombola è esaurita durante la procedura� Figura 13. Adattatore 2 in 1 per due bombole EZ-Connect2 Linea di alimentazione gas ausiliaria Adattatore a quattro vie con manometro Linea di alimentazione gas... -
Page 375: Navigazione Nell'interfaccia Utente
Contattare il Centro assistenza tecnica di Boston Scientific� Introduzione all’interfaccia utente Il sistema per crioablazione ICEfx fornisce un interfaccia utente che facilita la comunicazione rapida tra l’utente e il sistema tramite schermo touch screen�... -
Page 376: Barra Del Titolo
Pressure Gauge / Visualizza la pressione in dotazione della bombola di gas argon� Gas Indicator NOTA: il sistema di crioablazione ICEfx contiene regolatori interni che regolano la (Indicatore gas/ pressione del gas ai limiti di esercizio appropriati� manometro) L’Indicatore del gas si aggiorna in tempo reale quando gli aghi vengono scollegati o... -
Page 377: Tabella 9. Menu Opzioni
Tabella 9. Menu Opzioni N. Pulsante Descrizione Settings Configurare varie impostazioni di sistema (consultare la sezione Configurare le (Impostazioni) impostazioni)� NOTA: alcuni parametri di configurazione sono limitati solo agli utenti con privilegi amministrativi e/o di manutenzione� Reports (Report) In assenza di casi attivi, selezionare Reports (Rapporti) per visualizzare il contenuto dei report delle procedure salvati ed esportare i report su un’unità... -
Page 378: Schermata 5: Select Tissue Type (Selezionare Il Tipo Di Tessuto)
Schermata 5: Select Tissue Type (Selezionare il tipo di tessuto) Tabella 11. Select Tissue Type (Selezionare il tipo di tessuto) N. Pulsante Descrizione Tissue Type Selezionare kidney (rene), lung (polmone), liver (fegato), prostate (prostata), other (Tipo di tessuto) (altro)� CONFIRM Premere CONFIRM (CONFERMA) per proseguire�... -
Page 379: Tabella 12. Comandi Della Schermata Di Edit Case Information (Modifica Delle Informazioni Sul Caso)
Tabella 12. Comandi della schermata di Edit Case Information (Modifica delle informazioni sul caso) Comando Descrizione Patient ID Digitare l’ID per il paziente in questo campo� (ID paziente) ATTENZIONE: selezionare un ID paziente univoco che non riveli l’identità del paziente ad altri utenti del sistema� Physician (Medico) Digitare in questo campo il nome del medico che esegue la procedura�... -
Page 380: Tabella 13. Controlli Comuni Della Procedura
La Tabella 13 descrive i controlli comuni alle funzioni test, congelamento e scongelamento� Le sezioni che seguono descrivono i controlli pertinenti a ciascuna di queste funzioni� Tabella 13. Controlli comuni della procedura Comando Descrizione Premere il canale ALL (TUTTI) per eseguire una fase di test, congelamento o scongelamento su tutti i canali attivi contemporaneamente�... -
Page 381: Tabella 14. Informazioni Sul Timer
La Tabella 14 fornisce ulteriori informazioni sul timer� Tabella 14. Informazioni sul Timer N. Comando Descrizione Modalità La parte in alto a sinistra del timer visualizza le informazioni rilevanti per la funzione corrente: • Congelamento - Visualizza l’intensità del blocco� •... -
Page 382: Mts
La Schermata Procedura visualizza gli identificatori MTS, le posizioni del sensore e le temperature del sensore per l’MTS collegato� Il sensore più freddo per ogni MTS collegato è indicato dall’indicatore blu sul pulsante corrispondente (se si ruota l’impostazione Display MTS più freddo) On nella schermata Settings (Impostazioni) )� Schermata 9: Schermata Procedura –... -
Page 383: Tabella 16. Modifica Nome Mts
Tabella 16. Modifica nome MTS Comando Descrizione Modifica nome MTS Nel campo fornito, immettere il nuovo nome e fare clic su OK, CANCEL (ANNULLA), o DONE (FINE)� Cambia il nome e chiude la schermata� CANCEL (ANNULLA) Tornare alla schermata precedente� DONE (FINE) Cambia il nome e chiude la schermata�... -
Page 384: Avvio Di Un Ciclo Di Congelamento
Avvio di un ciclo di congelamento Per avviare un ciclo di congelamento, premere il pulsante Gelare per selezionare l’intensità di blocco desiderata (il valore predefinito è 100%), quindi premere il pulsante Inizio� Un ciclo di congelamento può essere avviato per un singolo canale attivo o per TUTTI i canali attivi contemporaneamente�... -
Page 385: Schermata 13: Cronologia Dei Canali Espansi
Selezionare un’intensità di congelamento dal menu o selezionare “Stick”� NOTA: il sistema di crioablazione ICEfx controlla l’intensità del congelamento regolando la durata del flusso di argon per ciascun intervallo di tempo di 10 secondi (ad esempio, al 30% dell’intensità il congelamento congela per 3 secondi e rimane inattivo per 7 secondi)�... -
Page 386: Schermata 14: Schermata Procedura Durante Lo Scongelamento (Funzione Fastthaw)
Per iniziare un ciclo di scongelamento: NOTA: un ciclo di scongelamento può essere avviato per un singolo canale attivo o per TUTTI i canali attivi contemporaneamente 1� Premere il pulsante Scongela per avviare l’attività di scongelamento (funzione FastThaw o funzione i-Thaw)� NOTA: •... -
Page 387: Tabella 19. Controlli Scongelamento
Tabella 19. Controlli scongelamento N. Comando Descrizione Visualizza la modalità di scongelamento (funzione i-Thaw o FastThaw)� NOTA: la funzione FastThaw genera una temperatura superiore a quella generata per la funzione i-Thaw, con conseguente tempo di scongelamento più rapido� Spia Visualizza l’intervallo di temperatura stimato del corpo dell’ago� temperatura NOTA: durante la fase di riscaldamento dell’ago, il timer visualizzerà... -
Page 388: Schermata 15: Schermata Funzione Di Cauterizzazione
NOTA: l’intervallo delle temperature dello stelo è mostrato in modo tale siccome le variabili di tessuto e procedure influiscono sulla temperatura� • Quando la funzione di cauterizzazione è terminata, il timer si mostrerà in stato di Arresto e il display della temperatura mostrerà... -
Page 389: Tabella 20. Controlli Della Funzione Di Cauterizzazione
Tabella 20. Controlli della funzione di cauterizzazione N. Comando Descrizione Pulsante PROCEDURE (PROCEDURA) – Premere per uscire dalla funzione cauterizzazione e ritornare alla Schermata Procedura � Pulsante Cauterizzazione – Premi il pulsante Cauterizzazione per selezionare la durata della funzione� Premere Inizio per avviare la funzione di cauterizzazione� 4 Stato della Mostra lo stato della funzione di Cauterizzazione�... -
Page 390: Comando Program Cycles (Cicli Di Programmazione)
Testare nuovamente un ago Per effettuare nuovamente il test di un ago, premere il pulsante Canale e quindi premere per avviare un test dell’ago� Comando Program Cycles (Cicli di programmazione) Ogni ciclo di congelamento-scongelamento consiste in un ciclo di congelamento seguito da un ciclo di scongelamento�... -
Page 391: Schermata 19: Schermata Programming Cycles (Cicli Di Programmazione)
Le Schermata Programming Cycles (Cicli di programmazione) per il canale selezionato� Schermata 19: Schermata Programming Cycles (Cicli di programmazione) 3� Premere il segno più in basso a sinistra della griglia per creare un nuovo passaggio� 4� Per ogni fase: • Scegliere tra congelare o scongelare •... -
Page 392: Schermata 21: Schermata All Reports (Tutti I Rapporti)
(quando non vi è alcun caso attivo)� La Visualizza All Reports (Tutti i rapporti) visualizza un elenco di tutti i report delle procedure salvati nel sistema di crioablazione ICEfx� Selezionare il rapporto che si desidera visualizzare e premere VIEW REPORT (VISUALIZZA RAPPORTO)�... -
Page 393: Schermata 22: Report Della Procedura
Il fuso orario può essere modificato solo da personale amministrativo o di assistenza� Il (Fuso orario) sistema di crioablazione ICEfx imposta automaticamente l’ora legale� Volume Units Selezionare la portata della bombola di gas argon in base allo standard della propria (Unità... - Page 394 Impostazione Descrizione Temperature Units Selezionare le unità di temperatura visualizzate per gli aghi MTS e CX� (Unità di temperatura) Clock Type Selezionare il tipo di orologio (12 hour (12 ore) o 24 hour (24 ore))� Il tipo di orologio può (Tipo di orologio) essere modificato solo da personale amministrativo o di assistenza�...
-
Page 395: Tabella 22. Schermata Settings (Impostazioni) - Pulsanti Di Comando
Aggiornamento manuale del software Gli utenti amministrativi e di assistenza possono aggiornare manualmente il software del sistema di crioablazione ICEfx tramite un’unità flash USB fornita da Boston Scientific� 1� Premere il pulsante ADMIN (AMMINISTRATORE) nella Schermata Settings (Impostazioni) � 2� Premere Software Update (Aggiornamento software)�... -
Page 396: Procedura
– Esportare report su un’unità flash USB Test pre-procedura di siringhe/MTS AVVERTENZA: prima di iniziare una procedura di crioablazione, impostare il sistema di crioablazione ICEfx (consultare la sezione Impostazione del sistema) ed eseguire i test di integrità e funzionalità dell’ago� I test devono essere completati con successo per poter iniziare la procedura�... -
Page 397: Schermata 23: Schermata Procedura
1� Sullo schermo touch screen premere START CASE (INIZIA CASO)� Viene visualizzata la procedura guidata di configurazione per illustrare la procedura di configurazione� Schermata 23: Schermata Procedura 2� OPZIONALE : sulla Schermata Edit Case Information (Modifica informazioni sul caso) visualizzata, immettere le informazioni opzionali sul trattamento del paziente e qualsiasi nota utilizzando la tastiera virtuale�... - Page 398 Un pulsante grigio scuro del canale indica un canale con aghi collegati� Per aghi CX, il sistema di crioablazione ICEfx rileva automaticamente il tipo di ago utilizzato, il numero di lotto e la data di scadenza del prodotto� Se il sistema rilevasse che la data di scadenza è stata superata, un messaggio informerà...
-
Page 399: Iniziare Una Procedura Di Crioablazione
10� Quando si utilizza MTS, preparare il quantitativo di sensori desiderato per il test� Il sistema per crioablazione ICEfx permetto l’uso di due sensori termici� 11� Collegare ciascun sensore termico a una porta di collegamento MTS premendo il connettore nella porta�... -
Page 400: Schermata 24: Argon Remaining (Argon Rimanente)
AVVERTENZA: se un ago senza funzionalità CX è collegato al sistema di crioablazione ICEfx, lo scongelamento attivo non è possibile� Il rilascio dell’ago da una sfera di ghiaccio sarà possibile solo con uno scongelamento passivo�... - Page 401 3� Controllare il timer per monitorare la fase di blocco del tempo� Al termine della durata di congelamento desiderata, premere il pulsante Stop (Stop) per accedere a una fase di inattività� 4� Se i sensori termici sono in uso, controllare la temperatura del tessuto utilizzando la sezione Sensori di temperatura della Schermata Procedura (fare riferimento alla sezione MTS)�...
-
Page 402: Aggiunta Di Un Ago Cx Durante Una Procedura Di Crioablazione
Se non vi sono canali aperti, utilizzare la procedura seguente per aggiungere un nuovo ago CX� ATTENZIONE: Boston Scientific consiglia che solo aghi dello stesso tipo siano posizionati insieme in un unico canale� L’uso di aghi di tipi diversi in un canale può influire sull’accuratezza dell’Indicatore del gas�... -
Page 403: Arresto Di Sistema
ARRESTO DI SISTEMA Spegnimento del sistema AVVERTENZA: informare il personale operante prima dello sfogo del sistema per crioablazione ICEfx per evitare di spaventarli� 1� Se al termine della procedura la console non è stata ventilata, eseguire queste fasi per sfiare il sistema�... -
Page 404: Figura 15. Valvola Vent (Di Sfiato) - Completamente Aperta
Figura 15. Valvola Vent (Di sfiato) - Completamente aperta c� Una volta completato Vent (di sfiato) del gas, ruotare la valvola di sfiato in posizione CLOSED (CHIUSA)� Figura 16. (uguale a Figura 8) Valvola Vent (di sfiato) - Completamente Chiusa 2�... -
Page 405: Dopo La Procedura
Tutte le superfici esterne e accessibili del dispositivo devono essere pulite in base alle istruzioni per la pulizia del sistema di crioablazione ICEfx incluse nel manuale utente� Sono compresi tutti i comuni cavi scollegabili (cavo di alimentazione, cavi video, cavi patch, ecc�)� Consultare il manuale d’uso per identificare la presenza di materiali pericolosi�... -
Page 406: Risoluzione Dei Problemi
RISOLUZIONE DEI PROBLEMI Boston Scientific suggerisce le seguenti opzioni per la risoluzione dei problemi del sistema di crioablazione ICEfx� Se gli approcci suggeriti non risolvono il problema o si verifica un problema non indicato di seguito, contattare il Centro di assistenza tecnica di Boston Scientific�... -
Page 407: Sostituzione Dei Fusibili
2� Se il problema persiste, provare un’unità flash USB differente fornita da Boston Scientific� sistema 3� L’unità flash USB è difettosa� Sostituire l’unità flash USB con una nuova unità flash USB fornita da Boston Scientific�... - Page 408 Istruzione Fotografia Tirare il meccanismo di ritenzione rosso del cavo per scollegare l’ingresso dell’alimentazione� Inserire un piccolo cacciavite nella fessura sulla parte superiore del portafusibili e abbassare la copertura del portafusibili� Inserire un piccolo cacciavite sotto il bordo del portafusibili per rimuovere il portafusibili dalla presa di corrente�...
- Page 409 Boston Scientific� Collegare il cavo di alimentazione� Contattare il centro di assistenza tecnica di Boston Scientific per programmare una chiamata di assistenza per determinare la causa dei fusibili bruciati, per stabilire se è necessaria assistenza e per fornire fusibili di ricambio�...
- Page 410 è 2� Compiere di nuovo il test di integrità e funzionalità sull’ago� stato avviato con i pulsanti 3� Contattare il Centro assistenza tecnica di Boston Scientific� Test, Congelamento o Scongelamento Black (K) ∆E ≤5.0...
- Page 411 2� La barra di bloccaggio potrebbe essere difettosa� Spostare l’ago o gli aghi su un canale collegamento degli diverso� Contattare il Centro assistenza tecnica di Boston Scientific per pianificare una aghi non può essere chiamata di assistenza� posizionata in 3�...
- Page 412 • Chiudere la valvola della bombola e sfogare il gas dal sistema per crioablazione ICEfx e la linea di alimentazione gas utilizzando la valvola Vent (di sfiato) (Figura 3)� Verificare che il sistema sia depressurizzato� Allentare e rimuovere l’adattatore del gruppo manometro�...
-
Page 413: Messaggi Visualizzati
3� Contattare il Centro assistenza tecnica di Boston Scientific� Messaggi visualizzati Il sistema di crioablazione ICEfx visualizza un messaggio sull’interfaccia utente quando un utente richiede assistenza o quando vengono rilevati errori dell’utente, dell’ago o del sistema� NOTA: registrare e segnalare il numero del messaggio (ad es� 10-01, 80-02) se è necessaria assistenza da parte del Centro di assistenza tecnica di Boston Scientific�... - Page 414 Motivo della visualizzazione/Soluzioni 10-03 Reset Password Challenge Motivo della visualizzazione: • To reset your password, contact Boston Scientific Technical L’utente ha dimenticato la password, ha premuto il Assistance Center pulsante Forgot Password (Password dimenticata) • Relay the Challenge on the screen below e ha ricevuto una richiesta da trasmettere al centro •...
- Page 415 Motivo della visualizzazione: • You have not entered the correct response L’utente ha tentato di reimpostare la password e • Contact Boston Scientific Technical Assistance Center for a non ha risposto correttamente alla richiesta� Response to the onscreen Challenge Soluzioni:...
- Page 416 Messaggio Motivo della visualizzazione/Soluzioni 20-04 Freeze All Channels Motivo della visualizzazione: • You selected to control all needles L’utente ha selezionato il pulsante Congela su ALL (TUTTI) i simultaneously canali per controllare tutti i canali attivi� • Do you want to initiate [x%] freeze for all active Soluzioni: needles now? Confermare l’inizio della fase di congelamento su tutti gli aghi...
- Page 417 Soluzioni: 1� Disconnettere e rinchiudere l’ago� 2� Collegare un tipo di ago supportato e selezionare il tipo di ago dal menu a tendina� 3� Per ulteriori istruzioni, contattare il centro di assistenza tecnica di Boston Scientific� Black (K) ∆E ≤5.0...
- Page 418 Il canale viene disabilitato • Return the needle to Boston Scientific fino a quando non viene collegato un ago con un numero di lotto • Connect a needle from a different lot diverso�...
- Page 419 • Si è verificato un errore durante il processo di Soluzioni: aggiornamento 1� Riprovare l’aggiornamento� • Ritentare l’aggiornamento 2� Contattare il Centro assistenza tecnica di Boston Scientific se l’aggiornamento fallisse� 60-02 Update Failed Motivo della visualizzazione: • An error occurred during the upload process Durante il caricamento di un registro dati di sistema è...
- Page 420 Errore report sono verificati errori che possono influire sulla completezza del • Si sono verificati errori durante la report� compilazione del report Soluzioni: • Il report potrebbe essere incompleto Contattare il Centro assistenza tecnica di Boston Scientific� Black (K) ∆E ≤5.0...
- Page 421 2� Se il problema persiste, contattare il Centro assistenza tecnica disconnessa o piena di Boston Scientific per ottenere un’unità flash USB di rimpiazzo� Messaggi di sistema NOTA: i messaggi di errore di sistema vengono visualizzati al centro della barra del titolo� Premere il messaggio di errore per visualizzare ulteriori dettagli�...
- Page 422 • La procedura verrà interrotta 80-04 Temperature Warning Motivo della visualizzazione: • The internal temperature of the ICEfx Cryoablation La temperatura interna del sistema supera i limiti di System exceeds appropriate operating limits esercizio appropriati� • Discontinue the cryoablation procedure as soon as...
- Page 423 System Error Motivo della visualizzazione: • Channel X is defective� Choose another channel� At the È stato rilevato un solenoide difettoso sul canale X; conclusion of the procedure, contact Boston Scientific selezionare un altro canale� Technical Assistance Center� Soluzioni: 80-32 Errore di sistema 1�...
- Page 424 90-02 Service Due Motivo della visualizzazione: • Service for the ICEfx Cryoablation System is past due Il sistema di crioablazione ICEfx non è stato sottoposto • Contact Boston Scientific Technical Assistance Center a manutenzione nei tempi previsti� Durante gli avvii to schedule service�...
-
Page 425: Specifiche Del Sistema
Motivo della visualizzazione/Soluzioni 90-03 System End of Life Motivo della visualizzazione: • The ICEfx Cryoablation System is at the end of Il sistema di crioablazione ICEfx è al termine della durata operational life operativa� • Contact Boston Scientific Technical Assistance Center... -
Page 426: Prestazioni Essenziali
Prestazioni essenziali Le prestazioni essenziali del sistema di crioablazione ICEfx sono: • La possibilità di attivare e disattivare il flusso di argon o elio agli aghi per crioablazione collegati tramite input di comando dall’interfaccia utente • La possibilità di mantenere un flusso di gas ininterrotto agli aghi selezionati dall’utente quando il flusso di gas viene attivato dall’utente... -
Page 427: Informazioni Per Il Paziente
• Esaminare i rischi e i benefici, tra cui la revisione dei potenziali effetti indesiderati elencati nelle istruzioni per l’uso, sia per il sistema ICEfx e i prodotti accessori utilizzati per eseguire procedure di crioablazione, sia per altri trattamenti interventistici che potrebbero essere impiegati�... - Page 428 Afbeelding 1� Vooraanzicht console ��������������������������������������������������������������������������������������������������������������� 433 Afbeelding 2� Achteraanzicht console ����������������������������������������������������������������������������������������������������������� 434 Touchscreenmonitor �������������������������������������������������������������������������������������������������������������������������������������������� 434 ICEfx-cryoablatiewagentje ����������������������������������������������������������������������������������������������������������������������������������� 435 Afbeelding 3� ICEfx-cryoablatiewagentje ������������������������������������������������������������������������������������������������������ 436 Afbeelding 4� ICEfx-cryoablatiewagentje – wielvergrendelingshendels ������������������������������������������������������ 436 Werkingsprincipe ������������������������������������������������������������������������������������������������������������������������������������������������� 437 Materialen ������������������������������������������������������������������������������������������������������������������������������������������������������������ 437 Niet-pyrogeen ������������������������������������������������������������������������������������������������������������������������������������������������������ 437 Informatie voor de gebruiker ������������������������������������������������������������������������������������������������������������������������������� 437 BEOOGD GEBRUIK �����������������������������������������������������������������������������������������������������������������������������������������������������438...
- Page 429 Systeemopstelling ����������������������������������������������������������������������������������������������������������������������������������������������� 452 Tabel 6� Volgorde instellen systeem �������������������������������������������������������������������������������������������������������������� 452 Afbeelding 5� Plaats de ICEfx-cryoablatieconsole op het wagentje �������������������������������������������������������������� 453 Afbeelding 6� Draai de bevestigingsschroef op het wagentje vast ��������������������������������������������������������������� 453 Afbeelding 7� Afsluitventiel Argon – stand ON (AAN) ������������������������������������������������������������������������������������ 454 Afbeelding 8�...
- Page 430 Tabel 15� MTS-bedieningselementen ������������������������������������������������������������������������������������������������������������466 Scherm 10: Scherm Procedure – Naam MTS-identificator wijzigen ��������������������������������������������������������������� 467 Tabel 16� MTS-naam wijzigen ������������������������������������������������������������������������������������������������������������������������ 467 Scherm 11: Scherm Procedure tijdens testen ������������������������������������������������������������������������������������������������� 467 Tabel 17� Testbedieningselementen ��������������������������������������������������������������������������������������������������������������468 Een bevriezingscyclus starten ������������������������������������������������������������������������������������������������������������������������������468 Scherm 12: Scherm Procedure tijdens bevriezen �������������������������������������������������������������������������������������������468 Tabel 18�...
- Page 431 Argongastoevoerslang ����������������������������������������������������������������������������������������������������������������������������������������� 511 Specificaties van gascilinder ��������������������������������������������������������������������������������������������������������������������������������� 511 Nauwkeurigheid van weergegeven waarden ������������������������������������������������������������������������������������������������������� 511 Essentiële prestaties ���������������������������������������������������������������������������������������������������������������������������������������������512 Boston Scientific Technical Assistance Center �������������������������������������������������������������������������������������������������������512 INFORMATIE VOOR HET INSTRUEREN VAN DE PATIËNT �������������������������������������������������������������������������������������������513 GARANTIE �������������������������������������������������������������������������������������������������������������������������������������������������������������������513 DEFINITIE VAN SYMBOLEN ����������������������������������������������������������������������������������������������������������������������������������������513 Black (K) ∆E ≤5.0...
-
Page 432: Waarschuwing Voor Hergebruik
Eén (1) EZ-Connect2 adapter voor twee cilinders: De adapter voor twee cilinders is een onderdeel dat wordt gebruikt om twee argoncilinders achter elkaar aan te sluiten op het ICEfx-cryoablatiesysteem� De adapter voor twee cilinders bestaat uit een vierweg adapterconstructie met een argonmanometer en aanvullende gasaansluiting bevestigd aan een lange gastoevoerslang en een korte ondersteunende gastoevoerslang met gascilinderaansluiting Raadpleeg het gedeelte Argongas aansluiten voor instructies over het gebruik van de EZ-Connect2 adapter voor twee cilinders�... -
Page 433: Icefx-Cryoablatieconsole
ICEfx-cryoablatieconsole De ICEfx-cryoablatieconsole is een draagbare, heliumvrije desktop cryoablatie-unit� De voorzijde van de console bevat vier naaldaansluitgroepen (elke groep bevat twee naaldpoorten), twee aansluitingen voor Multi-Point 1�5 Thermal Sensor-apparaatpoorten en een verzonken touchscreenmonitor van 10,1 inch� Afbeelding 1. Vooraanzicht console 1�... -
Page 434: Afbeelding 2. Achteraanzicht Console
MTS-connectorpoorten Er bevinden zich twee MTS-aansluitpoorten boven de naaldaansluitingsgroepen ter ondersteuning van de aansluiting van de Boston Scientific MTS, die worden gebruikt om de temperatuur binnen en nabij de doellocatie voor cryoablatie te bewaken� Black (K) ∆E ≤5.0... -
Page 435: Icefx-Cryoablatiewagentje
Met de Aan/uit-schakelaar wordt de console ingeschakeld als voorbereiding op een cryoablatieprocedure� Communicatiepoort Er bevindt zich een USB 2.0-communicatiepoort aan de achterzijde van de console waarmee de gebruiker rapporten kan opslaan op een USB-geheugenstick van Boston Scientific om ze te downloaden op een andere computer of af te drukken� Softwarereset De softwareresetknop wordt gebruikt om de ICEfx-cryoablatieconsole in een herstelmodus te zetten wanneer de software is beschadigd (raadpleeg het gedeelte Softwareherstel)�... -
Page 436: Afbeelding 3. Icefx-Cryoablatiewagentje
Haak voor accessoirezak Wielvergrendelingshendels Gebruik de wielvergrendelingshendels om de wielen van het ICEfx-cryoblatiewagentje tijdens een procedure te vergrendelen (afbeelding 4)� De wielvergrendelingshendels kunnen aan beide zijden worden vergrendeld� Door de wielvergrendelingshendel OMLAAG te duwen, wordt het wiel vergrendeld en wordt beweging tijdens de procedure voorkomen�... -
Page 437: Werkingsprincipe
Informatie voor de gebruiker Het ICEfx-cryoablatiesysteem is ontworpen voor gebruik door medische professionals die een grondig begrip hebben van de technische principes, klinische toepassingen en risico’s die gepaard gaan met cryoablatieprocedures� Optioneel onderwijs is beschikbaar bij uw vertegenwoordiger van Boston Scientific�... -
Page 438: Beoogd Gebruik
Het ICEfx-cryoablatiesysteem is bedoeld voor de vernietiging van weefsel via cryoablatie tijdens minimaal invasieve procedures; voor het uitvoeren van deze procedures zijn diverse accessoires van Boston Scientific vereist� Het ICEfx- cryoablatiesysteem is bedoeld voor gebruik als een cryochirurgisch hulpmiddel bij algemene chirurgie, dermatologie, neurologie (waaronder cryoanalgesie), thoraxchirurgie (met uitzondering van hartweefsel), gynaecologie, oncologie en urologie�... - Page 439 • Zorg ervoor dat de argongascilinder aan een wand of op een goedgekeurd wagentje is vastgemaakt om onbedoeld omvallen van de cilinder te voorkomen� • Sluit het ICEfx-cryoablatiesysteem niet aan op een gastoevoer met een hogere druk dan 6000 psi (414 bar, 41,4 MPa) om schade aan de interne systeemonderdelen te voorkomen.
- Page 440 • Draagbare RF-communicatieapparatuur (met inbegrip van randapparatuur zoals antennekabels en externe antennes) mag niet dichter dan 30 cm (12 in) bij enig deel van het ICEfx-cryoablatiesysteem worden gebruikt, met inbegrip van kabels die voor gebruik met het systeem zijn gespecificeerd� Gebeurt dit niet, dan kan dit leiden tot vermindering van de prestaties van deze apparatuur�...
-
Page 441: Voorzorgsmaatregelen
Maak gebruik van beeldvorming om ervoor te zorgen dat het ontdooien adequaat gebeurt� • Raak niet tegelijkertijd de ICEfx-cryoablatieconsole en de patiënt aan, om in het geval van een onbedoelde elektrische storing het risico op schokken bij de patiënt te voorkomen�... - Page 442 • Het ICEfx-cryoablatiesysteem moet in de nabijheid worden geplaatst om de naald toegankelijk te maken en te gebruiken� • Zet de ICEfx-cryoablatieconsole AAN alvorens de argongascilinder aan te sluiten, om ervoor te zorgen dat de juiste diagnostische tests worden uitgevoerd�...
-
Page 443: Ongewenst Voorval
• Boston Scientific raadt aan om alleen naalden van hetzelfde type in één groep te plaatsen� Gebruik van verschillende naaldtypen in één groep kan de nauwkeurigheid van de gasindicator aantasten� • Vermijd beschadiging van de naald door andere chirurgische instrumenten tijdens gebruik�... - Page 444 • hemothorax • leverfunctiestoornis/-falen • hernia • hypertensie • hypotensie • onderkoeling • darmafsluiting • impotentie • infectie/abces/sepsis • ontsteking • spierspasmen • myocardinfarct • necrose • noodzaak van extra ingreep of operatie • zenuwletsel • neuropathie • obstructie • pijn/ongemak •...
-
Page 445: Naleving Van Normen
WAARSCHUWING: Draagbare RF-communicatieapparatuur (met inbegrip van randapparatuur zoals antennekabels en externe antennes) mag niet dichter dan 30 cm (12 inches) bij enig deel van het ICEfx-cryoablatiesysteem worden gebruikt, met inbegrip van kabels die voor gebruik met het systeem zijn gespecificeerd� Gebeurt dit niet, dan kan dit leiden tot vermindering van de prestaties van deze apparatuur�... -
Page 446: Tabel 2. Elektromagnetische Emissie
Het ICEfx-cryoablatiesysteem is bedoeld voor gebruik in een elektromagnetische omgeving van een professionele gezondheidszorginstelling, waar sprake is van de hieronder weergegeven conformiteitsniveaus� De klant of de gebruiker van het ICEfx-cryoablatiesysteem dient ervoor te zorgen dat het in een dergelijke omgeving wordt gebruikt�... -
Page 447: Tabel 3. Elektromagnetische Immuniteit
Het ICEfx-cryoablatiesysteem is bedoeld voor gebruik in een elektromagnetische omgeving van een professionele gezondheidszorginstelling, waar sprake is van de hieronder weergegeven immuniteit-conformiteitsniveaus� De klant of de gebruiker van het ICEfx-cryoablatiesysteem dient ervoor te zorgen dat het in een dergelijke omgeving wordt gebruikt�... -
Page 448: Tabel 4. Elektromagnetische Immuniteit Voor Systemen Die Niet Levensondersteunend Zijn
Het ICEfx-cryoablatiesysteem is bedoeld voor gebruik in een elektromagnetische omgeving van een professionele gezondheidszorginstelling, waar sprake is van de hieronder weergegeven immuniteit-conformiteitsniveaus� De klant of de gebruiker van het ICEfx-cryoablatiesysteem dient ervoor te zorgen dat het in een dergelijke omgeving wordt gebruikt�... -
Page 449: Tabel 5. Aanbevolen Scheidingsafstanden Tussen Draagbare En Mobiele Rf-Communicatieapparatuur En
Aanbevolen scheidingsafstanden tussen draagbare en mobiele RF-communicatieapparatuur en het ICEfx- cryoablatiesysteem Het ICEfx-cryoablatiesysteem is bedoeld voor gebruik in een elektromagnetische omgeving met gecontroleerde uitgestraalde RF-storing� De klant of de gebruiker van het ICEfx-cryoablatiesysteem kan elektromagnetische interferentie helpen voorkomen door een minimale afstand aan te houden tussen draagbare en mobiele RF-communicatieapparatuur (zenders) en het ICEfx-cryoablatiesysteem, zoals hieronder wordt aanbevolen, overeenkomstig het maximale uitgangsvermogen van de communicatieapparatuur�... -
Page 450: Levering
Als de oorspronkelijke verpakking niet beschikbaar is, is het de verantwoordelijkheid van de klant om ervoor te zorgen dat de transportomstandigheden voldoende zijn of moet de klant contact opnemen met het Boston Scientific Technical Assistance Center om geschikt verpakkingsmateriaal aan te vragen�... -
Page 451: Installatie, Kalibratie En Service
Neem contact op met het Boston Scientific Technical Assistance Center voor het bestellen van cryoablatienaaldgroep-id-stickers� • Boston Scientific MTS: De MTS bevatten vier sensorlocaties langs de distale schacht van de naald om de temperatuur nabij het doelgebied en aangrenzende essentiële structuren te bewaken�... -
Page 452: Voorbereiding
Voorbereiding Systeemopstelling Tabel 6 toont de volgorde en de stappen voor het instellen van het ICEfx-cryoablatiesysteem� Dit gedeelte geeft een uitvoerige beschrijving van elke stap� Tabel 6. Volgorde instellen systeem Console instellen - Controleer de beschikbaarheid van gas, naalden en accessoires... -
Page 453: Afbeelding 5. Plaats De Icefx-Cryoablatieconsole Op Het Wagentje
De console op het ICEfx-cryoablatiewagentje bevestigen 1� Plaats de console op het ICEfx-cryoablatiewagentje� De uitsparing onder op de console rust op het uitstekende deel van het ICEfx-cryoablatiewagentje� Afbeelding 5. Plaats de ICEfx-cryoablatieconsole op het wagentje 2� Draai de bevestigingsschroef op het wagentje vast�... -
Page 454: Afbeelding 7. Afsluitventiel Argon - Stand On (Aan)
3� Steek de voedingskabel in een stopcontact voor ziekenhuisgebruik met een aardingsaansluiting� Boston Scientific adviseert een stabiele en ononderbreekbare stroomtoevoer te gebruiken� OPMERKING: Als de stroomtoevoer naar de ICEfx-cryoablatieconsole instabiel is of ruis bevat, zijn de MTS- temperatuuraflezingen mogelijk onnauwkeurig�... - Page 455 Boston Scientific� Zie het gedeelte Weergegeven berichten voor informatie over weergegeven berichten� Wanneer de software van het ICEfx-cryoablatiesysteem gas onder druk waarneemt in het systeem en de gastoevoerslang niet is aangesloten, verschijnt er een melding met de mededeling dat u het gas handmatig uit het systeem moet ontluchten�...
-
Page 456: Argongas Aansluiten
(raadpleeg het gedeelte SYSTEEMSPECIFICATIES voor de eisen voor gaszuiverheid)� Er moet voor elke behandeling minstens één volle reservecilinder beschikbaar zijn� LET OP: Zet de ICEfx-cryoablatieconsole AAN alvorens de argongascilinder aan te sluiten, om ervoor te zorgen dat de juiste diagnostische tests worden uitgevoerd�... -
Page 457: Afbeelding 9. Veiligheidskabel Op Console Aansluiten
Afbeelding 9. Veiligheidskabel op console aansluiten 4� Sluit de hogedruktoevoerslang voor argon aan op de argoningang op de console door middel van de snelkoppeling aan de achterzijde van de console (zie afbeelding 10)� Afbeelding 10. Argongastoevoerslang aansluiten 5� Sluit de hogedrukgastoevoerslang voor argon aan op de argoncilinder door de meteradapter op de cilinderaansluiting te bevestigen (zie afbeelding 11)�... -
Page 458: Afbeelding 12. Argongascilinder Openen
Afbeelding 12. Argongascilinder openen Wanneer er geen gasdruk voor argon op de manometer van het systeem wordt weergegeven, moet u controleren of het afsluitventiel Argon in de stand ON (AAN) staat� OPTIONEEL: Met de EZ-Connect2 adapter voor twee cilinders worden twee argongascilinders op de console aangesloten ter ondersteuning van een cryoablatieprocedure�... -
Page 459: Scherm 1: Gasindicator
Als het Vent (ontluchtings)ventiel volledig gesloten is en het sissende geluid aanhoudt, schakelt u het systeem UIT door middel van de aan/uit-schakelaar aan de voorzijde van de console (afbeelding 2)� Sluit de gastoevoer af met de afsluiter op de cilinder� Neem contact op met het Boston Scientific Technical Assistance Center�... -
Page 460: Door De Gebruikersinterface Navigeren
Manometer/ Geeft de toegediende druk van de argongascilinder weer� gasindicator OPMERKING: Het ICEfx-cryoablatiesysteem bevat een interne regelaar waarmee de argondruk tot passende werklimieten wordt gereguleerd� De Gasindicator wordt direct in real-time geüpdatet als er naalden worden losgekoppeld of extra naalden worden aangesloten en als de bevriezingsintensiteit wordt aangepast�... -
Page 461: Menu Opties
Menu Opties Via het menu Opties hebt u toegang tot extra functies, zoals het openen van rapporten en wijzigen van instellingen� Om de opties weer te geven en te selecteren, drukt u op het pictogram linksboven in het scherm en selecteert u de gewenste optie in het vervolgkeuzemenu�... -
Page 462: Scherm 4: Scherm Start Case (Casus Starten)
De procedure starten Nadat u zich bij het systeem hebt aangemeld, verschijnt het scherm Start Case (Casus starten) � Druk op START CASE (CASUS STARTEN) om een cryoablatieprocedure te starten� Als u op START CASE (CASUS STARTEN) drukt, wordt het scherm Select Tissue Type (Weefseltype selecteren) weergegeven�... -
Page 463: Scherm 6: Scherm Edit Case Information (Casusinformatie Bewerken)
Casusinformatie invoeren Gebruik het scherm Edit Case Information (Casusinformatie bewerken) om aanvullende informatie te verstrekken voor de cryoablatieprocedure� Dit is een optionele stap� Het scherm Edit Case Information (Casusinformatie bewerken) wordt aan het begin en het einde van een cryoablatieprocedure weergegeven� Aan het einde van de procedure wordt een optie geboden om de casusinformatie op te slaan�... -
Page 464: Scherm 7: Initieel Scherm Procedure
Scherm 7: Initieel scherm Procedure In tabel 13 worden de gebruikelijke bedieningselementen voor de test-, bevriezings- en ontdooifuncties beschreven� In de volgende hoofdstukken worden de bedieningselementen beschreven die relevant zijn voor elk van deze functies� Tabel 13. Vaak gebruikte bedieningselementen Bedieningselement Beschrijving Gebruik de groep ALL (ALLE) om een bevriezings-, ontdooi- of testfunctie tegelijkertijd uit te voeren op ALLE actieve groepen�... -
Page 465: Scherm 8: Timer Tijdens Fastthaw-Functie
Scherm 8: Timer tijdens FastThaw-functie Tabel 14 biedt aanvullende informatie over de timer� Tabel 14. Informatie over de timer Nr. Bedieningselement Beschrijving Modus Linksboven in de timer worden gegevens weergegeven die relevant zijn voor de huidige functie: • Bevriezen – Geeft de bevriezingsintensiteit weer� •... -
Page 466: Mts
Nr. Bedieningselement Beschrijving Temperatuur- Voor CX-naalden worden rechtsboven in de timer de temperatuurgegevens indicator weergegeven voor de huidige functie: • Testen – Geeft de naaldtemperatuur weer� • Bevriezen – Geeft de interne gastemperatuur bij de naaldtip weer� • Ontdooien – Geeft het geschatte temperatuurbereik van de naaldschacht weer� OPMERKING: Tijdens de naaldopwarmingsfase toont de timer een ronddraaiende opwarmingsindicator�... -
Page 467: Scherm 10: Scherm Procedure - Naam Mts-Identificator Wijzigen
Scherm 10: Scherm Procedure – Naam MTS-identificator wijzigen Tabel 16. MTS-naam wijzigen Nr. Bedieningselement Beschrijving MTS-naam wijzigen Voer in het daarvoor bedoelde veld de nieuwe naam in en klik op OK, CANCEL (ANNULEREN) of DONE (GEREED)� Wijzigt de naam en sluit het scherm� CANCEL (ANNULEREN) Keert terug naar het vorige scherm�... -
Page 468: Tabel 17. Testbedieningselementen
Tabel 17. Testbedieningselementen Nr. Bedieningselement Beschrijving Knop Test – Geeft aan dat de groep klaar is voor testen� Er kunnen geen andere bedieningselementen op een groep worden geselecteerd totdat de naaldtest is voltooid� Wanneer de naaldintegriteits- en -functionaliteitstests succesvol zijn voltooid, worden de procedurebedieningselementen voor de groep actief�... -
Page 469: Scherm 13: Uitgevouwen Groepsgeschiedenis
Selecteer een bevriezingsintensiteit in het menu of selecteer de “Stick” (Stick)- intensiteit� OPMERKING: Het ICEfx-cryoablatiesysteem regelt de bevriezingsintensiteit door de duur van de argonstroom over elk tijdsblok van 10 seconden aan te passen (bijv� 30% bevriezingsintensiteit bevriest gedurende 3 seconden en is inactief gedurende 7 seconden)�... -
Page 470: Een Ontdooicyclus Starten (Alleen Cx-Naalden)
Een ontdooicyclus starten (alleen CX-naalden) LET OP: Naalden zonder CX-functionaliteit ondersteunen de i-Thaw-functie of de FastThaw-functie niet� Het loshalen van de naald uit een ijsbal is alleen mogelijk met behulp van passieve ontdooiing� WAARSCHUWING: Het naaldhandvat en de distale schacht van de naald kunnen warm worden tijdens het actief ontdooien�... -
Page 471: Scherm 14: Scherm Procedure Tijdens Ontdooien (Fastthaw-Functie)
Bedieningselementen voor ontdooien Scherm 14: Scherm Procedure tijdens ontdooien (FastThaw-functie) Tabel 19. Bedieningselementen voor ontdooien Nr. Bedieningselement Beschrijving Geeft de momenteel geselecteerde ontdooimodus (i-Thaw-functie of FastThaw- functie) weer� OPMERKING: De FastThaw-functie genereert een temperatuur die hoger is dan die gegenereerd voor de i-Thaw-functie, wat resulteert in een snellere ontdooitijd� Temperatuurindicator Geeft het geschatte temperatuurbereik van de naaldschacht tijdens ontdooien weer�... - Page 472 Cauterisatiefunctie gebruiken (uitsluitend CX-naalden) Ablatie van het naaldtraject vindt plaats met behulp van de functie Cauterisatie� Tijdens de cauterisatiefunctie wordt het naaldtraject geableerd door middel van thermische energie� Elke naald wordt via de knop Cautery (Cauterisatie) afzonderlijk bediend voor de groep en poort waarop de naald is aangesloten� WAARSCHUWING: Monitor het inbrengen van de naald, het plaatsen van de naald, de vorming van ijsbal en het verwijderen voortdurend met behulp van beeldbegeleiding (zoals directe visualisatie, echografie of computertomografie (CT)) om te zorgen dat het weefsel voldoende wordt afgedekt en om beschadiging van...
-
Page 473: Scherm 15: Scherm Cauterisatiefunctie
• Als de naald blijft steken, draai dan lichtjes aan de naald en trek de naald langzaam terug� • Let tijdens het verwijderen van de naald op de 10 mm brede actieve zone-indicator op de naald om de naald terug te trekken� De actieve zone-indicator is een gemarkeerde band langs de naaldschacht, en bevindt zich op 20 mm distaal van het verwarmingsgedeelte van de naald�... -
Page 474: Geavanceerde Bedieningselementen Voor Groepen
Geavanceerde bedieningselementen voor groepen De geavanceerde bedieningselementen voor groepen bieden de optie om het naaldtype voor de geselecteerde groep te wijzigen, een naald opnieuw te testen en meerdere bevriezings-/ontdooicycli te programmeren� Bedieningselement Naaldtype selecteren 1� Om het naaldtype voor een groep te selecteren of te wijzigen, drukt u op de knop Groep om de lijst met naaldtypen weer te geven�... -
Page 475: Scherm 17: Geprogrammeerde Cyclus Selecteren
Een opgeslagen cyclusreeks uitvoeren: 1� Om een opgeslagen cyclusreeks uit te voeren, drukt u op de desbetreffende knop Groep of op de knop ALL (ALLE) en vervolgens op PROGRAM CYCLES (CYCLI PROGRAMMEREN)� 2� Het dialoogvenster Program Cycles (Cycli programmeren) wordt weergegeven� Selecteer de gewenste cyclusreeks in de lijst en druk op LOAD (LADEN)�... -
Page 476: Scherm 19: Scherm Cycli Programmeren
Het scherm Cycli programmeren voor de geselecteerde groep wordt weergegeven� Scherm 19: Scherm Cycli programmeren 3� Druk op het plusteken linksonder op het raster om een nieuwe stap te creëren� 4� Voor iedere stap: • U kunt kiezen tussen bevriezen of ontdooien •... -
Page 477: Scherm 21: Scherm All Reports (Alle Rapporten)
(als er geen actieve casus is)� Op het scherm All Reports (Alle rapporten) wordt een lijst met alle in het ICEfx-cryoablatiesysteem opgeslagen procedurerapporten weergegeven� Selecteer het rapport dat u wilt bekijken en druk op VIEW REPORT (RAPPORT WEERGEVEN)�... -
Page 478: Scherm 22: Procedurerapport
Een rapport weergeven tijdens een cryoablatieprocedure Druk op en selecteer Report (Rapport) in het uitgevouwen menu om de huidige patiëntgegevens tijdens een actieve casus weer te geven� Wanneer een rapport wordt weergegeven tijdens een cryoablatieprocedure, kunt u de details van het rapport dat verschijnt vernieuwen (met refresh [vernieuwen])� Opties voor het opslaan, verwijderen en exporteren zijn niet beschikbaar tijdens een cryoablatieprocedure�... - Page 479 Instelling Beschrijving Time Zone (Tijdzone) De tijdzone kan worden gewijzigd door systeembeheerders of onderhoudspersoneel� Het ICEfx-cryoablatiesysteem past zich automatisch aan de zomertijd aan� Volume Units Selecteer de argoncilindervolume-eenheden volgens de norm in uw (Volume-eenheden) geografische regio� Pressure Units (Drukeenheden) Selecteer de argoncilinderdrukeenheden volgens de norm in uw geografische regio�...
-
Page 480: Tabel 22. Scherm Settings (Instellingen) - Bedieningsknoppen
2� Druk op de knop ADMIN (BEHEERDER)� Software-update Handmatige software-update Systeembeheerders en onderhoudspersoneel kunnen de software van het ICEfx-cryoablatiesysteem handmatig updaten via de USB-geheugenstick van Boston Scientific� 1� Druk op de knop ADMIN (BEHEERDER) in het scherm Settings (Instellingen) �... -
Page 481: Procedure
– Exporteer het rapport naar een USB-geheugenstick Naald/MTS testen voor de procedure WAARSCHUWING: Voordat u een cryoablatieprocedure start, stelt u het ICEfx-cryoablatiesysteem in (raadpleeg het gedeelte Systeeminstelling) en voert u de integriteits- en functionaliteitstests van de naald uit� Tests moeten met succes worden voltooid om met de procedure te kunnen beginnen�... -
Page 482: Scherm 23: Scherm Procedure
Scherm 23: Scherm Procedure 2� OPTIONEEL : Op het scherm Edit Case Information (Casusinformatie bewerken) dat wordt weergegeven, voert u de optionele informatie over de behandeling van de patiënt en eventuele notities met behulp van het virtuele toetsenbord in� De beschikbare gegevensinvoervelden omvatten Patient ID (ID van de patiënt), Hospital Name (Naam van het ziekenhuis), Hospital Address (Adres van het ziekenhuis), Physician Name (Naam van de arts) en Organ Type (Soort orgaan)�... - Page 483 7� Herhaal stap 3 tot en met 6 voor elke cryoablatienaald die wordt getest� LET OP: Boston Scientific raadt aan om alleen naalden van hetzelfde type in één groep te plaatsen� Gebruik van verschillende naaldtypen in één groep kan de nauwkeurigheid van de gasindicator aantasten�...
-
Page 484: Een Cryoablatieprocedure Starten
Wanneer de naaldintegriteits- en -functionaliteitstest succesvol is uitgevoerd, worden de overige bedieningsknoppen van de groep actief� De naalden zijn gereed voor gebruik� 10� Maak bij gebruik van MTS het gewenste aantal sensoren gereed voor het testen� Het ICEfx-cryoablatiesysteem ondersteunt het gebruik van twee thermische sensoren�... -
Page 485: Scherm 24: Argon Remaining (Resterend Argon)
WAARSCHUWING: Als er een naald zonder CX-functionaliteit wordt aangesloten op het ICEfx-cryoablatiesysteem, is actief ontdooien niet mogelijk� Het loshalen van de naald uit een ijsbal is alleen mogelijk door middel van passieve ontdooiing�... - Page 486 3� Houd de timer in de gaten om te zien of de tijd voor de bevriezingsfase niet is verstreken� Wanneer de gewenste bevriezingsduur is verstreken, drukt u op de knop Stop om een rustfase in te gaan� 4� Als er temperatuursensoren worden gebruikt, bewaakt u de temperatuur van het weefsel in het gedeelte Temperatuursensoren van het scherm Procedure (raadpleeg het gedeelte MTS)�...
-
Page 487: Een Cx-Naald Toevoegen Tijdens Een Cryoablatieprocedure
Als er geen open groepen zijn, gebruikt u de volgende procedure voor het toevoegen van een nieuwe CX-naald� LET OP: Boston Scientific raadt aan om alleen naalden van hetzelfde type in één groep te plaatsen� Gebruik van verschillende naaldtypen in één groep kan de nauwkeurigheid van de gasindicator aantasten�... -
Page 488: Systeem Uitschakelen
SYSTEEM UITSCHAKELEN Uitschakelen van het systeem WAARSCHUWING: Waarschuw het procedurepersoneel voordat het ICEfx-cryoablatiesysteem wordt ontlucht om te voorkomen dat ze schrikken� 1� Als de console aan het eind van de procedure niet is ontlucht, voert u de volgende stappen uit om het systeem te ontluchten�... -
Page 489: Afbeelding 15. Vent (Ontluchtings)Ventiel - Volledig Geopend
Afbeelding 15. Vent (ontluchtings)ventiel – volledig geopend c� Nadat het gas is afgeblazen, draait u het Vent (ontluchtings)ventiel naar de stand CLOSED (GESLOTEN)� Afbeelding 16. (hetzelfde als afbeelding 8) Vent (ontluchtings)ventiel - volledig gesloten 2� Koppel de toevoerslang voor gas onder hoge druk los van de console en de argoncilinder� Berg de gastoevoerslang en meter op in de accessoirezak�... -
Page 490: Na De Ingreep
Elk ernstig incident in verband met dit apparaat moet aan de fabrikant en de relevante plaatselijke regelgevende autoriteit worden gemeld� Klanten in Australië dienen elk ernstig voorval met dit apparaat te melden aan Boston Scientific en aan de Therapeutic Goods Administration (https://www�tga�gov�au)�... -
Page 491: Probleemoplossing
Boston Scientific suggereert de volgende opties voor het oplossen van problemen met het ICEfx-cryoablatiesysteem� Als het probleem met de voorgestelde aanpak niet wordt opgelost of als u een probleem ondervindt dat hieronder niet wordt vermeld, dient u contact op te nemen met het Boston Scientific Technical Assistance Center� Softwareherstel Als de software beschadigd raakt of vastloopt, kan de software worden teruggezet naar de vorige softwareversie�... -
Page 492: Zekeringen Vervangen
3� Wanneer stappen 1 en 2 niet succesvol zijn, pakt u een nieuwe naald� Neem contact op met het Boston Scientific Technical Assistance Center om afspraken te maken over het retourneren van de defecte naald� 4� De groep is mogelijk defect� Gebruik deze groep niet� Verplaats de naald(en) naar een andere groep�... - Page 493 Instructie Foto Trek aan het rode kabelvergrendelingsmechanisme om de stroomkabel los te koppelen van de voedingsingang� Steek een kleine schroevendraaier in de sleuf aan de bovenzijde van de zekeringhouder om de afsluiting uit de zekeringshouder te wippen� Steek een kleine schroevendraaier onder de rand van de zekeringhouder om deze uit het contact te verwijderen�...
- Page 494 Scientific gespecificeerde zekeringen� Sluit de stroomkabel aan� Neem contact op met het Boston Scientific Technical Assistance Center om een afspraak te maken voor het bepalen van de oorzaak van het doorbranden van de zekering, om te bepalen of reparatie noodzakelijk is en om nieuwe zekeringen te bestellen�...
- Page 495 1� Koppel de naald los en verplaats de naald naar een andere groep� gastoevoer werd gestart 2� Voer nogmaals de naaldintegriteits- en -functionaliteitstest uit voor de naald� door middel van de 3� Neem contact op met het Boston Scientific Technical Assistance Center� knop Test, Bevriezen of Ontdooien Black (K) ∆E ≤5.0...
- Page 496 2� De vergrendelingsschuif is mogelijk defect� Verplaats de naald naar een andere kan niet in de stand groep� Neem contact op met het Boston Scientific Technical Assistance Center om een VERGRENDELD worden onderhoudsafspraak te maken� gezet 3�...
- Page 497 Plaats de meteradapter opnieuw op de cilinderafsluiter en draai de adapter vast met de sleutel die bij het ICEfx- cryoablatiesysteem wordt geleverd� Naalden...
-
Page 498: Weergegeven Berichten
3� Neem contact op met het Boston Scientific Technical Assistance Center� Weergegeven berichten Het ICEfx-cryoablatiesysteem toont een bericht op het gebruikersinterfacescherm wanneer een gebruiker om hulp vraagt of wanneer er gebruikers-, naald- of systeemfouten worden geconstateerd� OPMERKING: Noteer en meld het meldingsnummer (bijvoorbeeld, 10-01, 80-02) als u hulp nodig hebt van het Boston Scientific Technical Assistance Center�... -
Page 499: Wachtwoord Resetten
2� Neem contact op met de systeembeheerder voor • U hebt niet het juiste wachtwoord ingevoerd verdere hulp� • Voer uw wachtwoord opnieuw in 3� Neem contact op met het Boston Scientific Technical • Neem contact op met uw systeembeheerder als u Assistance Center� hulp nodig hebt •... - Page 500 • Relay the Challenge on the screen below Oplossingen: • Enter the Response provided by Customer Service 1� Neem contact op met het Boston Scientific Technical • Press the Login button Assistance Center en geef de op het scherm weergegeven...
- Page 501 Procedureberichten Bericht Reden voor weergave/oplossingen 20-01 Cannot Start Test Reden voor weergave: • The gas pressure is too low/high to begin a De gebruiker heeft de knop Test ingedrukt terwijl de procedure gascilinder nog niet was aangesloten of de gasdruk lager •...
- Page 502 Bericht Reden voor weergave/oplossingen 20-06 Thaw All Channels Reden voor weergave: • The argon shut off valve may be closed De gebruiker selecteerde de knop Ontdooien in de groep • Check and open if necessary ALL (ALLE) om alle actieve groepen te bedienen� 20-06 Alle groepen ontdooien Oplossingen:...
- Page 503 1� Koppel de naald los en leg deze apart� 2� Sluit een ondersteund naaldtype aan en selecteer het naaldtype in het keuzemenu� 3� Neem contact op met het Boston Scientific Technical Assistance Center als u verdere hulp nodig hebt� Black (K) ∆E ≤5.0...
- Page 504 1� Koppel de naald los en leg deze apart� • Dit naaldpartijnummer wordt geïdentificeerd 2� Stuur de naald terug naar Boston Scientific� als onderdeel van een terugroepactie en is niet 3� Sluit een naald met een ander partijnummer aan om door beschikbaar voor gebruik te gaan met de procedure�...
- Page 505 Oplossingen: • Er is een fout opgetreden tijdens het 1� Probeer de update nogmaals uit te voeren� updateproces 2� Neem contact op met het Boston Scientific Technical • Update opnieuw proberen Assistance Center als de update mislukt� 60-02 Update Failed Reden voor weergave: •...
- Page 506 1� Controleer of de USB-geheugenstick is ingestoken en • De USB-geheugenstick kan losgekoppeld of vol voldoende ruimte heeft� zijn� 2� Neem contact op met het Boston Scientific Technical Assistance Center als u meer hulp nodig hebt� Rapportberichten Bericht Reden voor weergave/oplossingen...
- Page 507 1� Verwijder de USB-geheugenstick uit de USB-poort op zijn de console� Wacht enkele seconden en steek de USB- geheugenstick opnieuw in de USB-poort� 2� Neem contact op met het Boston Scientific Technical Assistance Center voor een vervangende USB-geheugenstick als het probleem aanhoudt� Systeemberichten OPMERKING: Systeemfoutberichten worden in het midden van de titelbalk weergegeven�...
- Page 508 80-02 Opstartfout 1� Start de ICEfx-cryoablatieconsole opnieuw op� • Systeem zelfcontrole mislukt 2� Neem contact op met het Boston Scientific Technical • Herstart het systeem Assistance Center als het probleem aanhoudt� • Als het probleem aanhoudt, neem dan contact op...
- Page 509 1� Koppel de MTS los en leg deze apart • MTS defect in groep [X]� Vervang de MTS door een 2� Sluit een nieuwe MTS aan nieuwe� • Neem contact op met het Boston Scientific Technical Assistance Center 80-34 System Error Reden voor weergave: •...
- Page 510 Technical Assistance Center om service te plannen� 90-02 Service Due Reden voor weergave: • Service for the ICEfx Cryoablation System is past Het ICEfx-cryoablatiesysteem wordt niet volgens schema onderhouden� De gebruiker wordt er daarna bij het • Contact Boston Scientific Technical Assistance opstarten elke keer aan herinnerd dat het onderhoud Center to schedule service�...
-
Page 511: Systeemspecificaties
Bericht Reden voor weergave/oplossingen 90-03 System End of Life Reden voor weergave: • The ICEfx Cryoablation System is at the end of Het ICEfx-cryoablatiesysteem heeft het einde van zijn operational life levensduur bereikt� • Contact Boston Scientific Technical Assistance Oplossingen:... -
Page 512: Essentiële Prestaties
Essentiële prestaties De essentiële prestaties van het ICEfx-cryoablatiesysteem worden gedefinieerd als: • Het vermogen om de stroming van argon naar de aangesloten cryoablatienaalden in- en uit te schakelen door het invoeren van opdrachten via de gebruikersinterface • Het vermogen om een ononderbroken gasstroom naar door de gebruiker geselecteerde naalden te handhaven wanneer de gasstroom door de gebruiker wordt ingeschakeld •... -
Page 513: Informatie Voor Het Instrueren Van De Patiënt
ICEfx-cryoablatiesysteem in verband met de interventieprocedure: • Bespreek de risico’s en voordelen, inclusief een overzicht van mogelijke complicaties die in de gebruiksaanwijzingen staan vermeld voor het ICEfx-cryoablatiesysteem en aanvullende producten die worden gebruikt voor het uitvoeren van cryoablatieprocedures en voor andere interventionele behandelingen die waarschijnlijk worden toegepast�... - Page 514 Monitor de ecrã tátil ��������������������������������������������������������������������������������������������������������������������������������������������� 520 Carrinho de Crioablação ICEfx �������������������������������������������������������������������������������������������������������������������������������521 Figura 3� Carrinho de crioablação ICEfx ���������������������������������������������������������������������������������������������������������� 522 Figura 4� Carrinho de crioablação ICEfx - Alavancas dos travões das rodas �������������������������������������������������� 522 Princípio de funcionamento��������������������������������������������������������������������������������������������������������������������������������� 523 Materiais �������������������������������������������������������������������������������������������������������������������������������������������������������������� 523 Apirogénico ����������������������������������������������������������������������������������������������������������������������������������������������������������...
- Page 515 Configuração do Sistema ��������������������������������������������������������������������������������������������������������������������������������������537 Tabela 6� Fluxo de configuração do sistema ���������������������������������������������������������������������������������������������������537 Figura 5� Colocar a Consola de crioablação ICEfx no carrinho� ����������������������������������������������������������������������� 538 Figura 6� Apertar o parafuso de retenção no carrinho ����������������������������������������������������������������������������������� 539 Figura 7� Válvula de fecho do Argon (Árgon) - Posição ON (LIGADA) ������������������������������������������������������������540 Figura 8�...
- Page 516 Tabela 15� Controlos de MTS �������������������������������������������������������������������������������������������������������������������������� 552 Ecrã 10: Procedimento - Alterar o Nome do Identificador do MTS ���������������������������������������������������������������� 552 Tabela 16� Alterar nome do MTS �������������������������������������������������������������������������������������������������������������������� 553 Ecrã 11: Ecrã Procedimento durante o teste ��������������������������������������������������������������������������������������������������� 553 Tabela 17� Controlos do teste ������������������������������������������������������������������������������������������������������������������������� 553 Iniciar um ciclo de congelamento ������������������������������������������������������������������������������������������������������������������������...
- Page 517 Figura 15� Válvula Vent (Ventilação) - Totalmente aberta �������������������������������������������������������������������������������574 Figura 16� (igual à Figura 8) Válvula Vent (Ventilação) - Totalmente fechada �������������������������������������������������574 Pós-Procedimento ������������������������������������������������������������������������������������������������������������������������������������������������575 Limpeza do Sistema de crioablação ICEfx �������������������������������������������������������������������������������������������������������������575 Eliminação �������������������������������������������������������������������������������������������������������������������������������������������������������������575 RESOLUÇÃO DE PROBLEMAS ������������������������������������������������������������������������������������������������������������������������������������ 576 Recuperação de software ������������������������������������������������������������������������������������������������������������������������������������� 576 Substituir fusíveis �������������������������������������������������������������������������������������������������������������������������������������������������577...
-
Page 518: Advertência Contra Reutilização
A contaminação do dispositivo pode causar lesões, doença ou a morte do paciente� DESCRIÇÃO DO DISPOSITIVO Descrição do sistema O Sistema de crioablação ICEfx é composto por uma Consola de crioablação ICEfx e um Carrinho de crioablação ICEfx opcional� Conteúdo Uma (1) Consola de crioablação ICEfx... -
Page 519: Consola De Crioablação Icefx
Consola de crioablação ICEfx A Consola de crioablação ICEfx consiste numa unidade de crioablação de mesa, sem hélio, portátil� A dianteira da consola contém quatro canais para ligação de agulhas (cada um com duas portas para agulhas), duas portas para dispositivos Multi-Point 1�5 Thermal Sensor (MTS - Sensor térmico multiponto 1�5) e um monitor de ecrã... -
Page 520: Figura 2. Vista Traseira Da Consola
Portas de ligação de MTS As duas portas de ligação de MTS encontram-se por cima dos canais de ligação de agulhas para suportarem a ligação dos dispositivos MTS da Boston Scientific utilizados para monitorizar a temperatura dentro e perto do local-alvo da crioablação�... -
Page 521: Carrinho De Crioablação Icefx
Válvula Vent (Ventilação) A válvula Vent (Ventilação) é utilizada para ventilar o gás árgon a alta pressão para fora da consola de crioablação ICEfx. Admissão do gás árgon A linha de alimentação de gás liga a alimentação do gás árgon a partir da botija de gás árgon à admissão de gás árgon através de um conector de ligação rápida. -
Page 522: Figura 3. Carrinho De Crioablação Icefx
Alavancas dos travões das rodas Utilize as alavancas dos travões das rodas para travar o carrinho de crioablação ICEfx na sua posição durante um procedimento (Figura 4)� As alavancas dos travões das rodas podem ser acionadas a partir de ambos os lados�... -
Page 523: Princípio De Funcionamento
O Sistema de crioablação ICEfx utiliza gás árgon a alta pressão que circula através de agulhas de crioablação de ponta fechada para induzir o congelamento de tecido� O congelamento deve-se ao efeito Joule-Thomson aumentado por um permutador de calor de recuperação dentro da agulha de crioablação�... -
Page 524: Utilização Prevista
INDICAÇÕES DE UTILIZAÇÃO O Sistema de Crioablação ICEfx é indicado para utilização como ferramenta criocirúrgica em áreas como a cirurgia geral, dermatologia, neurologia (incluindo a crioanalgesia), cirurgia torácica (à exceção de tecido cardíaco), ginecologia, oncologia e urologia� Este sistema foi concebido para a destruição de tecidos (incluindo tecidos prostáticos e renais, metástases hepáticas, tumores e lesões cutâneas) através da aplicação de temperaturas extremamente baixas. - Page 525 • Certifique-se de que a botija do gás árgon está acorrentada a uma parede ou instalada num carrinho homologado para evitar tombos inadvertidos da mesma� • Não ligue o Sistema de crioablação ICEfx a um fornecimento de gás que exceda os 6000 psi (414 bar, 41,4 MPa) para evitar danos nos componentes internos do sistema�...
- Page 526 • Equipamento de comunicações de RF portátil (incluindo periféricos como os cabos da antena e as antenas externas) deverá ser usado a, no mínimo, 30 cm (12 in) de qualquer parte do Sistema de crioablação ICEfx, incluindo os cabos especificados para utilização com o sistema� De outro modo, poderá ocorrer a degradação do desempenho deste equipamento�...
-
Page 527: Precauções
A libertação da agulha de uma bola de gelo só será possível com descongelamento passivo� Utilize a orientação por imagens para garantir um descongelamento adequado� • Não toque na Consola de crioablação ICEfx enquanto estiver a tocar no doente para evitar o risco de eletrocussão no mesmo, em caso de falha elétrica inadvertida�... - Page 528 • O Sistema de crioablação ICEfx deve ser colocado nas proximidades de ligação e utilização acessível da agulha� • LIGUE a Consola de crioablação ICEfx antes de efetuar as ligações da botija do árgon para garantir que os testes de diagnóstico adequados são efetuados�...
-
Page 529: Efeitos Indesejáveis
• Não permita que o MTS toque na agulha de crioablação durante a utilização; poderão ser apresentadas medições de temperatura erráticas� • As agulhas sem a funcionalidade CX não são compatíveis com as Funções i-Thaw ou FastThaw� A libertação da agulha de uma bola de gelo só... - Page 530 • hipertensão; • hipotensão; • hipotermia; • íleo; • impotência; • infeção/abcesso/sépsis; • inflamação; • espasmo muscular; • enfarte do miocárdio; • necrose • necessidade de intervenção ou cirurgia adicional; • lesões dos nervos; • neuropatia; • obstrução; • dor/desconforto; •...
-
Page 531: Conformidade Com As Normas
(CEM) e tem de ser instalado e colocado em serviço de acordo com as informações de CEM fornecidas em seguida� O Sistema de crioablação ICEfx foi testado em ambiente de bloco operatório relativamente à conformidade com a compatibilidade eletromagnética (CEM) e a interferência eletromagnética (IEM)� O Sistema de crioablação ICEfx foi testado para estar em conformidade com as normas IEC 60601-1-2 e EN 55011�... -
Page 532: Tabela 2. Emissões Eletromagnéticas
Orientação e declaração do fabricante – emissões eletromagnéticas O Sistema de crioablação ICEfx destina-se a ser utilizado num ambiente eletromagnético de instituição de saúde profissional segundo os níveis de conformidade especificados de seguida� O cliente ou o utilizador do Sistema de crioablação ICEfx deve garantir que o equipamento é... -
Page 533: Tabela 3. Imunidade Eletromagnética
Orientação e declaração do fabricante – imunidade eletromagnética O Sistema de crioablação ICEfx destina-se a ser utilizado num ambiente eletromagnético de instituição de saúde profissional segundo os níveis de conformidade de imunidade especificados de seguida� O cliente ou o utilizador do Sistema de crioablação ICEfx deve garantir que o equipamento é... -
Page 534: Tabela 4. Imunidade Eletromagnética Para Sistemas Que Não Sejam De Suporte Vital
Para avaliar o ambiente eletromagnético causado por um transmissor de RF fixo, deve ser realizado um levantamento eletromagnético no local� Se a intensidade de campo medida no local onde é utilizado o Sistema de crioablação ICEfx exceder o nível de conformidade de RF aplicável indicado anteriormente, o Sistema de crioablação ICEfx deve ser observado para verificação do seu... -
Page 535: Móvel E O Sistema De Crioablação Icefx
O Sistema de crioablação ICEfx destina-se a ser utilizado num ambiente eletromagnético em que as interferências de RF irradiadas estejam controladas� O cliente ou o utilizador do Sistema de crioablação ICEfx pode ajudar a evitar a interferência eletromagnética mantendo uma distância mínima entre equipamento de comunicações de RF portátil e móvel (transmissores) e o Sistema de crioablação ICEfx como recomendado em seguida, em... -
Page 536: Retirar A Consola Do Carrinho
Condições de transporte Quando enviar o Sistema de crioablação ICEfx, utilize o recipiente de expedição original para evitar a ocorrência de danos durante o transporte� Se a embalagem de envio original não estiver disponível, o cliente assume a responsabilidade de garantir que as condições de transporte são cumpridas ou contacta o Centro de Assistência Técnica da Boston Scientific para obter a embalagem de transporte adequada�... -
Page 537: Instalação, Calibração E Assistência Técnica
ICEfx� Se for necessária assistência, contacte o Centro de Assistência Técnica da Boston Scientific� O Sistema de crioablação ICEfx apresentará um aviso no ecrã cerca de um mês antes da data da manutenção preventiva� Se o lembrete aparecer no ecrã e a manutenção preventiva ainda não estiver agendada, contacte o Centro de Assistência Técnica da Boston Scientific para agendar a manutenção�... -
Page 538: Figura 5. Colocar A Consola De Crioablação Icefx No Carrinho
Preparação para utilização Antes de utilizar a Consola de crioablação ICEfx, inspecione a consola o cabo de alimentação, os travões, o cabo de segurança, a linha de alimentação de gás e o monitor de ecrã tátil para garantir que não estão danificados�... -
Page 539: Figura 6. Apertar O Parafuso De Retenção No Carrinho
à terra� A Boston Scientific recomenda a utilização de uma tomada elétrica ininterrupta e estável� NOTA: se a fonte de alimentação da Consola de crioablação ICEfx for instável ou ruidosa, as leituras de temperatura de MTS poderão ser inexatas�... -
Page 540: Figura 7. Válvula De Fecho Do Argon (Árgon) - Posição On (Ligada)
Figura 7. Válvula de fecho do Argon (Árgon) - Posição ON (LIGADA) 5� Confirme se a válvula Vent (Ventilação) está totalmente fechada� Se necessário, rode o botão para a direita para a posição CLOSED (FECHADA)� Figura 8. Válvula Vent (Ventilação) - Totalmente fechada 6. -
Page 541: Ligar O Gás Árgon
Se o software do Sistema de crioablação ICEfx detetar gás pressurizado no sistema e a linha de alimentação de gás não estiver ligada, será apresentada uma mensagem a solicitar que ventile manualmente o gás a partir do sistema�... -
Page 542: Figura 9. Ligar O Cabo De Segurança À Consola
CUIDADO: LIGUE a Consola de crioablação ICEfx antes de efetuar as ligações da botija do árgon para garantir que os testes de diagnóstico adequados são efetuados� CUIDADO: posicione a botija de árgon suficientemente perto da consola para que a linha de alimentação de gás não fique esticada e não represente um risco de tropeçamento�... -
Page 543: Figura 11. Preparação Da Botija De Gás
5� Ligue a linha de alimentação de gás árgon de alta pressão à botija de hélio, encaixando o adaptador do conjunto do manómetro na ligação da botija (Figura 11)� Figura 11. Preparação da botija de gás 6� Rode cuidadosamente a válvula na botija de árgon um quarto de volta para a esquerda� Certifique-se de que a leitura da pressão no manómetro responde imediatamente�... -
Page 544: Figura 13. Adaptador Para Duas Botijas Ez-Connect2
• Consulte a secção Substituição das botijas de árgon durante um procedimento para instruções sobre a substituição de uma botija de gás durante um procedimento, no caso de a segunda botija também ficar vazia durante o procedimento� Figura 13. Adaptador para duas botijas EZ-Connect2 Linha de alimentação de gás auxiliar Conjunto do adaptador de quatro vias com manómetro Linha de alimentação de gás... -
Page 545: Navegar Pela Interface Do Utilizador
Para garantir um desempenho ideal, substitua a botija de árgon se a pressão descer abaixo do limite inferior da pressão de serviço� • A não operação da Consola de crioablação ICEfx dentro dos limites da pressão de serviço pode afetar o procedimento de crioablação�... -
Page 546: Tabela 8. Barra De Título
Apresenta a pressão fornecida das botijas de gás árgon� indicador de gás NOTA: o Sistema de crioablação ICEfx contém um regulador interno que regula a pressão do árgon para os limites de serviço adequados� O indicador de gás é atualizado em tempo real à medida que são desligadas agulhas ou são ligadas agulhas adicionais e é... -
Page 547: Tabela 9. Menu De Opções
Tabela 9. Menu de opções N.º Botão Descrição Settings Configurar várias definições do sistema (consulte a secção Configurar definições)� (Definições) NOTA: alguns parâmetros de configuração estão limitados a administradores e/ou a utilizadores de assistência técnica� Reports Quando não existir nenhum caso ativo, selecione Reports (Relatórios) para ver os (Relatórios) relatórios dos procedimentos guardados e exportar os relatórios para uma pen USB�... -
Page 548: Ecrã 5: Select Tissue Type (Selecionar Tipo De Tecido)
Ecrã 5: Select Tissue Type (Selecionar tipo de tecido). Tabela 11. Select Tissue Type (Selecionar tipo de tecido) N.º Botão Descrição Tissue Type Selecione kidney (rim), lung (pulmão), liver (fígado), prostate (próstata), other (outro)� (Tipo de tecido) CONFIRM Prima CONFIRM (CONFIRMAR) para avançar� (CONFIRMAR) CANCEL CASE Para selecionar um tipo de tecido diferente, prima CANCEL CASE (CANCELAR CASO) para... -
Page 549: Tabela 12. Controlos Do Ecrã Edit Case Information (Editar Informações Do Caso)
Tabela 12. Controlos do ecrã Edit Case Information (Editar informações do caso) N.º Controlo Descrição Patient ID (ID do Introduza a ID para o paciente neste campo� paciente) CUIDADO: selecione uma ID do paciente exclusiva que não revele a identidade do paciente a outros utilizadores do sistema�... -
Page 550: Tabela 13. Controlos Comuns Do Procedimento
A Tabela 13 descreve os controlos comuns às funções de teste, congelamento e descongelamento� As secções seguintes descrevem os controlos relevantes para cada uma destas funções� Tabela 13. Controlos comuns do procedimento N.º Controlo Descrição Utilize o canal ALL (TODOS) para realizar uma função de congelamento, descongelamento ou teste em TODOS os canais ativos em simultâneo. -
Page 551: Tabela 14. Informações Do Temporizador
A Tabela 14 fornece informações adicionais acerca do temporizador� Tabela 14. Informações do temporizador N.º Controlo Descrição Modo O canto superior esquerdo do temporizador apresenta informações relevantes para a função atual: • Congelamento — Apresenta a intensidade de congelamento� • Descongelamento — Apresenta o modo de descongelamento (Função i-Thaw ou Função FastThaw)�... -
Page 552: Mts
O ecrã Procedimento apresenta os identificadores de MTS, os locais dos sensores e as temperaturas dos sensores dos MTS ligados� O sensor mais frio para cada MTS ligado é indicado pela indicador azul no botão correspondente (se a definição Exibir MTS mais frio estiver ativa no ecrã Settings (Definições) � Ecrã... -
Page 553: Tabela 16. Alterar Nome Do Mts
Tabela 16. Alterar nome do MTS N.º Controlo Descrição Alterar nome do MTS No campo indicado, introduza o novo nome e clique em OK, CANCEL (OK, CANCELAR) ou DONE (CONCLUÍDO)� Altera o nome e fecha o ecrã� CANCEL (CANCELAR) Volta ao ecrã anterior� DONE (CONCLUÍDO) Altera o nome e fecha o ecrã�... -
Page 554: Iniciar Um Ciclo De Congelamento
Iniciar um ciclo de congelamento Para iniciar um ciclo de congelamento, prima o botão Congelar para selecionar a intensidade de congelamento desejada (a predefinição é 100%) e, em seguida, prima o botão Iniciar� Um ciclo de congelamento pode ser iniciado para um único canal ativo ou para TODOS os canais ativos em simultâneo. -
Page 555: Ecrã 13: Histórico De Canais Expandido
Selecione uma intensidade de congelamento a partir do menu ou selecione a intensidade “Stick” (Picar)� NOTA: o Sistema de crioablação ICEfx controla a intensidade de congelamento, ajustando a duração do fluxo de árgon em cada bloco de tempo de 10 segundos (por exemplo, 30% de intensidade de congelamento equivale a congelamento durante 3 segundos e a inatividade durante 7 segundos)�... -
Page 556: Ecrã 14: Ecrã Procedimento Durante O Descongelamento (Função Fastthaw)
Para iniciar um ciclo de descongelamento: NOTA: um ciclo de descongelamento pode ser iniciado para um único canal ativo ou para TODOS os canais ativos em simultâneo. 1� Prima o botão Descongelar para selecionar o modo de descongelamento (Funções i-Thaw ou FastThaw)� NOTA: •... -
Page 557: Tabela 19. Controlos De Descongelamento
Tabela 19. Controlos de descongelamento N.º Controlo Descrição Apresenta o modo de descongelamento atualmente selecionado (Função i-Thaw ou Função FastThaw)� NOTA: a Função FastThaw gera uma temperatura superior à gerada para a Função i-Thaw, o que resulta num tempo de descongelamento mais rápido� Indicador da Apresenta o intervalo de temperatura estimado para a haste da agulha durante o temperatura... -
Page 558: Ecrã 15: Ecrã Da Função De Cauterização
NOTA: a duração para a fase da função de cauterização pode ser selecionada de 30 segundos a 3 minutos, ajustável em incrementos de 30 segundos� • Durante a fase de aquecimento da agulha, o temporizador apresenta um indicador de aquecimento rotativo� •... -
Page 559: Tabela 20. Controlos Da Função De Cauterização
Tabela 20. Controlos da função de cauterização N.º Controlo Descrição Botão PROCEDURE (PROCEDIMENTO) – Prima-o para sair do modo de cauterização e voltar ao ecrã Procedimento � Botão Cauterização – Prima o botão Cauterização para selecionar a duração da cauterização� Prima Iniciar para dar início à... -
Page 560: Controlo Program Cycles (Programar Ciclos)
Testar novamente uma agulha Para testar novamente uma agulha, prima o botão Canal e, em seguida, prima para iniciar um novo teste de uma agulha� Controlo Program Cycles (Programar ciclos) Cada ciclo de congelamento-descongelamento é composto por um ciclo de congelamento seguido de um ciclo de descongelamento�... -
Page 561: Ecrã 19: Ecrã Programar Ciclos
(quando não estiver nenhum caso ativo)� O ecrã All Reports (Todos os relatórios) apresenta uma lista de todos os relatórios guardados no Sistema de crioablação ICEfx� Selecione o relatório que pretende ver e prima VIEW REPORT (VER RELATÓRIO)� Black (K) ∆E ≤5.0... -
Page 562: Ecrã 21: Ecrã All Reports (Todos Os Relatórios)
Ecrã 21: Ecrã All Reports (Todos os relatórios) Quando é selecionado um relatório a partir do ecrã All Reports (Todos os Relatórios) , o relatório que é apresentado fornece opções para a eliminação ou exportação do mesmo� NOTA: os utilizadores com ID de início de sessão de administrador podem eliminar qualquer relatório� Ordenar um relatório Para ordenar a lista por Report Name (Nome do Relatório), Hospital Name (Nome do Hospital), Doctor Name (Nome do Médico) ou Organ Type (Tipo de Órgão), prima a secção do cabeçalho apropriado na lista de relatórios�... -
Page 563: Ecrã 22: Relatório Do Procedimento
Time Zone O fuso horário pode ser alterado por administradores do sistema ou pessoal de (Fuso horário) assistência técnica� O Sistema de crioablação ICEfx ajusta automaticamente a hora de verão� Volume Units Selecione as unidades de volume da botija de árgon de acordo com a norma da região (Unidades de volume) geográfica�... -
Page 564: Inactivity Timeout
Definição Descrição Temperature Units Selecione as unidades de temperatura apresentadas para os MTS e as agulhas CX� (Unidades de temperatura) Clock Type Selecione o tipo de relógio (12 hour - 12 horas ou 24 hour - 24 horas)� O tipo de relógio (Tipo de relógio) pode ser alterado por administradores do sistema ou pessoal de assistência técnica�... -
Page 565: Tabela 22. Ecrã Settings (Definições) - Botões De Controlo
Atualização manual do software Os administradores do sistema e os utilizadores de assistência técnica podem atualizar manualmente o software do Sistema de crioablação ICEfx através de uma pen USB fornecida pela Boston Scientific� 1� Prima o botão ADMIN (ADMINISTRADOR) no Ecrã Settings (Definições)�... -
Page 566: Procedimento
– Exporte o relatório para uma pen USB� Testar as Agulhas/MTS Antes do Procedimento ADVERTÊNCIA: antes de iniciar um procedimento de crioablação, configure o Sistema de crioablação ICEfx (consulte a secção Configuração do sistema) e, em seguida, execute os testes de integridade e funcionalidade das agulhas�... -
Page 567: Ecrã 23: Ecrã De Procedimento
1� No monitor de ecrã tátil, prima START CASE (INICIAR CASO)� O assistente de configuração é apresentado para demonstrar os passos de configuração� Ecrã 23: Ecrã de procedimento 2� OPCIONAL : no ecrã Edit Case Information (Editar informações do caso) que é apresentado, introduza informações adicionais de tratamento do paciente e quaisquer notas, utilizando o teclado virtual�... - Page 568 Um botão do canal cinzento-escuro significa que o canal tem agulhas ligadas� Para agulhas CX, o Sistema de crioablação ICEfx deteta automaticamente o tipo de agulha em utilização, o número do lote e a data de validade do produto� Se o sistema detetar que a data de validade já foi ultrapassada, é...
- Page 569 Após a conclusão com êxito do Teste de Funcionalidade e Integridade das Agulhas, os restantes botões de controlo do canal ficam ativos� A(s) agulha(s) está(ão) agora pronta(s) a utilizar� 10� Quando utilizar os MTS, prepare o número de sensores que pretende testar� O Sistema de crioablação ICEfx suporta a utilização de dois sensores térmicos�...
-
Page 570: Iniciar Um Procedimento De Crioablação
ADVERTÊNCIA: se estiver ligada ao Sistema de crioablação ICEfx uma agulha sem a funcionalidade CX, não é possível descongelar ativamente� A libertação da agulha de uma bola de gelo só será possível com descongelamento passivo�... - Page 571 NOTA: ao selecionar ALL (TODOS) iniciará uma fase de congelamento à intensidade selecionada para cada canal� Para realizar o congelamento em todos os canais ativos à mesma intensidade, prima o botão Congelar para o canal ALL (TODOS) e selecione a intensidade de congelamento a aplicar a todos os canais ativos� Após selecionar a intensidade de congelamento, prima o botão Iniciar para o canal ALL (TODOS), com o intuito de iniciar o congelamento simultâneo em todos os canais ativos.
-
Page 572: Adicionar Uma Agulha Cx Durante Um Procedimento De Crioablação
Caso não exista nenhum canal aberto, use o procedimento seguinte para adicionar uma nova agulha CX� CUIDADO: a Boston Scientific recomenda que coloque apenas agulhas do mesmo tipo juntas num único canal� A utilização de agulhas de tipos diferentes no mesmo canal poderá afetar a precisão do indicador de gás. -
Page 573: Encerramento Do Sistema
ENCERRAMENTO DO SISTEMA Encerrar o sistema ADVERTÊNCIA: avise todo o pessoal do procedimento antes de ventilar o Sistema de crioablação ICEfx para não assustar ninguém� 1� Se a consola não for ventilada no final do procedimento, realize estes passos para ventilar o sistema�... -
Page 574: Figura 15. Válvula Vent (Ventilação) - Totalmente Aberta
Figura 15. Válvula Vent (Ventilação) - Totalmente aberta c� Rode a válvula Vent (Ventilação) para a posição CLOSED (FECHADA) após a ventilação ter sido concluída� Figura 16. (igual à Figura 8) Válvula Vent (Ventilação) - Totalmente fechada 2� Desligue a linha de alimentação de gás a alta pressão da consola e da botija de árgon� Armazene a linha de alimentação de gás e o conjunto do manómetro no saco de acessórios�... -
Page 575: Pós-Procedimento
O dispositivo deve ser eliminado de forma segura de acordo com a política hospitalar, administrativa e/ou governamental local ou devolvido à Boston Scientific� Para um Kit de Devolução de Produto, contacte o Centro de Assistência Técnica da Boston Scientific�... -
Page 576: Resolução De Problemas
RESOLUÇÃO DE PROBLEMAS A Boston Scientific sugere as seguintes opções para resolução de problemas do Sistema de crioablação ICEfx� Se as sugestões apresentadas não resolverem o problema ou se tiver um problema não referenciado abaixo, contacte o Centro de Assistência Técnica da Boston Scientific�... -
Page 577: Substituir Fusíveis
3� Se os passos 1 e 2 não tiverem êxito, selecione uma nova agulha para utilização� utilização� Contacte o Centro de Assistência Técnica da Boston Scientific para agendar a devolução da agulha inoperacional� 4� O canal poderá estar defeituoso� Não utilize esse canal� Coloque a(s) agulha(s) num canal diferente�... - Page 578 Instrução Fotografia Puxe pelo mecanismo de retenção do cabo vermelho para desligar o cabo de alimentação da entrada de alimentação� Insira uma chave de fendas pequena na ranhura que existe na parte superior do suporte dos fusíveis e vire para baixo a tampa do suporte dos fusíveis� Insira uma chave de fendas pequena sob a extremidade do suporte dos fusíveis para retirar o suporte dos fusíveis da tomada da alimentação�...
- Page 579 Substitua os fusíveis inseridos no suporte de fusíveis por dois fusíveis de substituição fornecidos pelo Centro de Assistência Técnica da Boston Scientific� NOTA: utilize apenas fusíveis especificados pela Boston Scientific na Consola de crioablação ICEfx� Ligue o cabo de alimentação�...
- Page 580 2� Efetue novamente o teste de funcionalidade e integridade das agulhas na agulha� de gás através dos botões 3� Contacte o Centro de Assistência Técnica da Boston Scientific� Testar, Congelar ou Descongelar� Black (K) ∆E ≤5.0...
- Page 581 Painel de Ligação 2� A barra de bloqueio poderá estar defeituosa� Coloque a agulha num canal diferente� de Agulhas na Contacte o Centro de Assistência Técnica da Boston Scientific para agendar uma visita da posição BLOQUEADA� assistência técnica� 3� Verifique o visor do indicador de gás e se o sistema não está pressurizado� Se existir pressão no sistema, termine o procedimento e abra a Válvula de Vent (Ventilação) na...
- Page 582 • Aperte a ligação com a chave fornecida com o Sistema de crioablação ICEfx� gás entre o adaptador do • Feche a válvula da botija e ventile o gás do Sistema de crioablação ICEfx e das manómetro e a válvula da linhas de alimentação de gás utilizando a válvula de Vent (Ventilação) manual...
-
Page 583: Mensagens Apresentadas
3� Contacte o Centro de Assistência Técnica da Boston Scientific� Mensagens apresentadas O Sistema de crioablação ICEfx apresenta uma mensagem na interface do utilizador quando um utilizador solicita assistência ou quando são detetados erros do utilizador, da agulha ou do sistema�... - Page 584 10-03 Reset Password Challenge Motivo do aparecimento: • To reset your password, contact Boston Scientific o utilizador esqueceu a palavra-passe, premiu o botão Technical Assistance Center� Forgot Password (Esqueceu-se da palavra-passe?) e • Relay the Challenge on the screen below�...
- Page 585 Motivo do aparecimento: • You have not entered the correct response� O utilizador tentou aceder à opção Iniciar Sessão de • Contact Boston Scientific Technical Assistance Emergência e não respondeu corretamente ao desafio� Center for a Response to the on-screen Challenge�...
- Page 586 Mensagens de Procedimento Mensagem Motivo do aparecimento/Soluções 20-01 Cannot Start Test Motivo do aparecimento: • The gas pressure is too low/high to begin a O utilizador premiu o botão Testar quando a botija de gás procedure� ainda não se encontrava ligada ou a pressão de gás estava •...
- Page 587 Mensagem Motivo do aparecimento/Soluções 20-06 Thaw All Channels Motivo do aparecimento: • The argon shut off valve may be closed� O utilizador selecionou o botão Descongelar no canal ALL • Check and open if necessary� (TODOS) para controlar todos os canais ativos� 20-06 Descongelar todos os canais Soluções:...
- Page 588 1� Desligue e ponha a agulha de parte� 2� Ligue um tipo de agulha compatível e selecione o tipo de agulha no menu pendente� 3� Contacte o Centro de Assistência Técnica da Boston Scientific caso seja necessário aconselhamento adicional� 40-03...
- Page 589 Mensagem Motivo do aparecimento/Soluções 40-04 Expired Needle Motivo do aparecimento: • The needle ‘Use by’ date is in the past� A verificação da data de validade da agulha efetuada pelo • Replace with a new needle� software identificou uma data ultrapassada� O canal ficará 40-04 Prazo de validade da agulha desativado até...
- Page 590 60-03 Software incompatível Soluções: • O software do Sistema de crioablação ICEfx não 1� Contacte o Centro de Assistência Técnica da Boston é compatível com aprovações regulamentares� Scientific caso seja necessária assistência técnica adicional� • Se o problema persistir, contacte o Centro de Assistência Técnica da Boston Scientific�...
- Page 591 Ocorreram erros que podem afetar a • Ocorreram erros ao compilar o relatório� integralidade do relatório� • O relatório poderá estar incompleto� Soluções: Contacte o Centro de Assistência Técnica da Boston Scientific� 70-04 Report Saved Motivo do aparecimento: • Report saved successfully�...
- Page 592 • Impossível exportar o relatório para a pen e reinsira a pen USB na porta USB� USB� 2� If problem persists, contact Boston Scientific Technical Assistance • A pen USB poderá estar desligada ou cheia� Center (Se o problema persistir, contacte o Centro de Assistência Técnica da Boston Scientific)�...
-
Page 593: Temperature Warning
• O procedimento vai ser terminado� 80-04 Temperature Warning Motivo do aparecimento: • The internal temperature of the ICEfx Cryoablation A temperatura interna do sistema excedeu os limites System exceeds appropriate operating limits� operacionais adequados� • Discontinue the cryoablation procedure as soon as Soluções:... - Page 594 Use podem resultar em valores inexatos no Pressure Gauge passive thaw� At the conclusion of the procedure, (Manómetro)� contact Boston Scientific Technical Assistance Center� Soluções: 80-30 Erro do sistema 1� Monitorize continuamente o procedimento com a •...
- Page 595 90-01 Service Due Motivo do aparecimento: • Service for the ICEfx Cryoablation System is past due� O utilizador foi alertado para o prazo de conclusão da • Service must be completed by [DATE]� assistência técnica agendada do sistema� O lembrete •...
- Page 596 90-02 Service Due Motivo do aparecimento: • Service for the ICEfx Cryoablation System is past due� A assistência técnica do Sistema de crioablação ICEfx não • Contact Boston Scientific Technical Assistance Center foi efetuada na data agendada� Durante os arranques to schedule service�...
-
Page 597: Especificações Do Sistema
± 5 segundos num intervalo de 10 minutos Desempenho essencial O desempenho essencial do Sistema de crioablação ICEfx é definido como: • A capacidade de ligar e desligar o fluxo ou o árgon às agulhas de crioablação ligadas através dos comandos enviados pela interface do utilizador�... -
Page 598: Centro De Assistência Técnica Da Boston Scientific
é descontinuado através do comando enviado pela interface do utilizador� • A capacidade de monitorizar e apresentar continuamente as temperaturas medidas pelos sensores térmicos selecionados pelo utilizador� Centro de Assistência Técnica da Boston Scientific Região Número de contacto E-mail Estados Unidos +1�800�949-6708... -
Page 599: Informações De Aconselhamento Aos Pacientes
INFORMAÇÕES DE ACONSELHAMENTO AOS PACIENTES O médico deve considerar os seguintes pontos ao debater com o paciente a utilização do Sistema de crioablação ICEfx em associação com procedimento de intervenção: • Aborde os riscos e benefícios, analisando os potenciais efeitos indesejáveis listados nas instruções de utilização para o Sistema de crioablação ICEfx e produtos acessórios utilizados para realizar procedimentos de crioablação e... -
Page 600: Instrucciones De Uso
Si experimenta alguna dificultad para acceder a las Instrucciones de uso por Internet o si prefiere recibir un ejemplar impreso, diríjase al Servicio de Atención al Cliente de Boston Scientific o al representante en su país� Se le enviará un ejemplar gratuito, que debería recibir en un plazo de siete días�... -
Page 601: Οδηγιεσ Χρησησ
Als het niet lukt om de GA online te bekijken of als u de voorkeur geeft aan een papieren exemplaar, neemt u contact op met Boston Scientific Customer Service of met de lokale contactpersoon in uw eigen land� Binnen zeven dagen wordt een gratis exemplaar naar u toe gestuurd�... -
Page 602: Sposób Użycia
Em caso de dificuldade para acessar as instruções de uso on-line ou preferir receber um exemplar impresso, entre em contato com o serviço de atendimento ao cliente da Boston Scientific ou com o representante no seu país� Você receberá um exemplar gratuito em até sete dias�... -
Page 603: Instrucţiuni De Utilizare
Dacă întâmpinați dificultăți în accesarea online a instrucțiunilor de utilizare sau preferați să primiți instrucțiunile pe hârtie, vă rugăm să contactați serviciul clienți Boston Scientific sau reprezentantul local. Vi se va expedia un exemplar gratuit care trebuie să sosească în șapte zile. -
Page 604: Naudojimo Instrukcijos
Če imate težave pri dostopanju do navodil za uporabo prek spleta ali bi radi prejeli tiskano kopijo, se obrnite na službo za stranke Boston Scientific ali na lokalni stik za vašo državo. Kopijo vam bomo poslali brezplačno in bi morala prispeti v sedmih dneh�... - Page 605 Black (K) ∆E ≤5.0...
- Page 606 Black (K) ∆E ≤5.0...
- Page 607 Contents Includes Power Cord Contenido Incluye cable de alimentación Contenu Inclut un cordon d'alimentation Inhalt Einschließlich Netzkabel Contenuto Include cavo di alimentazione Inhoud Inclusief voedingskabel Conteúdo Inclui Cabo de Alimentação Universal Serial Bus Includes Console Cover Bus serie universal Incluye cubierta de la consola Universal Serial Bus Inclut un couvercle de console Universal Serial Bus...
- Page 608 © 2023 Boston Scientific Corporation or its affiliates� All rights reserved� ICEfx, EZ-Connect2, FastThaw, i-Thaw, and Multi-Point 1�5 Thermal Sensor are trademarks of Boston Scientific Corporation or its affiliates� All other trademarks are the property of their respective owners� 2023-02 51217944-01 Black (K) ∆E ≤5.0...
Need help?
Do you have a question about the ICEfx and is the answer not in the manual?
Questions and answers