Advertisement
Quick Links
Thank you for purchasing a Sealey product. Manufactured to a high standard, this product will, if used according to these
instructions, and properly maintained, give you years of trouble free performance.
IMPORTANT: PLEASE READ THESE INSTRUCTIONS CAREFULLY. NOTE THE SAFE OPERATIONAL REQUIREMENTS, WARNINGS & CAUTIONS. USE
THE PRODUCT CORRECTLY AND WITH CARE FOR THE PURPOSE FOR WHICH IT IS INTENDED. FAILURE TO DO SO MAY CAUSE DAMAGE AND/OR
PERSONAL INJURY AND WILL INVALIDATE THE WARRANTY. KEEP THESE INSTRUCTIONS SAFE FOR FUTURE USE.
Refer to
Wear eye
instructions
protection
1.
SAFETY
WARNING! Ensure Health & Safety, local authority and general workshop practice regulations are adhered to when using this
‰
equipment.
Familiarise yourself with the application and the limitations of the grease gun, as well as the potential hazards.
9
Keep the work area clean, uncluttered and ensure there is adequate lighting.
9
Keep the grease gun clean for best and safest performance.
9
Check moving parts alignment on a regular basis.
9
DO NOT use the grease gun for any purpose other than that it was designed for.
8
DO NOT operate the grease gun if any parts are damaged or missing, as this may cause failure and/or personal injury.
8
When not in use store in a safe, dry, childproof location.
9
WARNING! Always wear approved eye protection when operating the grease gun.
‰
2.
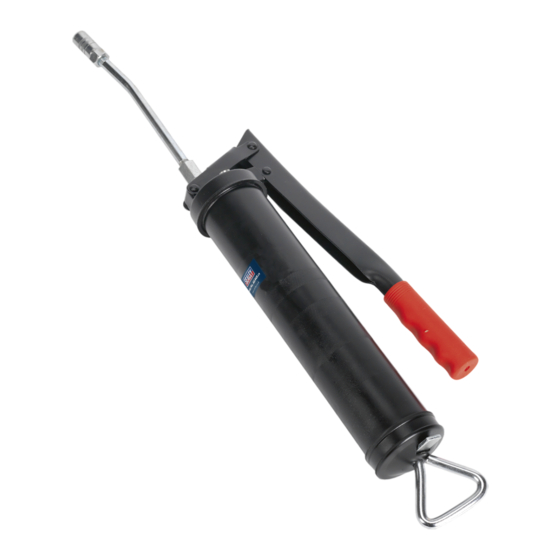
INTRODUCTION
3-Way fill with cartridge, bulk or manual capability. Supplied with rigid delivery tube and push-on hydraulic 4-jaw coupling. Contoured
pump handle. Accepts standard 400g cartridges.
3.
SPECIFICATION
Model No:
Capacity:
Delivery per Stroke:
Delivery Pressure:
Nett Weight:
1
Coupler
2
Outlet Nozzle
3
Grease filler plug
4
Handle
5
Plunger Handle
6
Lock Lever
7
End Cap
8
Barrel
4.
OPERATION
WARNING! An empty grease cartridge or grease may be under pressure
‰
from the spring in the barrel, use caution when removing it.
4.1.
GREASE GUN LOADING
4.1.1. Separate the gun head from the grease gun barrel (fig.1).
4.2.
CARTRIDGE LOADING
4.2.1. Withdraw the plunger rod fully
4.2.2. Remove plastic cap from end of grease gun cartridge, insert into barrel of grease gun.
4.2.3. Remove seal from grease gun cartridge and mount grease gun head back onto the barrel.
4.2.4. Release the plunger rod using its tab.
4.2.5. Pump the grease gun handle until grease flows.
© Jack Sealey Limited
MANUAL GREASE GUN 3-WAY FILL
MODEL NO:
Wear protective
gloves
AK445.V3
500cm³
1.2cm³
7000psi
1.22kg
Original Language Version
AK445.V3
fig.1
1
2
3
8
4
7
6
5
AK445.V3
Issue 1
28/05/24
Advertisement

Related Manuals for Sealey AK445.V3


Summary of Contents for Sealey AK445.V3
- Page 1 AK445.V3 MODEL NO: Thank you for purchasing a Sealey product. Manufactured to a high standard, this product will, if used according to these instructions, and properly maintained, give you years of trouble free performance. IMPORTANT: PLEASE READ THESE INSTRUCTIONS CAREFULLY. NOTE THE SAFE OPERATIONAL REQUIREMENTS, WARNINGS & CAUTIONS. USE THE PRODUCT CORRECTLY AND WITH CARE FOR THE PURPOSE FOR WHICH IT IS INTENDED.
- Page 2 IMPORTANT: No Liability is accepted for incorrect use of this product. WARRANTY: Guarantee is 12 months from purchase date, proof of which is required for any claim. Sealey Group, Kempson Way, Suffolk Business Park, Bury St Edmunds, Suffolk. IP32 7AR 01284 757500 sales@sealey.co.uk...
Need help?
Do you have a question about the AK445.V3 and is the answer not in the manual?
Questions and answers