Advertisement
Quick Links
Advertisement

Subscribe to Our Youtube Channel
Related Manuals for HYOSUNG 9T


Summary of Contents for HYOSUNG 9T
- Page 1 HYOSUNG 9T Installation Manual V02.01...
- Page 2 All features, functions and operations described in this document may not be marketed by HYOSUNG in all parts of the world. In some instances, photographs are of equipment prototypes. sold by HYOSUNG in all regions worldwide. Therefore, before using this document, contact with your HYOSUNG representative or HYOSUNG office for information that is applicable and current.
-
Page 3: Table Of Contents
Access for Device ........................................13 Power Cord & Data Wiring........................................14 Power Cable & Data Cable ....................................... 14 Sensor Cable Wiring ......................................... 15 Installation Frame ............................................ 16 Bottom of ATM .......................................... 16 Anchor Point ..........................................16 Installation © 2023 Hyosung TNS. All rights reserved. - Page 4 Minimum Installation Area When 2 Hyosung 9Ts are installed side by side......................21 Recommended Installation Area When 2 Hyosung 9Ts are installed side by side ....................21 Minimum Installation Area When 3 Hyosung 9Ts are installed side by side......................22 Recommended Installation Area When 3 Hyosung 9Ts are installed side by side ....................
- Page 5 Minimum Installation Area When 2 Hyosung 9Ts are installed side by side......................35 Recommended Installation Area When 2 Hyosung 9Ts are installed side by side ....................35 Minimum Installation Area When 3 Hyosung 9Ts are installed side by side......................36 Recommended Installation Area When 3 Hyosung 9Ts are installed side by side ....................
-
Page 6: Introduction
The document is organized into sections covering the following topics: • Introduction ‐ this section • Power Requirements • Variant Details Each page has one column ~ two columns laid out as follows: Installation © 2023 Hyosung TNS. All rights reserved. -
Page 7: Safety Precautions
5. A security container shall be permitted to optionally be provided with a secondary lock, but improper use of the secondary lock feature will the user’s authority to operate the equipment. reduce the security level of the ATM. Installation © 2023 Hyosung TNS. All rights reserved. - Page 8 ▪ Place the equipment in an area away from any combustible materials. ▪ The equipment may catch on fire from overheating or short circuit of the power supply unit. Installation © 2023 Hyosung TNS. All rights reserved.
-
Page 9: Document Revisions
Document Revisions Revision Date Change summary V01.00.00 2022-11-10 New Publication (7224000773) V01.01 2023-06-07 Modified the file name, cover title name an so on. V02.01 2023-06-09 Updated the installation drawing. (Wall 15” -> 14.5”) Installation © 2023 Hyosung TNS. All rights reserved. -
Page 10: Variant Details- 9T_Cen I_Wall 11
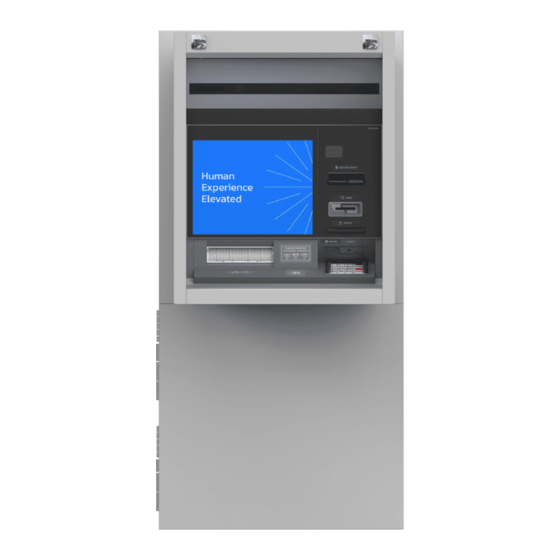
HYOSUNG 9T Variant Details- 9T_CEN I_WALL 11” Exterior Front Elevation Encrypting PIN Pad Barcode Check Scan Module Bill Recycling Module Card Reader Receipt Printer Screen Top Earphone Jack Screen Bottom Installation © 2023 Hyosung TNS. All rights reserved. -
Page 11: Side Elevation
HYOSUNG 9T Variant Details- 9T_CEN I_WALL 11” Plan View Side Elevation Installation © 2023 Hyosung TNS. All rights reserved. -
Page 12: Iso View
Variant Details- 9T_CEN I_WALL 11” Weight ISO View Default Weight : 1,821.01Ibs(826.0Kg), Cassettes full with media : 1855.85Ibs(841.8Kg), 241.1lbs/ft POWER CORD TYPE : B POWER CORD LENGTH 118.1 inch (3,000 mm) From side of unit Installation © 2023 Hyosung TNS. All rights reserved. -
Page 13: Access For Device
[57.9 mm] [153.4 mm] 48.4 inch 6.5 inch 19.4 inch Screen Top [1228.6 mm] [164.5 mm] [492.8 mm] 36.7 inch 4.0 inch 11.9 inch Screen Bottom [933.2 mm] [102.7 mm] [301.2 mm] Installation © 2023 Hyosung TNS. All rights reserved. -
Page 14: Power Cord & Data Wiring
HYOSUNG 9T Variant Details- 9T_CEN I_WALL 11” Power Cord & Data Wiring Power Cable & Data Cable Installation © 2023 Hyosung TNS. All rights reserved. -
Page 15: Sensor Cable Wiring
HYOSUNG 9T Variant Details- 9T_CEN I_WALL 11” Sensor Cable Wiring Installation © 2023 Hyosung TNS. All rights reserved. -
Page 16: Installation Frame
Variant Details- 9T_CEN I_WALL 11” Anchor Point Installation Frame Bottom of ATM 1. Make 6 anchor holes. 2. Place the ATM machine over the fixed label so that anchor holes line up according to the picture Installation © 2023 Hyosung TNS. All rights reserved. -
Page 17: Anchor Detail
• Minimum thickness – 0.787 inch (2 mm) Bolts • Mandatory : Steel 2 EA (back-side direction), SUS 304 2EA (front-side direction) • Option: Steel 2 EA (front, back-center direction) • Size-5/8 inch (M16) Installation © 2023 Hyosung TNS. All rights reserved. -
Page 18: Service Area
HYOSUNG 9T Variant Details- 9T_CEN I_WALL 11” Service Area General View 1. 4” plinth not attached Installation © 2023 Hyosung TNS. All rights reserved. - Page 19 HYOSUNG 9T Variant Details- 9T_CEN I_WALL 11” 2. 4” plinth attached Installation © 2023 Hyosung TNS. All rights reserved.
-
Page 20: Minimum Installation Area For 1 Hyosung 9T
HYOSUNG 9T Variant Details- 9T_CEN I_WALL 11” Minimum Installation Area for 1 Hyosung 9T Recommended Installation Area for 1 Hyosung 9T Installation © 2023 Hyosung TNS. All rights reserved. -
Page 21: Minimum Installation Area When 2 Hyosung 9Ts Are Installed Side By Side
HYOSUNG 9T Variant Details- 9T_CEN I_WALL 11” Minimum Installation Area When 2 Hyosung 9Ts Recommended Installation Area When 2 Hyosung are installed side by side 9Ts are installed side by side Installation © 2023 Hyosung TNS. All rights reserved. -
Page 22: Minimum Installation Area When 3 Hyosung 9Ts Are Installed Side By Side
HYOSUNG 9T Variant Details- 9T_CEN I_WALL 11” Recommended Installation Area When 3 Hyosung Minimum Installation Area When 3 Hyosung 9Ts 9Ts are installed side by side are installed side by side Installation © 2023 Hyosung TNS. All rights reserved. -
Page 23: Power Requirements
HEATER ON : 470.75 W HEATER ON : 818.36 W Thermal Output Idle (Min) Transaction (Max) HEATER OFF : 592.2 BTU/hr HEATER OFF : 1739.44 BTU/hr HEATER ON : 1607.34 BTU/hr HEATER ON : 2794.23 BTU/hr Installation © 2023 Hyosung TNS. All rights reserved. -
Page 24: Exterior
HYOSUNG 9T Variant Details- 9T_CEN I_WALL 14.5” Exterior Front Elevation Encrypting PIN Pad Barcode Check Scan Module Bill Recycling Module Card Reader Receipt Printer Screen Top Earphone Jack Screen Bottom Installation © 2023 Hyosung TNS. All rights reserved. -
Page 25: Side Elevation
HYOSUNG 9T Variant Details- 9T_CEN I_WALL 14.5” Plan View Side Elevation Installation © 2023 Hyosung TNS. All rights reserved. -
Page 26: Iso View
Variant Details- 9T_CEN I_WALL 14.5” Weight ISO View Default Weight : 1,821.01Ibs(826.0Kg), Cassettes full with media : 1855.85Ibs(841.8Kg), 241.1lbs/ft POWER CORD TYPE : B POWER CORD LENGTH 118.1 inch (3,000 mm) From side of unit Installation © 2023 Hyosung TNS. All rights reserved. -
Page 27: Access For Device
[146.8 mm] [153.4 mm] 48.4 inch 10.0 inch 19.4 inch Screen Top [1228.6 mm] [253.4 mm] [492.8 mm] 36.7 inch 7.5 inch 11.9 inch Screen Bottom [933.2 mm] [191.6 mm] [301.2 mm] Installation © 2023 Hyosung TNS. All rights reserved. -
Page 28: Power Cord & Data Wiring
HYOSUNG 9T Variant Details- 9T_CEN I_WALL 14.5” Power Cord & Data Wiring Power Cable & Data Cable Installation © 2023 Hyosung TNS. All rights reserved. -
Page 29: Sensor Cable Wiring
HYOSUNG 9T Variant Details- 9T_CEN I_WALL 14.5” Sensor Cable Wiring Installation © 2023 Hyosung TNS. All rights reserved. -
Page 30: Installation Frame
Variant Details- 9T_CEN I_WALL 14.5” Anchor Point Installation Frame Bottom of ATM 1. Make 6 anchor holes. 2. Place the ATM machine over the fixed label so that anchor holes line up according to the picture Installation © 2023 Hyosung TNS. All rights reserved. -
Page 31: Anchor Detail
• Mandatory : Steel 2 EA (back-side direction), SUS 304 2 EA (front-side direction) • Option: Steel 2 EA (front, back-center direction) • Size-5/8 inch (M16) • Minimum Length 5.9 inch (150 mm) • Strenth-high tensile (minimum ISO property class 6.8) Installation © 2023 Hyosung TNS. All rights reserved. -
Page 32: Service Area
HYOSUNG 9T Variant Details- 9T_CEN I_WALL 14.5” Service Area General View 1. 4” plinth not attached Installation © 2023 Hyosung TNS. All rights reserved. - Page 33 HYOSUNG 9T Variant Details- 9T_CEN I_WALL 14.5” 2. 4” plinth attached Installation © 2023 Hyosung TNS. All rights reserved.
-
Page 34: Minimum Installation Area For 1 Hyosung 9T
HYOSUNG 9T Variant Details- 9T_CEN I_WALL 14.5” Minimum Installation Area for 1 Hyosung 9T Recommended Installation Area for 1 Hyosung 9T Installation © 2023 Hyosung TNS. All rights reserved. -
Page 35: Minimum Installation Area When 2 Hyosung 9Ts Are Installed Side By Side
HYOSUNG 9T Variant Details- 9T_CEN I_WALL 14.5” Minimum Installation Area When 2 Hyosung 9Ts Recommended Installation Area When 2 Hyosung are installed side by side 9Ts are installed side by side Installation © 2023 Hyosung TNS. All rights reserved. -
Page 36: Minimum Installation Area When 3 Hyosung 9Ts Are Installed Side By Side
HYOSUNG 9T Variant Details- 9T_CEN I_WALL 14.5” Minimum Installation Area When 3 Hyosung 9Ts Recommended Installation Area When 3 Hyosung are installed side by side 9Ts are installed side by side Installation © 2023 Hyosung TNS. All rights reserved. -
Page 37: Power Requirements
HEATER ON : 818.36 W III. Thermal Output Idle (Min) Transaction (Max) HEATER OFF : 592.2 BTU/hr HEATER OFF : 1739.44 BTU/hr HEATER ON : 1607.34 BTU/hr HEATER ON : 2794.23 BTU/hr Installation © 2023 Hyosung TNS. All rights reserved.
Need help?
Do you have a question about the 9T and is the answer not in the manual?
Questions and answers