Table of Contents
Advertisement
Available languages
Available languages
Quick Links
Bedienungsanleitung
Manual de instrucciones
Notice d'utilisation
Istruzioni per l'uso
Gebruiksaanwijzing
User manual
Smarte mobile Klimaanlage
Climatiseur mobile intelligent
Slimme mobiele airconditioning
Aire acondicionado móvil inteligente
Aria condizionata mobile intelligentea
Smart mobile air conditioner
MEDION P901
(MD 37732)
Advertisement
Chapters
Table of Contents

Related Manuals for Medion P901


Summary of Contents for Medion P901
- Page 1 Bedienungsanleitung Manual de instrucciones Notice d‘utilisation Istruzioni per l‘uso Gebruiksaanwijzing User manual Smarte mobile Klimaanlage Climatiseur mobile intelligent Slimme mobiele airconditioning Aire acondicionado móvil inteligente Aria condizionata mobile intelligentea Smart mobile air conditioner MEDION P901 (MD 37732)
-
Page 2: Table Of Contents
Inhaltsverzeichnis Informationen zu dieser Bedienungs anleitung .........5 1.1. Zeichenerklärung ....................5 Bestimmungsgemäßer Gebrauch .............. 6 Sicherheits hinweise ..................7 3.1. Stromversorgung ....................7 3.2. Hinweise zum Kältemittel .................. 9 3.3. Produktspezifische Gefahren ................11 3.4. Geräuschemissionen ...................12 3.5. Lagerung/Transport ....................12 3.6. Umgang mit Batterien ..................12 Lieferumfang .................... - Page 3 EU-Konformitätsinformation ..............40 Serviceinformationen ................40 Impressum ....................42...
-
Page 4: Informationen Zu Dieser Bedienungs Anleitung
. Informationen zu dieser Bedienungs- anleitung Vielen Dank, dass Sie sich für unser Produkt entschieden haben. Wir wünschen Ihnen viel Freude mit dem Gerät. Lesen Sie vor Inbetriebnahme die Sicherheitshinweise und die gesamte Anleitung aufmerksam durch. Beachten Sie die Warnungen auf dem Ge- rät und in der Bedienungsanleitung. -
Page 5: Bestimmungsgemäßer Gebrauch
Symbol Schutzerdung • Aufzählungspunkt / (bei Schutzklasse I) Information über Ereig- nisse während der Be- Elektrogeräte der dienung Schutzklasse I sind Elektrogeräte, die durch- Auszuführende Hand- gehend mindestens lungsanweisung Basisisolierung haben und entweder einen Ge- Auszuführende Sicher- rätestecker mit Schutz- heitshinweise kontakt oder eine feste Anschlussleitung mit... -
Page 6: Sicherheits Hinweise
. Sicherheits hinweise Gerät und Zubehör an einem für Kinder unerreichbaren Platz aufbewahren. Dieses Gerät kann von Kindern ab 8 Jahren und von Perso- nen mit reduzierten physischen, sensorischen oder menta- len Fähigkeiten oder Mangel an Erfahrung und/oder Wissen benutzt werden, wenn sie beaufsichtigt oder bezüglich des sicheren Gebrauchs des Gerätes unterwiesen wurden und die daraus resultierenden Gefahren verstanden haben. - Page 7 Ziehen Sie den Netzstecker des Gerätes aus der Steckdose – wenn Sie das Gerät reinigen, – wenn Sie das Gerät nicht mehr gebrauchen – wenn Sie das Gerät nicht beaufsichtigen, – bei einem Gewitter. Ziehen Sie immer am Stecker, nicht am Netzkabel. ...
-
Page 8: Hinweise Zum Kältemittel
Setzen Sie das Gerät keinen extremen Bedingungen aus. Zu vermeiden sind: – Hohe Luftfeuchtigkeit oder Nässe, – extrem hohe oder tiefe Temperaturen, – direkte Sonneneinstrahlung, – offenes Feuer, – mechanische Schwingungen oder Stöße, – übermäßige Staubbelastung, – fehlende Belüftung, wie z. B. im Schrank oder Bücherregal. ... - Page 9 sich R290 hervorragend als Kältemittel für diese Anwendung. Aufgrund der hohen Entflammbarkeit des Kältemittels sind be- sondere Vorsichtsmaßnahmen zu beachten. WARNUNG! Brandgefahr! Das Kühlsystem des Gerätes enthält das natürliches Käl- temittel Propan R290. Beschädigen Sie nicht den Kältemittelkreislauf. Bei Betrieb, Lagerung und Aufstellung sollte der Raum eine Fläche von mindestens 7 m²...
-
Page 10: Produktspezifische Gefahren
Entfernen Sie keine Sicherheitszeichen, Aufkleber oder Etiket- ten vom Gerät und halten Sie sie lesbar. Beachten Sie die Einhaltung der nationalen Gasvorschriften. Verwenden Sie das Gerät nur mit dem vorgesehenen Kälte- mittel R290. WARNUNG! Wartungs-und Reparaturarbeiten am Käl- temittelkreislauf nur durch eine Fachkraft nach Herstel- lervorgaben durchführen lassen. -
Page 11: Geräuschemissionen
Betreiben Sie das Gerät nicht auf unebenen Flächen oder in der Nähe von Treppen. Vermeiden Sie während des Ge- brauchs ein Kippen des Gerätes (z. B. durch Kanten auf dem Boden). Betreiben Sie das Gerät nicht in unmittelbarer Nähe von Wär- mequellen wie Heizkörpern, Wärmespeichern, Öfen oder an- deren Geräten, die Wärme erzeugen. - Page 12 Vermeiden Sie Kontakt mit Batteriesäure. Bei Kontakt mit Haut, Augen oder Schleimhäuten spülen Sie die betroffenen Stellen mit reichlich klarem Wasser und suchen Sie umgehend einen Arzt auf. Halten Sie neue und gebrauchte Batterien von Kindern fern. Benutzen Sie die Fernbedienung nicht mehr, wenn das Bat- teriefach nicht sicher schließt und halten Sie sie von Kindern fern.
-
Page 13: Lieferumfang
. Lieferumfang GEFAHR! Erstickungsgefahr! Verpackungsfolien können verschluckt oder unsachge- mäß benutzt werden, daher besteht Erstickungsgefahr! Alle verwendeten Verpackungsmaterialien (Folien, Plastikbeutel, Polystyrolstücke usw.) nicht in der Reichweite von Kindern lagern. Lassen Sie Kinder nicht mit der Verpackung spielen. Entnehmen Sie das Produkt aus der Verpackung und entfernen Sie sämtliches Verpackungsmaterial. -
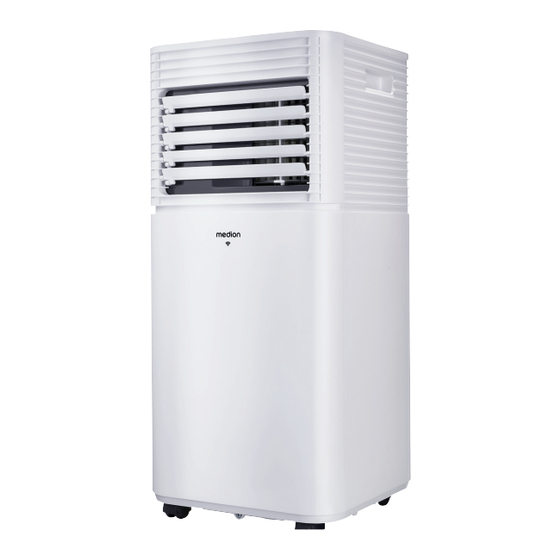
Page 14: Geräteübersicht
. Geräteübersicht Abb. 1 – Vorderseite Abb. 2 – Rückseite Bedienfeld 5. Obere Ansaugöffnung mit Filter- sieb 2. Tragegriff 6. Abluftöffnung 3. Luftauslass mit von Hand verstell- baren Lamellen Untere Ansaugöffnung mit Filter- sieb 4. Gelenkrollen 8. Kondensatabflussöffnung... - Page 15 Abb. 3 – Bedienpanel Lock: Tastensperre ein-/aus- Down: Temperatur/Timer ver- schalten ringern Sleep: Schlafmodus ein-/aus- Speed: Lüftergeschwindigkeit schalten einstellen Timer: Timer einstellen (auto- Mode: Betriebsart einstellen matischer Start/Stop) Power: Gerät ein-/ausschalten Up: Temperatur/Timer erhö- hen/Display Abb. 4 – Displayanzeigen...
- Page 16 Drahtlosnetzwerk aktiviert Entfeuchtungsbetrieb aktiviert 18. Display-Fenster Timer aktiviert Tastensperre aktiviert Niedrige Lüftergeschwindigkeit aktiviert Schlafmodus aktiviert Hohe Lüftergeschwindigkeit Lüfterbetrieb aktiviert aktiviert Kühlbetrieb aktiviert Abb. 5 – Fernbedienung Temperatur/Timer erhöhen Timer einschalten Hohe Lüftergeschwindig- Kühlbetrieb einschalten keit einstellen Entfeuchtungsbetrieb ein- Temperatur/Timer verrin- schalten gern Lüfterbetrieb einschalten...
-
Page 17: Gerät Vorbereiten/Aufstellen
Abb. 6 – Fensterkit 38. Reißverschluss 40. Klettbandleiste (nicht dargestellt, am Rand der Textildichtung) 39. Textildichtung 41. Klettband . Gerät vorbereiten/aufstellen Entfernen Sie sämtliches Verpackungsmaterial und überprüfen Sie das Gerät auf eventuelle Beschädigungen, bevor Sie es in Betrieb nehmen. WARNUNG! Brandgefahr! Das Kühlsystem des Gerätes enthält das natürliche Käl-... -
Page 18: Abluftschlauch Montieren
Stellen Sie das Gerät auf eine feste, ebene Oberfläche mit einem Bereich mit mindestens 50 cm Freiraum um das Gerät herum, damit eine gute Luftzirkulation gewährleistet ist. Lassen Sie das Gerät vor dem Einschalten für mindestens 24 Stunden in senk- rechter Position stehen. -
Page 19: Fensterkit Montieren
Schließen Sie Ihr Fenster, um das Fensterkit am Fenster zu befes- tigen. Sichern Sie das Fensterkit bei Bedarf mit Klebeband. Wir emp- fehlen, den Spalt zwischen dem Adapter und den Seiten des Fensters für maximale Effizienz abzudichten. Abb. 10 – Installation am Fenster ... - Page 20 Abb. 12 – Montage Kippfenster Abb. 13 – Montage Dachfenster Öffnen Sie das Fenster. Markieren Sie die Mitte (M) der textilen Fensterdichtung Markieren Sie die Mitte des Fensterrahmens. Kleben Sie das Klettband auf den Fensterrahmen des Kippfensters (innen, auf der Seite, wo sich der Fenstergriff befindet), ca.
-
Page 21: Lamellen Am Luftauslass Einstellen
Öffnen Sie den Reißverschluss vorzugsweise an den mit „S“ gekennzeichneten Stellen und befestigen Sie dort den Abluftschlauch. Verlegen Sie den Abluftschlauch so gerade wie möglich. Knicken Sie den Abluftschlauch nicht. .. Lamellen am Luftauslass einstellen WARNUNG! Verletzungsgefahr! Schnittgefahr durch rotierende Rotorblätter. -
Page 22: Bedienung
. Bedienung Stecken Sie den Netzstecker in eine geeignete Steckdose. Nachdem Sie den Stecker eingesteckt haben, ertönt ein Signalton. Das Gerät befindet sich dann im Stand-By-Modus. .. Gerät ein-/ausschalten Drücken Sie die Taste G e r ä t e i n - / a u s s c h a l t e n , um das oder Gerät einzuschalten. - Page 23 Alternativ können Sie die Lüftergeschwindigkeit über die Fernbedienung anwählen. Es sind folgende Lüftergeschwindigkeiten möglich: – N i e d r i g e L ü f t e r g e s c h w i n d i g k e i t e i n s t e l l e n –...
-
Page 24: Timer Einstellen
... Schlafmodus Im Schlafmodus wird die Lüftergeschwindigkeit reduziert und die Be- triebsleuchten werden ausgeschaltet. Der Schlafmodus kann nur im Kühlbetrieb aktiviert werden. Wählen Sie den Kühlbetrieb am Klimagerät oder über die Fernbedienung aus. Die Betriebsleuchte leuchtet. Drücken Sie die Taste S c h l a f m o d u s a k t i v i e r e n , um oder den Schlafmodus zu aktivieren. -
Page 25: Tastensperre
Wenn die Anzeige der Stunden aufhört zu blinken, ist Ihre Einstellung bestätigt. Das Gerät schaltet sich nach Ablauf der eingestellten Zeit automatisch aus. Um den Timer auszuschalten, drücken Sie erneut die Taste oder Die Betriebsleuchte erlischt. .. Tastensperre Drücken und halten Sie die Taste für ca. -
Page 26: Kondensatabflusschlauch Montieren
Um Austreten von Kondensatwasser zu vermeiden: Da der Unterdruck des Kondensatbehälters im Innern des Klimageräts groß ist, kippen Sie den Kondensatabflussschlauch nach unten in Richtung Boden (ca. 20 ° Gefälle). Richten Sie den Kondensatabflussschlauch gerade aus, um einen im Schlauch vorhandenen Siphon zu vermeiden. -
Page 27: Überlastungsschutz
Drücken und halten Sie die Schaltfläche auf dem Gerät für 3 Sekunden bis das WLAN-Symbol im Display zu blinken beginnt. Wenn Sie bisher noch kein Gerät in der MEDION® Life+ App angemeldet haben, tippen Sie auf die Schaltfläche Gerät hinzufügen. -
Page 28: Sprachsteuerung Über Amazon Alexa Oder Google Assistant
Sollten Sie bereits ein Gerät in der App eingebunden haben, klicken Sie auf die Schaltfläche Wählen Sie in der Liste den Bereich Klima aus. Wählen Sie das Modell MEDION Air Conditioner MD aus der Übersichts liste. Folgen Sie nun den weiteren Anweisungen in der App, um die Verbindung her- zustellen. -
Page 29: Fehlerbehebung
. Fehlerbehebung Bei einer Störung des Geräts prüfen Sie bitte zunächst, ob Sie das Problem mit Hilfe der folgenden Übersicht selbst beheben können. Versuchen Sie auf keinen Fall, die Geräte selbst zu reparieren. Wenn eine Reparatur notwendig ist, wenden Sie sich bitte an unser Service Center oder eine andere ge- eignete Fachwerkstatt. - Page 30 Problem Mögliche Ursache Fehlerbehebung Legen Sie die Batterien kor- Die Fernbedie- Die Batterien sind nicht nung funktioniert richtig eingelegt. rekt ein. nicht. Verringern Sie die Distanz Sie sind weiter als 5 Meter von dem Gerät zum Gerät. entfernt. ...
- Page 31 Problem Mögliche Ursache Fehlerbehebung Stellen Sie das Gerät auf eine Das Gerät ist sehr Das Gerät steht auf laut. einer unebenen Ober- harte glatte Oberfläche. fläche. Sichern und befestigen Sie Es sind lose, vibrieren- de Teile vorhanden. die Teile. ...
-
Page 32: Reinigung
. Reinigung WARNUNG! Stromschlaggefahr! Es besteht die Gefahr eines elektrischen Schlags durch stromführende Teile. Das Gerät darf nicht in Wasser oder andere Flüssig- keiten getaucht oder unter fließendes Wasser ge- halten werden, da dies zu einem Stromschlag führen kann. ... -
Page 33: Filtersiebe Reinigen
Reinigen Sie das Gehäuse nur mit einem weichen, feuchten Tuch oder einem weichen, dünnen Küchentuch. Befeuchten Sie das Tuch mit milden Seifenwasser, um hartnäckigen Schmutz zu entfernen. Trocknen Sie das Gehäuse sorgfältig ab, bevor Sie das Gerät einschalten. .. -
Page 34: Längere Nichtverwendung Und Lagerung
Drehen Sie die Filtersiebe um und spülen Sie die Filtersiebe unter fließendem Wasser aus. Lassen Sie das Wasser in entgegengesetzter Richtung des Luftstroms durch den Filtersieb laufen. Legen Sie die Filtersiebe beiseite und lassen Sie sie vollständig an der Luft trocknen. Abb. -
Page 35: Entsorgung
Drücken Sie die Taste oder G e r ä t e i n - / a u s s c h a l t e n , um das Gerät einzuschalten. Wählen Sie den Lüfterbetrieb am Klimagerät oder über die Fernbedienung aus. Die Betriebsleuchte leuchtet. - Page 36 Altgerät entnommen werden können, vor der Abgabe an einer Erfas- sungsstelle vom Altgerät zerstörungsfrei zu trennen und einer separaten Sammlung zuzuführen. Vertreiber mit einer Verkaufsfläche für Elektro- und Elektronikgeräte von mindestens 400 Quadratmetern sowie Vertreiber von Lebensmitteln mit einer Gesamtverkaufsfläche von mindestens 800 Quadratmetern, die mehrmals im Kalenderjahr oder dauerhaft Elektro- und Elektronikgeräte anbieten und auf dem Markt bereitstellen, sind verpflichtet, bei der Ab- gabe eines neuen Elektro- oder Elektronikgerätes an einen Endnutzer...
-
Page 37: Technische Daten
Das Symbol der durchgekreuzten Mülltonne bedeutet, dass die Batterie nicht in den Hausmüll gegeben werden darf. . Technische Daten Klimagerät Modell MD 37732 Inverkehrbringer MEDION AG Am Zehnthof 77 45307 Essen Deutschland Handelsregister-Nummer HRB 13274 Spannungsversorgung AC 220-240 V~ 50 Hz... -
Page 38: Informationen Zu Wlan/Bluetooth
Klimagerät Leistungsstufen Maximale Raumgröße ca. 32 m² Luftdurchsatz 330 m³/h Entfeuchtungsleistung ca 1 l/h Abmessungen (BxHxT) 31,5 x 70 x 31 cm Gewicht ca. 22,5 kg Betriebslautstärke < 65 dB(A) Fernbedienung 2 x Micro Batterien, Typ AAA LR03 1,5 V (im Lieferumfang enthalten) Reichweite: ca. - Page 39 MEDION AG, Am Zehnthof 77, 45307 Essen, Germany . EU-Konformitätsinformation Hiermit erklärt die MEDION AG, dass der Funkanlagentyp MD 37732 der Richtlinie 2014/53/EU [(RE-Richtlinie), sowie der Richtlinie 2009/125/EG (Öko-Design-Richtlinie) und der Richtlinie 2011/65/EU (RoHS-Richtlinie)] entspricht. Der vollständige Text der EU-Konformitätserklärung ist unter der folgenden Internetadresse verfügbar: www.medion.com/conformity.
- Page 40 Deutschland Österreich Öffnungszeiten Rufnummer Mo. - Fr.: 08:00 - 20:00 01 9287661 Sa.: 10:00 - 18:00 Serviceadresse MEDION Service Center Franz-Fritsch-Str. 11 4600 Wels Österreich Schweiz Öffnungszeiten Rufnummer Mo. - Fr.: 09:00 - 19:00 0848 - 33 33 32...
- Page 41 Mo. - Fr.: 09:00 - 19:00 02 - 200 61 98 Rufnummer (Luxemburg) 34-20 808 664 Serviceadresse MEDION B.V. John F.Kennedylaan 16a 5981 XC Panningen Die Niederlande Diese und viele weitere Bedienungsanleitungen stehen Ihnen über das Serviceportal www.medionservice.com zum Download zur Verfügung.
- Page 42 Sommaire Informations concernant la présente notice d’utilisation .......45 1.1. Explication des symboles .................45 Utilisation conforme .................. 46 Consignes de sécurité.................47 3.1. Alimentation électrique ..................47 3.2. Remarques relatives au réfrigérant ...............49 3.3. Risques spécifiques au produit ...............51 3.4. Émissions sonores ....................52 3.5.
- Page 43 Information relative à la conformité UE ..........80 Informations relatives au SAV ..............80 Mentions légales ..................82...
-
Page 44: Informations Concernant La Présente Notice D'utilisation
. Informations concernant la présente notice d’utilisation Nous vous remercions d’avoir choisi notre produit. Nous vous souhai- tons une bonne utilisation. Veuillez lire attentivement les consignes de sécurité et la notice d’utili- sation dans son intégralité avant la mise en service de l’appareil. Tenez compte des avertissements figurant sur l’appareil et dans la notice d’utilisation. -
Page 45: Utilisation Conforme
Marquage CE Symbole de courant al- ternatif Les produits portant ce symbole sont conformes • Énumération/informa- aux exigences des di- tion sur des événements rectives de l’Union eu- se produisant pendant ropéenne (voir chapitre l’utilisation « Information relative à la conformité UE »). ... -
Page 46: Consignes De Sécurité
conforme et peut entraîner des dommages corporels ou ma- tériels. . Consignes de sécurité Conservez l’appareil et les accessoires dans un endroit hors de portée des enfants. Cet appareil peut être utilisé par des enfants âgés de plus de 8 ans et par des personnes présentant des capacités phy- siques, sensorielles ou mentales restreintes ou manquant d’expérience et/ou de connaissances s’ils sont surveillés ou... - Page 47 correspondre à celle indiquée dans les caractéristiques tech- niques de l’appareil. Débranchez la fiche d’alimentation de l’appareil de la prise de courant – avant de nettoyer l’appareil, – si vous n’utilisez plus l’appareil, – si l’appareil est laissé sans surveillance, –...
-
Page 48: Remarques Relatives Au Réfrigérant
N’exposez pas l’appareil à des conditions extrêmes. À éviter : – humidité de l’air élevée ou pluie, – températures extrêmement hautes ou basses, – lumière directe du soleil, – flamme nue, – vibrations mécaniques ou chocs, – exposition excessive aux poussières, –... - Page 49 application. En raison de la haute inflammabilité du réfrigérant, il convient de respecter des mesures de précaution particulières. AVERTISSEMENT ! Risque d’incendie ! Le système de refroidissement de l’appareil contient du propane R290, un réfrigérant naturel. N’endommagez pas le circuit de réfrigérant. ...
-
Page 50: Risques Spécifiques Au Produit
N’enlevez aucun marquage de sécurité, autocollant ni éti- quette apposés sur l’appareil et veillez à ce qu’ils restent bien lisibles. Veillez au respect de la législation nationale sur le gaz. Utilisez l’appareil uniquement avec le réfrigérant R290 prévu à cet effet. -
Page 51: Émissions Sonores
Veillez à ce qu’aucun tissu tel que des rideaux ou autre, ris- quant de se coincer dans l’appareil, ne pende ni ne se trouve à proximité de l’appareil. Ne faites pas fonctionner l’appareil sur des surfaces irrégu- lières ou à proximité d’escaliers. Évitez tout risque de bascu- lement de l’appareil lorsqu’il fonctionne (p. -
Page 52: Manipulation Des Piles
Avant de stocker et de transporter l’appareil, videz toujours le réservoir de condensat et le tuyau d’évacuation du condensat. .. Manipulation des piles La télécommande fonctionne avec des piles. Veuillez tenir compte des indications suivantes : Évitez tout contact avec l’acide des piles. En cas de contact avec la peau, les yeux ou les muqueuses, rincez abondam- ment la zone concernée à... -
Page 53: Contenu De L'emballage
Si vous n’utilisez pas l’appareil pendant une longue période, retirez les piles. Avant d’insérer les piles, vérifiez que les contacts dans l’appa- reil et sur les piles sont propres et nettoyez-les si nécessaire. N’insérez que des piles neuves de même type. N’utilisez ja- mais des piles usagées et des piles neuves ensemble. -
Page 54: Vue D'ensemble De L'appareil
. Vue d’ensemble de l’appareil Fig. 1 - Face avant Fig. 2 - Face arrière Panneau de commande 5. Ouverture d’aspiration supérieure avec filtres 2. Poignée de transport 6. Sortie d’air 3. Sortie d’air avec ailettes réglables manuellement Ouverture d’aspiration inférieure avec filtres 4. - Page 55 Fig. 3 - Panneau de commande Lock : Activation/désactivation Down : Réduire la tempéra- du verrouillage des touches ture/la minuterie Sommeil : Activation/désacti- Speed : Réglage de la vitesse vation du mode sommeil du ventilateur Minuterie : Réglage de la mi- Mode : Réglage du mode de nuterie (démarrage/arrêt automa- fonctionnement tique)
- Page 56 Réseau sans fil activé Mode déshumidification activé 18. Fenêtre d’écran Minuterie activée Verrouillage des touches activé Faible vitesse de ventilation activée Mode sommeil activé Vitesse de ventilation élevée Mode ventilateur activé activée Mode refroidissement activé Fig. 5 - Télécommande Augmenter la température/ Activer la minuterie la minuterie Activer le mode refroidis-...
-
Page 57: Préparer/Installer L'appareil
Fig. 6 - Kit fenêtre 38. Fermeture à glissière 40. Bande Velcro (non représentée, sur le bord du joint textile) 39. Joint textile 41. Bande velcro . Préparer/installer l’appareil Retirez tout le matériel d’emballage et vérifiez que l’appareil n’est pas endomma- gé... -
Page 58: Monter Le Tuyau D'évacuation De L'air
Placez l’appareil sur une surface solide et plane avec une zone d’au moins 50 cm d’espace libre autour de l’appareil afin de garantir une bonne circulation de l’air. Laissez l’appareil en position verticale pendant au moins 24 heures avant de le mettre en marche. -
Page 59: Monter Le Kit Fenêtre
Fermez votre fenêtre pour fixer le kit fenêtre à la fenêtre. Si nécessaire, sécurisez le kit fenêtre avec du ruban adhésif. Nous recommandons de calfeu- trer l’espace entre l’adaptateur et les côtés de la fenêtre pour une efficacité maximale. Fig. - Page 60 Fig. 12 - Montage avec des fenêtres oscillo-battantes Fig. 13 – Montage avec des fenêtres de toit Ouvrez la fenêtre. Marquez le centre (M) du joint textile de la fenêtre Marquez le centre du cadre de la fenêtre. ...
-
Page 61: Régler Les Ailettes De La Sortie D'air
Ouvrez la fermeture éclair de préférence aux emplacements marqués d’un « S » et fixez-y le tuyau d’évacuation de l’air. Posez le tuyau d’évacuation de l’air le plus droit possible. Ne pliez pas le tuyau d’évacuation de l’air. .. Régler les ailettes de la sortie d’air AVERTISSEMENT ! Risque de blessure ! Les pales du rotor présentent un risque de coupure. -
Page 62: Utilisation
. Utilisation Branchez la fiche d’alimentation sur une prise de courant adaptée. Lorsque vous branchez la fiche, un signal sonore retentit. L’appareil est maintenant en mode veille. .. Allumer/éteindre l’appareil Appuyez sur le bouton Allumer/Éteindre l’appareil pour allu- mer l’appareil. -
Page 63: Mode Ventilateur
Vous pouvez également sélectionner la vitesse du ventilateur à l’aide de la télécom- mande. Les vitesses de ventilation suivantes sont possibles : – Régler la vitesse basse du ventilateur Régler la vitesse élevée du ventilateur – Le mode refroidissement s’arrête automatiquement lorsque la tempéra- ture ambiante est inférieure à... -
Page 64: Réglage De La Minuterie
... Mode sommeil En mode veille, la vitesse du ventilateur est réduite et les voyants de fonctionnement sont éteints. Le mode sommeil ne peut être activé qu’en mode refroidissement. Sélectionnez le mode de refroidissement sur le climatiseur ou via la télécom- mande. -
Page 65: Verrouillage Des Boutons
Votre réglage est confirmé lorsque l’affichage des heures cesse de clignoter. L’appareil s’éteint automatiquement lorsque la durée réglée est écoulée. Pour désactiver la minuterie, appuyez à nouveau sur le bouton Le voyant de fonctionnement s’éteint. .. Verrouillage des boutons ... -
Page 66: Monter Le Tuyau D'évacuation Du Condensat
Pour éviter les fuites d’eau de condensation : Comme la dépression du réservoir de condensat à l’intérieur du climatiseur est élevée, orientez le tuyau d’évacuation du condensat vers le bas, en direction du sol (inclinaison d’env. 20°). Veillez à ce que le tuyau d’évacuation du condensat soit droit, de façon à éviter que le condensat ne se bloque dans le tuyau. -
Page 67: Protection Contre La Surcharge
. Commande par application Pour utiliser pleinement votre climatiseur, téléchargez gratuitement l’application MEDION® Life+ sur votre smartphone/tablette depuis le Google Play Store® ou l’App Store d’Apple®. Pour ce faire, scannez tout simplement le code QR suivant ou rendez-vous dans le Play Store (Android™) ou l’App Store (iOS®), et recherchez l’application « ME-... -
Page 68: Configuration De L'application/Raccordement Au Climatiseur
Wi-Fi de l’écran commence à clignoter. Si vous n’avez pas encore enregistré d’appareil dans l’application MEDION® Life+ App, appuyez sur le bouton Ajouter un appareil. Si vous avez déjà intégré un appareil dans l’application, cliquez sur le bouton ... -
Page 69: Dépannage
. Dépannage En cas de panne de l’appareil, vérifiez d’abord si vous pouvez résoudre le problème vous-même à l’aide du tableau suivant. N’essayez en aucun cas de réparer vous-même l’appareil. Si une réparation s’avère nécessaire, veuillez vous adresser à notre SAV ou à un autre atelier spécialisé. Ne confier les travaux d’entretien et de réparation du circuit de réfrigérant qu’à... - Page 70 Problème Cause possible Dépannage Insérez correctement les La télécommande Les piles ne sont pas in- ne fonctionne pas. sérées correctement. piles. Réduire la distance par rap- Vous êtes à plus de 5 mètres de l’appareil. port à l’appareil. ...
- Page 71 Problème Cause possible Dépannage Videz le bac de récupération De l’eau s’échappe Débordement lors du de l’appareil. déplacement de l’ap- d’eau avant le transport. pareil. Redressez le tuyau d’évacua- Le tuyau d’évacuation du condensat est plié. tion du condensat. ...
-
Page 72: Nettoyage
Problème Cause possible Dépannage Videz le bac de récupération Affichage d’erreur Niveau de remplissage d’eau de condensation de l’eau intégré en retirant trop élevé l’obturation de l’orifice d’écoulement du condensat et laissez l’eau de condensa- tion s’écouler dans un réser- voir de condensat adapté. -
Page 73: Nettoyage Du Filtre
AVIS ! Appareil endommagé ! L’utilisation de produits d’entretien non adaptés sur l’appareil peut endommager les surfaces. Évitez les solvants et produits d’entretien chimiques qui pourraient endommager la surface et/ou les ins- criptions sur l’appareil. N’utilisez aucun produit d’entretien agressif, chimique ou récurant et aucune éponge dure. - Page 74 Retirez les filtres supérieur et inférieur de l’ap- pareil. Utilisez un aspirateur pour aspirer la poussière des filtres. Fig. 14 - Filtres Retournez les filtres et passez-les sous l’eau courante. Faites couler l’eau à travers le filtre dans le sens opposé...
-
Page 75: Non-Utilisation Et Stockage Prolongés
. Non-utilisation et stockage prolongés Si l’appareil n’est pas utilisé pendant une période prolongée, il doit être nettoyé et entièrement séché. AVIS ! Appareil endommagé ! L’évaporateur situé à l’intérieur de l’appareil doit avoir entièrement séché avant le stockage de l’appareil, afin d’éviter tout endommagement et toute formation de moisissure. -
Page 76: Recyclage
. Recyclage EMBALLAGE Votre appareil se trouve dans un emballage qui le protège des dommages pendant le transport. Les emballages sont fabriqués à partir de matériaux qui peuvent être éliminés de manière écologique et remis à un service de recyclage approprié. -
Page 77: Caractéristiques Techniques
. Caractéristiques techniques Climatiseur Modèle MD 37732 Distributeur MEDION AG Am Zehnthof 77 45307 Essen Allemagne Numéro d’enregistrement au registre HRB 13274 du commerce Alimentation électrique CA 220-240 V~ 50 Hz Puissance nominale 1005 watts Fusible 4,5 A Puissance frigorifique 9000 BTU Réfrigérant : R290 Quantité de réfrigérant 170 g... -
Page 78: Fiche Produit
DD : Q un canal/deux canaux (indication séparée pour kWh/h SD : Q le refroidissement et le chauffage) Niveau de puissance acoustique dB(A) Potentiel de réchauffement global Adresse de contact pour plus d’informations : MEDION AG, Am Zehnthof 77, 45307 Essen, Allemagne... - Page 79 . Information relative à la conformité UE L’entreprise MEDION AG déclare par la présente que le type d’équipe- ment radio MD 37732 est conforme aux directives 2014/53/UE [(directive RE), 2009/125/CE (directive sur l’écoconception) et à la directive 2011/65/ UE (directive RoHS)]. La déclaration de conformité UE intégrale est dis- ponible à...
- Page 80 02 - 200 61 98 Hotline SAV (Luxembourg) 34 - 20 808 664 Adresse du service après-vente MEDION B.V. John F.Kennedylaan 16a 5981 XC Panningen Pays-Bas La présente notice d’utilisation et bien d’autres sont disponibles au téléchargement sur le portail du SAV www.medionservice.com.
-
Page 81: Mentions Légales
La présente notice d’utilisation est protégé par les droits d’auteur. Toute reproduction sous forme mécanique, électronique ou sous toute autre forme que ce soit est interdite sans l’autorisation préalable écrite du fabricant. L’entreprise suivante possède les droits d’auteur : MEDION AG Am Zehnthof 77 45307 Essen Allemagne Veuillez noter que l’adresse ci-dessus n’est pas celle du service des retours. - Page 82 Inhoudsopgave Informatie over deze gebruiksaanwijzing ..........85 1.1. Betekenis van de symbolen ................85 Gebruiksdoel ....................86 Veiligheidsvoorschriften ................87 3.1. Stroomvoorziening ..................... 87 3.2. Aanwijzingen voor het koelmiddel ..............89 3.3. Productspecifieke gevaren ................91 3.4. Geluidsemissie .....................92 3.5. Opslag/transport ....................92 3.6. Omgaan met batterijen ..................92 Inhoud van de levering ................
- Page 83 EU-conformiteitsinformatie ..............119 Service-informatie ..................119 Colofon ...................... 120...
-
Page 84: Informatie Over Deze Gebruiksaanwijzing
. Informatie over deze gebruiksaanwijzing Hartelijk dank dat u voor ons product hebt gekozen. Wij wensen u veel plezier met het apparaat. Lees de veiligheidsvoorschriften en de volledige gebruiksaanwijzing aandachtig door voordat u het apparaat in gebruik neemt. Neem de waarschuwingen op het apparaat en in de gebruiksaanwijzing in acht. -
Page 85: Gebruiksdoel
Symbool randaarde • Opsommingsteken / (bij veiligheidsklasse I) informatie over gebeur- tenissen die zich tijdens Elektrische apparaten de bediening kunnen van veiligheidsklasse I voordoen zijn elektrische appara- ten die minimaal basi- Instructie voor een uit te sisolatie hebben en die voeren handeling zijn uitgerust met een ... -
Page 86: Veiligheidsvoorschriften
. Veiligheidsvoorschriften Bewaar het apparaat en de accessoires buiten het bereik van kinderen. Dit apparaat kan worden gebruikt door kinderen vanaf 8 jaar en door personen met een lichamelijke, zintuiglijke of ver- standelijke beperking of gebrek aan kennis en/of ervaring, mits iemand toezicht op hen houdt of hun instructie heeft gegeven hoe ze het apparaat veilig kunnen gebruiken en ze hebben begrepen welke gevaren het gebruik van het appa-... - Page 87 Trek de stekker van het apparaat uit het stopcontact: – wanneer u het apparaat reinigt; – wanneer u het apparaat niet meer gebruikt; – wanneer u geen toezicht meer hebt op het apparaat; – bij onweer. Trek altijd aan de stekker, nooit aan het netsnoer. ...
-
Page 88: Aanwijzingen Voor Het Koelmiddel
– open vuur; – mechanische trillingen of schokken; – overmatige blootstelling aan stof; – ontbrekende ventilatie, zoals in een kast of boekenrek. Controleer of het apparaat uitgeschakeld is voordat u de stek- ker in het stopcontact steekt. Trek de stekker nooit uit het stopcontact als het apparaat in- geschakeld is. - Page 89 WAARSCHUWING! Brandgevaar! Het koelsysteem van het apparaat bevat het natuurlijke koelmiddel propaan R290. Beschadig het koelmiddelcircuit niet. De ruimte voor gebruik, opslag en installatie moet minimaal 7 m² groot zijn, zodat er bij beschadiging van het koelsysteem voldoende lucht is. ...
-
Page 90: Productspecifieke Gevaren
WAARSCHUWING! Laat onderhouds- en reparatie- werkzaamheden aan het koelmiddelcircuit alleen uit- voeren door een vakman en volgens de aanwijzingen van de fabrikant. Neem contact op met het Service Center voor reparatie-in- structies. Componenten mogen alleen door identieke repara- tieonderdelen worden vervangen. .. -
Page 91: Geluidsemissie
Gebruik het apparaat niet in de directe omgeving van warm- tebronnen zoals radiatoren, warmtereservoirs, ovens of ande- re apparaten die warmte afgeven. Controleer alle schroefverbindingen en stekkers regelmatig! Draai losse schroeven aan en zorg dat stekkers stevig zijn aan- gesloten. - Page 92 Houd nieuwe en gebruikte batterijen uit de buurt van kinde- ren. Gebruik de afstandsbediening niet meer als het batterijvak niet goed sluit en houd de afstandsbediening buiten het be- reik van kinderen. WAARSCHUWING! Explosiegevaar! Als de batterijen niet op de juiste manier worden ver- vangen, bestaat er explosiegevaar! ...
-
Page 93: Inhoud Van De Levering
. Inhoud van de levering GEVAAR! Verstikkingsgevaar! Er bestaat verstikkingsgevaar door het inslikken of on- juist gebruiken van verpakkingsfolie! Bewaar al het gebruikte verpakkingsmateriaal (plas- tic zakken, stukken polystyreen enzovoort) buiten het bereik van kinderen. Laat kinderen niet met de verpakking spelen. ... -
Page 94: Overzicht Van Het Apparaat
. Overzicht van het apparaat Afb. 1 - voorzijde Afb. 2 - achterzijde Bedieningspaneel 5. Bovenste aanzuigopening met filterzeef 2. Draaggreep 6. Luchtafvoeropening 3. Luchtafvoer met handmatig instel- bare lamellen Onderste aanzuigopening met filterzeef 4. Zwenkwieltjes 8. Condensaatafvoeropening... - Page 95 Afb. 3 - bedieningspaneel Lock: Toetsblokkering in-/uit- Down: Temperatuur/timer schakelen verlagen Sleep: Slaapmodus in-/uitscha- Speed: Ventilatorsnelheid in- kelen stellen Timer: Timer instellen (automa- Mode: Modus instellen tisch starten/stoppen) Power: Apparaat in-/uitscha- Up: Temperatuur/timer verho- kelen gen/display Afb. 4 - aanduidingen op display...
- Page 96 Draadloos netwerk geacti- Ontvochtigingsmodus geacti- veerd veerd 18. Display Timer geactiveerd Toetsblokkering geactiveerd Lage ventilatorsnelheid geacti- veerd Slaapmodus geactiveerd Hoge ventilatorsnelheid geac- Ventilatiemodus geactiveerd tiveerd Koelmodus geactiveerd Afb. 5: afstandsbediening Temperatuur/timer verho- Timer inschakelen Koelmodus inschakelen Hoge ventilatorsnelheid Ontvochtigingsmodus in- instellen schakelen Temperatuur/timer verla-...
-
Page 97: Apparaat Voorbereiden/Opstellen
Afb. 6 - raamafdichting 38. Ritssluiting 40. Rand van klittenband (niet weer- gegeven, aan rand van de textielen 39. Textielen afdichting afdichting) 41. Klittenband . Apparaat voorbereiden/opstellen Verwijder al het verpakkingsmateriaal en controleer het apparaat op eventuele beschadigingen voordat u het in gebruik neemt. WAARSCHUWING! Brandgevaar! Het koelsysteem van het apparaat bevat het natuurlijke... -
Page 98: Luchtafvoerslang Monteren
Plaats het apparaat op een stabiele, vlakke ondergrond met minstens 50 cm vrije ruimte rondom het apparaat, zodat er een goede luchtcirculatie is. Laat het apparaat minimaal 24 uur rechtop staan voordat u het inschakelt. Gebruik het apparaat alleen bij een omgevingstemperatuur tussen 5 °C en 35 °C. ... -
Page 99: Raamafdichting Monteren
Sluit het raam om de raamaf- dichting aan het raam te beves- tigen. Maak de raamafdichting vast met klittenband, indien nodig. Voor maximale efficiëntie raden we aan de kier tussen de adapter en de zijkant van het raam dicht te maken. - Page 100 Afb. 12 - montage kantelramen Afb. 13 - montage dakramen Open het raam. Markeer het midden (M) van de textielen raamafdichting. Markeer het midden van het raamkozijn. Plak het klittenband op het raamkozijn van het kantelraam (aan de binnenkant, aan de kant van de raamgreep), op ca.
-
Page 101: Lamellen Op De Luchtafvoer Instellen
Open de ritssluiting, bij voorkeur op de plek die is aangeduid met “S” en bevestig daar de luchtafvoerslang. Zorg ervoor dat luchtafvoerslang in een zo recht mogelijke lijn loopt. Zorg ervoor dat de luchtafvoerslang niet geknikt is. .. -
Page 102: Bediening
. Bediening Steek de netstekker in een geschikt stopcontact. Nadat u de stekker hebt aangesloten, klinkt er een geluidssignaal. Het apparaat staat nu in de stand-bymodus. .. Apparaat in-/uitschakelen Druk op de toets Apparaat in-/uitschakelen om het apparaat in te schakelen. - Page 103 U kunt de ventilatorsnelheid ook instellen met de afstandsbediening. De volgende ventilatorsnelheden zijn beschikbaar: – Lage ventilatorsnelheid instellen Hoge ventilatorsnelheid instellen – De koelmodus wordt automatisch uitgeschakeld wanneer de tempera- tuur in de ruimte lager is dan de ingestelde temperatuur. Het apparaat schakelt dan over op ventilatie.
-
Page 104: Timer Instellen
... Slaapmodus In de slaapmodus wordt de ventilatorsnelheid verlaagd en worden de controlelampjes uitgeschakeld. De slaapmodus kan alleen vanuit de koelmodus worden geactiveerd. Kies de koelmodus op de airco of op de afstandsbediening. Het controlelampje brandt. Druk op de toets Slaapmodus activeren om de slaapmodus te acti- veren. -
Page 105: Toetsblokkering
Wanneer de weergave van de uren niet meer knippert, is de instelling bevestigd. Het apparaat wordt automatisch uitgeschakeld nadat de ingestelde tijd is verstre- ken. Druk opnieuw op de toets om de timer uit te schakelen. Het controlelampje brandt. .. -
Page 106: Condensaatafvoerslang Monteren
Ga als volgt te werk om te voorkomen dat condenswater uit het apparaat loopt: Omdat er grote onderdruk is in het condensaatreservoir van de airco, kantelt u de condensaatafvoerslang omlaag richting de vloer (ca. 20° verval). Zorg dat de condensaatafvoerslang recht ligt om een zwanenhals in de slang te voorkomen. -
Page 107: Beveiliging Tegen Overbelasting
. App-besturing Om alle functies van de airco optimaal te benutten, downloadt u de gratis MEDION® Life+ app naar uw smartphone/tablet via de Google Play Store® of Apple® App Sto- Scan hiervoor gewoon de volgende QR-code of bezoek de Play Store (Android™) of App Store (iOS®) en zoek daar naar "MEDION Life+". -
Page 108: Spraakbediening Via Amazon Alexa Of De Google Assistent
Als u nog geen apparaat in de MEDION® Life+ app heeft aangemeld, drukt u op de knop Apparaat toevoegen. Als u al een apparaat in de app hebt gekoppeld, klikt u op de knop Selecteer Klimaat in de lijst. - Page 109 Probleem Mogelijke oorzaak Problemen oplossen Trek de netstekker uit het Het apparaat De stekker zit niet goed werkt niet. in het stopcontact. stopcontact en steek deze opnieuw in het stopcontact. Controleer het geaarde stop- Het geaarde stopcon- tact is defect. contact door er een ander apparaat op aan te sluiten.
- Page 110 Probleem Mogelijke oorzaak Problemen oplossen Sluit ramen en deuren. Het apparaat koelt Er zijn ramen of deuren niet goed. geopend, waardoor er warme lucht de ruimte in kan komen. Reinig de filters zoals is be- De filters zijn erg vuil. schreven bij “Filters reinigen”.
-
Page 111: Reiniging
Probleem Mogelijke oorzaak Problemen oplossen Controleer de kabel op be- Storingsindicator Communicatiefout tus- sen de hoofdprintplaat schadigingen. en de printplaat van het display. Controleer de aansluiting. Storingsindicator De sensor voor de om- gevingstemperatuur is Reinig of vervang de tem- uitgevallen. -
Page 112: Filterzeef Reinigen
WAARSCHUWING! Gevaar voor letsel! Er bestaat snijgevaar door contact met de scherpe ran- den van de rotorbladen binnen in de behuizing. Haal het apparaat niet uit elkaar om de rotorbladen te reinigen. LET OP! Schade aan het apparaat! Door verkeerd gebruik van reinigingsmiddelen bij het reinigen van het apparaat kan het oppervlak bescha- digd raken. - Page 113 Gebruik het apparaat nooit zonder dat de filterzeef is geplaatst omdat hierdoor de verdamper in het appa- raat vuil kan worden. Druk op de toets om het apparaat uit te schakelen. Trek de stekker uit het stopcontact. ...
-
Page 114: Langdurig Niet-Gebruik En Opslag
. Langdurig niet-gebruik en opslag Wanneer het apparaat gedurende langere tijd niet wordt gebruikt, moet het schoon en volledig droog zijn. LET OP! Schade aan het apparaat! De verdamper binnenin het apparaat moet vóór het opslaan worden gedroogd om schade aan de compo- nent of schimmelvorming te vermijden. -
Page 115: Afvalverwerking
. Afvalverwerking VERPAKKING Het apparaat zit ter bescherming tegen transportschade in een verpakking. Verpakkingen zijn gemaakt van materialen die milieuvriendelijk kunnen worden afgevoerd en vakkun- dig kunnen worden gerecycled. Let op de volgende markering van verpakkingsmateriaal bij het schei- den van afval met de afkortingen (a) en (b): 1-7: kunststoffen/20–22: papier en karton/80-98: composietmaterialen (Alleen voor Frankrijk) Met het 'Triman'-symbool wordt de gebruiker geïnformeerd dat het pro-... -
Page 116: Technische Gegevens
. Technische gegevens Airco Model MD 37732 Distributeur MEDION AG Am Zehnthof 77 45307 Essen Duitsland Handelsregisternummer HRB 13274 Voedingsspanning AC 220 - 240 V ~ 50 Hz Nominaal opgenomen vermogen 1005 watt Zekering 4,5 A Koelvermogen 9000 BTU Koelmiddel R290... -
Page 117: Productinformatieblad
Opgenomen vermogen in bedrijfstoestand "Temperatuurregelaar uit" Opgenomen vermogen in stand-bymodus Stroomverbruik van éénkanaals-/tweeka- SD: 1,003 DD: Q naals-airconditioners (afzonderlijke specificatie kWh/h SD: Q voor koelmodus en verwarmingsmodus) Geluidsvermogenniveau dB(A) Aardopwarmingsvermogen Contactadres voor meer informatie: MEDION AG, Am Zehnthof 77, 45307 Essen, Duitsland... - Page 118 . EU-conformiteitsinformatie Hiermee verklaart MEDION AG dat het type radiografische apparatuur MD 37732 voldoet aan richtlijn 2014/53/EU [(RE-richtlijn) evenals richtlijn 2009/125/EG (ecodesignrichtlijn) en richtlijn 2011/65/EU (RoHS-richtlijn)]. Ga voor de volledige tekst van de EU-conformiteitsverklaring naar: www.medion.com/conformity. . Service-informatie Wanneer uw apparaat niet zoals gewenst of verwacht functioneert, neem dan con- tact op met onze klantenservice.
- Page 119 Deze gebruiksaanwijzing is auteursrechtelijk beschermd. Verveelvoudiging in mechanische, elektronische of welke andere vorm dan ook zonder schriftelijke toestemming van de fabrikant is verboden. Het copyright berust bij de firma: MEDION AG Am Zehnthof 77 45307 Essen Duitsland Houd er rekening mee dat het bovenstaande adres geen retouradres is. Neem eerst...
- Page 120 Índice Información acerca de este manual de instrucciones ......123 1.1. Explicación de los símbolos ................123 Uso conforme a lo previsto ..............124 Indicaciones de seguridad ............... 125 3.1. Alimentación eléctrica ..................125 3.2. Indicaciones sobre el refrigerante ..............127 3.3. Peligros específicos del producto ............... 129 3.4.
- Page 121 Ficha de datos del producto ..............156 Información de conformidad UE ............. 157 Informaciones de asistencia técnica ............157 Aviso legal ....................158...
-
Page 122: Información Acerca De Este Manual De Instrucciones
. Información acerca de este manual de ins- trucciones Muchas gracias por haber elegido nuestro producto. Le deseamos que disfrute con este aparato. Antes de la puesta en servicio, lea atentamente las indicaciones de segu- ridad y todo el manual. Tenga en cuenta las advertencias que aparecen en el propio aparato y en el manual de instrucciones. -
Page 123: Uso Conforme A Lo Previsto
Símbolo de puesta a Símbolo de corriente tierra de protección alterna. (clase de protección I) • Signo de numeración/in- Los aparatos eléctricos formación sobre eventos de la clase de protec- durante el manejo. ción I son aparatos que disponen al menos de ... -
Page 124: Indicaciones De Seguridad
. Indicaciones de seguridad El aparato y los accesorios se deben guardar en un lugar fuera del alcance de los niños. Este aparato puede ser utilizado por niños a partir de 8 años y por personas con disminución de sus facultades físicas, senso- riales o psíquicas o por personas que no tengan la suficiente experiencia o conocimiento, siempre y cuando lo hagan bajo supervisión o se les haya instruido sobre la manipulación se-... - Page 125 Desenchufe el aparato de la toma de corriente en los siguien- tes casos: – cuando limpie el aparato; – cuando no lo vaya a utilizar más; – cuando no lo esté vigilando; – cuando haya tormenta. Tire siempre de la clavija de enchufe y no del cable de alimen- tación.
-
Page 126: Indicaciones Sobre El Refrigerante
No exponga el aparato a condiciones extremas. Se debe evi- tar lo siguiente: – una alta humedad del aire o humedad en general; – temperaturas extremadamente altas o bajas; – la radiación solar directa; – fuego abierto; – oscilaciones mecánicas o golpes; –... - Page 127 todo el mundo. Gracias a sus propiedades energéticas eficien- tes, el R290 resulta muy adecuado como refrigerante para esta aplicación. Debido a la elevada inflamabilidad del refrigerante, deben tenerse en cuenta medidas de precaución especiales. ¡ADVERTENCIA! ¡Peligro de incendio! El sistema de refrigeración del aparato contiene el refri- gerante natural propano R290.
-
Page 128: Peligros Específicos Del Producto
Guarde el aparato protegido de la radiación solar en un lugar bien ventilado. No retire símbolos de seguridad, adhesivos ni etiquetas del aparato y manténgalos legibles. Observe el cumplimiento de la legislación nacional en mate- ria de gas. ... -
Page 129: Emisiones De Ruido
formada ni doblada. Procure que cerca del aparato no cuelguen/haya tejidos como cortinas o similares que puedan engancharse en el aparato. No ponga en marcha el aparato sobre superficies irregulares ni cerca de escaleras. Evite que el aparato pueda volcar duran- te el funcionamiento (p. ej., debido a bordes en el suelo). -
Page 130: Manipulación De Las Pilas
Antes del almacenamiento y el transporte, vacíe siempre el depósito colector de agua condensada y la manguera de des- agüe de agua condensada. .. Manipulación de las pilas El mando a distancia funciona con pilas. Observe al respecto las siguientes indicaciones: ... -
Page 131: Volumen De Suministro
Antes de colocar las pilas, compruebe si los contactos en el aparato y en las pilas están limpios y, de ser necesario, límpie- los. Básicamente deben utilizarse solo pilas nuevas del mismo tipo. Nunca mezcle pilas nuevas y usadas. ... -
Page 132: Vista General Del Aparato
. Vista general del aparato Fig. 1: Parte delantera Fig. 2: Parte trasera Panel de control 5. Orificio de aspiración superior con filtro 2. Asa de transporte 6. Orificio de salida de aire 3. Salida de aire con láminas regula- bles manualmente Orificio de aspiración inferior con filtro 4. - Page 133 Fig. 3: Panel de mandos Bloqueo: activar/desactivar el Abajo: reducir la temperatura/ bloqueo de teclas el temporizador Nocturno: activar/desactivar el Velocidad: Ajustar la velocidad modo nocturno del ventilador Temporizador: ajustar el tem- Modo: seleccionar el modo de porizador (inicio/parada automá- funcionamiento tico) Encendido: encender/apagar...
- Page 134 Red inalámbrica activada Modo de deshumidificación activado 18. Ventana de visualización Temporizador activado Bloqueo de teclas activado Velocidad baja del ventilador Modo nocturno activado activada Modo de ventilador activado Velocidad alta del ventilador Modo de refrigeración activa- activada Fig. 5: Mando a distancia Aumentar temperatura/ Activar temporizador temporizador...
-
Page 135: Preparación/Instalación Del Aparato
Fig. 6: Kit para ventana 38. Cremallera 40. Moldura de velcro (no visible, en el borde de la junta de tela) 39. Junta de tela 41. Velcro . Preparación/instalación del aparato Retire todos los materiales de embalaje y compruebe si el aparato presenta al- gún posible daño antes de ponerlo en funcionamiento. -
Page 136: Montaje De La Manguera De Salida De Aire
Fig. 7: Distancia alrededor del aparato Coloque el aparato sobre una superficie firme y plana en una zona con al menos 50 cm de espacio libre alrededor del aparato para garantizar una buena circula- ción de aire. Antes de conectar el aparato, déjelo reposar en posición vertical durante al me- nos 24 horas. - Page 137 Monte el adaptador del kit para ventana en el otro extremo de la manguera de salida de aire. Fig. 9: Montaje del adaptador de kit para ventana Adapte el kit para ventana al tamaño de su ventana. Puede montar el kit para ventana en una ventana basculante o en una ventana de buhardilla.
-
Page 138: Montaje Del Kit Para Ventana
Coloque la manguera de salida de aire en el orificio de salida de aire del climatizador. Ajuste la longitud de la mangue- ra flexible de salida de aire. Evite doblar la manguera. Fig. 11: Posición de la manguera de salida de aire ... -
Page 139: Ajuste De Las Láminas En La Salida De Aire
Fig. 13: Instalación en ventana de buhardilla Abra la ventana. Marque el centro (M) de la junta de tela de la ventana. Marque el centro del marco de la ventana. Pegue el velcro en el marco de la ventana basculante (en el interior, en el lado donde se encuentra la manilla), a aprox. -
Page 140: Colocación De Las Pilas En El Mando A Distancia
Sujete el asa situada en la lámina inferior y muévala hacia arriba o hacia abajo para ajustar la posición deseada de las láminas. .. Colocación de las pilas en el mando a distancia El mando a distancia contiene dos pilas micro, tipo AAA LR03 1,5 V. Si el aparato no responde o responde mal al mando a distancia, es necesario cam- biar las pilas. - Page 141 Activar el modo de ventilador – Activar el modo de deshumidificación – ... Modo de refrigeración Este modo operativo sirve para enfriar el aire ambiente. Seleccione el modo de refrigeración en el climatizador o a través del mando a distancia.
-
Page 142: Modo Nocturno
En el modo de ventilador no es posible ajustar la temperatura ni el modo nocturno. ... Modo de deshumidifi cación Este modo operativo sirve para reducir la humedad en la habitación. Seleccione el modo de deshumidificación en el climatizador o a través del man- do a distancia. -
Page 143: Bloqueo De Teclas
Para desconectar el temporizador, pulse de nuevo la tecla El piloto de servicio se apaga. ... Desconexión automática Cuando el aparato está encendido, puede fijar el margen de tiempo hasta el apaga- do automático. Pulse la tecla para ajustar el margen de tiempo deseado (entre 1 y 24 horas). -
Page 144: Montaje De La Manguera De Desagüe De Agua Condensada
Durante la refrigeración, en el modo de deshumidificación y en caso de alta hume- dad del aire, el líquido condensado se acumula en climatizador. El depósito de agua condensada se debe controlar con frecuencia y vaciar cuando sea necesario. Apague el aparato. ... -
Page 145: Funciones De Seguridad
. Control mediante aplicación Para sacar el máximo provecho de su aire acondicionado, descargue gratuitamente la aplicación MEDION® Life+ en su smartphone/tablet a través de Google Play Store® o Apple® App Store. Para ello solo tiene que escanear el siguiente código QR o visitar la Playstore (An- droid™) o la Appstore (iOS®) y buscar «MEDION Life+». -
Page 146: Requisitos Del Sistema
Si todavía no ha registrado ningún aparato en la aplicación MEDION® Life+, pul- se el botón Agregar dispositivo. En caso de que ya haya vinculado un aparato en la aplicación, haga clic en el botón... -
Page 147: Solución De Problemas
. Solución de problemas Si se produce un fallo en el aparato, compruebe primero si puede solucionar el pro- blema con ayuda del siguiente resumen. En ningún caso trate de reparar usted mismo los aparatos. Si fuera necesario reparar el aparato, póngase en contacto con nuestro Centro de servicio técnico o cualquier otro taller especializado autorizado. - Page 148 Problema Posible causa Solución Coloque las pilas correcta- El mando a distan- Las pilas no se han co- cia no funciona. locado correctamente. mente. Reduzca la distancia hasta el Se encuentra a más de 5 metros del aparato. aparato. ...
- Page 149 Problema Posible causa Solución Vacíe el depósito de agua an- Sale agua del apa- El agua rebosa al mover rato. el aparato. tes de transportar el aparato. Coloque la manguera recta. La manguera de des- agüe de agua conden- sada está...
-
Page 150: Limpieza
. Limpieza ¡ADVERTENCIA! ¡Peligro de descarga eléctrica! Existe peligro de descarga eléctrica a causa de las pie- zas conductoras de electricidad. El aparato no se debe sumergir en agua u otros lí- quidos, ni enjuagarse con agua, dado que se podría producir una descarga eléctrica. -
Page 151: Limpieza De Los Filtros
.. Limpieza de los fi ltros ¡AVISO! ¡Daños en el aparato! El polvo se acumula en los filtros y reduce la corriente de aire. La corriente de aire reducida disminuye la efi- ciencia del aparato. Si se acumula mucho polvo, el filtro puede bloquearse y se pueden producir daños en el aparato. -
Page 152: Largos Períodos De No Utilización Y Almacenamiento
¡ADVERTENCIA! ¡Peligro de lesiones! Existe peligro de cortes si se entra en contacto con la superficie afilada del evaporador al colocar los filtros. No toque la superficie afilada del evaporador con las manos desnudas. Vuelva a colocar el filtro una vez seco en el aparato. . -
Page 153: Eliminación
Desenchufe la clavija de la toma de corriente. Retire la manguera de salida de aire y el kit para ventana. Quite y limpie los filtros y deje que se sequen a continuación por completo. Vuelva a colocar los filtros en los bastidores de la carcasa previstos para tal fin. ... -
Page 154: Datos Técnicos
El símbolo de un cubo de basura tachado significa que la pila no puede tirarse a la basura doméstica normal. . Datos técnicos Climatizador Modelo MD 37732 Distribuidor MEDION AG Am Zehnthof 77 45307 Essen Alemania Número del registro mercantil HRB 13274 Alimentación de tensión 220-240 V CA ~ 50 Hz... -
Page 155: Información Sobre Wifi/Bluetooth
Climatizador Peso aprox. 22,5 kg Nivel de ruido en funcionamiento < 65 dB(A) Mando a distancia 2 pilas micro tipo AAA LR03 1,5 V (incluidas en el volumen de suministro) Alcance: aprox. 6 m . Información sobre wifi /Bluetooth® Rango de frecuencia: 2,4 GHz Wifi estándar: 802.11 b/g/n... -
Page 156: Información De Conformidad Ue
MEDION AG, Am Zehnthof 77, 45307 Essen, Alemania . Información de conformidad UE Por la presente, MEDION AG declara que el tipo de equipo inalámbrico MD 37732 cumple la directiva 2014/53/UE (Directiva sobre la comerciali- zación de equipos radioeléctricos), así como la directiva 2009/125/CE (Di- rectiva sobre diseño ecológico) y la directiva 2011/65/UE (Directiva sobre... -
Page 157: Aviso Legal
Horario Hotline de posventa Lu-Vi: 08:30-17:30 (+34) 91 904 28 00 Dirección de asistencia técnica MEDION Service Center ENAME, S.A Parque Industrial de Coimbrões, LOTE 4 E 5 São João de Lourosa 3500-618 VISEU Portugal Puede descargarse tanto este como muchos otros ma- nuales de instrucciones a través del portal de servicio... - Page 158 Indice Informazioni relative alle presenti istruzioni per l’uso ......161 1.1. Spiegazione dei simboli ...................161 Utilizzo conforme ..................162 Indicazioni di sicurezza ................163 3.1. Alimentazione elettrica ................... 163 3.2. Indicazioni sul refrigerante ................165 3.3. Pericoli specifici del prodotto ................167 3.4.
- Page 159 Informazioni sulla conformità UE ............196 Informazioni relative al servizio di assistenza ........196 Note legali ....................198...
-
Page 160: Informazioni Relative Alle Presenti Istruzioni Per L'uso
. Informazioni relative alle presenti istruzio- ni per l’uso Grazie per aver scelto il nostro prodotto. Ci auguriamo che sia di vostro gradimento. Prima di utilizzare il prodotto, leggere attentamente le indicazioni di sicurezza e le presenti istruzioni nella loro interezza. Osservare le avver- tenze riportate sull’apparecchio e nelle istruzioni per l’uso. -
Page 161: Utilizzo Conforme
Simbolo del collega- • Punto elenco / informa- mento a terra (per la zioni relative a eventi classe di protezione I) che si possono verificare durante l’uso Gli apparecchi elettrici della classe di protezio- Istruzioni operative da ne I possiedono almeno seguire un isolamento di base ... -
Page 162: Indicazioni Di Sicurezza
. Indicazioni di sicurezza Tenere l’apparecchio e gli accessori fuori dalla portata dei bambini. Il presente apparecchio può essere utilizzato da bambini a partire da un’età di 8 anni e anche da persone con capacità fisiche, sensoriali o intellettive ridotte o con carenza di espe- rienza e/o di conoscenze, a condizione che siano sorvegliate o istruite circa l’utilizzo sicuro dell’apparecchio e che abbiano compreso i pericoli che ne derivano. - Page 163 – quando non si utilizza più l’apparecchio, – quando non si supervisiona l’apparecchio, – in caso di temporale. Per estrarre la spina dalla presa elettrica tirare la spina, non il cavo di alimentazione. Non posizionare l’apparecchio in prossimità di un lavandino e non esporlo a spruzzi e gocce d’acqua.
-
Page 164: Indicazioni Sul Refrigerante
– eccessiva presenza di polvere, – mancanza di ventilazione, ad esempio in un armadio o in una libreria. Prima di inserire la spina di alimentazione assicurarsi che l’ap- parecchio sia spento. Mai estrarre la spina di alimentazione dalla presa elettrica quando l’apparecchio è... - Page 165 Non danneggiare il circuito del refrigerante. Ai fini del funzionamento, della conservazione e del posizio- namento, il locale deve disporre di una superficie minima di 7 m² per garantire un volume d’aria sufficiente in caso di dan- neggiamento del sistema di raffreddamento. ...
-
Page 166: Pericoli Specifici Del Prodotto
AVVERTENZA! Gli interventi di manutenzione e ripara- zione del circuito del refrigerante devono essere ese- guiti da un tecnico specializzato nel rispetto delle istru- zioni del produttore. Per le istruzioni di riparazione, contattare il servizio di assi- stenza. I componenti possono essere sostituiti solo mediante ricambi identici. -
Page 167: Emissioni Acustiche
Non utilizzare l’apparecchio nelle immediate vicinanze di fon- ti di calore come radiatori, accumulatori di calore, forni o altri apparecchi che generano calore. Controllare tutti i collegamenti a vite e a spina a intervalli re- golari! Stringere le viti allentate e correggere la tenuta dei collega- menti a spina. - Page 168 abbondantemente i punti interessati con acqua pulita e con- tattare immediatamente un medico. Tenere le batterie nuove e usate fuori dalla portata dei bambi- Tenere le batterie nuove e usate fuori dalla portata dei bambi- AVVERTENZA! Pericolo di esplosione! In caso di sostituzione impropria delle batterie, sussiste il pericolo di esplosione! ...
-
Page 169: Contenuto Della Confezione
. Contenuto della confezione PERICOLO! Pericolo di soffocamento! Le pellicole utilizzate per l’imballaggio possono essere inghiottite o utilizzate in modo improprio con conse- guente rischio di soffocamento! Tenere tutti i materiali di imballaggio utilizzati (pel- licole, sacchetti, pezzi di polistirolo ecc.) fuori dalla portata dei bambini. -
Page 170: Panoramica Dell'apparecchio
. Panoramica dell’apparecchio Fig. 1 – Lato anteriore Fig. 2 – Lato posteriore Pannello di controllo 5. Apertura di aspirazione superiore con filtro 2. Maniglia per il trasporto 6. Apertura di scarico aria 3. Apertura per la fuoriuscita dell’aria con lamelle regolabili manualmen- Apertura di aspirazione inferiore con filtro 4. - Page 171 Fig. 3 – Pannello di comando Lucchetto: Attivazione/disatti- Giù: Riduzione della tempera- vazione del blocco tasti tura/del timer Modalità notte: Accensione/ Velocità: Impostazione della spegnimento della modalità notte velocità di ventilazione Timer: Impostazione del timer Modalità: Impostazione della (avvio/arresto automatico) modalità...
- Page 172 Rete wireless abilitata Modalità di deumidificazione attivata 18. Finestra del display Timer attivato Blocco tasti attivato Bassa velocità di ventilazione Modalità notte attivata attivata Modalità ventola attivata Alta velocità di ventilazione Modalità di raffreddamento attivata attivata Fig. 5 – Telecomando Aumento della temperatu- Attivazione del timer ra/del timer...
-
Page 173: Preparazione/Regolazione Dell'apparecchio
Fig. 6 – Kit per finestra 38. Cerniera 40. Fettuccia con velcro (non raffigu- rata, in corrispondenza del bordo 39. Guarnizione di tessuto della guarnizione di tessuto) 41. Velcro . Preparazione/regolazione dell’apparecchio Rimuovere tutto il materiale di imballaggio e controllare l’eventuale presenza di danni all’apparecchio prima di metterlo in funzione. -
Page 174: Montaggio Del Tubo Di Scarico Dell'aria
Fig. 7 – Distanza dell’apparecchio Posizionare l’apparecchio su una superficie piana e stabile lasciando almeno 50 cm di spazio libero intorno all’apparecchio per garantire una buona circola- zione dell’aria. Prima di accendere l’apparecchio, lasciarlo in posizione verticale per almeno 24 ore. - Page 175 Montare l’adattatore per kit per finestra in corrispondenza dell’al- tra estremità del tubo di scarico dell’aria. Fig. 9 – Montaggio adattatore per kit per finestra Adattare il kit per finestra in base alle dimensioni della finestra. Il kit per fine- stra può...
-
Page 176: Montaggio Del Kit Per Finestra
Premere il tubo di scarico dell’a- ria sopra l’apertura di scarico dell’aria del climatizzatore. Adattare la lunghezza del tubo flessibile di scarico dell’aria. Evitare di piegare il tubo. Fig. 11 – Posizione del tubo di scarico Regolare le lamelle sull’apertura per la fuoriuscita dell’aria (vedere “6.3. Rego- lazione delle lamelle sull’apertura per la fuoriuscita dell’aria”... - Page 177 Fig. 13 – Montaggio con lucernari Aprire la finestra. Contrassegnare il centro (M) della guarnizione in tessuto per la finestra. Contrassegnare il centro del telaio della finestra. Applicare la fettuccia con velcro sul telaio della finestra a vasistas (all’interno, sul lato dove si trova la maniglia della finestra), a circa 1 cm dal bordo.
-
Page 178: Regolazione Delle Lamelle Sull'apertura Per La Fuoriuscita Dell'aria
.. Regolazione delle lamelle sull’apertura per la fuoriuscita dell’aria AVVERTENZA! Pericolo di lesioni! Pericolo di lesioni da taglio a causa della rotazione delle pale del rotore. Non infilare le dita o oggetti nelle aperture della gri- glia di protezione dell’involucro dell’apparecchio. ... -
Page 179: Funzionamento
. Funzionamento Inserire la spina di alimentazione in una presa idonea. Dopo aver inserito la spina nella presa viene emesso un segnale acusti- co. L’apparecchio è ora in modalità standby. .. Accensione/spegnimento dell’apparecchio Premere il tasto o il tasto Accensione/spegnimento dispositivo per accendere l’apparecchio. - Page 180 In alternativa è possibile selezionare la velocità di ventilazione desiderata tramite il telecomando. Sono disponibili le seguenti velocità di ventilazione: Impostazione velocità di ventilazione bassa – Impostazione velocità di ventilazione alta – La modalità di raffreddamento si spegne automaticamente quando la temperatura ambiente scende al di sotto della temperatura impostata.
-
Page 181: Impostazione Del Timer
... Modalità notte Nella modalità notte, la velocità di ventilazione è ridotta e le spie di fun- zionamento sono spente. La modalità notte può essere attivata solo in modalità di raffreddamen- Selezionare la modalità di raffreddamento sul climatizzatore o tramite il teleco- mando. -
Page 182: Blocco Dei Tasti
Premere il pulsante Aumento temperatura/timer per aumenta- re il timer. Premere il pulsante Riduzione temperatura/timer per ridurre il timer. Quando l’indicazione delle ore termina di lampeggiare l’impostazione è confermata. L’apparecchio si spegnerà automaticamente una volta trascorso il tempo impostato. ... -
Page 183: Montaggio Del Tubo Di Scarico Della Condensa
Posizionare l’uscita del tubo di scarico della condensa su uno scarico o un conte- nitore adeguato (ad es. un secchio). Assicurarsi che il liquido di condensa possa defluire liberamente dall’apparec- chio. Non immergere in acqua l’estremità del tubo di scarico della condensa, altrimen- ti potrebbe formarsi una “chiusa d’aria”... -
Page 184: Protezione Contro I Sovraccarichi
Rete Wi-Fi a 2,4 GHz • Piattaforma Android™ 9 o superiore • iOS 14 o superiore • App MEDION® Life+ Il controllo tramite l’app MEDION® Life+ funziona solo su reti Wi-Fi a 2,4 GHz. Non è possibile utilizzare l’app su reti Wi-Fi a 5 GHz. -
Page 185: Configurazione Dell'app/Collegamento Dell'app Al Climatizzatore
Seguire le istruzioni contenute nella rispettiva app, accedere con il proprio ac- count cliente MEDION e confermare la connessione tra l’app Life+ e l’app Alexa o Assistente Google. Dopo l’autorizzazione, è possibile utilizzare l’apparecchio tramite controllo voca- le.. - Page 186 Problema Possibile causa Risoluzione dei problemi Staccare la spina dalla presa L’apparecchio non La spina non è inserita funziona. correttamente. elettrica e reinserirla. Controllare la presa elettrica La presa con messa a terra è difettosa. con messa a terra collegando un altro apparecchio.
- Page 187 Problema Possibile causa Risoluzione dei problemi Chiudere porte e finestre. L’apparecchio non Nel locale vi sono porte raffredda corretta- o finestre aperte dalle mente. quali entra aria calda. Pulire i filtri come descritto I filtri sono molto spor- chi.
- Page 188 Problema Possibile causa Risoluzione dei problemi Spegnere l’apparecchio e Il compressore La protezione della mo- non funziona. dalità di raffreddamen- attendere 3 minuti prima di to è attiva. riaccenderlo. È attivata la protezione contro il surriscalda- mento. Controllare che i cavi non sia- Codice errore E0 Errore di comunicazio- ne tra il circuito stam-...
-
Page 189: Pulizia
. Pulizia AVVERTENZA! Pericolo di scossa elettrica! Pericolo di scossa elettrica dovuto alla presenza di com- ponenti sotto tensione. Per evitare il pericolo di scosse elettriche, non im- mergere l’apparecchio in acqua o altri liquidi e non tenerlo sotto l’acqua corrente. ... -
Page 190: Pulizia Dei Filtri
Per rimuovere lo sporco ostinato inumidire il panno con acqua saponata tiepida. Asciugare accuratamente il corpo dell’apparecchio prima di accenderlo. .. Pulizia dei fi ltri AVVISO! Danni all’apparecchio! La polvere si accumula sui filtri limitando il flusso d’a- ria. -
Page 191: Pericolo Di Lesioni
Girare i filtri e risciacquarli sotto l’acqua corren- te. Fare scorrere l’acqua nei filtri nel senso con- trario a quello del flusso d’aria. Mettere da parte i filtri e lasciarli asciugare com- pletamente all’aria. Fig. 15 – Pulizia del filtro AVVERTENZA! Pericolo di lesioni! Pericolo di taglio in caso di contatto con i bordi affilati... -
Page 192: Smaltimento
Premere il tasto Accensione/spegnimento dispositivo o il tasto per accendere l’apparecchio. Selezionare la modalità ventola sul climatizzatore o tramite il telecomando. La spia di funzionamento si accende. Lasciare in funzione l’apparecchio in modalità ventola per qualche ora in modo che possa asciugarsi completamente all’interno. -
Page 193: Dati Tecnici
Il simbolo del bidone della spazzatura barrato indica che la batteria non può essere smaltita nei rifiuti domestici. . Dati tecnici Climatizzatore Modello MD 37732 Distributore MEDION AG Am Zehnthof 77 45307 Essen Germania Numero del registro di commercio HRB 13274 Alimentazione elettrica AC 220-240 V ~ 50 Hz Potenza nominale assorbita 1005 watt... -
Page 194: Informazioni Su Wi-Fi/Bluetooth
Climatizzatore Capacità deumidificante circa 1 l/h Dimensioni (LxAxP) 31,5 x 70 x 31 cm Peso ca. 22,5 kg Rumorosità di funzionamento <65 dB(A) Telecomando 2 microbatterie di tipo AAA LR03 da 1,5 V (in dotazione) Portata: ca. 6 m . Informazioni su Wi-Fi/Bluetooth® Gamma di frequenza: 2,4 GHz Standard Wi-Fi: 802.11 b/g/n... - Page 195 45307 Essen, Germany . Informazioni sulla conformità UE Con la presente MEDION AG dichiara che il tipo di apparecchiatura radio MD 37732 è conforme alla direttiva 2014/53/UE [(Direttiva RED), alla diret- tiva 2009/125/CE (Direttiva sulla progettazione ecocompatibile) e alla di- rettiva 2011/65/UE (Direttiva RoHS)].
- Page 196 Orari di apertura Assistenza Post-Vendita Lun.-ven.: 9.00-19.00 0848 - 33 33 32 Indirizzo del servizio di assistenza MEDION/LENOVO Service Center Ifangstrasse 6 8952 Schlieren Svizzera Queste e altre istruzioni per l’uso possono essere scaricate dal portale dell’assistenza www.medionservice.com. Per ragioni di sostenibilità abbiamo deciso di non stampare le condizioni di garanzia: le nostre condizioni di garanzia sono re- peribili sul nostro portale dell’assistenza.
-
Page 197: Note Legali
Le presenti istruzioni per l’uso sono protette da copyright. È vietata la riproduzione in forma meccanica, elettronica e in qualsiasi altra forma senza l’autorizzazione scritta da parte del produttore. Il copyright appartiene all’azienda: MEDION AG Am Zehnthof 77 45307 Essen Germania L’indirizzo riportato sopra non è... - Page 198 Contents Information about this user manual ............201 1.1. Explanation of symbols ................... 201 Proper use ....................202 Safety instructions ...................203 3.1. Power supply ......................203 3.2. Information on refrigerant ................205 3.3. Product-specific hazards ................207 3.4. Noise emissions ....................208 3.5. Storing/transporting ..................208 3.6.
- Page 199 EU declaration of conformity ..............234 Service information ..................234 Legal Notice....................235...
-
Page 200: Information About This User Manual
. Information about this user manual Thank you for choosing our product. We hope you enjoy using this ap- pliance. Please read the safety instructions and the user manual carefully before using the appliance for the first time. Note the warnings on the appli- ance and in the user manual. -
Page 201: Proper Use
Protective earthing • Bullet point/information symbol (for protection on steps during opera- class I) tion Electrical appliances in Instruction to be carried protection class I are electrical appliances that permanently have Safety instructions to be at least basic insulation observed and either have a plug with earth contact or a... -
Page 202: Safety Instructions
. Safety instructions Keep the appliance and its accessories out of the reach of chil- dren. This appliance can be used by children of 8 years and older, and by people with reduced physical, sensory or mental ca- pacity, or with a lack of experience and/or knowledge, but only with proper supervision, or if they have been told how to use the appliance safely, and have understood the risks in-... - Page 203 – if the appliance is left unattended – during thunderstorms. Always hold the plug to pull it out and never pull the mains cable. Do not place the appliance near to sinks and do not expose it to water droplets or spray. ...
-
Page 204: Information On Refrigerant
Make sure that the appliance is switched off before plugging in the mains plug. Never unplug the mains plug from the socket while the appli- ance is running. Do not use multi-plugs. Immediately turn off the appliance and remove the mains plug if you notice an unpleasant smell (smell of burning). - Page 205 During operation, storage and installation, the room should have an area of at least 7 m² in order to ensure an adequate amount of air in case of damage to the refrigeration system. If the refrigeration system has nevertheless become dam- aged, ventilate the room.
-
Page 206: Product-Specific Hazards
.. Product-specifi c hazards Do not place your fingers or other objects into the openings for the air outlet. Do not use the appliance in a room where flammable gases may leak. Do not use the appliance in the bathroom or in other damp environments. -
Page 207: Noise Emissions
not be used in areas with particle-laden air (for example flour or wood dust). .. Noise emissions The sound pressure level of the appliance is less than 66 dB(A). .. Storing/transporting Where possible, always transport the appliance upright. After transportation, only connect to the mains and turn on after 24 hours so that the refrigerant circuit can settle after transporta- tion. - Page 208 Store batteries in a cool, dry place. Strong direct heat can damage batteries. Do not expose the appliance to sources of intense heat. Never short-circuit batteries. Never throw batteries into a fire. Remove leaking batteries from the appliance immediately. Clean the contacts before inserting new batteries.
-
Page 209: Package Contents
. Package contents DANGER! Risk of choking and suffocation! Packaging film can be swallowed or used improperly, creating a risk of choking and suffocation. Keep all packaging materials used (film, plastic bags, pieces of polystyrene, etc.) out of the reach of chil- dren. -
Page 210: Appliance Overview
. Appliance overview Fig. 1 – Front Fig. 2 – Rear Control panel 5. Upper suction opening with filter strainer 2. Handle 6. Exhaust air opening 3. Air outlet with manually adjustable slats Lower suction opening with filter strainer 4. Castors 8. - Page 211 Fig. 3 – Control panel Lock: Switch the button lock Down: Reduce temperature/ on/off timer Sleep: Switch sleep mode on/ Speed: Set fan speed Mode: Set mode Timer: Set timer (automatic Power: Switch the appliance start/stop) on/off Up: Increase temperature/tim- er/display Fig.
- Page 212 Wireless network enabled Dehumidification mode ena- bled 18. Display window Timer enabled Key lock activated Low fan speed enabled Sleep mode enabled High fan speed enabled Fan mode enabled Cooling mode enabled Fig. 5 – Remote control Increase temperature/timer Switch on timer Set high fan speed Switch on cooling mode Reduce temperature/timer...
-
Page 213: Preparing/Setting Up The Appliance
Fig. 6 – Window kit 38. Zip 40. Hook and loop strip (not shown, at the edge of the textile seal) 39. Textile seal 41. Hook and loop fastener . Preparing/setting up the appliance Remove all packaging material and check the appliance for any damage before you put it into operation. -
Page 214: Mounting The Exhaust Air Hose
Place the appliance on a stable, level surface with an area of at least 50 cm clear- ance around the appliance to ensure good air circulation. Leave the appliance in a vertical position for at least 24 hours before switching ... -
Page 215: Mounting The Window Kit
Close your window to attach the window kit to the window. If necessary, secure the window kit with adhesive tape. We rec- ommend sealing the gap be- tween the adapter and the sides of the window for maximum efficiency. - Page 216 Fig. 12 – Mounting on bottom-hung window Fig. 13 – Mounting on roof window Open the window. Mark the centre (M) of the textile window seal Mark the centre of the window frame. Adhere the hook and loop fastener to the window frame of the bottom-hung window (inside, on the side where the window handle is located), about 1 cm from the edge.
-
Page 217: Adjusting Slats On The Air Outlet
When closing the window, care must be taken to ensure that the textile seal be- tween the sash and the window frame is not jammed. Preferably open the zip at the places marked “S” and attach the exhaust air hose there. -
Page 218: Operation
. Operation Plug the mains plug into a suitable socket. A beep will sound once you insert the plug. The appliance is then in stand-by mode. .. Switch the appliance on/off Press the Switch the appliance on/off button to switch the ap- pliance on. -
Page 219: Fan Operation
Cooling mode is switched off automatically if the room temperature is lower than the set temperature. The appliance continues to ventilate. If the room temperature rises, cooling mode resumes. ... Fan operation This operating mode is used for circulating the indoor air, but not for cooling. ... -
Page 220: Setting The Timer
.. Setting the timer ... Automatic switch-on You can set the period of time until the air conditioner automatically switches on in stand-by mode. Press the button to set the desired period of time (1 to 24 hours) to automatic switch-on. -
Page 221: Emptying The Condensate Tank
.. Emptying the condensate tank CAUTION! Risk of injury! There is a risk to health! Do not drink the condensate. NOTICE! Material damage! There is a possibility of material damage due to acci- dental overflow of condensate. Do not leave the appliance unattended when emp- tying the condensate tank. -
Page 222: Safety Functions
In the event of a power failure, there is a 3-minute delay until compressor restart to protect the compressor. . App control To make full use of your air conditioner, download the MEDION® Life+ app free of charge from the Google Play Store® or Apple® App Store onto your smartphone/ tablet. -
Page 223: System Requirements
3 seconds until the WLAN symbol starts flashing on the display. If you have not yet registered an appliance in the MEDION® Life+ app, tap the Add device button. If you have already connected an appliance in the app, click the button. -
Page 224: Troubleshooting
. Troubleshooting If the appliance stops working properly, please refer to the troubleshooting table shown below to see if you can resolve the problem yourself. Never attempt to repair the appliance yourself. If a repair is necessary, please con- tact our Service Centre or a suitable authorised repair workshop. Only allow maintenance and repair work to be carried out on the refrigerant circuit by a qualified technician according to the manufacturer’s specifications. - Page 225 Problem Possible cause Troubleshooting Insert the batteries correctly. The remote con- The batteries are not trol is not working. inserted properly. Reduce the distance to the You are more than 5 metres away from the appliance. appliance. Remove any obstacles. The path between the remote control and the infrared sensor is not...
- Page 226 Problem Possible cause Troubleshooting Place the appliance on a The appliance is The appliance is on an very noisy. uneven surface. hard, smooth surface. Secure and fasten the parts. There are loose, vibrat- ing parts. Noise is caused by flowing The noise sounds like running water.
-
Page 227: Cleaning
. Cleaning WARNING! Risk of electric shock! There is a risk of electric shock due to live parts. The appliance must not be immersed in water or other liquids, or held under running water, because this could cause an electric shock. ... -
Page 228: Cleaning The Filter Screens
.. Cleaning the fi lter screens NOTICE! Damage to the appliance! Dust collects on the filter screens and restricts the air flow. The restricted air flow reduces the efficiency of the appliance. In case of excessive accumulation of dust, the filter can be blocked and material damage to the appliance can occur. -
Page 229: Prolonged Non-Use And Storage
Turn the filter screens around and rinse the fil- ter screens under running water. Run the water in the opposite direction of the air flow through the filter screen. Set the filter screens aside and allow them to air dry completely. -
Page 230: Disposal
Press the Switch the appliance on/off button to switch the ap- pliance on. Select the fan mode on the air conditioner or using the remote control. The indicator light is illuminated. Keep the appliance running in fan mode for a few hours so that it dries com- pletely from the inside. -
Page 231: Technical Specifications
The crossed-out wheelie bin symbol means that the battery must not be disposed of with household rubbish. . Technical specifi cations Air conditioner Model MD 37732 Distributor MEDION AG Am Zehnthof 77 45307 Essen Germany Commercial register number HRB 13274 Power supply AC 220–240 V~ 50 Hz... -
Page 232: Information About Wlan/Bluetooth
Air conditioner Dehumidification performance Approx. 1 l/h Dimensions (W × H × D) 31.5 × 70 × 31 cm Weight Approx. 22.5 kg Operating volume <65 dB(A) Remote control 2 x micro batteries, type AAA LR03 1.5 V (included in package contents) Range: approximately 6 m . -
Page 233: Eu Declaration Of Conformity
MEDION AG, Am Zehnthof 77, 45307 Essen, Germany . EU declaration of conformity MEDION AG hereby declares that the radio equipment type MD 37732 complies with the directive 2014/53/EU [(RE directive), as well as the di- rective 2009/125/EC (ecodesign directive) and the directive 2011/65/EU (RoHS directive)]. -
Page 234: Legal Notice
These operating instructions are protected by copyright. Mechanical, electronic and any other forms of reproduction are prohibited without the written permission of the manufacturer. Copyright is owned by the company: MEDION AG Am Zehnthof 77 45307 Essen Germany Please note that you cannot use the address above for returns. Please always con-... - Page 236 Prodott o in Cina...
Need help?
Do you have a question about the P901 and is the answer not in the manual?
Questions and answers