Table of Contents
Advertisement
Quick Links
Este manual es parte inseparable del aparato por lo que debe estar disponible a todos
los usuarios del equipo. Le recomendamos leer atentamente el presente manual y seguir
rigurosamente los procedimientos de uso para obtener las máximas prestaciones y una
mayor duración del mismo.
This manual should be available for all users of these equipments. To get the best
results and a higher duration of this equipment it is advisable to read carefully this
manual and follow the processes of use.
Ce manuel est une partie indissociable de l'appareil et doit être mis à la disposition de
tous les utilisateurs de l'équipement. Nous vous recommandons de lire attentivement
ce manuel et de suivre scrupuleusement les procédures d'utilisation afin d'obtenir des
performances maximales et une plus longue durée de vie de l'appareil.
Espectrofotómetro visible HJB003
ESPECTROFOTÓMETRO 4201/20
4201/20 SPECTROPHOTOMETER
SPECTROPHOTOMÈTRE 4201/20
REF. / CODE / RÉF. HJB003
Pág. 1
Versión 6, julio de 2024
Advertisement
Table of Contents

Subscribe to Our Youtube Channel
Related Manuals for Zuzi 4201/20


Summary of Contents for Zuzi 4201/20
- Page 1 ESPECTROFOTÓMETRO 4201/20 4201/20 SPECTROPHOTOMETER SPECTROPHOTOMÈTRE 4201/20 REF. / CODE / RÉF. HJB003 Este manual es parte inseparable del aparato por lo que debe estar disponible a todos los usuarios del equipo. Le recomendamos leer atentamente el presente manual y seguir rigurosamente los procedimientos de uso para obtener las máximas prestaciones y una...
-
Page 2: Table Of Contents
ENGLISH LANGUAGE INDEX 1-21 Spanish 22-41 English 42-61 French TABLE OF CONTENTS 1 General information ......................24 1.1 Safety information ....................24 1.1.1 Danger and warning information ..............24 1.1.2 Prevention label .................... 24 1.2 Product information ....................25 1.2.1 Product appearance ..................25 1.2.2 Product description .................. - Page 3 ENGLISH 5 General operation ........................30 5.1 Getting started ......................30 5.1.1 Use the knob ....................31 5.1.2 Use the keyboard ...................31 5.1.3 Main interface ....................31 5.1.4 Common operations ..................32 6 Measurement ........................32 6.1 Important guidelines ....................32 6.2 Prepare and check ....................33 6.3 Absorbance measurement ..................33 6.4 Transmission measurement ..................34 6.5 The calibration standard sample measures the unknown sample concentration....35 6.6 Enter the equation coefficient to measure the concentration ..........36...
-
Page 4: General Information
ENGLISH 1 GENERAL INFORMATION 1.1 Safety information Unpack and read this entire manual before installing or operating this equipment. Pay attention to all danger and warning instructions. Failure to do so may result in serious personal injury to the operator or damage to the equipment. To ensure that the protection provided by this equipment is not impaired, do not use or install this equipment in any way other than as specified in this manual. -
Page 5: Product Information
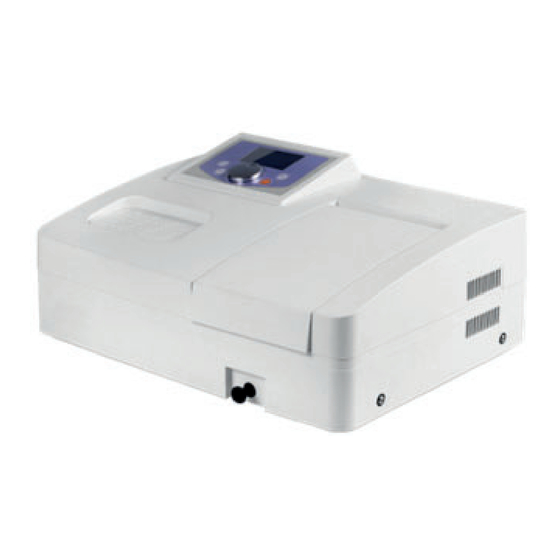
ENGLISH 1.2 Product information 1.2.1 Product appearance 1 – LCD display 2 – Knob 3 – Membrane keyboard 4 – Sample room 5 – Pull rod Fig. 1-1 Appearance 1.2.2 Product description This model of spectrophotometer can be used for laboratory and field analysis. The instrument has basic photometric and concentration measurements. -
Page 6: Specifications
ENGLISH 2 SPECIFICATIONS Model 4201/20 Reference HJB003 Optical system Single beam, 1200 l/mm grating Light source Tungsten lamp Detector Silicon photodiode Spectral bandwidth 4 nm Wavelength range 325~1050 nm Wavelength accuracy ±1.5 nm Wavelength repeatability ≤0.5 nm Wavelength resolution 0.5 nm... -
Page 7: Installation
ENGLISH 3 INSTALLATION 3.1 Unpack the instrument This model of spectrophotometer contains the following parts: • Spectrophotometer 1 PC • Instruction Manual 1 PC • 10 mm glass cuvette 4 PCS • 10 mm quartz cuvette 2 PCS (UV-1150 only) •... -
Page 8: Connection
ENGLISH 3.3 Connection 3.3.1 Power connection Check the instrument power switch to ensure that in the closed position, as shown in Figure 3-2, insert the female end of the power cord into the instrument’s power connector and the male end into the power outlet. -
Page 9: Computer Connection
ENGLISH 3.3.3 Computer connection As shown in Figure 3-5, plug one end of the USB communication cable into the instrument’s USB port (Type B, square) and the other end into the computer’s USB port (Type A, flat). Note: The USB communication cable is an accessory of the computer application software (Optional configuration, need to be purchased separately) and is not configured with the instru- ment. -
Page 10: General Operation
ENGLISH Fig. 4-1 Warm up Fig. 4-2 System initialization and calibration 5 GENERAL OPERATION 5.1 Getting started Fig. 5-1 Operation panel Page 30 Version 6, July 2024 User’s manual for visible spectrophotometer HJB003... -
Page 11: Use The Knob
ENGLISH 5.1.1 Use the knob The knob of the instrument has two operation modes. • Rotating Rotate the knob to switch test mode in the main interface. Rotate the knob to change the parameter value in the parameter setting interface. •... -
Page 12: Common Operations
ENGLISH Absorbance measurement Measure the absorbance value of the sample. Transmissivity measurement Measure the transmittance of the sample. The calibration standard sample measures the unknown sample concentra- tion By measuring the absorbance value of a standard sample and entering the corresponding concentration, a standard curve is established with the origin, and the concentration of the unknown sample is measured using the standard curve. -
Page 13: Prepare And Check
ENGLISH • During sample preparation, measuring procedures and maintenance and cleaning work, observe all local laboratory safety precautions (e.g. wear protective clothing and gloves, use of disinfec- tant) regarding the handling of sample material. • Dispose of measuring solutions and cleaning and disinfectant materials in accordance with the relevant local laboratory regulations. -
Page 14: Transmission Measurement
ENGLISH 6.4 Transmission measurement • On the main screen, turn the knob to the “Transmission” on the screen and press “ENTER” to enter (Figure 6-3). Fig. 6-3 Transmissivity measurement 1. Press the knob to pop up the setting interface (Figure 6-4), rotate the knob to change the measu- rement wavelength, press “ENTER”... -
Page 15: The Calibration Standard Sample Measures The Unknown Sample Concentration
ENGLISH 6.5 The calibration standard sample measures the unknown sample concentration • On the main screen, turn the knob to the “Concentration” and press “ENTER” to enter (Figure 6-5). Fig. 6-5 The calibration standard sample measures the unknown sample concen- tration 1 Press the knob to pop up the setting interface (Figure 6-6), rotate the knob to change the measu- rement wavelength, press “ENTER”... -
Page 16: Enter The Equation Coefficient To Measure The Concentration
ENGLISH Fig. 6-8 Measuring standard sample 4. Place the “reference” in the measurement channel, close the sample room, and press “ZERO” to do blank. 5. Place the “sample” in the measurement channel, close the sample room, and wait for the measured value to read the result stably. -
Page 17: Energy Measurement
ENGLISH 2. According to the prompt (Figure 6-11), enter the slope K and intercept B values of the equation C=K*A+B, and press “ENTER”to finish; Fig. 6-11 Input slope and intercept 3. Place the “reference” in the measurement channel, close the sample room, and press “ENTER” to do blank. -
Page 18: Repair And Maintenance
ENGLISH 1. Press the knob to pop up the setting interface (Figure 6-13), rotate the knob to change the mea- surement wavelength, press “ENTER” to confirm; Fig. 6-13 Set the measurement wavelength 2. Rotate the knob to set the gain of the amplifier (1, 2, 4 or 8 times); 3. -
Page 19: Troubleshooting
ENGLISH 7.2 Troubleshooting Problem Cause Solution 1 The power supply to the instrument is 1 Turn on the power supply Power on, not turned on 2 Improve connection no response 2 Power cord connection is not reliable 3 Replace fuse 3 Fuse destroyed Boot, light source positio-... -
Page 20: Spare Parts Replacement
ENGLISH 7.3 Spare Parts Replacement 7.3.1Fuse replacement Danger! Be sure to turn off the power of the instrument and unplug the power cable before replacement! 1. Prepare a 3×75 flat blade screwdriver; 2. Turn off the device and unplug the power cord; 3. - Page 21 ENGLISH Fig. 7-3 Instrument case fixing screws 4. Unscrew the fixing screws of the lamp housing cover (Figure 7-4) and remove the lamp housing cover; Fig. 7-4 Open the lamp housing cover 5. Replace the tungsten lamp (Figure 7-5). Wear cotton gloves. Remove the old tungsten lamp, and insert the new tungsten lamp into the tungsten lamp holder;...
Need help?
Do you have a question about the 4201/20 and is the answer not in the manual?
Questions and answers