Table of Contents
Advertisement
Quick Links
Este manual es parte inseparable del aparato por lo que debe estar disponible a todos
los usuarios del equipo. Le recomendamos leer atentamente el presente manual y seguir
rigurosamente los procedimientos de uso para obtener las máximas prestaciones y una
mayor duración del mismo.
This manual should be available for all users of these equipments. To get the best
results and a higher duration of this equipment it is advisable to read carefully this
manual and follow the processes of use.
Ce manuel est une partie indissociable de l'appareil et doit être mis à la disposition de
tous les utilisateurs de l'équipement. Nous vous recommandons de lire attentivement
ce manuel et de suivre scrupuleusement les procédures d'utilisation afin d'obtenir des
performances maximales et une plus longue durée de vie de l'appareil.
Espectrofotómetro visible HJB008
ESPECTROFOTÓMETRO VISIBLE 4265/50
4265/50 VISIBLE SPECTROPHOTOMETER
SPECTROPHOTOMÈTRE VISIBLE 4265/50
Pág. 1
Versión 1, abril de 2024
Advertisement
Table of Contents

Related Manuals for Zuzi CHEMetrics 4265/50


Summary of Contents for Zuzi CHEMetrics 4265/50
- Page 1 ESPECTROFOTÓMETRO VISIBLE 4265/50 4265/50 VISIBLE SPECTROPHOTOMETER SPECTROPHOTOMÈTRE VISIBLE 4265/50 Este manual es parte inseparable del aparato por lo que debe estar disponible a todos los usuarios del equipo. Le recomendamos leer atentamente el presente manual y seguir rigurosamente los procedimientos de uso para obtener las máximas prestaciones y una mayor duración del mismo.
-
Page 2: Table Of Contents
ENGLISH LANGUAGE INDEX 2-34 Spanish 36-68 English 70-102 French TABLE OF CONTENTS Safety Information ........................38 Package Contents ........................38 Unpacking..........................38 Installation ..........................39 Symbols and Conventions ....................... 39 Overview ..........................39 Specifications ........................40 Description ..........................41 Getting Started ........................42 General Operating Instructions .................... - Page 3 ENGLISH Performance Verification ......................50 Verifying Wavelength Accuracy and Wavelength Repeatability .......... 51 Verifying Photometric Accuracy and Photometric Repeatability .......... 51 Verifying Stray Light ...................... 51 Verifying Noise ......................52 Verifying Dark Noise ...................... 52 Verifying Stability ......................52 Verifying Bandwidth ...................... 52 Measurement ........................
-
Page 4: Safety Information
ENGLISH SAFETY INFORMATION Please follow the guidelines below, and read this manual in its entirety to ensure safe operation of the unit. Do not open the device. Disconnect the device from the mains supply before carrying out maintenance work or changing the fuses. -
Page 5: Installation
ENGLISH INSTALLATION Placement Place the instrument on the stable table carefully. Install printer (Optional) Check to confirm instrument power switch is turned off, connect the printer’s data cable to the Instru- ment’s serial/USB port. Information: The spectrophotometer supports USB printers using the HP PCL3 GUI print description language. -
Page 6: Specifications
ENGLISH SPECIFICATIONS Model 4265/50 Reference HJB008 Optical system Single beam, 1200 l/mm grating Light source Tungsten lamp Detector Silicon photodiode Spectral bandwidth 2 nm Wavelength range 320~1100 nm Wavelength accuracy ±0,5 nm Wavelength repeatability ≤0,2 nm Wavelength resolution 0,1 nm Wavelength swing speed 10000 nm/min Wavelength scanning speed... -
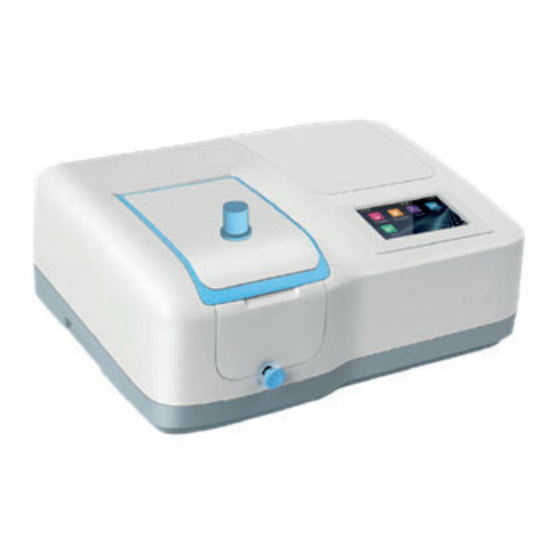
Page 7: Description
ENGLISH DESCRIPTION Front View Right View Rear View Page 41 Version 1, April 2024 User’s manual for visible spectrophotometer... -
Page 8: Getting Started
ENGLISH Sample Holder GETTING STARTED The following chart describes the basic operation of the instrument. Turn On and Self-check Switch on the power. Self-check includes the following steps: Turn On Lamp - Locating Filter Disc - Lo- cating Automatic Sample Holder (If Installed) - Get Dark Current - Locating Wavelength- Check Energy - Check System baseline. -
Page 9: General Operating Instructions
ENGLISH GENERAL OPERATING INSTRUCTIONS Touch Screen Using Tips The entire screen can be started with a touch. To make a choice, use your nails, fingertips, pencil, or stylus to press the screen. Don’t press the screen with sharp objects (such as ball point). Select Application Main Interface, press the icon to select application. -
Page 10: Basic Operation
ENGLISH Basic Operation Home Back to main interface. Return Back to the previous interface. Page Up/Down Go to previous/next page. Measurement Results Operation Open Open result(s) from internal/USB memory. Save Save result(s) to internal/USB memory. Print Print result(s). Delete Delete selected result(s). Rename, Print and Delete Results Rename a Sample: List interface, press the area Name, key in the sample name (up to 8 characters). - Page 11 ENGLISH Open Results Open: 1. List interface, press the icon 2. Press the icon internal memory/USB memory to select the memory which the file saved. 3. Press file lists to select, press the button Open. Save Results Save: 1. List interface, press the icon Save. 2.
-
Page 12: Files Operation
ENGLISH Files Operation Internal Memory Internal memory of the spectrophotometer. USB Memory USB extended mass memory. Copy Copy the selected file(s) from internal /USB memory to USB/internal memory. Export csv Export file(s) to *.csv format Export txt Export file(s) to *.txt format Delete Delete the selected file(s). -
Page 13: Calibration And System Settings
ENGLISH CALIBRATION AND SYSTEM SETTINGS Select the icon in the main interface. Display options to calibrate the system and configure the basic instrument settings. Calibrate Start to do calibration. Calibration Select Tab Calibration in the System interface. Remove something in the measurement channel, close the sample chamber cover, select the item Dark current, Wavelength or System baseline, press the icon to do calibration. -
Page 14: Edit Clock
ENGLISH Accept Accept the new value. Edit Clock Select Tab Clock in the System interface. Press the value of year, month, date, hour, minute or second to change. Press the icon to accept new value. Format Internal Memory Format the internal memory of Memory the spectrophotometer. -
Page 15: Language Selection
ENGLISH Accept Accept the new language. Language Selection Select Tab Language in the System interface. Select a language, press the icon to change. General Options Select Tab General Options in the System interface. Beep: Press the icon to turn on/off the beep. Brightness: Press the icon to decrease/increase the brightness of the LCD display. -
Page 16: Restore Defaults
ENGLISH Restore Defaults Restore Restore the parameters to factory settings. Select Tab Restore defaults in the System interface. Select an item, press the icon to restore. PERFORMANCE VERIFICATION Select the icon in the main interface. Display options to verify the performance of the instrument. Important information Before verifying the performance, the instrument needs to be preheated for 30 minutes, and then re-measure dark current. -
Page 17: Verifying Wavelength Accuracy And Wavelength Repeatability
ENGLISH Verifying Wavelength Accuracy and Wavelength Repeatability Select Tab Wavelength accuracy in the Performance verification interface. Standard Sample: Holmium oxide solution or equivalent filter Measurement: 1. Remove something in the measurement channel, close the sample chamber cover, press the wavelength value, type in the wavelength of measurement, press the button Zero. 2. -
Page 18: Verifying Noise
ENGLISH Verifying Noise Select Tab Noise (0A) in the Performance verification interface. Standard Sample: None Measurement: 1. Remove something in the measurement channel, close the sample chamber cover, press the wavelength value, type in the wavelength of measurement, press the button Zero. 2. -
Page 19: Measurement
ENGLISH MEASUREMENT Important Guidelines - Reagents and dilution buffers can cause cauterization and other damage to health. - Samples (nucleic acids, proteins, bacteria cultures) can be infectious and cause serious damage to health. - During sample preparation, measuring procedures and maintenance and cleaning work, observe all local laboratory safety precautions (e.g. - Page 20 ENGLISH 2. Press the icon to switch to the measurement mode. Measure absorbance value of the sample(s). Measure transmittance value of the sample(s). Measure energy value of the sample(s). 3. Press the icon to set wavelength, key in the measurement wavelength. 4.
-
Page 21: Quantitation
ENGLISH Quantitation Quantitation mode is used to measure the concentration of the sample. 1. Main interface, press the icon to start a Quantitation application. 2. Establish Method 2.1 Quantitation interface, press the button Establish method. Page 55 Version 1, April 2024 User’s manual for visible spectrophotometer... - Page 22 ENGLISH A=A1: Absorbance is equal to the measured absorbance value of the mea- sured wavelength 1. A=A1-m*A2: Absorbance is equal to the difference between the absorban- Measurement ce value of the measured absorbance at the wavelength 1 and the wavelen- gth 2, m is the coefficient.
- Page 23 ENGLISH Measure standard sample to establish the standard curve 1- Put the reference in the measurement channel, press the button Zero to do zero. 2- Put the 1# standard sample in the measurement channel, press the button Read to measure. 3- Repeat step 2 to measure other standard samples.
- Page 24 ENGLISH Input standard sample values to establish the standard curve 1- Press the item Abs and Conc to input absorbance and concentration of standard samples, press the button Next. 2.4 Establish method finished. Press the button Save to save the method, press the button Measure to accept the new method and go to the measurement interface, press the button Finish to exit.
- Page 25 ENGLISH 3.2 Press the icon to select method. 3.3 Press the button Open to load measurement method stored in the internal memory/USB disk. 3.4 Press the button Measure to accept the new measurement method and back to measurement interface. 3.5 Put the reference in the measurement channel, press the icon to do zero.
-
Page 26: Spectrum
ENGLISH Spectrum Spectrum mode is used to scan the absorbance or transmissivity of the sample in a wavelength range. 1. Main interface, press the icon to start a Spectrum application. Method Set the measurement parameters Zero Scan baseline Read Scan the sample and draw curve Stop Stop scanning List View the results list 2. - Page 27 ENGLISH Start wavelength Scan start wavelength End wavelength Scan end wavelength Step Scan interval: 0.1, 0.2, 0.5, 1.0, 2.0, 5.0, 10.0 nm Speed HS: High speed, MS: Medium speed, LS: Low speed Photometry mode Abs: absorbance, %T: transmissivity Y minimum Minimum ordinate Y maximum Maximum ordinate...
-
Page 28: User Program
ENGLISH Scale Set the coordinate value Left Moves the cursor to the left point (peak) to point (peak) Right Moves the cursor to the right point (peak) to point (peak) Mode %T Change the mode to %T Mode Abs Change the mode to Abs Point/Peak Change the search mode point/peak User Program User Program mode is to measure the sample using a customized measurement method. - Page 29 ENGLISH 2. Press the icon to select the measurement method. Select it directly or key in the method number by pressing the button Number sel. to select the measurement method. Information The device supports user method updates (up to 45 methods can be written). Users can copy the method file to the root directory of the USB memory and press the button Update to update the method file.
-
Page 30: Troubleshooting
ENGLISH 5. Press the icon to browse the results. TROUBLESHOOTING Review the information in the table below to troubleshoot operating problems. Problem Cause Solution Power on, no response Power cord connection is not reliable Improve connection Blown fuse Replace fuse Measurement uncertainty Sample is not stable Improve the sample... -
Page 31: Repair And Maintenance
ENGLISH REPAIR AND MAINTENANCE Daily Maintain Check the compartment: After measurement, the cuvettes with sample solutions should be taken out of the compartment in time. Or the volatilization of the solution would make the mirror go moldy. Users must pay more attention to the corrosive sample and liquid easy to volatilize. Any solution remains in the compartment should be wipe off immediately. - Page 32 ENGLISH Reset the fuse seat: Replace the fuse seat in the power socket. Push the fuse case by using the screw- driver, and turn it clockwise, the fuse seat will be locked when released. Switch on the power: Plug the socket and switch on the power. Lamp replacement Hot! Wait 20 minutes before opening the lamp chamber after power off to avoid...
-
Page 33: Warranty
ENGLISH Adjust the position of the W lamp: Switch on the power. Observe the entrance facular; it should be in the center of the entrance hole. If the facular deviate to left or right, then loosen the two screws and move the lamp seat to left or right until it focuses on the center of the slot. -
Page 34: Annex- List Of Programmed Methods And Corresponding Test Kits
ENGLISH ANNEX- LIST OF PROGRAMMED METHODS AND CORRESPONDING TEST KITS Range of application Method Analyte CHEMetrics cat. No. Auxilab code (ppm) K-1413 NBC009 0,20-3,00 K-1413 NBC009 4,00-60,0 K-1503 NBC010 0,50-7,00 Ammonia K-1513 NBC036 0,50 – 10,00 K-1513 NBC036 7,5 - 150 K-1523 NBC011 1,5 –...
Need help?
Do you have a question about the CHEMetrics 4265/50 and is the answer not in the manual?
Questions and answers