Advertisement
Quick Links
UI Paediatric SmartSeat Pro User Guide. Iss3 02/22
UI
SmartSeat Pro Quick User Guide
The Paediatric SmartSeat Pro, our revolutionary modular
chair, takes specialist seating to the next level. This seating
system is highly adjustable for individuals with complex
posture and pressure management needs.
WARNING
A level of supervision appropriate to the user's abilities should be
applied at all times.
Class 1
Medical Device
Advertisement

Related Manuals for CareFlex SmartSeat Pro


Summary of Contents for CareFlex SmartSeat Pro
- Page 1 UI Paediatric SmartSeat Pro User Guide. Iss3 02/22 SmartSeat Pro Quick User Guide The Paediatric SmartSeat Pro, our revolutionary modular chair, takes specialist seating to the next level. This seating system is highly adjustable for individuals with complex posture and pressure management needs.
- Page 2 If you are in any doubt about the safe operation of the SmartSeat Pro, contact your CareFlex Customer Support or your local CareFlex distributor for clarification and further training.
- Page 3 UI Paediatric SmartSeat Pro User Guide. Iss3 02/22 The Small SmartSeat Pro Features The small SmartSeat Pro chair incorporates features which allow it to be set up to accommodate different postures and provide seating positions for a range of activities.
- Page 4 UI Paediatric SmartSeat Pro User Guide. Iss3 02/22 1. Brakes During transfer it is important that the chair is as stable as possible. The chair is fitted with four fully braked castors and the brakes on at least TWO of the castors should be engaged prior to transfer.
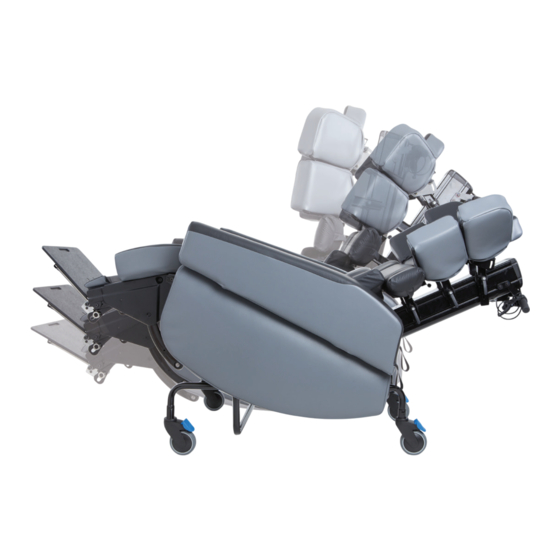
- Page 5 UI Paediatric SmartSeat Pro User Guide. Iss3 02/22 2. Tilt-in-Space The SmartSeat Pro chair has a Tilt-in-Space facility which allows the client to be reclined without adjusting the angle at the hips. This helps the client to maintain a stable sitting posture whilst distributing their weight over a large surface area.
- Page 6 UI Paediatric SmartSeat Pro User Guide. Iss3 02/22 3. Back Angle Recline The SmartSeat Pro chair has a Back Angle Recline (BAR) facility which is used to adjust the angle between the seat and the back, thus opening/closing the hip angle.
- Page 7 UI Paediatric SmartSeat Pro User Guide. Iss3 02/22 4. Leg rest Extension The SmartSeat Pro has an integral leg rest which can be angled upwards to support the legs. The patented leg rest mechanism articulates, following the movement of the knee as it elevates the legs. The leg rest incorporates visco-elastic memory foam for pressure relief.
- Page 8 UI Paediatric SmartSeat Pro User Guide. Iss3 02/22 5. Integral Footplate The leg rest has an integral height and angle adjustable footplate to provide support for the client’s feet when the leg rest is raised or when they are being portered in the chair.
- Page 9 UI Paediatric SmartSeat Pro User Guide. Iss3 02/22 5b. Footplate angle The footplate has three angle settings to provide comfort and support plantar flexion. As the leg rest is elevated, having a 90 angle at the ankle will become more uncomfortable.
- Page 10 UI Paediatric SmartSeat Pro User Guide. Iss3 02/22 6. Seat to Footplate Height The SmartSeat Pro has an articulating leg rest which has a naturalistic movement to provide support to the lower leg as the knees flex. This means that for the majority of occupants the footplate will provide consistent support as the leg rest elevates.
- Page 11 UI Paediatric SmartSeat Pro User Guide. Iss3 02/22 7. Arm Removal & Side Transfer The arms of the SmartSeat Pro can be removed for servicing and for side transfer. If the intention is to regularly remove the arms then the arm locking device can be disabled so that the arms can be lifted off the chair easily.
- Page 12 UI Paediatric SmartSeat Pro User Guide. Iss3 02/22 7b. Frequent Arm Removal • If the arm is going to be removed frequently as would be expected if regular side transfers are being made, the locking device can be disabled. •...
-
Page 13: Seat Depth
If the client already has a chair or wheelchair with the correct seat depth, measure this size and use it as a starting point for setting the SmartSeat Pro. 8a. Adjusting Seat Depth Seat depth is adjusted by moving the back of the chair over the seat unit. -
Page 14: Seat Width
UI Paediatric SmartSeat Pro User Guide. Iss3 02/22 9. Seat Width Seat width affects side-to-side pelvic stability. This is important as the spine should line up centrally with the pelvis. If the pelvis is free to move to one side then the client’s spine will usually lean in the opposite direction. - Page 15 If the client is less ambulant then the seat height can be set reference to the footplate, again ensuring the foot is flat and fully supported. • The SmartSeat Pro will have been measured at assessment and manufactured to the preferred dimensions. 10a. Seat Height Adjustments •...
- Page 16 To maintain the integrity of client postural management settings, key adjustments on the back are adjustable using a 10mm swan neck spanner or socket. Alterna- tively, CareFlex can provide an optional lever-lock kit if specified at the time of chair order—please contact your local CareFlex distributor for details.
- Page 17 UI Paediatric SmartSeat Pro User Guide. Iss3 02/22 11a. Height, Depth, Angle & Rotation Adjustment Each back cushion element is secured to the centre pillar by two adjustment pivot points. When loosened, these pivot points will permit the cushion element...
- Page 18 UI Paediatric SmartSeat Pro User Guide. Iss3 02/22 11a. Height, Depth, Angle & Rotation Adjustment Cont. The pivot point plastic parts include indicators to act as a guide reference for adjustment; • Each line on the geared mechanism indicates 7.5 of angle rotation.
- Page 19 UI Paediatric SmartSeat Pro User Guide. Iss3 02/22 11c. Head Support Angle Adjustment The upper head support cushion element can be articulated by a further 45 • To achieve this, locate the two small wing grips (circled below) and loosen.
- Page 20 UI Paediatric SmartSeat Pro User Guide. Iss3 02/22 11e. Lateral Wing Adjustment The lumbar back element includes adjust- able wings that can be used to provide contouring or act as mild laterals. When left as ‘flat’, the wings are positioned just above the arm rest of the seat and can therefore be used as elbow blocks/pads.
- Page 21 UI Paediatric SmartSeat Pro User Guide. Iss3 02/22 12. Headrests The complete range of CareFlex headrests are available for the SmartSeat Pro. Headrests are attached to the thin round bar located on the rear of the upper back cushion. Each headrest has a strap attached to its top edge, which in turn has short strips of plastic hook profile sewn at intervals along their length.
- Page 22 UI Paediatric SmartSeat Pro User Guide. Iss3 02/22 13b. Removing the Pommel To remove the pommel, hold it at the bottom edge of the metal stem and pull directly outwards. 13c. Fitting the Pommel Bracket If ordered with a chair, the pommel re- ceiving bracket will be fastened in place.
- Page 23 UI Paediatric SmartSeat Pro User Guide. Iss3 02/22 14. Belts & Harnesses CareFlex belts and harnesses are designed to be used as positioning aids to help the client maintain a good sitting posture whilst reducing the risk of soft tissue damage through the effects of shear which can occur if the client has unstable posture.
- Page 24 UI Paediatric SmartSeat Pro User Guide. Iss3 02/22 14b. Fitting Pelvic Belts • Pelvic belts are attached to the anchor bars on the rear bottom edge of the back frame. • Thread the end of each strap through a ladder lock buckle. Loop the...
- Page 25 UI Paediatric SmartSeat Pro User Guide. Iss3 02/22 14d. Padded Pelvic Belts The padded pelvic belt is ‘rear pull’, so that day to day adjustments are made by pulling D-rings on the webbing straps which adjust in length through ladder lock buckles on the ends of the comfort pads.
- Page 26 UI Paediatric SmartSeat Pro User Guide. Iss3 02/22 14f. 4-Point Pelvic Belts This belt has a centre-pull adjustment. The main 40mm strap is mounted so that it sits at between 45 and 60 across the hips. The secondary straps pull down over the thighs to sit at right angles to the seat board.
- Page 27 UI Paediatric SmartSeat Pro User Guide. Iss3 02/22 14h. Dynamic Chest Harness The Dynamic chest harness is made from neoprene with soft edge binding which allows the harness to stretch in response to movement. This provides comfort and support whilst not restricting active positioning.
- Page 28 UI Paediatric SmartSeat Pro User Guide. Iss3 02/22 14j. Adjusting Chest Harnesses The shoulder straps of the chest harness should be fed through the back of the chair between the head (cervical) and shoulder (thoracic) cushions. Two triple slot brackets can be fitted to the rearward slot of the centre column, at a height appropriate to the client.
- Page 29 UI Paediatric SmartSeat Pro User Guide. Iss3 02/22 14k. Groin Harness A groin harness helps to keep the user positioned correctly in the chair. • Position the loose webbing straps over the arms of the chair and transfer the client onto the chair so that they are sitting on the groin harness.
- Page 30 UI Paediatric SmartSeat Pro User Guide. Iss3 02/22 15. Tray The SmartSeat Pro has a tray which can be used as a surface for activities and, when the chair is upright, to support cups and plates. The tray rests across the arms of the chair and is made from moulded plastic.
- Page 31 UI Paediatric SmartSeat Pro User Guide. Iss3 02/22 15b. Retrofitting Tray Straps If a chair is ordered with a tray the chair will be fitted with the appropriate attachment straps. If a tray is ordered separately then attachment straps will need to be fitted to the chair.
- Page 32 The SmartSeat Pro can be fitted with adjustable laterals which have height and width adjustment to provide support to the sides of the rib cage. The adjustable laterals can be retrofitted to any SmartSeat Pro chair and each lateral can be independently adjusted.
- Page 33 UI Paediatric SmartSeat Pro User Guide. Iss3 02/22 16b. Width Adjustment Simply slide the lateral inwards or outwards to adjust the width setting. Ensure the hand wheel is tightened securely once the desired width is achieved. It is possible to achieve 50mm range of adjustment per side. Note that on the maximum width setting it is necessary to ensure the lumbar cushion wing is positioned rearward.
- Page 34 UI Paediatric SmartSeat Pro User Guide. Iss3 02/22 17. Motorised SmartSeat Pro The SmartSeat Pro uses actuators to adjust the Tilt-in-Space, back angle recline and leg rest elevation. The actuators are powered by a 24V DC rechargeable battery system, which needs to be regularly charged in order to maintain battery performance.
- Page 35 CareFlex use a range of covering materials, each with particular characteristics and specific cleaning guidelines. If you are unsure of the chair’s covering material, contact CareFlex with the serial number of the chair which will allow CareFlex to trace the specification of the chair.
- Page 36 The number is essential for tracing the product and allows accessories and spare parts to be easily selected and ordered. Regularly check the SmartSeat Pro set up to ensure it is working as intended and that the client is benefiting from the posture and pressure management features...
- Page 37 UI Paediatric SmartSeat Pro User Guide. Iss3 02/22 Identification Each SmartSeat Pro chair has a unique chair number which must be quoted during any correspondence with CareFlex or the local CareFlex distributor. This is on a white label on the back of the chair.
- Page 38 UI Paediatric SmartSeat Pro User Guide. Iss3 02/22 Notes Write the CareFlex Chair Number Here: _________________________________ Record of Chair Settings for your Reference...
- Page 39 UI Paediatric SmartSeat Pro User Guide. Iss3 02/22 Notes Write the CareFlex Chair Number Here: _________________________________...
- Page 40 UI Paediatric SmartSeat Pro User Guide. Iss3 02/22 Scan me Watch the SmartSeat Pro How To Video Play list on YouTube CareFlex Ltd. Templer House, King Charles Bus. Pk., Old Newton Rd., Heathfield, Devon. TQ12 6UT Tel: 0800 018 6440 | www.careflex.co.uk info@careflex.co.uk...
Need help?
Do you have a question about the SmartSeat Pro and is the answer not in the manual?
Questions and answers