
Related Manuals for Paul Agnew HESTIA 1000


Summary of Contents for Paul Agnew HESTIA 1000
- Page 1 HESTIA OPERATION AND INSTALLATION MANUAL Version 1 01/03/24 Contents of manual may be updated without notice. For the latest version of this manual please refer to our website: www.paulagnewdesigns.com.au...
-
Page 2: Table Of Contents
DOOR OPENING AND CLOSING Hestia insert single sided guillotine door (Hestia 1200 and 1400 series) Hestia insert single sided guillotine door (Hestia 1000 Guillotine GF, Left and Right) Hestia insert three sided guillotine door (Hestia 1000 Guillotine Bay and Peninsula) -
Page 3: General Information
Thank you for buying Paul Agnew Designs solid fuel appliances! Natural hea�ng – these words perfectly reflect the philosophy of Paul Agnew Designs brand. In line with this philosophy, we produce fireplaces and stoves fired with wood, i.e. the raw materials which are the least harmful for the environment. -
Page 4: Intended Use Of The Insert
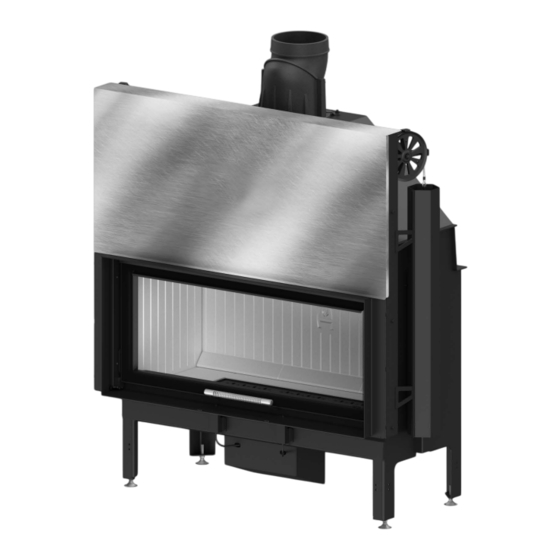
HESTIA avoid installa�on in rooms with B type gas devices, hoods (with or without exhaust), heat pumps, collec�ve • ven�la�on conduits or mul�ple flue pipes; the insert must not be fi�ed in the vicinity of the staircase or rooms with appliances capable of crea�ng nega�ve pressure; avoid direct contact with the insert (it becomes very hot during use) and wear suitable protec�ve equipment •... - Page 5 HESTIA 1 – body of the insert; 2 – front panel type guillo�ne; 3 – panels from ceramic accumula�on concrete; 4 – iron grate; 5 – regulated legs; 6 – expansion box with air supply tube; 7 – out flue; 8 – back doors type standard (service).
-
Page 6: Technical Data
HESTIA 3.TECHNICAL DATA Fireplace insert HESTIA – one sided guillo�ne doors Parameters Symbol Unit. Hes�a 1000 Hes�a 1000 Hes�a 1200 Hes�a 1400 Guillo�ne GF Guillo�ne L/R Guillo�ne GF Guillo�ne GF Nominal power [kW] 8-19 9-23 11-28.5 9.5-24.5 Range of hea�ng power [kg] 6.02 4.15... - Page 7 HESTIA Fireplace insert HESTIA – two sided doors (front guillo�ne, back standard) Parameters Symbol Unit. Hes�a 1200 Guillo�ne Hes�a 1400 Guillo�ne Tunnel Tunnel Nominal power 10-26 11-28.5 [kW] Range of hea�ng power [kg] Maximum fuel load wight [kg/h] Avarage fuel consump�on 76.5 η...
- Page 8 HESTIA Fireplace insert HESTIA – three sided guillo�ne door Parameters Symbol Unit. Hes�a 1000 Guillo�ne Hes�a 1000 Guillo�ne Peninsula Nominal power 6-15.5 6-15.5 [kW] Range of hea�ng power [kg] Maximum fuel load wight [kg/h] Avarage fuel consump�on η Thermall efficiency 0.0792 1.133 CO emmision (with 13% O₂)
- Page 9 HESTIA Figure 4. The basic dimensions of Hes�a fireplace inserts with a guillo�ne door. The basic dimensions of Hes�a fireplace inserts with a guillo�ne door Dimensions [mm] Hes�a 1200 Guillo�ne GF Hes�a 1400 Guillo�ne GF 1474 1324 1604 1604 1254 1105 ØZcz ØZd...
- Page 10 HESTIA Figure 5. The basic dimensions of Hes�a fireplace inserts with two sided doors: front guillo�ne and back standard. The basic dimensions of Hes�a fireplace inserts with a guillo�ne door Dimensions [mm] Hes�a 1200 Guillo�ne Tunnel Hes�a 1400 Guillo�ne Tunnel 1474 1324 1604...
- Page 11 HESTIA Figure 6. The basic dimensions of Hes�a fireplace inserts with guillo�ne type door The basic dimensions of Hes�a fireplace inserts with a guillo�ne door Dimensions [mm] Hes�a 1000 Guillo�ne Glass Fronted 1431 ØZcz ØZd Table 6. The basic dimensions of Hes�a fireplace inserts with guillo�ne type door...
- Page 12 HESTIA Figure 7. The basic dimensions of Hes�a fireplace inserts with guillo�ne-type doors (LEFT-sided) The basic dimensions of Hes�a fireplace inserts with a guillo�ne le� Dimensions [mm] Hes�a 1000 Guillo�ne Le� 1124 1324 ØZcz ØZd Table 7. The basic dimensions of Hes�a fireplace inserts with guillo�ne type door (le� Sided)
- Page 13 HESTIA Figure 8. The basic dimensions of Hes�a fireplace inserts with guillo�ne-type doors (Right-sided) The basic dimensions of Hes�a fireplace inserts with a guillo�ne right Dimensions [mm] Hes�a 1000 Guillo�ne Right 1124 1324 ØZcz ØZd Table 8. The basic dimensions of Hes�a fireplace inserts with guillo�ne type door (right Sided)
- Page 14 HESTIA Figure 9. The basic dimensions of Hes�a fireplace inserts with three sided guillo�ne doors The basic dimensions of Hes�a fireplace inserts with three sided guillo�ne doors Dimensions [mm] Hes�a 1000 Guillo�ne Bay 1041 1871 ØZcz ØZd Table 9. The basic dimensions of Hes�a fireplace inserts with three sided guillo�ne doors...
- Page 15 HESTIA ØZcz Figure 10. The basic dimensions of Hes�a fireplace inserts with three sided guillo�ne door The basic dimensions of Hes�a fireplace inserts with three sided guillo�ne doors Dimensions [mm] Hes�a 1000 Guillo�ne Peninsula 1897 1115 ØZcz ØZd Table 10. The basic dimensions of Hes�a fireplace inserts with three sided guillo�ne door...
-
Page 16: Structure And Operation Of The Insert
HESTIA 4. STRUCTURE AND OPERATION OF THE INSERT 4.1 Hestia insert single sided guillotine door (Hestia 1200 and 1400 series) Figure 11. General construc�on of HESTIA insert single sided guillotine door (Hestia 1200 and 1400 series) The fireplace insert consists of a body 1 and a front 4. The body (coat of the insert) is made of 4 mm steel. The front of the insert consists of steel door made of a special profile and profiled steel metal sheet, heat-resistant glass and a handle 3. - Page 17 4.2 Hestia single sided guillotine door (Hestia 1000 Guillotine GF) Figure 12. General structure of the Hestia 1000 Guillotine glass fronted The fireplace insert consists of a body 2 and of a front 10. The body (shell) is made up of 3mm thick steel.
- Page 18 HESTIA The bottom of the combustion chamber 1, its side walls and the back wall are lined with akubet (a kind of chamotte) 8. It has a double floor 3 with primary and secondary air inlets, as well as an ash pan 6 and a grate 7.
- Page 19 HESTIA The fireplace insert consists of a body 1 and a front 4. The body of the insert is made of 3 mm P265GH boiler steel. It is enclosed with the cover 2 and lower and upper bar 3. The front of the insert consists of steel door made of a special profile and profiled steel metal sheet, heat-resistant glass and a handle 5.
-
Page 20: Door Opening And Closing
HESTIA 5. DOOR OPENING AND CLOSING A. Hestia insert single sided guillotine door (Hestia 1200 and 1400 series) 5.1. Guillo�ne type with lever (sideways) The guillo�ne door, in addi�on to up-down shi�ing, can also be opened sideways in selected Hestia models. Side ways opening is used only to service the insert (cleaning the glass, etc.). - Page 21 HESTIA door hooks Figure 15. Hinged type door – opening Closing the door of the insert consists in: • restore the door to its ini�al posi�on; • move the hooks right and le� side so that their posi�on is parallel to the insert - fixing the door in the handles;...
-
Page 22: Hestia Insert Single Sided Guillotine Door (Hestia 1000 Guillotine Gf, Left And Right)
Do not slam the door when closing - this may cause the glass crack or break. B. Hestia insert single sided guillotine door (Hestia 1000 Guillotine GF, Left and Right) A guillotine-type door can be moved up or down. It also opens sideways. -
Page 23: Hestia Insert Three Sided Guillotine Door (Hestia 1000 Guillotine Bay And Peninsula)
ATTENTION! Do not slam the door when closing - this may cause the glass crack or break. C. Hestia insert three sided guillotine door (Hestia 1000 Guillotine Bay and Peninsula) 5.5. Guillotine type with hooks (sideways) The guillotine door, in addition to up-down shifting, can also be opened sideways. - Page 24 HESTIA Closed hook Open hook Figure 18. Side doors- opening and closing Figure 19. Side door unlocked Closing the door of the insert consists in: • returning the door to the initial position; • moving the hooks to the initial position - fixing the door in the holder; ATTENTION! Do not slam the door when closing - this may cause the glass crack or break.
-
Page 25: Transport, Assembly And Installation Of The Insert
HESTIA 6. TRANSPORT, ASSEMBLY AND INSTALLATION OF THE INSERT Before assembling, installing and using the fireplace insert, read the Opera�on and Installa�on Manual carefully and follow the instruc�ons contained in it. It will ensure safe and efficient opera�on of the fireplace. Non-compliance with this Opera�on and Installa�on Manual may invalidate the guarantee and put the user at risk of injury or loss of life. - Page 26 HESTIA NOTE: To ensure the correct func�oning of the insert, there must be a correct chimney draught in the connector of the flue pipe: the insert will not func�on properly if the chimney draught is not sufficient, resul�ng in excessive soot •...
-
Page 27: Ventilation Of The Insert
HESTIA Enough room should be le� when building the enclosure of the fireplace insert so as to ensure an easy access for the purpose of cleaning the insert, the flue pipe and the chimney. Figure 20. Diagram of connec�ng the insert to the chimney. 6.3. -
Page 28: Installation Of The Insert
HESTIA in the case of using a system of distribu�ng air to other rooms, it is essen�al to ensure the return of cooled • air to the room where the fireplace insert is installed so that the air can circulate freely (otherwise, the work cycle of the fireplace insert may become disrupted, which will hinder the distribu�on of warm air);... -
Page 29: Start-Up
HESTIA 7. START-UP Before lighting your appliance for first time make sure you have read this manual fully and acquainted yourself with the controls of this appliance. Ensure that you have allowed sufficient time for the heat resistant sealant to cure. -
Page 30: Use
HESTIA During the first hours of using the insert, it is recommended to load the fireplace with a small amount of fuel, i.e. up to 50% of the normal load. When the fireplace is lit for the first �me, water may condense on the internal walls of the combus�on chamber. This phenomenon is normal and is caused by the condensa�on of water vapour contained in combus�on gases. -
Page 31: Refuelling
HESTIA NOTE: It is forbidden to burn waste fuel, liquid fuels and other types of fuel not recommended by the manufacturer of the fireplace insert. It is strictly forbidden to use the following as fuel for the fireplace: bituminous coal, the wood of tropical trees, all types of products containing chemical compounds such as petrol, alcohol, naphthalene, oil, waste and laminated panels containing adhesives. -
Page 32: Keeping The Glass Pane Clean
HESTIA NOTE: Take care not to overload the insert with fuel. Overloading may cause permanent damage to its structure. 8.3. Keeping the glass pane clean The cleanliness of the glass pane depends on using appropriate fuel, as well as on: supplying a sufficient quan�ty of air for the burning process;... -
Page 33: Maintenance
HESTIA It is forbidden: to leave any flammable materials or items sensi�ve to high temperature near the glass of the insert; • to use the appliance when its glass is broken; • to ex�nguish the hearth fire with water; • to let children come near the appliance;... -
Page 34: Periodic Cleaning Of The Fireplace
HESTIA 9.1. Periodic cleaning of the fireplace To ensure an efficient burning process in the hearth of the fireplace insert, the combus�on chamber, the grate, the flue and combus�on gas ducts must be cleaned periodically. Component Frequency Tools and resources The convec�on surfaces of the fireplace As needed, but not less frequently A brush made from a resilient... -
Page 35: Nameplate
HESTIA The hea�ng insufficient quan�ty of fuel in the hearth add as much fuel as is required efficiency is low or the fire in the hearth the moisture content of the fuel is too high use fuel with a moisture content of up to 20% goes out inadequate chimney draught check the efficiency of the chimney installa�on... -
Page 36: Inspection Records
HESTIA 12. INSPECTION RECORDS REGISTER OF INSPECTIONS OF THE CHIMNEY Inspec�on Date, signature and stamp Inspec�on Date, signature and stamp Inspec�on Date, signature and stamp Inspec�on Date, signature and stamp Inspec�on Date, signature and stamp Inspec�on Date, signature and stamp... - Page 37 HESTIA REGISTER OF INSPECTIONS OF THE FLUE PIPE Inspec�on Date, signature and stamp Inspec�on Date, signature and stamp Inspec�on Date, signature and stamp Inspec�on Date, signature and stamp Inspec�on Date, signature and stamp Inspec�on Date, signature and stamp...
- Page 38 HESTIA HESTIA 148 Cochranes Road Moorabbin, Victoria 3189 www.paulagnewdesigns.com.au info@paulagnewdesigns.com.au...
Need help?
Do you have a question about the HESTIA 1000 and is the answer not in the manual?
Questions and answers