Table of Contents

Related Manuals for Paul Agnew i700 Series


Summary of Contents for Paul Agnew i700 Series
- Page 1 i700 Range USER INSTRUCTIONS AND INSTALLATION PAD-i700 PAD-i700PED Version 1.1 12/02/20 Contents of manual may be updated without notice. PAD-i700BOX For the latest version of this manual please refer to our website: www.livingfire.com.au...
- Page 2 ATTENTION: Your wood heater must be installed by a qualified person whose work conforms with local council regulations, Australian standards & manufacturers recommendations. Failure to do so will void your warranty and could possibly void any home insurance. This appliance is tested and certified as per relevant Australian and New Zealand standards. However, check your local council requirements (eg: permits) as there may be additional rules and regulations applicable in your locality.
-
Page 3: Table Of Contents
TABLE OF CONTENTS Safety Warnings Appliance Dimensions Installation Prerequisites Clearances To Combustibles Adequate Air Intake Flue System Appliance Installation Clearance To Combustibles Installing The Flue External Installation Clearances Firebricks Installation Operating Instructions Selecting Right Fuel First Fire Of Your Appliance Overnight Burns Combustion Air Intake Lighting The Fire And Refuelling... -
Page 4: Safety Warnings
SAFETY WARNINGS • Never place combustible items such as but not limited to fabric, furniture, aerosols or wood within the specified clearances to combustibles • Glass and other surfaces are hot during operation as well as during the cooling down period. Precaution should be taken and young children must be supervised at all times. -
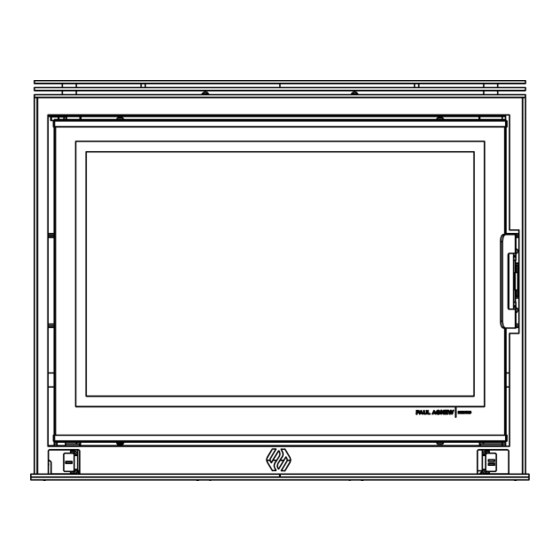
Page 5: Appliance Dimensions
APPLIANCE DIMENSIONS PAD-i700 PAD-i700PED PAD-i700BOX PAD-i700 PAD-i700PED PAD-i700BOX Appliance height Appliance width Appliance depth From centre of flue to rear of the appliance Flue diameter Base width 1000 Base depth Base height Note: All measurements are in ‘mm’ i700 Range... -
Page 6: Installation Prerequisites
INSTALLATION PREREQUISITES Please consider following requirements are met prior to the installation of your appliance. CLEARANCE TO COMBUSTIBLES It is extremely important that you comply to required installation distances and that you respect local installation regulations. The manufacturer is not responsible for the product, if it is not installed according to these recommendations. -
Page 7: Appliance Installation
APPLIANCE INSTALLATION CLEARANCE TO COMBUSTIBLES PAD-i700 PAD-i700PED PAD-i700TAB Rear of heater to rear wall Side of heater to side wall Hearth extension from front of heater Centre of flue to rear wall Minimum hearth depth Minimum hearth width Rear corner of heater to wall Hearth thickness Note: All measurements are in ‘mm’... -
Page 8: Installing The Flue
INSTALLING THE FLUE Flat Ceiling The following drawings are intended as a guide only. Your wood heater must be installed Triple Skin Cowl by a qualified person whose work conforms with local council regulations, Australian/New Zealand standards (AS/NZS 2918:2018) & manufacturers recommendations. - Page 9 INSTALLING THE FLUE ..Continued Pitched Ceiling If the appliance is connected to a masonry chimney, it is recommended a chimney register Triple Skin Cowl be installed above any installation into a masonry fireplace minimising heat loss up the chimney. Any chimney should be fully intact with no holes or missing bricks.
-
Page 10: External Installation Clearances
EXTERNAL INSTALLATION CLEARANCES 6 0 0 0 3 0 0 0 M ore than 3 0 0 0 o r l e s s 6 0 0 m in. 3 0 0 0 10 0 0 m in. if c l ear within 3 0 0 0 of flue to p In c rea se a s n e c e s s ar y unt il n o... -
Page 11: Firebricks Installation
FIREBRICK INSTALLATION Bottom brick Rear brick Left brick Right brick Baffle INSTALLATION STEPS Remove the log retainer Place the base firebrick Securely position the rear firebrick Place side bricks by sliding the front edge of the fire brick (long side) into the U-channel at the front of the firebox then pushing the back into place Fit Baffle brick by sliding one side up over side brick then sliding the other side into place All bricks should be installed with the smooth surface facing into the middle of the firebox... -
Page 12: Operating Instructions
Do Not Touch, use tools where necessary. OVERNIGHT BURNS Paul Agnew Designs appliances are designed to maximise burn times as well as to meet strict Australian and New Zealand efficiency and emissions standards. Although our modern appliances may not give a lengthy burn time compared to old appliances, by using good fuel and cleverly maintaining the combustion air intake, you can achieve longer burn times. -
Page 13: Combustion Air Intake
OPERATING INSTRUCTIONS ..Continued COMBUSTION AIR INTAKE The adjustable primary air is supplied through two air slides on both sides of the heater, towards the bottom of the fire box. Please see figure 1 to understand the open-close positions. The non-adjustable secondary air is supplied through the rear of the firebox. -
Page 14: Appliance Maintenance
APPLIANCE MAINTENANCE FLUE SYSTEM During the season, we recommend you check your flue system at least once a month. If you notice any soot and creosote build-up, clean the flue system prior to lighting the next fire. You should also look for any signs of damage to joints. -
Page 15: Troubleshooting
TROUBLE SHOOTING If you believe your appliance is not working the way you think it should, we expect you to speak to your installer first, they can help you with issues such as burning too much or too little wood, smoke in the room when you open the door, blackened glass or build-up of creosote during use. - Page 16 TROUBLE SHOOTING ..Continued FAST BURNING RATE POSSIBLE CAUSE REMEDY Too much draught Try reducing the air supply to the wood heater by closing down your air controls, or combustion air if this fails then you may have to adjust the door, or you may have damage to the sealing.
- Page 18 Distributed By: LIVING FIRE +61 3 99 777 888 info@livingfire.com.au www.livingfire.com.au...
Need help?
Do you have a question about the i700 Series and is the answer not in the manual?
Questions and answers