
Related Manuals for Dyaco MED 7.0T


Summary of Contents for Dyaco MED 7.0T
- Page 1 User manual Please read this entire manual carefully Rehabilitation Treadmill before operating your new 7.0T and save it for future use. 7.0T...
- Page 2 Thank you for your recent purchase of the 7.0T. Dyaco provides simple, reliable products that offer the most relevant feedback to caregivers and users to achieve best-in-class outcomes and empower individuals to build confidence in rebuilding and maintaining healthy lifestyles and keep in touch with their communities.
-
Page 3: Table Of Contents
Contents Important safety instructions Important electrical information Important operation instructions Application specification Operating principle Significant physical characteristics Significant performance characteristic Intended user profile Operating the 7.0T... - Page 4 Features Operation of your new 7.0T Data transfer software instructions Using a heart rate transmitter Assembly instructions for 7.0T Important assembly instructions Maintenance Specifications Description of packaging & labeling symbols 82...
-
Page 5: Important Safety Instructions
Important safety instructions Attention Read all instructions in this manual before using this 7.0T. Danger To reduce the risk of electric shock, disconnect your 7.0T from the electrical outlet prior to cleaning and/or service work. Warning Do not modify this equipment without authorization of the manufacturer. - Page 6 Do not use any after market parts on this 7.0T, other than those recommended by Dyaco. Do not attempt any servicing or adjustments other than those described in this manual. All else must be left to trained service...
- Page 7 المهمة السالمة إرشادات ت ن ب ي ه . ا ق ر أ ج م ي ع ا إل ر ش ا د ا ت ا ل و ا ر د ة ف ي ه ذ ا ا ل د ل ي ل ق ب ل ا س ت خ د ا م ا ل ج ه ا ز خ...
- Page 8 مستشعرات نبضات اليد ليست جها ز ً ا طب ي ًا. قد تؤثر العوامل المختلفة، التي من بينها حركة المستخدم، في دقة قراءة معدل ضربات القلب. مستشعرات النبض المقدمة في الجهاز معدة للمساعدة في أغراض التمرين فقط وذلك بتحديد اتجاهات...
- Page 9 Wichtige Sicherheitshinweise Achtung Lesen Sie vor dem Gebrauch dieses Geräts alle Anweisungen in diesem Handbuch. Gefahr Vor Reinigungs- und / oder Wartungsarbeiten den Stecker aus der Steckdose ziehen, um das Risiko eines elektrischen Schocks zu verringern. Warnung Nehmen Sie an dem Gerät keine Ä nderungen ohne die Genehmigung des Herstellers vor.
- Page 10 Mindestfreiraum von einem Fuß vorhanden sein und hinter dem Gerät dreieinhalb Fuß . Verwenden Sie bei diesem Gerät keine anderen Ersatzteile, als die von Dyaco empfohlenen. Fü hren Sie keine anderen als in diesem Handbuch beschriebenen Wartungen oder Anpassungen aus. Alles andere muss geschultem Servicepersonal ü...
- Page 11 Attention Lire toutes les instructions de ce manuel avant utilisation. Danger Pour réduire le risque d’électrocution, débranchez l’appareil de la prise avant d’effectuer des travaux de nettoyage et/ou d’entretien. Avertissement Ne modifiez pas cet appareil sans l’autorisation de l’autorité du fabricant.
- Page 12 à l’arrière. N’utilisez pas de pièces après-vente sur cet appareil, autres que celles recommandé es par Dyaco. N’essayez pas d’effectuer d’autres opérations d’entretien ou de réglage que celles décrites dans ce manuel. Tout le reste doit être confié à un personnel de service qualifié...
- Page 13 Belangrijke veiligheids instructies Let op Lees alle instructies in deze handleiding voordat u dit apparaat gebruikt. Gevaar Koppel het apparaat los van het stopcontact voordat u reinigings- en/of servicewerkzaamheden uitvoert om het risico op elektrische schokken te verminderen. Waarschuwing Wijzig deze apparatuur niet zonder toestemming van de fabrikant. Installeer de loopband op een vlakke ondergrond met toegang tot een geaard stopcontact van 230 volt AC, 50 Hz en 10 ampère om het risico op brandwonden, brand, elektrische schokken of persoonlijk letsel te...
- Page 14 Er moet minimaal 30 cm. vrije ruimte zijn aan de voorkant en één meter aan de achterkant. Gebruik geen aftermarket-onderdelen op dit apparaat, andere welke worden aanbevolen door Dyaco. Voer geen onderhoud uit of breng geen aanpassingen aan die niet in deze handleiding worden beschreven. Al het overige moet worden...
-
Page 15: Important Electrical Information
The 7.0T is not protected against the ingress of water or particulate matter. The 7.0T is not suitable for use in an oxygen rich environment. If not stated otherwise Dyaco 7.0T are designed for operation in normal climatic surroundings (IEC 60601-1): Temperature: + 10° ... + 36° C Relative humidity: 30 ... - Page 16 Grounding instructions This product must be grounded. In the unlikely event that the rehabilitation treadmill's electrical system should malfunction or breakdown grounding provides a path of the least resistance for electric current, reducing the risk of electric shock. This product is equipped with a cord having an equipment-grounding plug.
- Page 17 معلومات مهمة كهربائية تحذير تجنب مطل ق ً ا إزالة أي أغطية دون فصل مقبس التيار الكهربائي أو ال ً . إذا كان الجهد الكهربائي يتباين بمقدار أو أكثر، فإن أداء جهاز الجري قد يتضرر من ذلك. ال يشمل الضمان مثل تلك الحاالت. إذا شككت في انخفاض الجهد، فاتصل بشركة...
- Page 18 Das Laufband ist nicht fü r den Gebrauch in einer sauerstoffreichen Umgebung geeignet. Wenn nichts anderes angegeben ist, sind die Geräte von Dyaco fü r einen Betrieb in normalen klimatischen Umgebungen (IEC 60601-1) Temperaturen von +10° bis +36° C konzipiert Relative Luftfeuchtigkeit: 30 ...
- Page 19 Erdungsanweisungen Dieses Produkt muss geerdet werden. In dem unwahrscheinlichen Fall, dass an dem Elektrosystem des Rades Fehlfunktionen oder eine Unterbrechung der Erdung auftreten, besteht die Gefahr eines Stromschlags. Dieses Produkt ist mit einem Kabel mit Erdungsstecker ausgestattet. Der Stecker muss in eine geeignete Steckdose gesteckt werden, die ordnungsgemäß...
- Page 20 Le tapis de course ne convient pas à une utilisation dans un environnement riche en oxygène. Sauf indication contraire, les appareils Dyaco sont conçus pour fonctionner dans un environnement au climat normal (CEI 60601-1) : Température : + 10°... + 36 °C Humidité...
- Page 21 Renseignements concernant la mise à la terre Ce produit doit être mis à la terre. Dans le cas peu probable où le système électrique du tapis de course ne fonctionnerait pas correctement ou que la mise à la terre serait interrompue, le courant électrique serait moins résistant, ce qui réduirait le risque de choc électrique.
- Page 22 De loopband is niet geschikt voor gebruik in een zuurstofrijke omgeving. Tenzij anders vermeld, zijn Dyaco-apparaten ontworpen voor gebruik onder normale klimatologische omstandigheden (IEC 60601-1): Temperatuur: + 10 ° ... + 36 ° C relatieve luchtvochtigheid: 30 ... 90% (niet condenserend) Luchtdruk: 700 ...
- Page 23 Aardingsinstructies Dit product moet geaard worden. In het onwaarschijnlijke geval dat het elektrische systeem van de loopband defect raakt, biedt de aarding een weg van de minste weerstand voor elektrische stroom, waardoor het risico op elektrische schokken wordt verminderd. Dit product is uitgerust met een snoer met een aardestekker.
-
Page 24: Important Operation Instructions
Important operation instructions Never use the 7.0T during an electrical storm. Surges may occur in your facility power supply that could damage the 7.0T's components. All users should have medical clearance before starting any rigorous exercise program. Start the user at a safe exercise level. Do not allow the user to be over exerted. - Page 25 معلومات إرشادات التشغيل المهمة التيار الكهربائي في مرافق ال تستخدم جهاز الجري أب د ً ا أثناء عاصفة كهربائية. قد تحدث طفرات في مصدر إقامتك، بما يمكن .أن يتلف مكونات جهاز الجري يجب أن يحصل مستخدمي الدراجة على تصريح طبي قبل بدء أي برنامج ...
- Page 26 Wichtige Bedienungs- anweisungen Benutzen Sie Ihr Laufband nie während eines Gewitters. In Ihrem Anlagennetzteil kö nnen Ü berspannungen auftreten, die die Laufbandkomponenten beschädigen kö nnen. Alle Benutzer sollten eine ärztliche Genehmigung haben, bevor sie mit einem strengen Trainingsprogramm beginnen. Lassen Sie den Benutzer mit einer sicheren Ü bungsstufe beginnen. Achten Sie darauf, dass sich der Benutzer nicht ü...
- Page 27 Consignes d’utilisation importantes N’utilisez jamais votre tapis de course en cas d’un orage. Des surtensions peuvent survenir dans l’alimentation électrique et endommager les composants du tapis de course. Tous les utilisateurs doivent obtenir une autorisation médicale avant d’entreprendre tout programme d’exercices rigoureux. Commencez à...
- Page 28 Belangrijke bedieningsinstructies Gebruik uw loopband nooit tijdens onweer. Er kunnen spanningspieken in de stroomvoorziening van uw installatie optreden die de componenten van de loopband kunnen beschadigen. Alle gebruikers moeten over medische toestemming beschikken voordat ze aan een rigoureus trainingsprogramma beginnen. Laat de gebruiker op een veilig trainingsniveau beginnen.
-
Page 29: Application Specification
Application specification Medical purpose Patient warm-up before a physical therapy session. Have the patient walk to improve ambulation and range of motion after knee/hip/ankle surgery or neurological conditions. Allow patients to perform cardiovascular exercise. Used for open kinetic chain exercise only, patient is not restrained or connected to the 7.0T. - Page 30 Intended conditions of use Environment including hygienic requirements General: intended for indoors use. This product is not designed for use outdoors, near a pool or spa, or in any other high humidity environment. Conditions of visibility: Ambient luminance: standard ambient room lighting is sufficient.
-
Page 31: Operating Principle
Operating principle The operator will start the 7.0T and use the speed and incline keys to control motors. When the speed key is pressed, a signal will be sent to the AC motor inverter to request a change. The inverter will then send the appropriate amount of power the AC drive motor to reach the requested speed. -
Page 32: Significant Performance Characteristic
Significant performance characteristic Please refer to “Unique uses for the 7.0T” in operating the 7.0T. -
Page 33: Intended User Profile
Intended user profile Intended operator There is no particular restriction on age, gender, height, weight, ability and culture. Education: University or above Knowledge: The operator should read the user’s manual before use. Discipline: The operator should receive training from the manufacturer before use. -
Page 34: Operating The 7.0T
Operating the 7.0T The 7.0T is intended to be used in aiding in the physical rehabilitation process for patients with orthopedic and neurological problems. Also used in sports medicine, wellness and general conditioning programs. Typical applications for this type of product are Patient warm up before physical therapy session. -
Page 35: Features
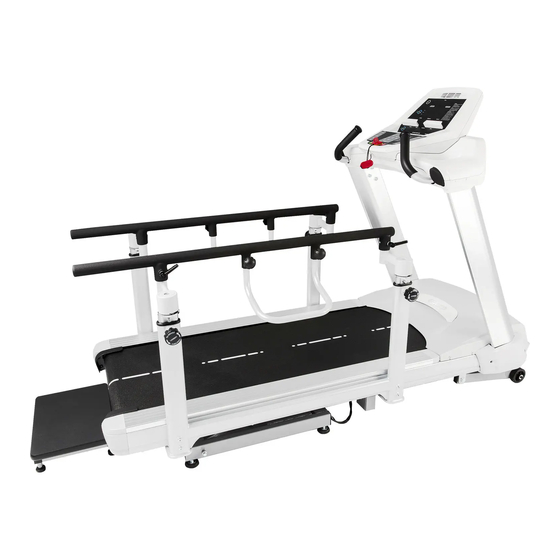
Features 7.0T Parts and adjustments 1. Hand grips 2. Electronic console 3. Safety lanyard 4. Adjustable handrails 5. Handrail horizontal adjustment 6. Handrail vertical adjustment 7. Handrail lift bar 8. Rear step 9. Rear incline 10. Front incline... - Page 36 The 7.0T is an easy product to set up and use, from the adjustments to the intuitive interface. This section explains how to set up, adjust and operate your 7.0T. Leveling the 7.0T Once the 7.0T is assembled, and placed on a flat level floor, it may be necessary to adjust the leveling glides on the bottom of the rear incline unit to ensure proper stability of the 7.0T.
- Page 37 Adjusting the handrail vertical position To lift: Turn both the left and right vertical adjustment knobs counterclockwise one or two rotations. Then just grab the lift bar and pull up. The locking pins in the knobs will automatically ratchet into the indexing holes in the tubes.
-
Page 38: Operation Of Your New 7.0T
Operation of your new 7.0T 7.0T Electronic console Dot matrix display Tablet friendly reading rack holder Message window Heart rate % profile Speed buttons Incline buttons Power on When initially powered on the console, it will perform an internal self-test. During this time all the lights will turn on for a short time. The message window will display a software version (i.e. - Page 39 The odometer will remain displayed for only a few seconds then the console will go to the start up display, also known as Idle Mode. The message window will be scrolling the start up message. You may now begin to use the 7.0T. The console will automatically power down after 30 minutes of inactivity.
- Page 40 The dot matrix has 24 columns of lights and each column represents 1 minute in the Quick start program (time per column can be modified in other programs). At the end of the 24 column (or 24 minutes of work) the display will wrap around and restart at the first column again. Basic information The dot matrix display is used for displaying graphic feedback and has three basic displays for most programs.
- Page 41 To the left of the message window is a display key that allows you to switch the data shown. Below the message window is a heart icon and a bar graph. Wearing an optional heart rate chest belt transmitter will start the Heart Icon blinking (this may take a few seconds).
- Page 42 Forward This key sets the belt direction to forward. Forward is the default direction setting when the 7.0T is powered on and any time the console is in the idle mode. If the belt is already set in the reverse direction, it will change the direction of the belt to forward.
- Page 43 Deck-lift program This program allows you to raise the entire deck parallel to the floor. In this mode the deck, rear step and handrails can be used for step-up, step-down, stretching and PNF/PTA exercises. Lifting the deck while a patient walks allows the therapist to assist the patient by moving their legs without having to bend over too far.
- Page 44 Manual The manual program works as the name implies, manually. This means that you control the workload yourself, not the computer. To start the manual program follow the instructions below or just press the manual button then the enter button and follow the directions in the message window.
- Page 45 Preset programs speed and incline settings The preset program speed and incline levels are shown in the chart below. The Speed numbers shown in the chart indicate a percentage of the top speed of the program. Prog Warm up Cool down Speed Plateau Incline...
- Page 46 Designing and saving a new program Press the facility key. The message window will show a welcome message; if you had previously saved a program, the message will contain the name you gave it. Then press the Enter key to begin programming.
- Page 47 Running a saved program Press Facility key then Enter Enter Time then press enter. Then press start to begin program. Vo2 test The Vo2 test is based on the Gerkin protocol, also known as the fireman’s protocol, and is a sub-max Vo2 (volume of oxygen) test. The test will increase speed and elevation alternately until 85% of Max heart rate is attained.
- Page 48 Before the test Make sure you are in good health; check with your physician before performing any exercise if you are over the age of 35 or persons with pre-existing health conditions. Make sure you have warmed up and stretched before taking the test. Do not take in caffeine before the test.
- Page 49 What the score indicates: Vo2max Chart for males and very fit females 18-25 26-35 36-45 46-55 56-65 years years years years years years excellent >60 >56 >51 >45 >41 >37 good 52-60 49-56 43-51 39-45 36-41 33-37 above average 47-51 43-48 39-42 35-38...
- Page 50 Symmetry The symmetry program provides basic gait information and a feedback graph. The program will measure the left and right step length and calculates the symmetry index. The message window will display the user’s cadence, left and right step length in inches (or centimeters) and symmetry index.
- Page 51 Biofeedback graph Below is a sample picture showing the symmetry graph. In the message window there is an average step cadence, left and right step length and symmetry measurements. In the example below the step length numbers shown indicate that the left leg is stepping longer than the right leg, 26 vs.
-
Page 52: Data Transfer Software Instructions
Use a USB cable (type a to type b, illustrated to the right) to connect the product and the computer. Step 1. Download the software from the link (http://www.dyaco.com/software) and connect the console of the product to the computer via USB cable. Click "Install" when you see the pop-up window as below during installation. - Page 53 Step 2. Click "Connect" or "Change" to select the connecting port (left figure). After clicking the "Change", or connecting to the wrong port, the COM port selection window pops up (right figure). Select the correct COM port and click "Connect". Selecting COM port Pop-Up COM Port Selection Window...
- Page 54 Step 3. After the status shows “Connected” and the product model name to the right, choose the file path and create the file name for saving the data. Click the “Record” button to start collecting data. Click “Stop” or quit the program from the console of the product to stop the data collection process.
-
Page 55: Using A Heart Rate Transmitter
Using a heart rate transmitter Note: The chest strap transmitter is not a standard part, but is a separate purchase. Most transmitters that operate at 5kHz frequency will also work. How to wear your wireless chest strap transmitter? Attach the transmitter to the elastic strap using the locking parts. Adjust the strap as tightly as possible as long as the strap is not too tight to remain comfortable. - Page 56 Your workout must be within range - distance between transmitter/ receiver – to achieve a strong steady signal. The length of range may vary somewhat but generally stay close enough to the console to maintain good, strong, reliable readings. Wearing the transmitter immediately against bare skin assures you of proper operation.
- Page 57 The antenna that picks up your heart rate is very sensitive. If there is an outside noise source, turning the whole machine 90 degrees may de-tune the interference. If there is another person wearing a chest strap within 1 meter, it will interfere.
-
Page 58: Assembly Instructions For 7.0T
Assembly instructions for 7.0T Hardware Step 1. #104-3/8" × 3-3/4" #58- Ø 10 × 2T #59-3/8" × 25 × 2T (6PCS) (6PCS) (6PCS) Step 2. #153-3/8" × 3/4" #58- Ø 10 × 2T #59-3/8" × 25 × 2T (6PCS) (6PCS) (6PCS) #108-M8 ×... - Page 59 Step 3. #110-M5 × 10L #112-M5 × 30L (2PCS) (2PCS) Step 4. #153-3/8" × 3/4" #59-3/8" × 25 × 2T (8PCS) #226-3/8" × 2" (8PCS) (8PCS) Tools. #113-Phillips screw driver (1PCS) #137-5mm Allen wrench (1PCS) #259-6mm Allen wrench (1PCS)
- Page 60 Assembly Read each step’s instructions and study the drawing carefully to become familiar with all the parts and procedures before beginning each step. Step 1. Upright tubes The right side upright tube (19) has the computer cables pre-installed. Lift the tube off the walking surface and attach it to the base frame.
- Page 61 Step 2. Console frame assembly Install the two mounting brackets (3 & 4) with the six M8 x 12mm screws (108). Refer to the important instructions on the following page for this step. Mount the console frame (5) to the upright tubes (18 & 19) with six 3/8” x 3/4”...
-
Page 62: Important Assembly Instructions
When assembling the console mounting brackets (Items 3&4,) please be sure to slide the brackets all the way towards the back of the console frame before tightening the bolts. Push mounting bracket all the way towards the back of the console, then tighten screws. - Page 63 Step 3. Console assembly Plug all the connectors in back of the console. Mount the console (36) to the console frame (5) with two M5 x 30mm screws (112) in the top holes and two M5 x 10mm screws (110) in the bottom holes in the back side of the console frame.
- Page 64 Step 4. Parallel bar handrail assembly Install the eight 3/8” x 3/4” bolts (153) and 3/8” flat washers (59) into the holes on the underside of the frame. Only thread them into the holes two or three turns so the slots in the handrail brackets can slide onto the bolts easily.
- Page 65 Exploded view drawing...
- Page 66 7.0T parts list Item Description Main Frame Incline Bracket Console Mast Locking Assembly (L) Console Mast Locking Assembly (R) Console Support Running Deck Stabilizer Assembly (A) Running Deck Stabilizer Assembly (B) Belt Guide (R) Belt Guide (L) Front Roller W/Pulley Rear Roller Running Deck Running Belt...
- Page 67 Item Description Oval Eye Tube Endcap Square End Cap Handpulse End Cap Stable Wheel Spacer Ø 10 × Ø 25 × 0.8T_Nylon Washer Motor Cover Anchor(D) Rear Adjustment Base (R) Rear Adjustment Base (L) 76 × 52 × 80mm_Handgrip Foam Insulation bushing 3/8"...
- Page 68 Item Description M8 × P1.25 × 12L_Socket Head Cap Bolt M5 × P0.8 × 10L_Phillips Head Screw M5 × P0.8 × 30L_Phillips Head Screw Phillips Head Srewdriver Ø 3.5 × 12L_Sheet Metal Screw Ø 5 × 1.5T_Spring Washer Ø 5 × 0.6T_Star Washer M8 ×...
- Page 69 Item Description Fan Mounting Plate Ø 14 × 10 × 25L_Podwer metallurgy Sleeve Ø 20 × 13.4 × 41L_Podwer metallurgy Sleeve Seat/Handlebar Adj. Locking Lever Ø 54 × 25mm_Transportation Wheel Rubber Foot Ø 37mm × 3/8"_Adjustment Foot Pad Ø 55 × 3/8"_Adjustment Foot Pad Slider Sleeve 30 ×...
- Page 70 Item Description M6 × P1.0 × 5T_Luck Nut M5 × P0.8 × 30L_Socket Head Cap Bolt M5 × P0.8 × 35L_Socket Head Cap Bolt Ø 15_C Ring U-Joint, Step Sensor U-Joint Mounting Plate Ø 20 × M6 × 20L_Step Magnet Holde Plunger, Step Sensor Linear Bearing Rotate Axle Spacer...
- Page 71 Item Description 800mm_Computer Cable 2100mm_Computer Cable Communication Cable Step Sensor Board 800mm_Step Sensor Cable, Right 1550mm_Step Sensor Cable, Left Back Plate Plate Breaker Grounding Brush Brush Holder M3 × 10L_Phillips Head Screw M3 × 2.5T_Luck Nut Ferrite Core (29mm) Ferrite Core (21.4mm) Ferrite Core (30mm) 80mm_Connecting Cable Of Motor Ø...
-
Page 72: Maintenance
Maintenance Belt and deck Your 7.0T uses a very high-efficient low-friction deck and belt. Performance is maximized when the bed is kept as clean as possible. Use a soft, damp cloth or paper towel to wipe the edge of the belt and the area between the belt edge and frame. Also reach as far as practical directly under the belt edge. - Page 73 Tighten the rear roller bolts only enough to prevent slippage at the front roller. Turn both tread-belt tension adjustment bolts with a 10mm allen wrench in increments of 1/4 to 1/2 turn each and inspect for proper tension by walking on the belt at a low speed, making sure the belt does not slip.
- Page 74 Turn the bolt clockwise to move the belt to the right. Turn the bolt only a 1/4 turn and wait a few minutes for the belt to adjust itself. Continue to make 1/4 rotation turns until the belt stabilizes in the center of the running deck.
- Page 75 Pause Turns pause mode on or off. When on, pause lasts 30 minutes. Odometer reset Reset odometer readings Units Set display to English or metric readings Grade Return (GS Mode) Turns GS mode on or off. Returns the elevation to the lowest setting when pause is pressed Beep Turns the speaker (beep sound) on or off.
- Page 76 Calibration MW: START LEFT SIDE When Start is pressed the MW shows: AD _ _ _ TGT 65 Speaker will beep slowly when magnet distance is too far, quickly when near and steady when correct. Press enter to continue MW: START RIGHT SIDE When Start is pressed the MW shows: AD _ _ _ TGT 65 Speaker will beep slowly when magnet distance is too far, quickly when near and steady when correct.
- Page 77 Factory and Acceleration Settings Enter the Factory settings; press Start and Speed Fast keys while console is in power up reset. User presses enter UNITS: ENGLISH The default setting is English. User can press any up/down arrows to change to Metric. User presses enter. ADJUST MIN SPEED THEN PRESS ENTER Default value is 0.1 mph and can be adjusted up to 0.5mph.
- Page 78 Error Codes, Messages and Solution/Cause Error Codes E1 Over Current E12 EPROM RD E26 Bk Chopper Deck Lube Check AC Line V Reset Power Bad Drive or Motor Reset Power Bad Drive Check Brake Bad Drive E27 PG Error E2 Over Volt E13 EPROM WR Check Motor Check AC line V...
-
Page 79: Specifications
IEC 60601-1-2:2014, EN 60601-1-2:2015, IEC 60601-1:2015+A1:2012, EN 60601-1:2006+A1:2013+A12:2014 EN ISO 20957:2013, MDD 93/42/EEC Class IIa , ISO 14971; 2012 0123 Manufacturer Dyaco Europe GMBH Dyaco International Inc. Address: Friedrich-Ebert-Straß e No. 1, Gong 1st Rd., Hemei 75, 51429 Bergisch Gladbach,... - Page 80 Guidance and manufacturer’s declaration – electromagnetic compatibility The 7.0T is intended for use in the electromagnetic environment specified below. The customer or the user of the 7.0T should assure that it is used in such an environment. Emissions test Compliance Electromagnetic environment –...
- Page 81 Immunity test IEC 60601 Compliance level – Electromagnetic environment test level guidance Electrical fast +/-2 kV for power supply +/-2 kV for power supply Mains power quality should be that transient/burst lines lines of a typical commercial or hospital IEC 61000-4-4 +/-1 kV for input/output +/-1 kV for input/output environment.
-
Page 82: Description Of Packaging & Labeling Symbols
Description of packaging & labeling symbols Indicates that the package is heavy and two or more people are required to lift. Package contains fragile electronic equipment. Care should be used when handling. The product inside the packaging could be easily damaged if dropped or handled without care and attention. - Page 83 AC power 220-240 Volt, 10Amps, 50Hz Product certificate logo, CE MDD 93/42/EEC Class IIa read this entire manual carefully before operating your new 7.0T Type B applied parts. This is used for parts applied to the patient that require only ordinary electrical protection, e.g.
Need help?
Do you have a question about the MED 7.0T and is the answer not in the manual?
Questions and answers