Advertisement
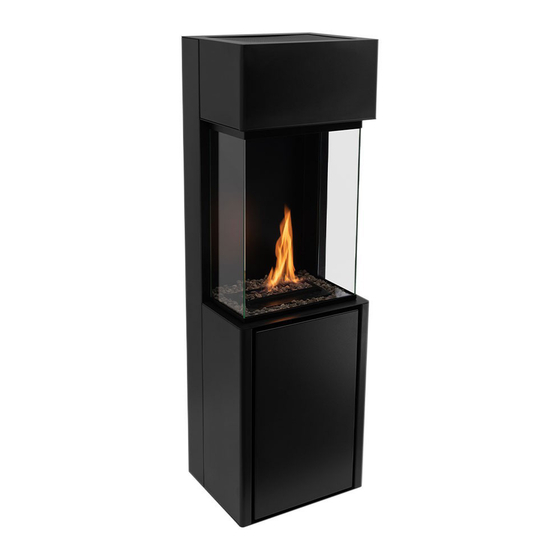
Arcticon Fireplace
EN Installation manual / DE Montageanleitung / ES Manual de montaje /
FR Notice de montage / IT Istruzioni di montaggio / PL Instrukcja montażu /
RU инструкция по монтажу
WARNING / WARNUNG / ADVERTENCIA / AVERTISSEMENT / ATTENZIONE / OSTRZEŻENIE / ВНИМАНИЕ
EN This manual only applies to the installation and operation of dedicated burner in Arcticon firebox only.
DE Diese Anleitung gilt nur für die Installation und den Betrieb des Brenners in der Arcticon Brennkammer.
ES Este manual sólo se aplica a la instalación y el funcionamiento del quemador dedicado en el hogar Arcticon.
FR Ce manuel s'applique uniquement à l'installation et au fonctionnement d'un brûleur dédié dans un foyer Arcticon.
IT Il presente manuale si applica esclusivamente all'installazione e al funzionamento del bruciatore dedicato nel focolare Arcticon.
PL Niniejsza instrukcja dotyczy wyłącznie instalacji i obsługi dedykowanego palnika w obudowie Arcticon.
RU Данное руководство относится только к установке и эксплуатации специальной горелки только в топке Arcticon.
Copyright Planika Sp. z o.o.
www.planika.com
I1510#08
22.07.2024
Advertisement
Table of Contents

Related Manuals for Planika Arcticon


Summary of Contents for Planika Arcticon
- Page 1 DE Diese Anleitung gilt nur für die Installation und den Betrieb des Brenners in der Arcticon Brennkammer. ES Este manual sólo se aplica a la instalación y el funcionamiento del quemador dedicado en el hogar Arcticon. FR Ce manuel s'applique uniquement à l'installation et au fonctionnement d'un brûleur dédié dans un foyer Arcticon.
- Page 2 Do not use the device in humid and drafty spaces. Do not cover top ventilation openings of the device. Only use manufacturer-approved decorative accessories for Planika fireplaces. Follow the provided guidelines to prevent damage to the unit. Only use the plugs/electrical cords supplied with the fireplace.
- Page 3 No utilice el dispositivo en espacios húmedos y con corrientes de aire. No cubra las aberturas de ventilación superiores del aparato. Utilice únicamente accesorios decorativos aprobados por el fabricante para las chimeneas Planika. Siga las directrices proporcionadas para evitar daños en el aparato.
- Page 4 Ne pas utiliser l'appareil dans des espaces humides et soumis à des courants d'air. Ne pas couvrir les ouvertures de ventilation supérieures de l'appareil. N'utilisez que des accessoires décoratifs approuvés par le fabricant pour les foyers Planika. Respectez les directives fournies afin d'éviter d'endommager l'appareil.
- Page 5 4. Nie używaj urządzenia w wilgotnych pomieszczeniach oraz tam gdzie występują przeciągi. 5. Nie zakrywać górnych otworów wentylacyjnych urządzenia. 6. Do kominków Planika należy stosować wyłącznie akcesoria dekoracyjne zatwierdzone przez producenta. Należy przestrzegać dostarczonych wytycznych, aby zapobiec uszkodzeniu urządzenia. 7. Należy używać wyłącznie wtyczek/przewodów elektrycznych dostarczonych wraz z kominkiem.
- Page 6 Quantity Fireplace Carcasa de la Alloggiamento del Gehäuse des Kamins Boîtier de cheminée Obudowa kominka Корпус камина housing chimenea caminetto Contenedor de Conteneur de Contenitore del Pojemnik na Fuel container Kraftstoffbehälter Топливный контейнер combustible carburant carburante paliwo Front glass Frontglas Vidrio frontal Verre frontal Vetro anteriore...
- Page 7 Plug the cables into the sockets at the bottom of the fireplace. Pull the cable with the plug through the opening at the back of the appliance. Stecken Sie die Kabel in die Steckdosen an der Unterseite des Kamins. Ziehen Sie das Kabel mit dem Stecker durch die Öffnung auf der Rückseite des Geräts.
- Page 8 Install the bracket J1 to the wall and J2 to the back wall of the fireplace using added bolts. Lift the fireplace and place it on the wall bracket. Attention! The fireplace must stand on legs and not hang. Montieren Sie die Halterung J1 an der Wand und J2 an der Rückwand des Kamins mit zusätzlichen Schrauben. Heben Sie die Feuerstelle an und setzen Sie sie auf die Wandhalterung.
- Page 9 VENTILATION MESH Place the granules (E, F) evenly in the marked area leaving no uncovered area. Use one bag (F) to cover the burner. Distribute the remaining bag (E) around the ventilation mesh. Make sure the granules are not in contact with the filament. Do not place the granules on the (VENTILATION MESH) Das Granulat (E, F) an der markierten Stellen gleichmässig verteilen, damit keine freie Lücken entstehen.
- Page 10 NOTE! Make sure the device is turned off and the glass shields have cooled down to room temperature. Place the shield so the top edge fits in the top frame space, then place its bottom edge in the bottom frame space. Lower the glass shield vertically down. Proceed with the remaining glass shields. ACHTUNG! Stellen Sie sicher, dass das Gerät ausgeschaltet ist und die Glasscheiben auf Raumtemperatur abgekühlt sind.
- Page 11 1. Glühelement 1. Filament 1. Filamento 1. Filament 2. Burner 2. Feuerungsleiste 2. Quemador 2. Foyer 3. Device surface 3. Feuerungsrost 3. Tapa de la chimenea Brûleur 4. Control panel 4. Bedienpanel 4. Panel de control 4. Panneau de commande 5.
- Page 12 1. Mode ECO ECO Modus 1. ECO mode Modo Eco 2. Allumage / extinction de la Schaltet den Kamin ein / 2. Flame ignition / flame Encendido / extinción de fuego flamme extinguishing Toma de servicio 3. Fente de service Servicesteckdose 3.
-
Page 13: Flame Ignition
REPLACING FUEL CONTAINER 1. If the fuel container is empty ( ), unscrew the cap with the pumping hose and remove the container from the holder ( ) (I). 2. Insert a full fuel container with a cap removed ( ) (II). -
Page 14: Troubleshooting
TROUBLESHOOTING Some alarms are accompanied by a sound signal. Press START/STOP to mute. SOLUTION DIODES (contact the Service Department if the solution does not eliminate the error) The device is being cooled. Wait for the green diode The device run out of fuel while operating. The device is being cooled. Wait for the red diode to turn off. - Page 15 REGULIERUNG DER FLAMMENHÖHE Wenn die Flamme brennt, drücken Sie ECO, um die Flammenhöhe zu verringern (zwei Signaltöne). Um die Flammenhöhe zu vergrößern, drücken Sie noch mal ECO (ein Signalton). Falls die Temperatur des Gerätes zu hoch ansteigt, wird die Flammenhöhe automatisch verringert (ECO), ACHTUNG! und die Regulierung der Flammenhöhe wird nicht mehr möglich.
- Page 16 RELLENO DEL COMBUSTIBLE 1. Cuando de depósito está vacío ( ), desenrosque el tapón de la manguera y retire la bombona de combustible de su soporte ( ) (I). 2. Inserte la bombona de combustible sin conectar la manguera ( ) (II).
-
Page 17: Mensajes De Alarma
MENSAJES DE ALARMA Algunos mensajes van acompañados de una señal audible. Para silenciarlo, presione START / STOP. DIODOS DE PANEL PROCEDIMIENTO DE CONTROL (contacte al servicio si el procedimiento recomendado no elimina el error) El dispositivo está frío. Espere a que aparezca el diodo verde. No hubo combustible durante la operación. -
Page 18: Messages D'alarme
ALLUMAGE DE LA FLAMME signifie que l'appareil est prêt à démarrer la flamme. La diode verte Appuyez sur START pendant 3 secondes. Le démarrage de la flamme prend de 2 à 10 minute ).Pendant ce temps, l'odeur des vapeurs de carburant peut être ressentie. La diode READY éteinte la flamme a été... - Page 19 PROCESSO DI RIFORNIMENTO DEL COMBUSTIBILE 1. Se il serbatoio del combustibile è vuoto ( ), svitare il tappo con il tubo di rifornimento ed estrarre il serbatoio dall`alloggiamento ( ) (I). 2. Ricollocare il serbatoio pieno di combustibile nell`alloggiamento ( ) (II).
- Page 20 MESSAGGI DI ALLARME Alcuni messaggi sono accompagnati da un segnale acustico. Per disattivare l'audio, premere START / STOP. LED sul pannello di PROCEDURA (contattare il servizio d’assistenza se la procedura consigliata non elimina l'errore) controllo Il dispositivo si sta raffreddando. Attendi che il LED verde appaia Mancato carburante durante il funzionamento.
- Page 21 ODPALANIE PŁOMIENIA oznacza, że urządzenie jest gotowe do odpalenia płomienia. Zielona dioda Wciśnij START przez 3 sekund. Odpalanie płomienia trwa 2-10 minuty ( ). W tym czasie może być wyczuwalny zapach oparów paliwa. Wyłączona dioda READY ( informuje, że płomień został odpalony i urządzenie osiągnęło temperaturę...
- Page 22 НАПОЛНЕНИЕ ТОПЛИВОМ Если топливный бак пустой ( ), следует открутить крышку с кабелем от насоса и вытянуть топливный бак с держателя ( ) (I). Вставить полный бак на место ( ) (II). Закрутить крышку топливного бака с кабелем насоса (III). ЗАПУСК...
-
Page 23: Предупреждающие Сообщения
ПРЕДУПРЕЖДАЮЩИЕ СООБЩЕНИЯ При некоторых сообщениях выступает звуковой сигнал. Чтобы его выключить, следует нажать START/STOP. ДИОДЫ НА ПАНЕЛИ ДЕЙСТВИЯ № УПРАВЛЕНИЯ (Надо связаться с сервисом если рекомендации не устраняют ошибки) Устройство охлаждается. Подождать появления зеленого диода Во время работы устройства закончилось топливо. Устройство охлаждается. Подождать...
Need help?
Do you have a question about the Arcticon and is the answer not in the manual?
Questions and answers