Advertisement
Quick Links
WARRANTY
DO NOT RETURN YOUR PRODUCT TO THE STORE. PLEASE CONTACT
BABY TREND® FOR REPLACEMENT PARTS, SERVICE AND REPAIR.
The Baby Trend® warranty covers workmanship defects within 1 year of purchase. Any
product which has been subjected to misuse, abuse, abnormal use, excessive wear and
tear, improper assembly, negligence, environmental exposure, alteration or accident, or has
had its serial number altered or removed invalidates all claims against the manufacturer. Any
damage to property during installation is the sole responsibility of the end user.
Customer Service Department can be contacted at 1 (800) 328-7363 Monday through Friday
between 8:00 a.m. and 4:30 p.m. (PST). Return Authorizations are required prior to returning
product(s) to Baby Trend®. Please visit http://babytrend.com/pages/limited-warranty
for complete warranty details.
NO DEVUELVA SU PRODUCTO A LA TIENDA. POR FAVOR CONTACTE A
BABY TREND® PARA PIEZAS DE REPUESTO, SERVICIO Y REPARACION.
La garantía de Baby Trend® cubre defectos de fábrica por 1 año después de la compra.
Cualquier producto que haya sido sometido a uso inadecuado, abuso, uso anormal,
desgaste excesivo, montaje incorrecto, negligencia, exposición ambiental, alteración o
accidente, o cuyo número de serie haya sido alterado o removido, anula todos los reclamos
contra el fabricante. Cualquier daño a la propiedad durante la instalación es la exclusiva
responsabilidad del usuario final. El Departamento de Servicio al Cliente está disponible
llamando al 1 (800) 328-7363, de lunes a viernes de 8:00 a.m. a 4:30 p.m. (PST). Se
requiere una Autorización de Devolución antes de poder devolver el o los productos a
Baby Trend®. Visite http://babytrend.com/pages/limited-warranty
para conocer todos los detalles de la garantía.
Baby Trend, Inc.
13048 Valley Blvd.
Fontana CA 92335
GARANTIA
1-800-328-7363
(8:00am ~ 4:30pm PST)
www.babytrend.com
Read all instructions BEFORE assembly and USE of product.
KEEP INSTRUCTIONS FOR FUTURE USE.
Lea todas las instrucciones ANTES de armar y USAR el producto.
CONSERVE LAS INSTRUCCIONES PARA USO FUTURO.
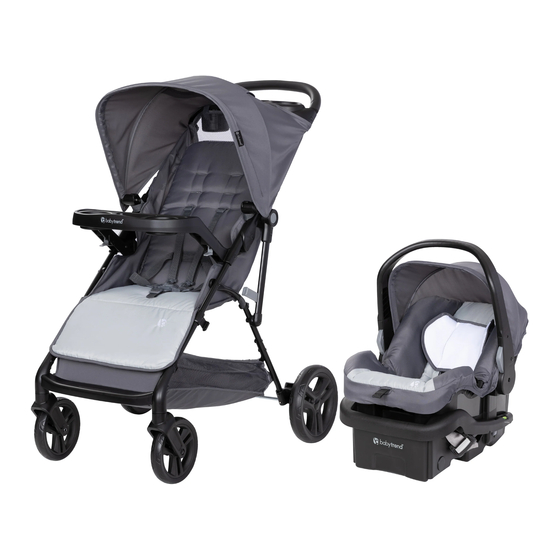
Venture 4-Wheel Stroller Travel System
TS16XXXA
Instruction Manual
Manual de Instrucciones
with EZ-Lift
™
infant car
seat
TS16XXXA_052924
Advertisement

Related Manuals for BABYTREND Venture 4


Summary of Contents for BABYTREND Venture 4
- Page 1 Customer Service Department can be contacted at 1 (800) 328-7363 Monday through Friday between 8:00 a.m. and 4:30 p.m. (PST). Return Authorizations are required prior to returning product(s) to Baby Trend®. Please visit http://babytrend.com/pages/limited-warranty Venture 4-Wheel Stroller Travel System for complete warranty details.
- Page 2 PARTS PIEZAS PARTS PIEZAS Check that you have all the parts for this model before assembling the stroller. Verifique que tenga todas las piezas para este modelo antes de montar el carrito. Parent Tray Rear Axle parts (2) caps and spare parts Bandeja de los padres Partes del eje trasero (2) tapas y piezas de repuesto Stroller and Canopy...
- Page 3 WARNING WARNING WARNING: • CAUTION: This single stroller is designed for one child only. Please follow all of Use with more than one child may cause the unbalance these instructions to ensure the safety condition which can injure/ harm your child. of your child.
- Page 4 ADVERTENCIA ADVERTENCIA ADVERTENCIA: • PRECAUCIÓN: Este carrito está diseñado para un niño solamente. Por favor, El uso con más de un niño podría provocar inestabilidad y lesionar siga todas estas instrucciones para o dañar a su hijo. garantizar la seguridad de su hijo •...
- Page 5 ASSEMBLY ENSAMBLAR ASSEMBLY ENSAMBLAR IMPORTANT ! SET UP THE STROLLER FRAME To ensure safe operation of your CONSTRUIR EL BASTIDOR DEL CARRITO product, please follow these instructions carefully. Please keep these instructions for future reference. NOTE: Please remove the IMPORTANT ! "remove and discard"...
- Page 6 ASSEMBLY ENSAMBLAR ASSEMBLY ENSAMBLAR • Get the axel bar through the Update to Rear Axle and Rear Axle rear wheel and insert the Assembly second washer (Fig. 2c). This update replaces page 9 in the manual. • Place the pin horizontally into the NOTE: Please remove rear axle parts hole of the axle bar and then rotate package from rear axle...
- Page 7 1-800-328-7363, de lunes a viernes, en el horario de 8:00 a.m. a 4:30 p.m., Hora Estándar del Pacífico. www.babytrend.com/contact-us Copyright © 2024, Baby Trend Inc., All Rights Reserved. Todos los derechos reservados. Tous droits réservés.
- Page 8 ASSEMBLY ENSAMBLAR ASSEMBLY ENSAMBLAR PARENT TRAY REAR CANOPY ATTACHMENT TO PARENT TRAY ACCESORIO DE LA CUBIERTA TRASERA PARA LA BANDEJA PARA PADRES BANDEJA PARA PADRES Arch / Arco WARNING: • Face the tray with the prominent Do not place hot liquids or more arch side towards the canopy.
- Page 9 ASSEMBLY ENSAMBLAR ASSEMBLY ENSAMBLAR To Insert Parent Tray: Face the parent tray towards the canopy. • Oriente la bandeja con el lado del arco prominente hacia el dosel. • Ubique las tres correas de la capota y las correas del asiento (Fig. 3a). Align the parent tray tabs to the outer tabs on both sides of the •...
- Page 10 ASSEMBLY ENSAMBLAR ASSEMBLY ENSAMBLAR CHILD TRAY Parent tray removal: Locate • the parent tray tabs on the outer BANDEJA PARA NIÑOS frame. Pull both sides of tray to lift WARNING: up the tray from the housing (Fig. The child’s tray is not a restraint 4c).
- Page 11 ASSEMBLY ENSAMBLAR ASSEMBLY ENSAMBLAR To attach the child tray: Push the • STORAGE BASKET tray downward into the connectors CESTA DE ALMACENAMIENTO (Fig. 5a). Check that the tray is securely latched in place. Check Straps: Ensure that all straps with snap closures are attached •...
- Page 12 SAFETY SEGURIDAD SAFETY SEGURIDAD REAR BRAKES SECURE THE CHILD FRENOS TRASEROS PARA SUJETAR AL NIÑO WARNING: WARNING: Always set brakes when the Avoid serious injury from falling or stroller is not being pushed so that the stroller will not sliding out. Always use the safety harness. roll away.
- Page 13 SAFETY SEGURIDAD SAFETY SEGURIDAD • To adjust harness height unhook the shoulder strap from the crotch buckle. Feed the shoulder strap through the harness spread slots (Fig. 8b). You can access these slots from the rear of the seat underneath the fabric. Feed shoulder strap Center Clasp •...
- Page 14 ASSEMBLY ENSAMBLAR INFANT CAR SEAT / SILLITA PARA EL AUTOMÓVIL THE INFANT CAR SEAT SEATBACK POSITIONING LA SILLITA PARA EL AUTOMÓVIL POSICIONES DEL RESPALDO WARNING: Avoid serious injury from falling • To recline seat, pinch the backrest adjustment buckle while loosening or sliding out, always use the Infant Car Seat harness.
- Page 15 INFANT CAR SEAT / SILLITA PARA EL AUTOMÓVIL INFANT CAR SEAT / SILLITA PARA EL AUTOMÓVIL Removing the car seat: CS01 EZ-Lift, CS02 EZ-Lift PLUS and CS03 EZ-Lift PRO Infant Car Seats Retirada de la silla de auto: Car seats module connection Conexión de sillita para el automóvil •...
- Page 16 FOLD PLEGAR INFANT CAR SEAT / SILLITA PARA EL AUTOMÓVIL TO FOLD STROLLER TO FOLD STROLLER PARA PLEGAR EL CARRITO ASIENTOS DE COCHE COMPATIBLES • Push both fold buttons located WARNING: Care must be taken when folding on each shoulder of the stroller simultaneously (Fig.
- Page 17 MAINTENANCE MANTENIMIENTO FOLD PLEGAR MAINTENANCE MANTENIMIENTO TO UNFOLD STROLLER FRONT AND REAR WHEEL RELEASE PARA DESPLEGAR EL CARRITO LIBERACIÓN DE LAS RUEDAS LIBÉRER DES ROUES CAUTION: • If replacing the front wheel: Locate Do not allow children near the release pin located behind the stroller while unfolding.
- Page 18 MAINTENANCE MANTENIMIENTO MAINTENANCE MANTENIMIENTO ENTRETIEN MAINTENANCE MANTENIMIENTO opposite side of rear axle • If replacing the rear wheel: Flip stroller over to expose release lado opuesto del eje trasero pin behind the rear axel, press the release pin and pull the wheel out (Fig.
Need help?
Do you have a question about the Venture 4 and is the answer not in the manual?
Questions and answers