Advertisement
Quick Links
Advertisement

Related Manuals for SEPLOS Smart BMS 8S-16S 50A


Summary of Contents for SEPLOS Smart BMS 8S-16S 50A
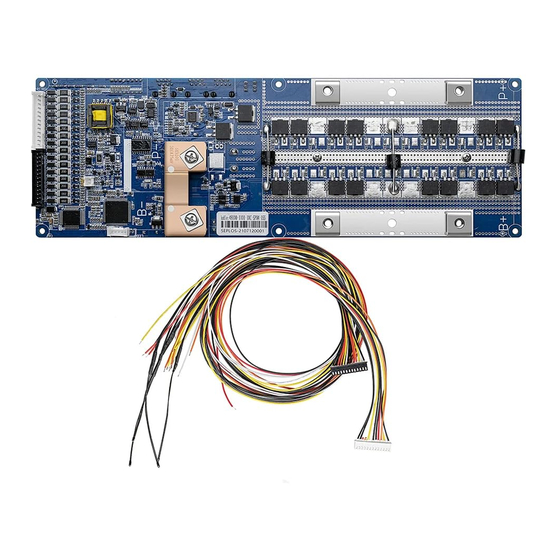
- Page 1 Shenzhen Seplos Technology Co., Ltd User Manual SEPLOS Smart BMS 8S-16S 50A 100A 150A 200A...
- Page 2 BatteryMonitor Installation Guide www.seplos.com Battery Connection - RS485 to USB adapter 1. SEPLOS USB-RS485 adapter, just connect BMS with battery via SEPLOS USB-RS485 adapter. 2. If the adapter needs wiring, connect the RJ45 cables according to the following wire diagram.
- Page 3 BatteryMonitor Installation Guide www.seplos.com Software Download and Installation 1. Download the newest version of SEPLOS ‘BatteryMonitor’ software installation package with the link blow. https://drive.google.com/drive/folders/10pxgNLHovcDZRVGrCZsSkfecBrRw-AdW?usp=sharing 2. To run the ‘BatteryMonitor’ application, make sure the computer has installed ‘NET Framework 4.0’ and above. Download the ‘NET Framework’...
- Page 4 BatteryMonitor Installation Guide www.seplos.com NET Framework official website: Google Drive site shared by SEPLOS: https://drive.google.com/drive/folders/10pxgNLHovcDZRVGrCZsSkfecBrRw-AdW?usp=sharing Click the link > Click ‘02 Drive’ > Download the ‘BatteryMonitor Software Drive’ 3. Double click ‘NET Framework’ to install drive first. And wait for the progress bar to fill up.
- Page 5 BatteryMonitor Installation Guide www.seplos.com 4. Unzip and extract the compressed file. Note: Some USB to RJ45 adapters need drive, please make sure you’ve install the corresponding drive before formally run the BatteryMonitor application. Run the software 5. Open ‘BatteryMonitor’ folder. And double click ’BatteryMonitor.exe’...
- Page 6 BatteryMonitor Installation Guide www.seplos.com 6. If a prompt dialogue box pops up, and indicates ’No agreement was found, please load agreement’ like the following picture showed, please click ‘OK’. 7. Then choose the ‘16S_V20_ADDR_EN.XML’ agreement (An example of 48v 100A 16S BMS for LiFePO4 battery.) within the ‘BatteryMonitor’...
- Page 7 BatteryMonitor Installation Guide www.seplos.com 8. After the prompt dialogue pops up. Click ‘OK’. And the software will be restarted automatically (Restart time about 10 seconds). Note: If a incompatible agreement was loaded, please re-choose the agreement according to your BMS models.
- Page 8 BatteryMonitor Installation Guide www.seplos.com 10. Before connect with battery system. Make sure the ‘Decimal symbol’, ‘No. of digits after decimal’ and ‘digits grouping symbol’ as follows. Control panel > Time & Language > Additional data, time & regional settings > Region >...
- Page 9 BatteryMonitor Installation Guide www.seplos.com 11. Choose the port number, which is different for different computer devices. Check the ports in ‘Device Manager’. 12. Baud rate is 19200. And click ‘Connect’. Computer Manager > Device Manager > Ports 13. Different adapters may need different drive. (Some computers will install drive automatically when the adapter is plugged in.) If there isn’t...
- Page 10 BatteryMonitor Installation Guide www.seplos.com 14. When successfully connected with the battery, the battery information can be read and displayed on the software interface. 15. If BMS fail to connect with battery, a prompt dialogue box will pop up indicating the connection time out. Please check the port number and...
- Page 11 BatteryMonitor Installation Guide www.seplos.com 16. To manage the parameters, we need to login as administrator. (Administrator account: admin; Password: admin) 17. After login successfully, choose the menu ‘upload parameter’. Then double click the parameters that need to modify. And click ‘set all’ to...
- Page 12 BatteryMonitor Installation Guide www.seplos.com 18. The ‘upload menu’ could also manage the ON/OFF of functions. Double click to choose the switch status. And click ‘set all’ to save the change. 19. Click ‘communication log’ menu. The communication information of warning status can be checked.
- Page 13 BatteryMonitor Installation Guide www.seplos.com 20. Click ‘Real time’, and its background color will turn yellow. BMS will record the battery information in real-time (Every seconds). 21. And the record data can be read and saved though the ‘Real time record’ menu. Click ‘Real time’ again, real-time recording will stop...
- Page 14 22. Click the ‘History record’. All the historical data can be read and saved. 23. Current Calibration and Voltage Calibration is for quality control during manufacturing. (Do not click unless being permitted, or the BMS will be damaged, and SEPLOS will not responsible for the damage.) 电流校准和电压校准用于出厂质检,只有专业设备才能使用。 (未 经允许请勿点击,否则会损坏 BMS,SEPLOS 对因此造车的损坏不承 担任何责任。)...
- Page 15 BatteryMonitor Installation Guide www.seplos.com 24. Click ‘Calibrate’ - ‘Get time’ to get BMS time. If the date and time is not accurate, click ‘Set time’ to updating. (Make sure the computer date and time correctly before operating.) 25. When multiple packs in parallel, make sure the DIP address is correctly set.
- Page 16 BatteryMonitor Installation Guide www.seplos.com 26. And choose the corresponding packs before clicking ‘connect’. Or the connection will resulted in time out. 27. Then the ‘BatteryMonitor’ installed successfully. All the cell voltage, curent, status and historical record can be monitored in real-time.
Need help?
Do you have a question about the Smart BMS 8S-16S 50A and is the answer not in the manual?
Questions and answers