Table of Contents
Advertisement
Quick Links
Advertisement
Table of Contents

Related Manuals for LePRESSO LECMBGBK


Summary of Contents for LePRESSO LECMBGBK
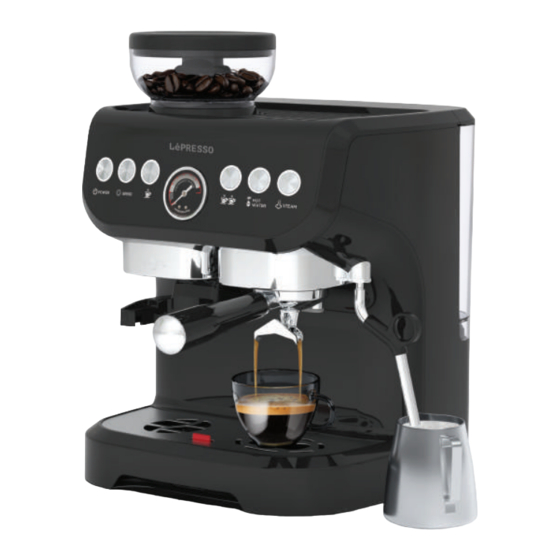
- Page 1 Espresso Coffee Maker with Bean Grinder-SKU:LECMBGBK...
-
Page 2: Precautions For Safe Use
Precautions for Safe Use Please ensure to read this manual thoroughly before operating the appliance and heed the following safety precautions: *To prevent electric shock, never handle the power cord or the appliance with wet hands. Do not disconnect the power by pulling on the cord. *To avoid burns, refrain from moving the appliance or touching its hot components, such as the water boiling elements or the water outlet, during operation. - Page 3 *The appliance is not a toy and should not be used or played with by children. *Do not operate the appliance if the plug, cord, or the machine itself is damaged. Do not attempt to repair, disassemble, or modify the appliance yourself. Instead, send it to a service center for professional maintenance.
- Page 4 *It is critical to never pour hot water into the water tank. *Always turn off or unplug the appliance prior to cleaning. *The appliance is not designed for direct washing with water. *The appliance is not intended for outdoor use; protect it from elements such as direct sunlight and moisture.
-
Page 5: Unpacking Instructions
Unpacking Instructions 1. Carefully remove the espresso Capsule coffee machine from its packaging. 2. Upon removal, verify the inclusion of the following components: Water tank Coffee machine Instruction manual Important Note: *Ensure the voltage of your home power supply corresponds with the voltage specified on the machine's rating plate. -
Page 6: Component Description
Component Description A - Coffee Bean Container B - Coffee Granularity Adjustment C - Operational Control Interface D - Coffee Dispense Outlet E - Used Water Collection Tray F - Water Reservoir G - Steam Wand H - Coffee Brewing Handle I- Measuring Spoon for Coffee J - Scatter Prevention Ring for Coffee Powder... -
Page 7: Control Panel Description
Control Panel Description Function Description Name POWER Controls the power switch of the machine. Engages the grinder. Press again to stop the grinder. GRIND Starts brewing a single cup of coffee. Press again to stop brewing. Single cup Initiates brewing for two cups. Press again to cease brewing. Double cup Dispenses hot water. -
Page 8: Important Instructions
Important Instructions: For the double cup function, ensure that the machine starts brewing coffee upon pressing the button. To stop brewing and determine the quantity of coffee, press the button again. When using the hot water function, place a cup with a minimum capacity of 300ml under the steam pipe outlet. -
Page 9: Usage Method
Usage Method If the machine has not been used for an extended period or is being used for the first time, it requires cleaning. 1.1 Open the water tank lid. 1.2 Fill the tank with no more than 2 liters of purified water, ensuring the water is not warmer than 35°C. - Page 10 3 .Press the POWER button to switch on the machine. 4. Indicator Lights Guide Situation 1: Water Refill Required Indicator: The single and double cup lights blink red. Action: Press either the single or double cup button to fill the waterway; the lights will turn white once complete.
- Page 11 5. To flush the system: a. Place a cup (capacity over 150 ml) above the wastewater tray. b. Press either the single cup or double cup button. c. Wait for the machine to finish the flushing cycle. Coffee Bean Grinding Instructions 1.
- Page 12 2. Operating the Control Keys Control Key 1 (GRIND): Press to initiate grinding; press again to halt grinding. Control Key 2: Use the brewing cup lever to start the bean grinding process; press Control Key 2 again to cease grinding. Control Key 1 Control Key 2 3.
- Page 13 4. Adjusting the Grind Press the GRIND button to commence grinding. Adjust the grind setting wheel to obtain the desired coarseness or fineness of coffee powder. Coarse 5. Grinding Methods Method 1: Press to begin grinding; continue until you achieve the required amount of coffee powder, then press again to stop.
- Page 14 Attention: The grinder will automatically shut off after 13 seconds if no further action is taken. You can interrupt grinding by using both the brewing cup lever and the GRIND button Reminder If the grinder operates for more than 4 minutes (approximately 6-7 times), causing it to overheat (indicated by the red light flashing), the machine will stop to prevent damage.
- Page 15 2. Grinding Position the portafilter with the anti-flying powder ring Production of coffee bean flour. under the grinder outlet to fill with coffee bean flour. 3. Removal After grinding, remove the anti-flying powder ring from Take out the anti flying powder ring. the portafilter.
-
Page 16: Making Coffee
Making Coffee 1. Bean Loading Load no more than 150g of coffee beans into the bean hopper. 2. Grind Adjustment Adjust the grinder to your preferred grind size, from fine to coarse. Coarse 3. Grinding Methods Method 1: Press the GRIND button [logo] to start and stop grinding to achieve the desired amount of coffee powder. - Page 17 Method 2: Engage the brewing cup lever to start and stop grinding, to reach the desired coffee powder volume. Attention: The grinder will cease operation automatically if inactive for 13 seconds post-GRIND button engagement. To halt grinding, you can either push the brewing cup lever forward again or press the GRIND button.
- Page 18 5. Portafilter Transfer Secure the portafilter in the brewing head. 6. Brewing Process Position a cup with a capacity of over 150ml on the drip tray, beneath the portafilter. Initiate brewing by pressing the desired coffee button (single or double). Ensure the water tank contains more than 150ml of water.
- Page 19 Hot Water Production 1. Positioning the Cup Place your cup under the steam wand. 2. Activating Hot Water Press the hot water button to start dispensing hot water. 3. Completing Hot Water Dispense Once the desired amount of hot water is dispensed, press the hot water button again to stop.
- Page 20 Ensure the water tank has at least 150 ml of purified water before starting. Production of Milk Foam 1. Initial Preparation: Pour a minimum of 50ml of fresh milk into the pitcher. Ensure that the milk is positioned below the steam wand. 2.
- Page 21 3. Positioning the Steam Wand: Insert the steam wand into the milk so that it is 1-2 cm below the surface. Position it near the side of the pitcher, ideally at the three o'clock position, and wait for steam production to initiate. 4.1 Creating the Vortex: With the steam wand inserted, the milk should begin to rotate in a clockwise direction, forming a vortex.
-
Page 22: Energy Saving Mode
Note: Before removing the steam wand from the milk, cease the steam to avoid excess foam production. 5. Cleaning the Steam Wand: Immediately after use, clean the steam wand thoroughly with a damp towel to remove any milk residue. Caution: Do not touch the steam wand with bare hands when it is hot to prevent burns. Energy-Saving Mode 1. - Page 23 2. Restarting from Energy-Saving Mode: To reactivate the machine from energy-saving mode, press the POWER button. >15 minutes Energy-Saving Mode Setting To enable energy-saving mode, simultaneously press and hold the GRIND and buttons, then connect the machine to the power supply. The indicator light on the GRIND button will turn off, signaling that energy-saving mode is activated.
-
Page 24: Descaling Mode
Descaling Mode Cautions: Regular use of the coffee machine can lead to scale buildup in the internal water system, which may result in decreased coffee output or blockages. In such instances, it is necessary to initiate the descaling mode for maintenance. Descaling Mode Function: 1. -
Page 25: Pre Brewing Function
Pre Brewing Function Pre Brewing Mode Setting: 1. To activate the pre-brewing mode, simultaneously press and hold the grind and [Logo] buttons until the machine is plugged in and powered on. 2. Release the buttons. If the power light turns off [Logo], the pre-brewing mode is deactivated. To begin pre-brewing, ensure the power light [Logo] is on. - Page 26 Single Cup Quantity Function Setting: 1. Place a cup under the coffee outlet. 2. In standby mode, press and hold the single cup button. The machine will begin brewing. Release the button once the desired amount of coffee (minimum 25ml) is dispensed. Double Cup Quantity Function Setting: 1.
-
Page 27: Restore Factory Settings
Grind Time Quantity Setting: In standby mode, press and hold the grind button until the desired grind time is reached (minimum 9 seconds, maximum 20 seconds), then release. Restore Factory Settings 1. Reset to Default: To revert to the original factory settings, press and hold the steam button. - Page 28 Cleaning Cautions: *It is strictly forbidden to submerge the coffee machine in water. *Always disconnect the power cord before commencing any cleaning procedures. *Avoid the use of harsh detergents, abrasive materials, or sharp objects when cleaning the coffee maker. Whole machine cleaning Steam rod cleaning Parts Cleaning...
- Page 29 Bean Box Cleaning Steps 1. Unlocking: Disengage the bean hopper. 2. Removal: Detach the bean hopper from the machine. 3. Emptying: Dispose of any leftover coffee beans from the hopper. 4. Grinder Access: Rotate the grinder mechanism counterclockwise and lift to remove.
- Page 30 5. Grinder Cleaning: Utilize a brush to purge coffee grounds from the grinder. 6. Bean Hopper Cleaning: Use a brush to clear away any residues from the bean hopper. 7. Dispensing Channel Cleaning: Employ a brush to clean the coffee dispensing outlet. 8.
- Page 31 Powder Plugging Treatment *The coffee powder outlet may become blocked due to variations in coffee beans, inadequate drying, or incorrect usage. *Clear the powder outlet channel using the appropriate tools provided. Powder outlet channel with tools Cautions Do not pour water directly Be mindful of the onto the machine to avoid high temperature of the...
- Page 32 Solution for Water Pumping Failure Cautions *Use caution when starting a new machine for the first time or if the machine has not been used for an extended period. *Ensure the water reservoir has sufficient water during operation. If the machine fails to pump out water, refer to the following two solutions. Method 1 Method 2 1.
-
Page 33: Frequently Asked Questions
Frequently Asked Questions Fault Phenomenon Potential Causes Solutions 1. Ensure the machine is plugged in. 1. No power connection. 2. Press the power button. Indicator Light Off 2. The power button hasn’t been 3. Verify the power source compatibility. If issues pressed. - Page 34 LECMBGBK Rated Voltage AC 220V–240V Rated Frequency 50/60Hz Coffee Machine Power 1450W Coffee Grinding Power 110W Contact Us If you have any questions or concerns about our Shipping and Returns Policy, please contact us at info@lepresso.com Website: lepresso.com Instagram: lepresso_official...
Need help?
Do you have a question about the LECMBGBK and is the answer not in the manual?
Questions and answers