Advertisement
Advertisement
Table of Contents

Related Manuals for LePRESSO LPECMLDBK


Summary of Contents for LePRESSO LPECMLDBK
- Page 1 Lepresso Espresso Coffee Maker With Bean Grinder and LCD Display...
-
Page 2: Precautions For Safe Use
Introduction We appreciate you choosing our coffee maker. To ensure optimal use and maintenance of this product, we have meticulously crafted this manual for your benefit. Please review this manual thoroughly before operating the device and retain it for future reference. This manual pertains exclusively to our "LPECMLD"... - Page 3 wet hands to avoid electric shock. Do not remove the power cord from the socket by pulling on the cord itself. 2. Burn Prevention: Do not move or touch the machine while it is in use, especially the hot parts such as the water boiling components or water outlet during operation. 3.
- Page 4 10. Placement: Operate the machine on a stable, heat-resistant surface. Avoid humid, dusty environments, and keep it away from open flames and water to prevent accidents. 11. Operational Awareness: If the machine malfunctions, stop using it immediately. Do not cover the appliance or obstruct any vents while it is operating. Also, be cautious of water vapor to prevent burns.
-
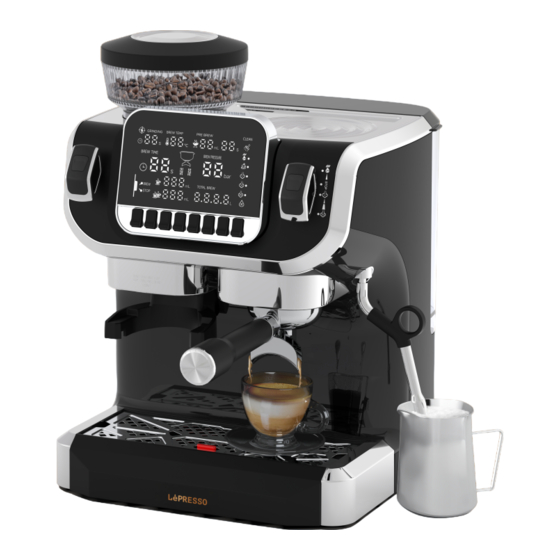
Page 5: Parts Descriptions
20. If the power cord or other components are damaged or malfunctioning, do not use the machine. Instead, consult a professional for testing, maintenance, and potential replacement. Parts Descriptions A. Coffee bean box B. Coffee powder adjustment knob C. Control panel D. -
Page 6: Description Of Control Panel
Description of Control Panel Adjusts and displays operating parameters for Display each function. Shows current status of various "+" Key Increases values within the menu settings. Screen functions. Initiates the brewing process when toggled and Coffee ceases brewing when returned to the original Brewing I: "–"... -
Page 7: How To Use
How to Use 2. Power Connection: Connect the machine to a power source. ensure proper functioning of your coffee maker, especially if it's new or hasn't been used in a while, it's essential to perform an initial rinse: 4. State 1: Water Shortage 1. - Page 8 Coffee Bean Grinding 4. State 2: Preheating Indicator: The preheating process is Preparation before putting coffee beans indicated by the flashing of five lights. 1. Securing the Bean Box: *Ensure the bean box is locked prior to adding coffee beans to prevent any malfunctions.
- Page 9 5. Grinding Methods: cup handle to start grinding and Method 1: Press the grinding press the control button again button and continue until the to stop. desired coffee powder quantity is achieved, then press again to stop. Method 2: Engage the handle to 3.
- Page 10 Coffee Making Process after 13 seconds if not manually stopped. To stop grinding sooner, push down the brewing handle 1. Bean Preparation: and press the grinding button Fill the bean box with no more than 150 grams of coffee beans. again.
-
Page 11: Preparation Of Hot Water
6.2 Brewing: 3. Completing Hot Water Dispense: Press the button for the desired *Once the desired amount of hot coffee volume (single or double) water is dispensed, return the lever and wait until the brewing cycle to its original position to cease is complete. - Page 12 Preparation of Milk Foam 4.Creating Milk Vortex: When steaming milk, insert the steam 1. Milk Pouring: wand into the milk and create a swirling Fill the cup with at least 50mL of vortex by gently stirring the milk. Keep the fresh milk to cover the bottom, steam wand at or just below the surface ensuring the steam nozzle can...
-
Page 13: Descaling Mode
purified water and add the Descaling Mode recommended amount of descaling agent. 3. Descaling Activation: Press Cautions: and hold both the single Regular descaling is necessary double cup buttons for due to mineral buildup from 3 seconds to initiate the long-term use, which can lead descaling mode. -
Page 14: Restore Factory Settings
Restore Factory Settings Cleaning Cautions: To revert the coffee maker to its original settings: In standby mode, simultaneously *Never submerge the coffee press the buttons. The maker in water. display screen will flash *Disconnect the power cord twice, indicating the restoration before commencing any cleaning of factory settings. - Page 15 Bean Box Cleaning 1. Ensure the bean box is 4. Rotate the grinder' s locking 2. Remove the bean box 3. Dispose of any remaining unlocked before attempting mechanism counterclockwise from the machine. coffee beans. to clean. and lift to remove. 5.
- Page 16 Cautions Solution for Water Pumping Failure Avoid pouring water directly If your new machine or one that onto the coffee machine. hasn't been used for a while is having trouble pumping water, there are two methods to resolve this: Method 1: Place a cup under the steam pipe.
- Page 17 Whole Machine: Gently wipe down the machine's exterior with a soft, damp cloth. Parts Cleaning: Remove and clean detachable parts such as the drip tray and brewing cup under running water. Steam Rod: After use, purge and wipe the steam rod to remove any milk residue.
- Page 18 Contact Us If you have any questions or concerns about our Shipping and Returns Policy, please contact us at info@lepresso.com Website: lepresso.com Instagram: lepresso_official...
Need help?
Do you have a question about the LPECMLDBK and is the answer not in the manual?
Questions and answers