Table of Contents
Advertisement
Advertisement
Table of Contents

Subscribe to Our Youtube Channel
Related Manuals for neakasa M1


Summary of Contents for neakasa M1
- Page 1 Neakasa M1 Automatic Litter Box User Manual EN / JP...
-
Page 3: Table Of Contents
Content • Safety Instructions • Package Contents • Parts Name • Get Started 04-11 • Specifications • Warranty and After-Sales Service 目次 • 安全上のご注意 • 内容物 • 部品リスト • 使い始める 17-24 • 製品仕様 • 保証... -
Page 4: Safety Instructions
Safety Instructions · Place the product in a stable, indoor, cool, and dry location, avoiding exposure to direct sunlight to prevent component aging. · Keep out of reach of children. Children and those with disabilities should use the product under adult supervision. ·... -
Page 5: Package Contents
Package Contents Main Unit Litter Trapping Mat Support Legs x4 Power Adapter Trash Bags (10 pieces/roll) x2 User Manual Quick Guide... -
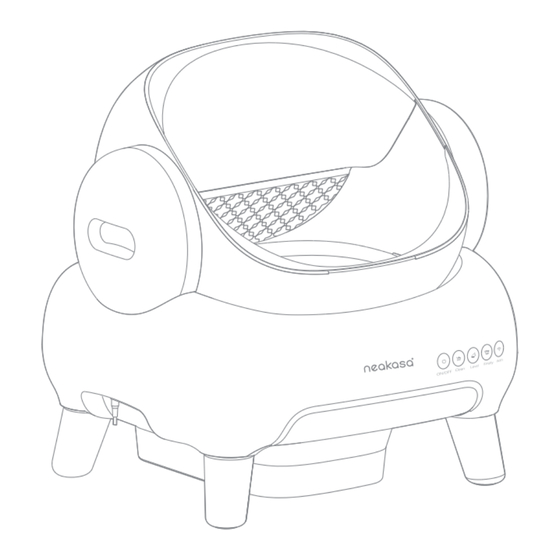
Page 6: Parts Name
Parts Name Litter Chamber Fixed Cover - Right Litter Chamber Fixed Cover - Left Litter Chamber Fixed Cover Lock Catchet Main Unit Buttons Power Connector Support Legs ON/OFF Clean Level Empty WIFI Waste Bin Pull out the drawer Trash Bag Drawstring Fixing Slot ,Siclicone Slot... -
Page 7: Get Started
Get Started 1. Turn the cardboard tray upside down, place the machine on the tray, and insert the four legs into the round holes at the bottom in the outward direction. Then, flip it over. · Do not forcefully rotate the litter chamber; the machine will automatically return to its original position after powering on. - Page 8 Get Started 2. Pull out the drawer, press down on the bottom to unfold the collapsible waste bin, tear off a trash bag, unfold it, and fit it onto the waste bin following the diagram. Thread one end of the strap through the buckle slot to secure the bag in place. Place the waste bin into the bottom of the machine.
- Page 9 Get Started 3. Move the machine to the desired location (it is recommended to hold the bottom of the machine body). Plug in the power adapter. · Please place the machine on a flat surface, preferably in the same location or nearby where the previous cat litter box was positioned. Avoid placing it outdoors.
- Page 10 Get Started 4. Add cat litter up to the indicated line, ensuring it does not fall below the minimum line or exceed the maximum line. We recommend using high clumping bentonite cat litter. If using tofu cat litter, set the automatic cleaning time to more than 10 minutes to ensure proper clumping.
- Page 11 Get Started 6. Scan the QR code to download the Neakasa app. Long-press the WIFI button for 3 seconds and wait for the WIFI indicator light to flash white.In the Neakasa app, select "Add" and choose the cat litter box. Proceed to the pairing page, then select your home WIFI and input the password.Wait for the prompt on the screen, and once the connection is successful, follow the system's instructions to set a name and...
- Page 12 Cat Litter Level Calibration · The innovative design of the M1 litter box allows us to measure the remaining cat litter in the litter compartment. Please ensure there are no objects placed on the litter box to avoid inaccurate weight measurement.
- Page 13 Get Started Button Function Description Basic Functions Interrupt Indicator Lights Long press for 3 seconds to Powered on: Steady white light; turn on or off Powered off: Not lit ON/OFF Button Normal state: Not lit; Cleaning in Press once to start a During the cleaning, progress: Green light breathing;...
- Page 14 Get Started Indicator Light for Malfunctions Light Positions Indicator Lights for Malfunctions (sorted by severity, red blinking > steady red > yellow blinking > steady yellow) Red blinking: Weight sensor overloaded. Steady red: Left/right litter chamber fixed cover not installed. ON/OFF Red blinking: Chamber door motor blocked Steady red: Litter chamber motor blocked...
-
Page 15: Specifications
Specifications Product Model PS0120 Rated Power Rated Voltage Litter Chamber Capacity 7.2L Waste Bin Capacity Litter Chamber Entrance Height 35cm or 13.8 inch Operating Noise Level 50dB... -
Page 16: Warranty And After-Sales Service
Consumables and accessories that come with the product. 5. If the product is repaired under warranty, the shipping cost will be covered by Neakasa, but the cost of packaging materials will not be included. 6. If the product is not covered by the warranty, the customer will be responsible for shipping and repair costs when returning it for repair. -
Page 17: 安全上のご注意
安全上のご注意 · 本機は屋内の涼しく乾燥した場所に置いてください。 強い日差しの当たる場所での保管は避けてください。 · 幼児に取り扱わせたり、触らせたり、近づかせたり、登らせたりしないでください。また、幼児や知的障害者は保護 者の管理のもと使用してください。 · 機器ボディの拭き取りにはガソリンなどの有機溶液を使用せず、また製品全体を水洗いしたり水に浸したりすること はしないでください。 · 節電のため、長時間使用しないときは電源を切り、機械内の残砂を排出してください。 · 昇圧トランスを主電源プラグに接続しないでください。 · 水がかかる場所での使用は禁止します。 · 使用前に本機を設置し、固定してください。 製品は常に清潔で水平な硬い表面に置いてください。 · 電源を切るときは、電源コードが抜けないように直接引っ張らないでください。 · 引火性物質や揮発性物質を機械に近づけないでください。 · 輸送や積み下ろしの際には、製品や付属品の衝突や傷を防ぐため、静かに運んだり置いたりする必要があります。 · 本機の屋外設置は禁止されています。 温度4~40℃、相対湿度90%以下、周囲に腐食性ガスのない、換気された乾燥 した環境に設置してください。 · 猫砂はベントナイト製を推奨します。機器が長時間使用されていないときは、猫のフンやトイレトレーを空にしてく ださい。 · 電源プラグは清潔に保ち、濡れた手でプラグを抜き差ししないでください。 · ローターが回転しているとき、機械全体にわずかな振動と騒音が生じますが、これは正常な現象です。 · 濡れた場所やほこりの多い場所では、回路が破損する恐れがあります。 · 強い磁気を帯びた機器が近くにあると、火災や製品の損傷、回路の故障の原因となることがあります。 ·... -
Page 18: 内容物
内容物 本体 メッシュプレート 脚部パーツx4 説明書 ごみ袋(10枚ロールx2) 電源アダプター クイックマニュアル... -
Page 19: 部品リスト
部品リスト ドーム固定カバー(右) ドーム固定カバ ー(左) 排泄室 ドームカバーラッチ 本体 ボタン 電源接続ポート 脚部パーツ 電源オン/オフ 掃除 砂を均す 砂を排出 WIFI ゴミ箱 引き出しを開ける ゴミ袋のひもを所定の位置にはめ込み、シリコンも所定 の位置にはめ込みます。... -
Page 20: 使い始める
使い始める 1. 包装紙トレーを逆さまにし、本機をトレーの上に逆さまに置き、4本の脚パーツを底部の丸い穴にフレアの方向に差し込み、本機をひっくり 返します。 · ドームを強制的に回転させないでください、本機は電源入れた後自動的にリセットされます。... - Page 21 使い始める 2. 引き出しを引いて、底を押して折りたたんだゴミ箱を広げ、ゴミ袋をちぎって広げ、図のようにゴミ箱に取り付け、一方の端のストラップを カラビナビットに通します。 · ゴミ箱をマシンの底に置きます。...
- Page 22 使い始める 3. - 本機を置きたい位置に移動し(ボディの底に沿わせることをお勧めします)、それから電源コネクターを差し込みます。 · ﹙水平な場所、できれば元猫用トイレの場所か隣に置いてください。 室外に置かないでください)電源が入ると、本機はごみ箱の位置検出を 行い、自動的に初期位置に向きを変えます。)...
- Page 23 使い始める 4. 猫砂を目盛り線まで入れ、最低線を下回らず、最高線を超えないでください。 凝集性の良いベントナイトの猫砂を推奨し、豆腐の猫砂を使 用する場合は、凝集性を確保するために自動洗浄時間を10分以上に設定してください、大きな粒子[粒子が8mm(直径)x18mm(長さ)以上]の猫砂 を使用することはできません。または猫砂の大量の浪費につながる可能性があります。 100% 5. 猫砂を注いだ後にLEVELボタンを押して砂を平らにすることができます。または本機が自動に砂を平らにするまで数分待ってください。...
- Page 24 使い始める 6. QRコードをスキャンし、neakasaアプリをダウンロードします。WIFIボタンを3秒押し、インジケーターが白く点滅するまで待ちます。ア プリで「追加」を選択し、猫用自動トイレを選択し、ペアリングをします。WIFIとパスワードを入力し、接続します。接続後画面に従い、名 前と猫砂の量を設定します。 我的设备 选择设备 扫地机 添加设备 Neakasa 猫砂盆 网络重置 链接网络 连接成功 连接成功 Home wifi 空闲中 觅觅的WC 12345678 充足 正常 开始清理 下一步 下一步 开始体验 7. 標準設定は猫は排泄後10分で自動的に掃除され、隔月ごとに製品本体の清掃通知が届きます。 ・システム設定にて変更することが可能です。...
- Page 25 Cat Litter Level Calibration · The innovative design of the M1 litter box allows us to measure the remaining cat litter in the litter compartment. Please ensure there are no objects placed on the litter box to avoid inaccurate weight measurement.
- Page 26 使い始める Button Function Description Basic Functions Interrupt Indicator Lights Long press for 3 seconds to Powered on: Steady white light; turn on or off Powered off: Not lit ON/OFF Button Normal state: Not lit; Cleaning in Press once to start a During the cleaning, progress: Green light breathing;...
- Page 27 使い始める Indicator Light for Malfunctions 故障ランプ表示 ボタン 故障の深刻度順に、 赤点滅>赤常時点灯>黄灯点滅>黄灯常時点灯 赤ランプ点滅:ロードセルが過負荷状態 赤ランプ常時点灯:左右のドーム固定カバー未装着 オン / オフ 赤ランプ点滅:ドームドアのモーターが詰まって回転しない 赤ランプ常時点灯:ドームのモーターが固着して回転しない オン / オフ 黄ランプ点滅:猫が掃除を中断、 解除すると消える 故障表示灯 赤ランプ点滅:猫砂の量が不足している ロードセルエラー:5 つ 赤ランプ常時点灯:ゴミ箱が所定の位置にない のランプが赤色に点滅 黄色ランプ点滅:猫が砂を均すことを中断する 黄ランプ常時点灯:砂が多すぎる レベル 赤ランプ点滅:ゴミ箱が満杯 赤ランプ常時点灯:ゴミ箱が所定の位置にない エンプティ ネットワークが切断:オレンジ色のランプが常に点灯 WIFI...
-
Page 28: 製品仕様
製品仕様 製品型番 PS0120 定格出力 定格電圧 ドーム容積 7.2L ゴミ箱容量 地面からドーム入れ口の高さ 35cm 動作音 50dB... - Page 29 4. 以下の場合は、 保証期間に関係なく修理を承りかねます。 ① 当社が取り引きする販売店以外で購入した商品 (個人販売やオークションなど) 。 ② お客様が商品を分解したり、 改造など ; ③ 消耗品および付属品。 5. 保証期間内の修理は、 当社が製品の送料を負担または返済しますが、 梱包材の費用はお客様のご負担となります。 6. 保証期間外の修理は、 製品の送料と修理料金がお客様に請求されます。 7. 交換した製品の保証期間は、 交換前の製品の保証期間が適用されます (交換前の製品の購入日から起算されます) 。 8. 修理または交換は、 特定の国 / 地域でのみ有効です。 9. ご質問がある場合、 または修理を必要とする場合はご購入元または support@neakasa.com にご連絡ください。 10. 本製品の規定は予告なしに変更される場合があり、 当社は必要に応じて保証内容を更新する権利を保留します。 全ての修理および要求は、 最新の 保証条件に従って処理されます。...
Need help?
Do you have a question about the M1 and is the answer not in the manual?
Questions and answers
I can not get the thing with the litter to come off the machine - very frustrasting.
To remove the litter container (waste bin) from the Neakasa M1 machine, pull out the drawer where the waste bin is located. This area is referred to as the "Waste Bin Pull out the drawer" in the parts list.
This answer is automatically generated
@Sue G Russell Что такое перегрев главного двигателя?
need to change language to english on m1
how to change language
Cannot get the litter doors to open & close
If the litter doors on the Neakasa M1 won't open or close, follow these steps:
1. Remove the litter chamber.
2. Check if there is any object stuck in the door or at the bottom of the machine.
3. If an object is found, clean it out.
4. If no obstruction is found and the issue continues, contact customer service.
Also, avoid applying force to the chamber door area to prevent deformation, which may hinder normal opening and closing.
This answer is automatically generated
猫砂が少なすぎるというメッセージがでて、較正ができないのですが、どうすれば良いですか? 電源を入れたまま耳などを外して、もとに戻す方法はやってみましたがダメでした。
Пишет " Перегрев главного двигателя ".. Лотку полгода, жесть!!!! Что это?
постоянно горит красная лампочка хотя лоток пустой и наполнитель в норме