Table of Contents
Advertisement
Quick Links
Advertisement
Table of Contents

Related Manuals for Olivetti d-ColorMF3302


Summary of Contents for Olivetti d-ColorMF3302
- Page 1 Quick Guide...
-
Page 3: Table Of Contents
Table of contents Safety information Introduction ............................. 1-3 Environmental information......................1-4 Safety information........................... 1-5 Regulation notices .......................... 1-9 Caution notations and labels ....................... 1-13 Special notice to user ........................1-14 Space requirements........................1-15 Operation precautions........................1-16 Legal restrictions on reproduction....................1-17 Before using this machine Environmental initiatives ........................ - Page 4 Registering a destination How to register a destination ......................8-3 Read this if you have a problem Main messages and remedies ....................... 9-3 9.1.1 Checking a notification message on the Touch Panel................9-3 9.1.2 Screen displayed at occurrence of paper jam ..................9-4 9.1.3 When an error message appears......................9-5 When the Touch Panel is not visible .....................
-
Page 5: Safety Information
Safety information... -
Page 7: Introduction
Introduction Safety information Introduction This [Quick Guide] uses illustrations to describe operating procedures for the most commonly used functions in an easy-to-understand way. Start by using this manual to become proficient with the useful functions that this machine offers. For details on the various functions, refer to the User’s Guides on the User’s Guide DVD included with this machine. -
Page 8: Environmental Information
Environmental information Environmental information Environmental benefits of power management Electricity consumption of a device depends on both its properties and the way of using the device. Suitable power management setting offers you resource saving usage way. By setting the time to go into power saving modes (e.g. -
Page 9: Safety Information
Safety information Safety information This section contains detailed instructions on the operation and maintenance of this machine. To achieve op- timum utility of this device, all operators should carefully read and follow the instructions in this manual. Please read the following section before connecting the machine to the supply. It contains important infor- mation related to user safety and preventing equipment problems. - Page 10 Safety information WARNING Do not use a multiple outlet adapter to connect any other appliances or machines. Use of a power outlet for more than the marked current value could result in a fire or electrical shock. Do not use an extension cord. Use of an extension cord could cause a fire or electric shock. If the power cord furnished with the product is not long enough to be plugged into a wall outlet, contact your Technical Representative.
- Page 11 Safety information CAUTION Whenever moving this product, be sure to disconnect the power cord and other cables. Failure to do this could damage the cord or cable, resulting in a fire, electrical shock, or breakdown. When moving this product, always hold it at the locations specified in the User’s Guide or other documents.
- Page 12 Safety information Consumables WARNING Do not throw toner or a container that contains toner (e.g., toner cartridge, developing unit and Waste Toner Box) into an open flame. The hot toner may scatter and cause burns or other damage. CAUTION Do not leave toner-related parts (e.g., toner cartridge, developing unit and Waste Toner Box) within easy reach of children.
-
Page 13: Regulation Notices
OLIVETTI branded model d-COLOR MF3302. CE Marking (Declaration of Conformity) for users of the European Union (EU) Hereby, Olivetti S.p.A. declares that the radio equipment models specified above are in compliance with Di- rective 2014/53/EU. The full text of the EU declaration of conformity is available at the following internet address: "https://www.olivetti.com/en/support/download-certificates/". - Page 14 Regulation notices Electromagnetic Interference This product must be used with a shielded interface cable. The use of non-shield cables is likely to result in interference with radio communications and is prohibited under CISPR and local rules. Laser safety This is a digital machine which operates using a laser. There is no possibility of danger from the laser provided the machine is operated according to the instructions in the manuals.
- Page 15 Regulation notices For European users 7WARNING Use of controls, adjustments or performance of procedures other than those specified in this manual may result in hazardous radiation exposure. This is a semiconductor laser. The maximum power of the laser diode is 25 mW and the wavelength is 770-800 nm.
- Page 16 Regulation notices USB host Connect USB devices (Memory, Authentication, Hub etc.) devices directly to the USB host. If an extension cable is used, electromagnetic interference could occur. Graphic symbols used on this machine These are some of major exemplary graphical symbols. Graphic Descriptions Graphic...
-
Page 17: Caution Notations And Labels
Caution notations and labels Caution notations and labels Safety precaution notations and labels appear on this machine at the following positions. Be very careful that an accident does not occur when operations such as removing paper jams and staple jams are performed. NOTICE Do not remove caution labels or notations. -
Page 18: Special Notice To User
Special notice to user Special notice to user For Europe The Facsimile has been confirmed to meet the standards (or requirements) ETSI for pan-European single ter- minal connection to the public switched telephone network (PSTN). 1-14 d-COLOR MF3302... -
Page 19: Space Requirements
Space requirements Space requirements To ensure that machine operation, consumables replenishing, part replacement, and regular maintenance can easily be performed, adhere to the recommended space requirements detailed below. For North America Unit: inch (mm) Main unit + KP-P03 + WT-P03 + FS-P04 + PF-P21 + DK-P05 For other Unit: inch (mm) Main unit + KP-P03 + WT-P03 + FS-P04 + PF-P20 + DK-P04... -
Page 20: Operation Precautions
Operation precautions Operation precautions To ensure the optimum performance of this machine, observe the precautions described below. Power source The power source requirements are as follows. Voltage fluctuation: Maximum ± 10% (at 110 to 127 V/220 to 240 V AC) Frequency fluctuation: Maximum ±... -
Page 21: Legal Restrictions On Reproduction
Legal restrictions on reproduction Legal restrictions on reproduction Certain types of originals must never be reproduced with the purpose or intent to pass reproductions of such originals off as the originals. The following is not a complete list, but is meant to be used as a guide to responsible reproduction. <Financial Instruments>... - Page 22 Legal restrictions on reproduction 1-18 d-COLOR MF3302...
-
Page 23: Before Using This Machine
Before using this machine... -
Page 25: Environmental Initiatives
Environmental initiatives Before using this machine Environmental initiatives The company continuously strives to reduce the negative environmental impacts of all stages of its business operations. As part of such activities, the company is implementing resource-saving steps by reducing the number of pages in the User's Guide. -
Page 26: Target Groups
Target groups Target groups The user's guides are intended for the following users of the system: Target group Description User Persons using the system for objectives described in "Intended use of office MFP de- vices" as well as managing system functions and consumables according to the as- signed user rights. -
Page 27: Symbols And Notations Used In This Manual
Symbols and notations used in this manual Symbols and notations used in this manual 7WARNING Improper handling can cause serious injury or death. 7CAUTION Improper handling can cause minor injury or damage to houses and property. NOTICE This symbol indicates a risk that may result in damage to this machine or documents. Follow the instructions to avoid property damage. - Page 28 Administrator password d-COLOR MF3302...
-
Page 29: How To Use The Html User's Guide
How to use the HTML User's Guide... - Page 31 How to use the HTML User's Guide About the HTML User's Guide Select a desired function on the top page (Home), and check the details of the function. Selecting [Introduction] on the top page (Home) allows you to view detailed methods for using the HTML Us- er's Guide.
- Page 32 d-COLOR MF3302...
-
Page 33: About This Machine
About this machine... -
Page 35: Optional Components
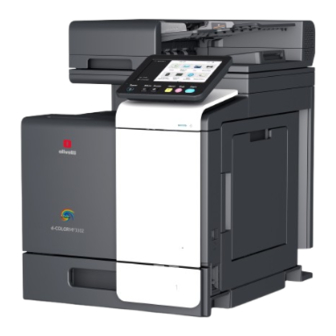
Optional components About this machine Optional components List of optional components Name Description Main unit Scans the original in the scanner section, and prints a scanned image in the printer section. This unit is referred to as "this machine" or "the main unit" in the man- ual. - Page 36 Optional components Name Description Finisher FS-P04 Staples the printed sheets. For staples, use Staple Kit SK-501. For details on how to use the Finisher FS-P04, refer to the HTML Us- er's Guide. Keypad KP-P03 It is equipped on the side of the Control Panel. Allows you to operate this machine or enter a number by using hard- ware keys.
-
Page 37: Name Of Each Component (Main Unit)
Name of each component (main unit) Name of each component (main unit) Front/side Name Description Control Panel Used to configure various settings in this machine. Automatic Document Automatically feeds and scans originals by page. This unit scans a 2- Feeder sided original by only requiring the paper be fed into the machine once without reversing. - Page 38 Name of each component (main unit) Rear side This illustration shows the main unit with the optional Fax Kit FK-517. Name Description Ethernet (LAN) Port Connect to this port when using this machine as a network printer or (1000Base- network scanner. T/100Base- TX/10Base-T) USB Port (Type B)
-
Page 39: Power Supply
Power supply Power supply This machine provides the Main Power Switch and Power key. Name Description Main Power Switch Turns the main power of this machine on or off. For details on how to turn the main power on or off, refer to page 4-7. Power key Switches this machine to the Power Save mode. - Page 40 Power supply d-COLOR MF3302...
-
Page 41: About Panels
About panels... -
Page 43: Control Panel
Control Panel About panels Control Panel Name Description Touch Panel Displays setting screens and messages. Directly press this panel to carry out operations. Start Press this key to start an operation such as printing. Stop Press this key to temporarily stop an active print job. •... -
Page 44: Touch Panel
Touch Panel Touch Panel Home screen The layout of the home screen is as follows. Name Description User/Account Name This area displays the name of the current login user or the account name when User Authentication or Account Track is enabled. [Job List] Displays active or standby jobs. -
Page 45: Login Methods
Login methods Login methods When user authentication is enabled: When user authentication is enabled on this machine, the login screen is displayed. Enter the user name and the password, and perform user authentication. The contents of the login screen may vary depending on the authentication setting of this machine. If Public User Access (unregistered users) is enabled, you can tap [Used by public user] on the login screen to operate this machine without authentication. - Page 46 Login methods When account track is enabled: When account track is enabled on this machine, the login screen is displayed. Enter the account name and the password to perform account track. The contents of the login screen may vary depending on the authentication setting of this machine. Enter the account name and password.
-
Page 47: Loading The Original And Paper
Loading the original and paper... -
Page 49: Load The Original
Load the original Loading the original and paper Load the original The original loading methods are classified into two types: loading the original into the ADF (Automatic Doc- ument Feeder), and directly loading the original onto the Original Glass. Select the appropriate one for your requirements. 6.1.1 Loading the original into the ADF This function is useful when you want to scan an original containing multiple pages, or a sheet original of dif-... -
Page 50: Loading Paper
Loading paper Loading paper No paper setting is required because frequently used paper is loaded during general use. This section describes how to use paper that is not usually loaded into a paper tray. The methods for loading envelopes and postcards are as follows. 6.2.1 Loading paper in Tray1 Up to 500 sheets of plain paper can be loaded into Tray 1. -
Page 51: Loading Paper Into The Bypass Tray
Loading paper Load paper into the tray with the print side facing up. When you load paper other than plain paper or change the paper size, specify the paper type and paper size. % For details on how to specify the paper type and paper size, refer to the HTML User’s Guide. 6.2.2 Loading paper into the Bypass Tray When selecting a paper size other than for paper trays, use the Bypass Tray. -
Page 52: Loading Envelopes
Loading paper Load paper into the tray with the print side facing down. % Insert paper into the tray until their edges are pressed against the back. NOTICE Do not load an excessive number of sheets such that the top of the stack is higher than the mark. - Page 53 Loading paper For Tray 1 Up to 30 envelopes can be loaded into the tray. Load envelopes with the flap part facing down. Align the Lateral Guide with the envelope size. Select the desired envelope size from [Envelop/4 e 6] ([Envelop/A6 Card]) of [Paper Size]. For Bypass Tray Up to 10 envelopes can be loaded into the tray.
-
Page 54: Loading Postcards
Loading paper 6.2.4 Loading postcards Precautions when using postcards When loading curled postcards, uncurl them. When using postcards other than 4 e 6 (A6 Card), confirm its size, and select [Paper Size] - [Custom Size] to specify the size. For Tray 1 Up to 20 postcards can be loaded into the tray. - Page 55 Loading paper For Bypass Tray Up to 20 postcards can be loaded into the tray. Load postcards with the print side facing down. Align the Lateral Guide with the postcard size. Select the desired postcard size from [Envelop/4 e 6] ([Envelop/A6 Card]) of [Paper Size]. Max.
- Page 56 Loading paper 6-10 d-COLOR MF3302...
-
Page 57: Available Operations In This Machine
Available operations in this machine... -
Page 59: How To Copy
How to copy Available operations in this machine This machine provides the copy function, print function, and scan/fax function as major functions. This sec- tion describes the basic operations for each function. If you want to learn about more detailed descriptions or operation methods, refer to the HTML User's Guide included in the User's Guide DVD. - Page 60 How to copy Set copy options as needed. % Specify the size of the target original in [Scan Size] (default: [8-1/2 e 11] (inch area)/[A4] (centimeter area)). If you fail to set the original size correctly, the image may be cut off. If necessary, specify the number of copies using the keypad.
-
Page 61: How To Print
How to print How to print Basic print operations This section describes the basic print operations. Open document data using the application software. From the [File] menu, select [Print]. Check the [Printer Name] (or [Select Printer]) make sure that the desired printer has been selected. % The [Print] dialog box differs depending on the application. -
Page 62: How To Scan
How to scan How to scan Basic scan operations This section describes the basic scan operations. If user authentication is enabled, the login screen appears. Enter the required items, and tap [Login]. Load the original. % When loading the original into the ADF, pull out the Document Stopper (1) to prevent the scanned original from falling. - Page 63 How to scan Specify transmission options as needed. % Specify the size of the target original in [Scan Size] (default: [8-1/2 e 11] (inch area)/[A4] (centimeter area)). If you fail to set the original size correctly, the image may be cut off. Use the Start key to start transmission.
-
Page 64: How To Fax
How to fax How to fax Basic fax operations This section describes the basic fax operations. If user authentication is enabled, the login screen appears. Enter the required items, and tap [Login]. Load the original. % When loading the original into the ADF, pull out the Document Stopper (1) to prevent the scanned original from falling. - Page 65 How to fax Specify the destination. Specify transmission options as needed. % Specify the size of the target original in [Scan Size] (default: [8-1/2 e 11] (inch area)/[A4] (centimeter area)). If you fail to set the original size correctly, the image may be cut off. Use the Start key to start transmission.
- Page 66 How to fax 7-10 d-COLOR MF3302...
-
Page 67: Registering A Destination
Registering a destination... -
Page 69: How To Register A Destination
How to register a destination Registering a destination How to register a destination Registering a fax address Tap [Utility] - [Utility] - [Store Address] - [Address Book] - [New Registration]. In [Select Destination], select [Fax]. Enter destination information. Setting Description [No.] Destination registration number. - Page 70 How to register a destination Registering E-mail address Tap [Utility] - [Utility] - [Store Address] - [Address Book] - [New Registration]. In [Select Destination], select [E-mail Address]. Enter destination information. Setting Description [No.] Destination registration number. Select [Use opening number] to automati- cally assign the smallest available number.
-
Page 71: Read This If You Have A Problem
Read this if you have a problem... -
Page 73: Main Messages And Remedies
Main messages and remedies Read this if you have a problem Main messages and remedies 9.1.1 Checking a notification message on the Touch Panel The notification icon is displayed on the home screen when there is a machine condition warning or notice notification. -
Page 74: Screen Displayed At Occurrence Of Paper Jam
Main messages and remedies 9.1.2 Screen displayed at occurrence of paper jam If any paper jam occurs on this machine, the paper jam clearing procedure and the paper jam location are displayed on the screen of this machine. Confirm the clear procedure and jam location, and follow the guid- ance to clear the jam. -
Page 75: When An Error Message Appears
Main messages and remedies Return the original or paper, and tap [OK] or [Complete]; the system restarts scanning or printing of the orig- inal. Item Description [Start Guidance] Tap this button to start the guidance showing how to clear a paper jam. [Display Switch] Changes the screen that shows the paper jam clearing procedure and the screen that shows where the paper jam occurred. -
Page 76: When The Touch Panel Is Not Visible
When the Touch Panel is not visible When the Touch Panel is not visible If a certain length of time has elapsed without any operations being carried out on this machine, the Touch Panel may turn off. Check the following items: Touch the Touch Panel. -
Page 77: When Printing Quality Has Deteriorated
When printing quality has deteriorated When printing quality has deteriorated Cleaning the Original Glass and roller Wipe the surface using a soft, dry cloth. 7CAUTION The inside of this product has areas subject to high temperature, which may cause burns. When check- ing the inside of the unit for malfunctions such as a paper misfeed, do not touch the locations (around the fusing unit, etc.) which are indicated by a "Caution HOT"... - Page 78 When printing quality has deteriorated Cleaning the Slit Scan Glass (back) Open the ADF. Open the Opening and Closing Guide. % Release the lock lever of the Opening and Closing Guide, and open the Opening and Closing Guide. Wipe stains off the Slit Scan Glass (back) and Lateral Guide using a dry, clean cloth. NOTICE Do not touch the Slit Scan Glass (back).
- Page 79 When printing quality has deteriorated Close the Opening and Closing Guide you opened in step 2. Cleaning the Print Head Glass Printing quality deteriorates if the Print Head Glass is dirty. If this occurs, clean the Print Head Glass ac- cording to the following procedure.
- Page 80 When printing quality has deteriorated Remove the Printhead Cleaner from the Front Door of this machine. Slowly insert the Printhead Cleaner all the way to the back end of the Print Head Glass, and then slowly pull it out. % Repeat this operation approximately three times for all the Print Head Glass sections. Mount the Printhead Cleaner onto the Front Door of this machine.
-
Page 81: When A Message Appears To Replace Consumables Or Carry Out Cleaning
When a message appears to replace consumables or carry out cleaning When a message appears to replace consumables or carry out cleaning A message appears indicating the time(s) that expiring consumables used in this machine should be re- placed. Also, a message appears when the Slit Scan Glass is dirty. Replace consumables or clean the Slit Scan Glass as instructed in the displayed message. - Page 82 When a message appears to replace consumables or carry out cleaning Replacing a Toner Cartridge The following example shows how to replace a Yellow Toner Cartridge. Black only Tips Shake a new Toner Cartridge well vertically, horizontally, and back and forth, approximately 5 to 10 times, before installing it.
- Page 83 When a message appears to replace consumables or carry out cleaning 7CAUTION Never touch the electrical contacts of the units (e.g., toner cartridge and developing unit), as an elec- trostatic discharge may damage the product. Do not leave toner-related parts (e.g., toner cartridge, developing unit and Waste Toner Box) within easy reach of children.
-
Page 84: About Waste Toner Bottle
When a message appears to replace consumables or carry out cleaning 9.4.3 About Waste Toner Bottle When the Waste Toner Bottle is full, a message appears to prompt you to replace it (at replacement by user). Follow the displayed guidance to take an action. Replacing a Waste Toner Bottle Waste toner bottle Used... - Page 85 When a message appears to replace consumables or carry out cleaning 7WARNING Do not throw toner or a container that contains toner (e.g., toner cartridge, developing unit and Waste Toner Box) into an open flame. The hot toner may scatter and cause burns or other damage. 7CAUTION Do not leave toner-related parts (e.g., toner cartridge, developing unit and Waste Toner Box) within easy reach of children.
-
Page 86: Replacing A Staple Cartridge
Replacing a Staple Cartridge Replacing a Staple Cartridge 9-16 d-COLOR MF3302...
Need help?
Do you have a question about the d-ColorMF3302 and is the answer not in the manual?
Questions and answers