Table of Contents
Advertisement
Quick Links
User Manual
LG Energy Solution strongly advises users to exercise due care in following
LG Energy Solution's product installation manual. Warranty claims are invalid if damage is
caused by human error in a manner inconsistent with the installation manual's instructions.
Version 1.0
for
Hybrid Inverter
SHH-G1 Series
5.0-6.0kW
Advertisement
Table of Contents

Related Manuals for LG SHH


Summary of Contents for LG SHH
- Page 1 5.0-6.0kW LG Energy Solution strongly advises users to exercise due care in following LG Energy Solution’s product installation manual. Warranty claims are invalid if damage is caused by human error in a manner inconsistent with the installation manual’s instructions. Version 1.0...
-
Page 2: Table Of Contents
Trademarks and other LG trademarks are trademarks of LG Energy Solution, Ltd. All other trademarks or registered trademarks mentioned in this manual are owned by LG Energy Solution, Ltd. NOTICE The information in this user manual is subject to change due to product updates or other reasons. -
Page 3: Safety Precaution
User Manual carefully to acquire knowledge about equipment is powered off. Wait for at least 5 minutes product features and safety precautions. LG Energy for the equipment to discharge to a safe voltage to Solution will not be responsible for any equipment avoid electric shock. -
Page 4: Symbol Defnition
• Force majeure events such as lightning, earthquake, fire Wait at least 5 minutes after turning disaster, storm, or volcanic eruption, etc. off or disconnecting the inverter before • Unauthorized replacement, dismantling, maintenance, or touching or operating it to avoid modification of software code. -
Page 5: Model
UP breaker PV Master App. sufficient. 2.2 Model ① ②③ ④ ⑤ ⑥ • SHH-G1-050-GL Mode Ⅳ • SHH-G1-O60-GL The battery can be charged by the grid, and the charging time 2.3 Appearacne and power can be set... -
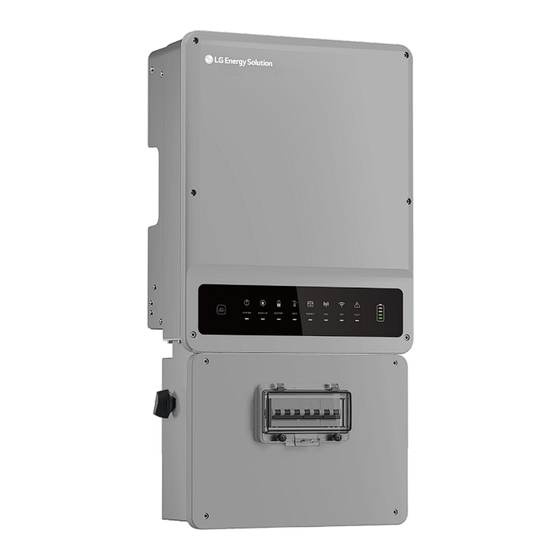
Page 6: Product Dimension
2.5 Product Dimension Indicator Status Explanation 192 mm ON = System is ready 182 mm 415 mm 175 mm BLINK = System is starting up SYSTEM SYSTEM SYSTEM SYSTEM OFF = System is not operating BACK-UP ON = Back-up is ready / power SYSTEM BACK-UP BACK-UP... -
Page 7: Installation Requirements
When the inverter is working in Back-up mode, neutral and PE on Back-up side are connected together via the internal relay. And this internal relay will be open when the inverter is working in the Grid-tied mode. Distribution box Back-up Loads Battery Back-up... -
Page 8: Improper Installation Mode
Back-up The ON-GRID or BACK-UP side should not be connected to any AC generator. Leave enough space around the inverter according to the below figure for proper heat dissipation 500mm Battery A Battery that is not officially compatible cannot be connected to inverter. On-Grid Back-up 300mm... -
Page 9: Installing The Inverter
WiFi module Expansion Bolts x7 Documentation Disassemble Tool x1 Bluetooth moudle x1 WARNING *1: Supplied according to PV port numbers. *2: Including Quick Installation Guide, User Manual, etc. • Avoid using excessive force on the heatsink sides to prevent any damage 4.2 Installing the Inverter •... -
Page 10: Electrical Connections
� ..To Smart Meter � AC Breaker ON-Grid Load The AC breaker specification depends on actual loads. Back-Up Loads Battery Model PV Cable BAT Cable AC Cable PE Cable SHH-G1-050-GL 3-4mm² 12-13mm² 5-6mm² 5-6mm² SHH-G1-060-GL 3-4mm² 12-13mm² 8-10mm² 8-10mm²... -
Page 11: Connecting The Pe Cable
5.2 Connecting the PE cable Connect the ground cable to the ground plate on the grid side. Click 5.3 Connecting PV Cables CAUTION • The total short-circuit current of PV string must not exceed inverter’s max DC current. • The minimum isolation resistance to ground of the PV string must exceed 19.33kΩ... -
Page 12: Connecting Ac Cables
1. Prepare the AC cables and terminals. Vaconn Series 2. Pass the AC cable through the terminal cover and screw the three cables tightly onto the connectors. 3. Lock the terminal cover and screw the terminal cap. 4. Lock the terminal cover and screw the terminal cap. 10-15mm 12-14mm Click Φ: 13-22mm... -
Page 13: Connecting Communication Cables
Back-Up function, and LG will not cover the standard warranty for any consequences resulting from • It detects grid voltage and current direction and non-compliance. - Page 14 BMS Meter Color Smart Meter Orange and White 485_A2 Orange Green and White 485_B2 485_B1 Blue CAN_H Blue and White CAN_L Green 485_A1 Brown and White 485_B1 Brown 485_A1 1 2 3 4 5 6 7 8 POWER ENERGY Smart Meter LED Indications Blinking POWER Not working...
-
Page 15: Dred And Remote Shutdown Connection
*1: Please connect to 5/6PIN of DRED port if Remote Shutdown is applied. *2: Connect BMS to this port if a battery with RS485 port is selected. *3: For LG RESH10-TypeR battery, connect the BMS cable to RS485_*A2/B2 port and connect the enable cable to LG_EN+ and LG_EN-. -
Page 16: Parameter Configuration
PV module can be quickly turned LGES PV Master is an external monitoring and off. configuration app for the hybrid inverters of LG Energy 6.2.4 Inverter Arc Detection (Optional) Solution. It can be used on smartphones or tablets with An electric arc is a gas discharge phenomenon caused by both Android and iOS systems. -
Page 17: Wifi Configuration
6.3 WiFi Configuration Turn on Arc detection Arc detection This section explains how to configure the inverter using function: “Settings→ Advanced Setting→ either the web page or the LGES PV Master App. To Arc decection Arc detection→ Arc enable online monitoring and maintenance, it is essential Arcing detection status: Not self-checking detection”. -
Page 18: Maintenance
4. Click on "Start Setup" and select your router. • Water-proof covers: Check if the water-proof covers of RS485 and other parts are fastened once a year. 5. Then click on "Next". inverter requires periodically maintenance, details as below: The fans of the inverter should be cleaned on a yearly basis. -
Page 19: Troubleshooting
8. Troubleshooting 8.1 Error Message The following error message will be displayed on the LGES PV Master App or reported by email if the error actually occurs. Error Explanation Reason Solutions Message 1. Use a multi -meter to check if there is voltage on the AC side . - Page 20 Error Explanation Reason Solutions Message External factors such Try restarting the inverter and check if the issue persists. Internal as a strong magnetic If it does not, it may have been an occasional occurrence. SPI Failure communication field, can cause this However, if the issue persists, contact after-sales service for failure error.
-
Page 21: Faq
Error Explanation Reason Solutions Message Possible causes of Check with a multi-meter if there is any voltage (which high ground leakage The ground should be close to 0V) between the earth and inverter frame current include a leakage current to verify if the neutral and ground cables are well-connected poorly connected Ground I in the inverter... - Page 22 Contact after-sales service for further assistance, if the issue persists. Which battery should I use for the Only use the compatible battery from LG Energy Solution hybrid inverter? The inability to save settings on LGES PV Master App may be due to a loss of connection to Solar-WiFi.
- Page 23 Problems Solutions Why are the data on the homepage and The data on the APP is sourced from the inverter , and the refresh Param page different on the App, such frequency for the home page and parameter page may be different, as the charge/discharge, PV value, load resulting in a discrepancy in data between the pages on the APP as value, or grid value?
-
Page 24: Technical Parameters And Certificates
9. Technical Parameters and Certificates SHH-G1- SHH-G1- SHH-G1- SHH-G1- Technical Data Technical Data 050-GL 060-GL 050-GL 060-GL Max. Total Harmonic Battery Input Data <3% Distortion Battery Type Li-Ion AC Output Data (Back-up) Nominal Battery Voltage (V) Back-up Nominal Apparent 5,000... - Page 25 SHH-G1- SHH-G1- Technical Data 050-GL 060-GL User Interface LED, WLAN+APP Communication with BMS RS485, CAN Communication with Meter RS485 Communication with Portal WiFi Weight (kg) 28.8 32.3 Dimension (W×H×D mm) 415×791×175 Noise Emission (dB) <50 Topology Non-isolated Self-consumption at Night <20...
-
Page 26: Appendix
10. Appendix Pollution degree definition No pollution or only dry, non-conductive Pollution Protection category definition polllution occurs. The pollution has no Degree I influence. Moisture location category definition Normally only non-conductive pollution Level Pollution occurs. Occasionally, however, a Moisture temporary conductivity caused by Degree II Parameters 4K4H... - Page 28 Keep this manual for later use © 2023 LG Energy Solution ESS Battery Division PARC1, 108, Yeoui-daero, Yeongdeungpo-gu, Seoul, Republic of Korea, 07335 https://www.lghomebattery.com http://www.lgensol.com 340-00940-00...
Need help?
Do you have a question about the SHH and is the answer not in the manual?
Questions and answers