
Related Manuals for Lumber Jack BS400


Summary of Contents for Lumber Jack BS400
- Page 1 SAFETY AND OPERATING MANUAL 16" & 18" Professional Bandsaw BS400 / BS450 ORIGINAL INSTRUCTIONS...
-
Page 2: Product Specifications
PRODUCT SPECIFICATIONS Attention: Please choose correct power source, voltage and frequency that are shown in the label for your band saw. Model BS400 BS450 Voltage/Cycle 230V/50Hz 230V/50Hz Motor Power... - Page 3 SAFETY INSTRUCTIONS SYMBOLS Read and understand the entire instruction manual before attempting assembly or operation. Attention,General safety notice. Risk of electric shock! Risk of personal injury by electric shock. Never reach into the machine while it is operating or running down. Always wear safety goggles and ear protection.
- Page 4 Do not wear clothing, apparel or jewelry that can become entangled in moving parts. Always tie back or cover long hair. Wear non-slip footwear to reduce risk of slipping and losing control or accidentally contacting cutting tool or moving parts. Keep work area clean.
- Page 5 32. Never leave machine running unattended. Turn power off and do not leave bandsaw until blade comes to a complete stop. 33. Remove loose items and unnecessary work pieces from area before starting machine. 34. Keep hands out of line of saw blade. 35.
-
Page 6: Electrical Requirements
Be sure your extension cord is properly wired and in good condition. Always replace a damaged extension cord or have it repaired by a qualified person before using it. Protect your extension cords from sharp objects, excessive heat and damp or wet areas. Circuit diagram for BS400... -
Page 7: Accessories And Attachments
Circuit diagram for BS450 ACCESSORIES AND ATTACHMENTS WARNING: To avoid injury: • Follow instructions that accompany accessories. Use of improper accessories may cause hazards. • Use only accessories designed for this bandsaw to avoid injury from thrown broken parts or work pieces. •... - Page 8 TABLE OF LOOSE PARTS Unpack carton; check your machine to see parts listed below: Code Name Quantity Bandsaw Fence assembly Table assembly Mitre gauge assembly Table insert assembly 2.5, 3, 4, 5, 6, 8mm hex wrench Double end wrench 10-13mm, 17-24mm...
-
Page 9: Installation
INSTALLATION Moving and mounting the bandsaw WARNING: This bandsaw is a heavy machine. Serious personal injury may occur if safe moving methods are not used. ⚫ Get assistance to remove the machine from the shipping box. Move the saw to its permanent working location. The site should be dry, well lit, and have enough room to handle long stock and servicing or adjustment of the machine from any side. -
Page 10: Install The Table
To prevent the bandsaw from tipping over when in operation, mounting the bandsaw to the floor is recommended. ⚫ There are four mounting hole on the base of machine, Through the mounting hole, using Lag shield anchors with lag bolts or anchor studs are two popular methods for anchoring an object to a concrete floor. Lag shield anchor with bolt Mounting hole Anchor stud... - Page 11 ⚫ Get assistance to slide table assembly so that the saw blade passes through the slot of table. When the saw blade reaches the rectangular hole in the center of the table, rotate the table assembly by 90 degrees according to the arrow. ⚫...
- Page 12 Attach the table insert ⚫ Rotate the locking plate under the table insert to the angle shown in the following figure, and then install the table insert into the square hole in the center of the table. ⚫ Pull down and rotate the locking plate to make it hook the table. ⚫...
- Page 13 Attach tools onto the tool storage ⚫ The machine is equipped with six hex wrenches and two double-ended wrenches. They can be stored in the storage on the rear side of the machine. Tool storage Connecting to dust collection system Warning: DO NOT operate this bandsaw without an adequate dust collection system.
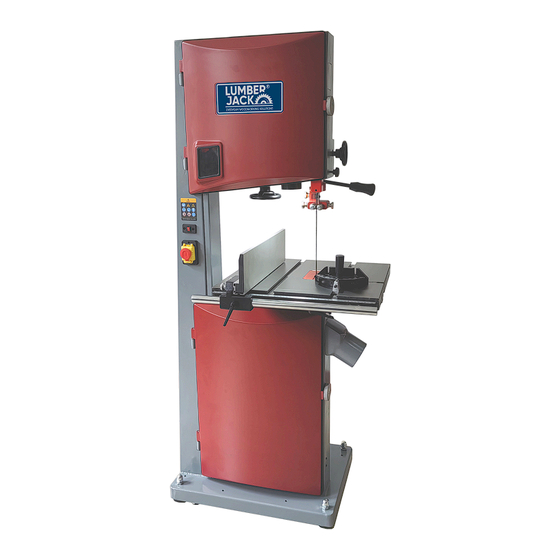
- Page 14 Blade tracking window Blade guide Adjusting Blade tension hand wheel viewing window Blade tension hand wheel LED light Fence Upper blade guide Mitre gauge BS400 controls switch Table Top Main switch BS450 controls Lower door Stop button Castors Feet LED switch...
- Page 15 Tracking adjusting & locking knob Tool storage Blade tension handle Horizontal position stop Table tilting hand wheel Dust port Motor...
-
Page 16: Tilting Table
ADJUSTING WARNING: Always be sure that the machine is switched off and unplugged before any adjustments. 1. Tilting table Loosen the short locking handle B and long locking handle C; rotate the table tilting hand wheel to adjust the table ⚫... -
Page 17: Adjusting The Blade Tension
2. Adjusting the blade tension Warning: Too much tension can cause the bandsaw blade to break. Too little tension can cause the driven bandsaw wheel to slip and the saw blade to stop. Raise the upper blade guide fully, adjust the upper and lower guide bearings as far away from the blade as possible. ⚫... -
Page 18: Upper Blade Guide Adjustment
4. Upper blade guide adjustment The height of blade guide needs to be adjusted: prior to every cutting/operation, to accommodate the height of work piece (the upper blade guide should be set approx. 3mm above the workpiece). Loosen the locking knob B and turn the hand wheel A, set upper blade guide to the desired height. After ⚫... -
Page 19: Guide Post Parallelism
6. Guide post parallelism The guide post should be parallel to blade throughout vertical travel of the guide post. This setting has been accurately made by the manufacturer and should not require immediate attention, but may be checked in future as follows: ⚫... -
Page 20: Cutting Speed Adjustment
7. Cutting speed adjustment ⚫ Open the lower door. Loosen three hex bolts A and lift up motor using handle B on rear side of the bandsaw. ⚫ ⚫ Reposition V-belt. Push down on handle to apply tension. Belt is properly tensioned when light pressure applied to midpoint of the belt produces about 10mm deflection. - Page 21 OPERATIONS Warning: to reduce the risk of personal injury, the following safety recommendations should be observed when operating the saw. A complete operation generally consists of the following steps: ⚫ Examine the workpiece to make sure it is suitable for cutting. ⚫...
-
Page 22: Cutting Curves
3. Crosscutting Crosscutting is cutting across the grain of the workpiece, while using the mitre gauge to feed the workpiece into the blade. To make a crosscut: ⚫ Move the fence out of the way. ⚫ Place the workpiece evenly against the mitre gauge. - Page 23 Blade Features Width Bandsaw blades come in different standard widths, measured from the back of the blade to the tip of the tooth. Generally, wider blades are used for ripping or making straight cuts; narrower blades are often used when the part being cut has curves with small radii.
-
Page 24: Troubleshooting
TROUBLESHOOTING Trouble Possible Cause Solution Saw unplugged Check plug connections Door safety switch disengaged/at fault. Close door or adjust/replace switch. Thermal overload relay tripped. Allow relay/motor to cool. Break or short in wiring; or loose or corroded Trace/replace broken or corroded wires; fix loose connections. - Page 25 Trouble Possible Cause Solution Blade is overloaded and twists. Decrease the feed rate. Use the correct blade for material and speed of The blade TPI is too coarse. cut. The cuts are rough, or The blade is loose and slipping on wheels. Adjust bade tension as required.
-
Page 26: Maintenance
MAINTENANCE Warning! Always be sure the machine is switched off and disconnected the plug from the power supply before inspection and maintenance BLADE CHANGES ⚫ All saw blades are dangerous and may cause personal injury. To reduce the risk of being injured, wear leather gloves when handling saw blades. -
Page 27: Assembly Diagram
Assembly Diagram BS400 A /'--.. ; 22 / 23 � -- · -----.., 120. < __ __ __ ____ _ _ .._. - Page 28 BS400 PART B...
- Page 29 BS450 PART A...
- Page 30 BS450 PART B...
- Page 31 BS400 PARTS LIST A...
- Page 32 BS400 PARTS LIST B...
- Page 33 BS450 PARTS LIST A...
- Page 34 BS450 PARTS LIST B...
- Page 35 Unit C, Manders Ind. Est., Old Heat h Road, Wolverhampton, WV1 2RP. Declare that the product: Designation: 16" & 18" Bandsaw Model: BS400 / BS450 Complies with the following Directives: Machine Directive - 2006/42/EC Standards & technical specifications referred to: Report No: 4840323608300...
Need help?
Do you have a question about the BS400 and is the answer not in the manual?
Questions and answers